CRA (Create-React-App) provides an easy way to start our React project. But there are still lots of things we can do to make the project more easy to develop. In this article, I will show you how I usually config my React project and explain what's the benefit of doing that.
Before we start, some people might be wondering why we need to spend so much time on config the project. We already have tons of examples and boilerplate. We can simply clone and start coding right away.
I believe there are at least two benefits to understand how to properly config your project. First, we can choose the feature we need and replace them any time we want. Second, it will be easier if we want to upgrade any one of those libraries.
The frameworks and libraries like React, Next.js, and Typescript keep releasing new versions to provide many awesome features. So if it is possible, I always try to apply the latest version in my project to enjoy the new features. If we familiar with how to config our project, it will be easier to upgrade the framework/library on our project.
In this article, I will explain how to apply those great frameworks/libraries to our project. Here is the repo for reference - react-config. You can check the change in each git commit.
--
Next.js
What's Next.js?
Next.js is a React framework support SSR (server-side rendering) and lots of great features like built-in routing system, CSS-in-JS, and AMP support (Accelerated Mobile Pages), etc.
How to start using Next.js?
(1). Create a folder and init the project:
mkdir your-project-name
cd your-project-name
npm init -y
git init
(2). Create .gitignore with the following contents:
node_modules
.next
(3). Install:
npm install --save next react react-dom
(4). Open package.json and add the following scripts:
"scripts": {
  "dev": "next",
  "build": "next build",
  "start": "next start"
}
(5). Create ./pages/index.js with the following contents:
function HomePage() {
  return <div>Welcome to Next.js!</div>
}

export default HomePage
(6). Start local web server:
npm run dev
(7). Visit http://localhost:3000 to view your application.
Pros and Cons of Next.js?
✅ SSR:
SSR not only improves SEO but also brings us much flexibility to do extra stuff on the server like custom response header and proxy third-party API to prevent expose the token.
✅ Route system:
I love the way Next.js handle the routing by folder structure. This makes the project easier to understand.
✅ AMP support:
Next.js make implement AMP so easy. If you already familiar with React and want to implement AMP on your website. I highly recommend you try using Next.js.
❌ Node.js support:
If we want to support SSR, we will have to make sure our code can execute properly under Node.js environment. This might raise the entry barrier.
But base on my point of view, if we want to master in front-end field. We will inevitably have to familiar with Node.js one day.
❌ Hosting:
We will have to host a server and this usually brings extra fees. But if you don't need the server, you can still export static HTML on Next.js - Static HTML export.
--
Typescript
What's Typescript?
TypeScript is a typed superset of JavaScript that compiles to plain JavaScript. Just like prop-types we used to apply in React project. But we can have type-checking not only on component props but also on all our Javascript code.
How to start using Typescript?
(1). Install:
npm install --save-dev typescript @types/react @types/node
(2). Create an empty tsconfig.json file in the root of your project:
touch tsconfig.json
(3). Change the .js file into .ts/.tsx.
(.tsx for the file using JSX, .ts for the rest)
(4) Run next, Next.js will automatically update the tsconfig.json and generate the file we need:
npm run dev
🔸[Additional] Import Path Alias🔸
Apply import path alias allow us to import the file with an absolute path. We won't have to worry about where is our current file and where is the target file we want to import. This will make copy & paste the import syntax and moving files into different folders much easier.
// Before
import App from '../components/App/App';

// After
import App from '@components/App/App';
(1). Install
npm install --save-dev babel-plugin-module-resolver
(2). Create .babelrc with the following contents:
{
  "presets": [["next/babel"]],
  "plugins": [
    [
      "module-resolver",
      {
        "root": ["./"],
        "alias": {
          "@components": "./components"
        }
      }
    ]
  ]
}
(3). Add the following contents into tsconfig.json:
  "compilerOptions": {
    ...
    "baseUrl": "./",
    "paths": {
      "@components/*": ["./components/*"]
    }
  },
Pros and Cons of Typescript?
✅ Static type-checking:
Type-checking during compilation can help us prevent lots of mistakes.

✅ IntelliSense and autocomplete:
With properly type definitions, VScode will tell us the correct attribute we can use and even autocomplete for us.

❌ Type definitions:
We need to learn how to define the type properly. And something we have to modify more files when we want to change something.
--
Linter
What's Linter?
Linter is a tool that helps us debug our code. It will scan the code for common issues and errors. Then provide the information with line numbers and the rule we violate.

*update 2020/05/29: Tslint has been deprecated, if you're starting a new project, you should use eslint instead. Thanks for @n00nietzsche 's mention. To implement eslint into our project, just use npx eslint --init then follow the step.
https://github.com/palantir/tslint/issues/4534
How to start using Linter?
(1). Install:
npm install --save-dev tslint tslint-config-airbnb
(2). Add tslint.json with the following content:
{
  "extends": ["tslint-config-airbnb", "tslint-react-hooks"],
  "rules": {
    "import-name": false,
    "align": false,
    "function-name": [
      true,
      {
        "function-regex": "^[a-zA-Z$][\\w\\d]+$",
        "method-regex": "^[a-z$][\\w\\d]+$",
        "private-method-regex": "^[a-z$][\\w\\d]+$",
        "protected-method-regex": "^[a-z$][\\w\\d]+$",
        "static-method-regex": "^[a-z$][\\w\\d]+$"
      }
    ],
    "variable-name": {
      "options": ["ban-keywords", "check-format", "allow-leading-underscore", "allow-pascal-case"]
    }
  }
}
(3). Add the following script into package.json:
  "scripts": {
    ...
    "tslint": "tslint -p . -c tslint.json"
  },
(4). run tslint to verify our code
npm run tslint
🔸[Additional] tslint-react-hooks🔸
If you're using React hook in your project. This can help us prevent some mistakes while using it.
(1). Install:
npm install --save-dev tslint-react-hooks
(2). Update tslint.json:
{
  "extends": ["tslint-config-airbnb", "tslint-react-hooks"],
  "rules": {
   ...
    "react-hooks-nesting": true
  }
}
🔸[Additional] Prettier🔸
Manually fixes all the tslint errors might be tedious. So we can apply prettier to help us fix some format errors automatically.
(1). Install:
npm install --save-dev prettier
(2). Add the following content into package.json:
  "prettier": {
    "singleQuote": true,
    "trailingComma": "es5",
    "printWidth": 120
  },
(3). Create ./.vscode/settings.json with the following contents:
{
  "editor.formatOnSave": true
}
🔸[Additional] husky🔸
Because execute the linter manually is not efficient and easy to forget. So we can apply husky to trigger the linter by Git hook.
(1). Install:
npm install --save-dev husky
(2). Add the following contents into package.json:
{
  ...
  "husky": {
    "hooks": {
      "pre-commit": "npm run tslint"
    }
  }
  ...
}
(3) Now when we do git commit, it will trigger tslint to validate our code.
Pros and Cons of Linter?
✅ Prevent Errors:
Linter can help us prevent some common mistakes.
✅ Maintainability:
Linter forces us to use proper format and naming to produce readable code and make the code easy to maintain.
❌ Config Proper rules:
Not all rules are suited for everyone. We will have to spend time to figure out the best setting for us and our teammates.
--
Jest & Enzyme
What's Jest & Enzyme?
Jest is a JavaScript testing framework. Enzyme is a JavaScript testing utility for React that makes it easier to test your React Components' output.
Combine both of them, we will be able to implement testing on our project to make sure our code works as what we expected.
How to start using Jest & Enzyme?
(1). Install:
npm install --save-dev jest enzyme enzyme-adapter-react-16 babel-jest @types/jest @types/enzyme
(2). Create ./config/setup.js with the following contents:
const enzyme = require('enzyme');
const Adapter = require('enzyme-adapter-react-16');

enzyme.configure({ adapter: new Adapter() });
(3). Create ./jest.config.js with the following contents:
module.exports = {
  roots: ['<rootDir>'],
  moduleFileExtensions: ['js', 'ts', 'tsx', 'json'],
  setupFiles: ['<rootDir>/config/setup.js'],
  testPathIgnorePatterns: ['<rootDir>[/\\\\](build|docs|node_modules|.next)[/\\\\]'],
  transformIgnorePatterns: ['[/\\\\]node_modules[/\\\\].+\\.(ts|tsx)$'],
  testEnvironment: 'jsdom',
  testURL: 'http://localhost',
  transform: {
    '^.+\\.(ts|tsx)$': 'babel-jest',
  },
  testRegex: '/__tests__/.*\\.(test|spec)\\.tsx?$',
};
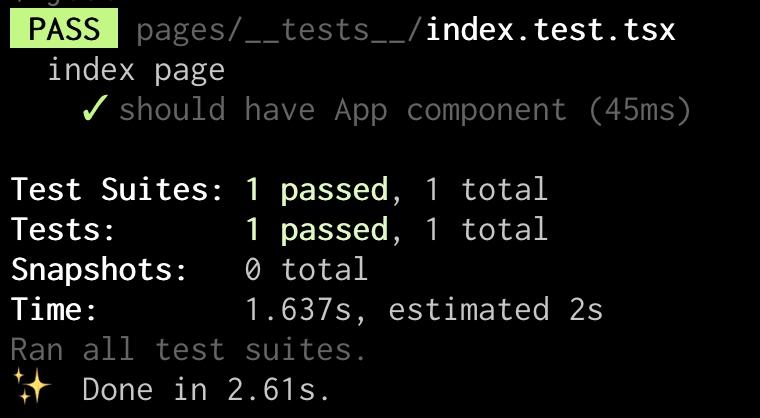
(4). Create pages/__tests__/index.test.tsx with the following contents:
import React from 'react';
import { mount } from 'enzyme';
import Index from '../index';

describe('index page', () => {
  it('should have App component', () => {
    const subject = mount(<Index />);

    expect(subject.find('App')).toHaveLength(1);
  });
});
(5). Add the following script into package.json:
  "scripts": {
    ...
    "test": "jest"
  },
(6) Run unit test
npm run test
🔸[Additional] enzyme-to-json🔸
Format the snapshot to make it more readable.
(1) Install enzyme-to-json:
npm install --save-dev enzyme-to-json
(2) Add the following content into jest.config.js:
module.exports = {
  ...
  snapshotSerializers: ['enzyme-to-json/serializer'],
};
🔸[Additional] jest-watch-typeahead🔸
Display the match tests while we're filtering
the tests under jest watch mode.

(1). Install:
npm install --save-dev jest-watch-typeahead
(2). Add the following content into jest.config.js:
module.exports = {
  ...
  watchPlugins: ['jest-watch-typeahead/filename', 'jest-watch-typeahead/testname'],
};
🔸[Additional] lint-staged🔸
Run test and linter on git staged files.
(1). Install:
npm install --save-dev lint-staged
(2). Add the following content into package.json:
ps. here we also add prettier and tslint into lint-staged pipeline and trigger by the pre-commit hook.
{
  ...
  "husky": {
    "hooks": {
      "pre-commit": "lint-staged"
    }
  },
  "lint-staged": {
    "*.+(ts|tsx)": [
      "prettier --write",
      "git add",
      "jest --findRelatedTests",
      "tslint"
    ]
  },
}
Pros and Cons of Jest & Enzyme?
✅ Reliability:
We can use Jest & Enzyme to test our code until all kinds of scenarios to make sure it works as expected. This can save us time to do the test manually and also make it easier to refactor.
✅ Maintainability:
With proper test cases, people will be easier to understand the purpose of each function and component.
❌ Might overuse it:
Sometime we might create too many unnecessary tests and make the code even harder to maintain.
Conclusion
Some people might feel overwhelmed and it's just a start. After finishing all those configurations, we still have to spend tons of time to get familiar with all the frameworks/libraries which have mentioned above.
Although it will be tough at the beginning. But once we get familiar with them. It will definitely make coding much easier and also let us produce maintainable code.
If you have any suggestions about how we can config our project. I will love to learn more. Please feel free to leave your comment. Thanks for reading.
--

Top comments (11)
Amazing article, I had a query. I already have my project in javascript and was thinking of migrating to ts, just wanted to know if this can be done in the same project (running js and ts) or will i have to start a new project for refactored code?
Yes, you can apply typescript into your current project, then migrate the js files into ts one by one.
I just saw this article, it might be helpful.
2ality.com/2020/04/migrating-to-ty...
If you feel overwhelmed by all the config you need to do, check out github.com/UnlyEd/next-right-now which is a boilerplate with Next.js/Zeit/TypeScript/Jest/Cypress built-in. You may save yourself quite some time.
Thanks for sharing.
thanks for the article
good article I really like it
Sorry to say that TSLint now is deprecated so it would better to use ESLint instead. github.com/palantir/tslint/issues/... the URL is about TSLint deprecated issue.
Exactly, thanks for pointing out this issue. I will update the article later.
Very well writtenn.
Thanks for the article, I was looking for such an article, and really excellent!
thank you