
Noise algorithms
Some time ago I went through how noise algorithms are used in different procedural content generation techniques. This lead me to a few resources where I was able to use these techniques on P5.js. Noise algorithms are used all over the place in procedural content generation, but they are also useful for any kind of interpolation you might need when selecting from a distribution of psuedo-random values over n-dimensions.
Flow Fields

In the above example, I have created a visualization that uses 3-dimensional perlin noise for a variety of features to get the desired flow like effect. This includes:
- red, blue, green 3D-noise color field
- angle vector for each grid cell
- magnitude vector for each angle vector
- noise for introducing new continuous particles
- noise for removing old particles
Each particle is a nothing more than a simulation of a point with a velocity, acceleration, position, maximum speed, and uses the flow vector field to follow the direction by applying each vector at the position index as a force. By showing each vector in the grid you can see how the flow field changes direction over time.
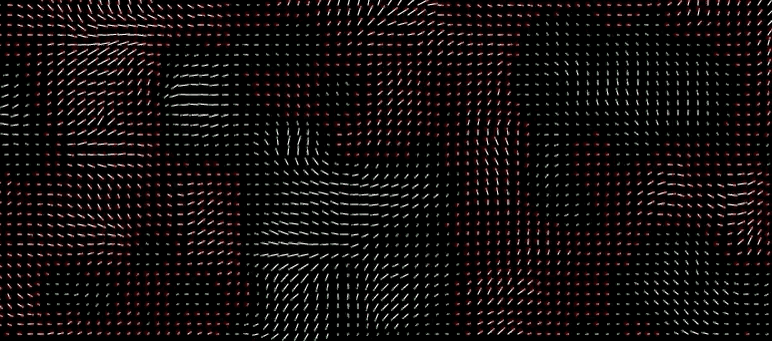
Note how I'm using the a combination of negative and positive magnitude vectors. The magnitude is itself calculated by a 3 dimensional noise value mapped to the values between -5 and 5. You can change this to only positive values or only negative values and the flow will move in mostly one direction.
The processing loop works by moving over the rows and columns (calculated along the grid cell size) and generating a noise value for each feature that I was interested in using the different offsets in each dimension. Each noise feature generates a value between 0 and 1 (in P5 at least, in other libraries this value is typically between -1 and 1). Multiply that value by the scale for the given feature. For the angle we multiply by TWO_PI, for a color value it is scaled by 255...etc. Most of the features simply use a particular offset in the 3D noise map by iterating along the x and y grid with a more global z offset used as a factor of time. X and Y offsets are incremented with a step size to move along the noise function, while the Z is incremented each time the draw loop is called according to time. I am incrementing the magnitude offset in a separate incrementing term that isn't necessarily tied to the same z offset but it functions according to time as well with a different step size.
var stepSizes = {
    x: 0.1,
    y: 0.1
    z: 0.005,
    m: 0.0005
};
var incStart = 0.005;
var cellSize = 10;
var zoff = 0;
var magOff = 0;
var rows, cols;
var features = {
    r: { scale: 255 },
    g: { scale: 255, offset: 100 },
    b: { scale: 255, offset: 200 },
    angle: { scale: TWO_PI },
    m: { scale: 1 }
};

var numParticles = 1000;
var particles = [];
var flowfield, flowcolorfield;

function setup() {
    createCanvas(800, 350);
    pixelDensity(1);

    cols = floor(width / cellSize);
    rows = floow(height / cellSize);
    flowfield = new Array(rows * cols);
    flowcolorfield = new Array(rows * cols);
    particles = new Array(numParticles);
    for (let i = 0; i < particles.length; i++) {
        particles[i] = new Particle();
    }

    background(0);
}

function calcNoise(k, xoff, yoff, zoff) {
    let f = features[k];
    f.offset = f.offset || 0;
    let n = noise(xoff + f.offset, yoff + f.offset, zoff);
    let amplitude = f.scale || f.amplitude || 1;
    return n * amplitude;
}

function draw() {
    // layering to gradually fade out
    background(color(0, 0, 0, 5));

    // loop over grid to calculate noise
    let yoff = 0;
    for (let y = 0; y < rows; y++) {
        let xoff = 0;
        for (let x = 0; x < cols; x++) {
            let r = calcNoise('r', xoff, yoff, zoff);
            let g = calcNoise('g', xoff, yoff, zoff);
            let b = calcNoise('b', xoff, yoff, zoff);
            let angle = calcNoise('angle', xoff, yoff, zoff);
            let v = p5.Vector.fromAngle(angle);
            let m = map(calcNoise('m', xoff, yoff, magOff), 0, 1, -5, 5);
            v.setMag(m);

            xoff += stepSizes.x;

            let index = x + y * cols;
            flowfield[index] = v;
            flowcolorfield[index] = [r,g,b];
        }
        yoff += stepSizes.y;
    }
    magOff += stepSizes.m;
    zoff += stepSizes.z;

    for (let i = 0; i < particles.length; i++) {
        particles[i].follow(flowfield, flowcolorfield);
        particles[i].update();
        particles[i].edges();
        particles[i].show();
    }
}
This particular implementation could be refactored such that each noise feature is setup within a particular noise loop. Noise loops are especially interesting; you can create a perfect loop so long as you start back at the same offset for the noise function to generate the same value.
Noise Loops
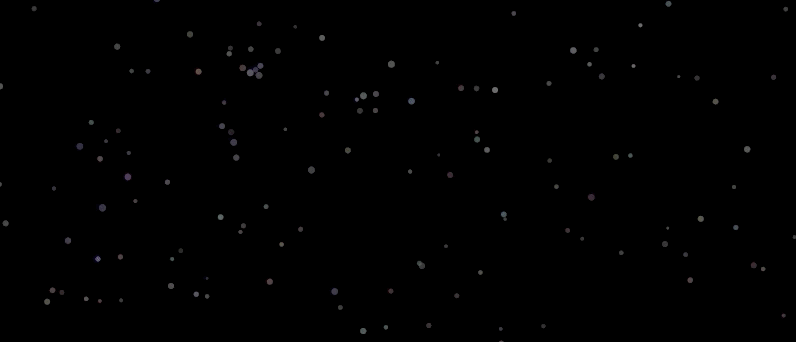
In the above example, I am using the concept of a noise loop by stepping a given offset over TWO_PI. In reality, I could pick any arbitrary value set so long as I gradually return back to the same value. A circle just makes this straightforward to implement. Any feature can be turned into a noise loop and that's pretty much what I've done to the positions, colors, sizing and alpha.
function noiseLoop(diameter, min, max, rnd) {
  let cx = random(rnd || 1000);
  let cy = random(rnd || 1000);
  return function (angle) {
    let xoff = map(cos(angle), -1, 1, cx, cx + diameter);
    let yoff = map(sin(angle), -1, 1, cy, cy + diameter);
    let zoff = sin(angle) * 0.001;
    let r = noise(xoff, yoff, zoff);
    return map(r, 0, 1, min, max);
  };
}

function Particle() {
  this.xn = noiseLoop(0.05, -width, width * 2);
  this.yn = noiseLoop(0.05, -height, height * 2);
  this.rn = noiseLoop(0.5, 0, 255);
  this.gn = noiseLoop(0.5, 0, 255);
  this.bn = noiseLoop(0.5, 0, 255);
  this.dn = noiseLoop(0.5, 1, 10);
  this.an = noiseLoop(1, 5, 200);

  this.render = function (a) {
    noStroke();
    fill(this.rn(a), this.gn(a), this.bn(a), this.an(a));
    circle(this.xn(a), this.yn(a), this.dn(a));
  };
}

var particles = new Array(200);
var totalFrames = 240;
var counter = 0;

function setup() {
  createCanvas(800, 350);
  for (let i = 0; i < particles.length; i++) {
    particles[i] = new Particle();
  }
}

function draw() {
  background(0);
  percent = (counter % totalFrames) / totalFrames;
  let a = percent * TWO_PI;
  for (let i = 0; i < particles.length; i++) {
    particles[i].render(a);
  }
  counter++;
}
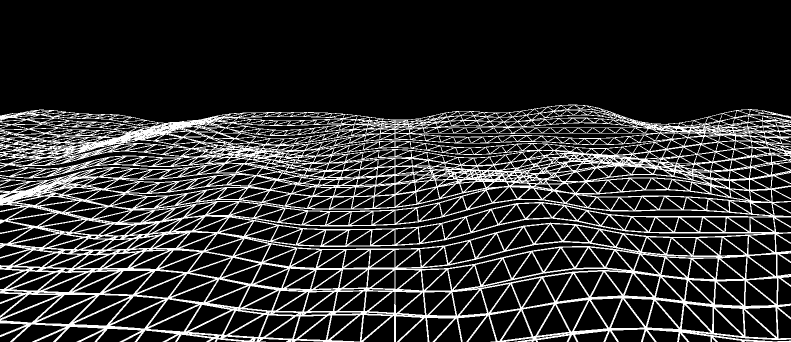
Terrain Generation
Along with 2 dimensional visualizations using the third dimension of time for noise functions, 3 dimensional noise is used extensively in terrain generation algorithms. This becomes a foundational concept when you need something a little more organic without having to generate an actual simulation. In the example below, I am modulating the z offset as a factor of time (same as I was doing in previous examples) and suddenly the terrain works decent as an animation for water.
Simplex Noise
As a follow-up, I discovered that the implementation of perlin noise in processing P5.js uses the same algorithm as the original 1983 version invented by Ken Perlin. This implementation has noticable directional artifacts that were later resolved in 2001 by improvements to the perlin noise algorithm. Ken Perlin himself also created another algorithm called Simplex that helps makes things significantly smoother and quicker. Unfortunately, he also patented that algorithm. Lucky for us, there is an open source implementation that augments part of the algorithm to take out a particular variant that falls under the patent rules. Simplex has the following advantages (as noted by Wiki)
- lower computational complexity, fewer multipliers
- scales to higher dimensions with less computational cost O(n*n) instead of O(n * 2 ^ n)
- no noticable directional artifacts
- well defined and continuous gradient everywhere that can be computed cheaply
- easy to implement in hardware
There are a number of implementations I found for open simplex (for different languages, platforms..etc). I'm using the simplex version in javascript to demonstrate the difference between what I was seeing from classic perlin noise and simplex below in my wave demo.
Note that the simplex version is significantly smoother and doesn't exhibit the same sort of directional artifacts that you get with classic perlin noise in my previous example. Of course, both of these demos work better under hardware acceleration.
Conclusion
While the actual underlying implementation for the algorithm is a bit more in depth than this article lays out, I'm happy to be exploring this space in more detail and expose myself to techniques for generating at least interesting and unique artwork. I've found that some abstractions, while difficult to understand the underlying implementation details, the abstraction is a helpful tool that can be applied in a variety of ways once you recognize the utility of the abstraction. It's not imperative to know the nitty gritty details of a mathematical formula so long as you understand the basic concepts like interpolation, smoothing, gradients, and learn to work with different geometries. I'm hoping to explore other types of noise functions, most notable cellular noise as I dive deeper into procedural content generation.
References
- Book of shaders: noise https://thebookofshaders.com/11/
- Perlin Noise https://en.wikipedia.org/wiki/Perlin_noise
- Simplex Noise https://en.wikipedia.org/wiki/Simplex_noise
- Simplex Demystified http://staffwww.itn.liu.se/~stegu/simplexnoise/simplexnoise.pdf
- Vector fields https://en.wikipedia.org/wiki/Vector_field
- Coding train flow fields https://m.youtube.com/watch?v=BjoM9oKOAKY
If you liked this article, give me a follow and a like. Also check out my twitter for similar content!
Cheers 🍻

Top comments (1)
Great article! Would like to see your first projects in generative art. I'm a noob in the field but so far the point of first plotting a grid makes a lot of sense before anything else can be done. Would appreciate an article explaining in depth the logic behind the randomness in generative algorithms.