
Let's be honest. Dealing with tooling is not something enjoyable if you have to deliver code. It should just work and not be in the way. So let's explore how to kickstart your next React project using Vite, in under 2 minutes, without worrying about the setup.
Table of Contents
1. How do I create a new project setup?
2. Running, building and testing the app
3. Building the app
4. Testing the app
5. Running integration tests with Cypress
6. Linting
7. Customize Vite and Vitest
8. Hidden gem: Caching
9. Hidden gem: Easily modularize your app
10. Hidden gem: Visualize your architecture
11. Hidden gem: Guard your boundaries
12. Hidden gem: Just run what changed
13. Hidden gem: A dedicated Editor extension
14. Hidden gem: Automated Upgrades
15. Using CRA? Automatically migrate to Vite + Nx
16. Conclusion
17. Learn more
Traditionally, you might lean towards Create-React-App (CRA) started to do precisely that. But what if I told you there's a better alternative, providing
- not just scaffolding for the initial setup but helping you along the way to generate components, routing, etc
- automatically sets you up with best practices tools for e2e testing, unit testing, code formatting, and linting
- has built-in support for Vite and Vitest (alternatively Webpack & Jest)
- caches your scripts to speed up things
- helps you modularize your application
- comes with automated upgrade features to keep your tooling evergreen
I'm talking about Nx. Nx comes with a set of plugins that come with code generation abilities and help abstract some of the lower-level tooling setups. And this can be really interesting for the use case we wanna tackle today.
Reader: "Wait a minute, I heard about Nx. Isn't that for monorepos?"
Me: "Yeah you're right. But in 15.3 they introduced something called 'standalone apps'"
Reader: "Standalone?"
Me: "Yeah, a fancy term for a setting up a single app and allows for some cool modularization. There's a video introducing that feature here: https://youtu.be/qEaVzh-oBBc"
Reader: "ha, interesting 🤔"
So let's go and set up our React + Vite + TypeScript project.
How do I create a new project setup?
To set up a new project, just invoke the following command:
npx create-nx-workspace@latest awesomereactapp --preset=react-standalone
Note awesomereactapp is the name of the app and folder being created, and --preset=react-standalone tells Nx which template to use when scaffolding the initial setup. You can also invoke it like:
npx create-nx-workspace@latest awesomereactapp
And then choose the option you prefer in the terminal prompt:

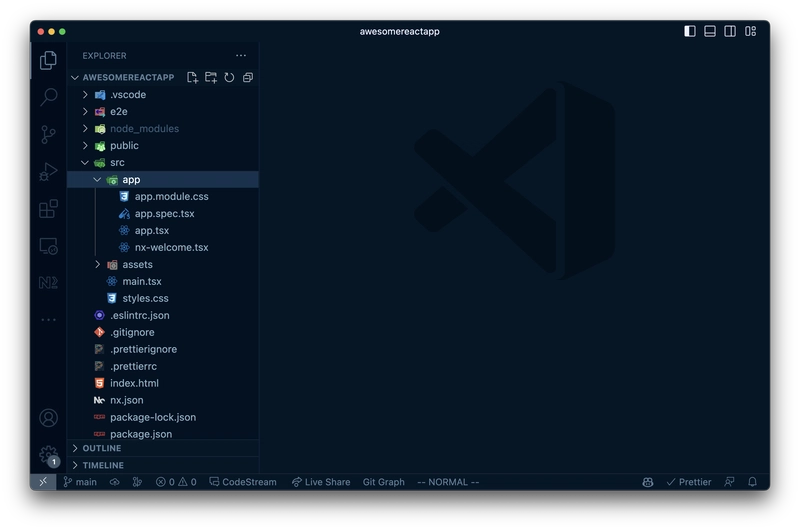
In the end, what you'll get is the following structure:
Running, building and testing the app
First off, let's run our new, shiny application. Just invoke
npm start
And in a matter of milliseconds, your app should be served at http://localhost:4200/.
npm start just invokes the script defined in the package.json:
// package.json
{
  "name": "awesomereactapp",
  ...
  "scripts": {
    "start": "nx serve",
    "build": "nx build",
    "test": "nx test"
  }
  ...
}
Internally this delegates to nx serve, where serve is the Nx target to be invoked. You can find those in the project.json:
// project.json
{
  "name": "awesomereactapp",
  "$schema": "node_modules/nx/schemas/project-schema.json",
  "sourceRoot": "./src",
  "projectType": "application",
  "targets": {
    "build":  {...},
    "serve": {
      "executor": "@nrwl/vite:dev-server",
      "defaultConfiguration": "development",
      "options": {
        "buildTarget": "awesomereactapp:build"
      },
      "configurations": {
        "development": {
          "buildTarget": "awesomereactapp:build:development",
          "hmr": true
        },
        "production": {
          "buildTarget": "awesomereactapp:build:production",
          "hmr": false
        }
      }
    },
    "test": {...},
    "lint": {...}
  },
  "tags": []
}
This is where you can see all the targets available for a given project, and you can add your own! In a Nutshell, an Nx target contains
-
executor- a function (heredev-server) exposed by the plugin (here@nrwl/vite) to run the task at hand. Think of it as the wrapper of your usual Npm scripts -
options- this is where you can pass options to theexecutor -
configurations- allows you to create different versions of theoptions. You control which configuration is used by passing it via the--configuration=productionflag to your commands. Also, note thedefaultConfiguration.
You can go more in-depth if you want on the Nx docs.
Building the app
Just in the same way as serving our web app, we can build it with
npx nx build
This places an output into a dist folder. Now that we've seen the project.json targets, you probably guessed that you could customize that output folder directly in those settings.
Testing the app
This setup also comes with testing baked in using Vitest. And you probably guessed it, you can just run tests as follows:
npx nx test
Running integration tests with Cypress
You might have noticed the e2e folder. That's a fully-functioning setup of Cypress for doing integration-level or even full end-to-end tests.
This is excellent because you don't have to configure anything at all. No need to
- Cypress configured to use Vite (instead of Webpack)
- set up linting for the e2e project (yes writing good quality test code is just as important)
- spinning up our development server manually first that serves our React app such that we can load it in our Cypress tests environment
All we need to do is to use
npx nx e2e e2e
This might look weird initially, but basically, we run the e2e target (see e2e/project.json) on the e2e project.
// e2e/project.json
{
  "name": "e2e",
  "$schema": "../node_modules/nx/schemas/project-schema.json",
  "sourceRoot": "e2e/src",
  "projectType": "application",
  "targets": {
    "e2e": {
      "executor": "@nrwl/cypress:cypress",
      "options": {
        "cypressConfig": "e2e/cypress.config.ts",
        "devServerTarget": "awesomereactapp:serve:development",
        "testingType": "e2e"
      },
      "configurations": {
        "production": {
          "devServerTarget": "awesomereactapp:serve:production"
        }
      }
    },
    ...
  }
}
By default, these tests run in headless mode, but you can pass --watch to run it interactively with the Cypress test runner such that the tests get re-executed whenever we change our source.
Want Cypress Component testing? There's an Nx generator that can help set that up. Check out the docs: https://nx.dev/packages/react/generators/cypress-component-configuration
Linting
And similarly, linting can be triggered by running the following command:
npx nx lint
There's a .eslintrc.json file already at the workspace's root that contains some best practices rules.
Customize Vite and Vitest
The project setup is made in a way that you can easily customize your Vite and Vitest setup. Just open the pre-generated vite.config.ts at the root of your workspace and add custom Vite plugins or fine-tune Vitest.
/// <reference types="vitest" />
import { defineConfig } from 'vite';
import react from '@vitejs/plugin-react';
import viteTsConfigPaths from 'vite-tsconfig-paths';

export default defineConfig({
  server: {
    port: 4200,
    host: 'localhost',
  },
  plugins: [
    react(),
    viteTsConfigPaths({
      root: './',
    }),
  ],

  // vitest config
  test: {
    globals: true,
    cache: {
      dir: './node_modules/.vitest',
    },
    environment: 'jsdom',
    include: ['src/**/*.{test,spec}.{js,mjs,cjs,ts,mts,cts,jsx,tsx}'],
  },
});
Hidden gem: Caching
Nx is known for its caching that helps optimize the speed in monorepos. Caching takes the inputs (the command, source files, environment variables...) and computes a hash.

On every run, Nx compares that hash against a local cache folder. If the hash exists, Nx restores the command line output and potential artifacts (JS, CSS,... files) produced by a previous run. This helps speed up computation because you don't run it if you don't need to.
See Nx the docs for more info: https://nx.dev/concepts/how-caching-works
While this obviously makes a lot of sense in a monorepo, it can also help speed up single-project workspaces. Most projects have multiple targets, such as build, test, lint. These can be cached! Imagine you have a PR where you change some *.spec.ts files because you add a test or fix some. Your CI script probably runs all the targets (build, test, lint) all the time. And it should totally do that. But you could avoid the build step because your spec file should not influence that outcome. As such, it could be restored from the cache. test needs to run and potentially also lint if you run linting also for spec files.
You can fine-tune what goes into the cache for each command. More on the Nx docs
Hidden gem: Easily modularize your app
Imagine a storefront application. You will probably have domain areas like
- Product list - which would have facilities for listing all currently available products, their ratings, user reviews etc
- Orders - for viewing your currently open orders as a user or browsing past orders. Things like placing a new order or triggering a refund on a previously acquired product
- Payments - for handling the payment flow, asking for the credit card, triggering the payment, and starting the order placement process once the payment is successful
- Authentication - which handles the whole signup/login flow and provides lower-level utilities for other domain areas in the app, like getting access to the current user.
- User Profile - which manages everything user related. Think of it when you access Amazon and go to your account. Things like managing your addresses
- ...
We're just scratching the surface here. This can become big quickly. The only way to manage such a structure with the current tooling (including CRA) is to organize these domains in folders. So you'd have something like this in a CRA setup:
cra-app
  ├─ public/
  ├─ src/
  │   ├─ authentication/
  │   │  ├─ current-user/
  │   │  │   ├─ ...
  │   │  │   └─ index.ts
  │   │  ├─ login/
  │   │  └─ signup/
  │   ├─ orders/
  │   │   ├─ checkout/
  │   │   ├─ place-order/
  │   │   ├─ refund/
  │   │   └─ order-list/
  │   ├─ payments/
  │   ├─ products/
  │   ├─ user-profile/
  │   │   ├─ addresses/
  │   │   └─ credit-cards/
  │   ├─ App.css
  │   ├─ App.tsx
  │   ...
  ├─ package-lock.json
  ├─ package.json
  └─ README.md
Most devtools (including CRA) force you into a monolithic structure, where you divide your features into folders. Folders are limited in terms of isolation, though; as your application grows, this might quickly go out of hand.
We can impose a different, stronger structure with Nx by extracting these areas into dedicated libraries or modules. These live side-by-side with your application. Let's say we have a folder named "domains" which contains these domain areas. Then you can easily generate a new library with the following command:
npx nx g @nrwl/react:lib checkout --directory=domains/orders/checkout --bundler=none
The above command creates a new " checkout " library in the domains/orders/ folder. Here's what it looks like:
awesomereactapp
├─ public
│  └─ favicon.ico
├─ src
│  ├─ app
│  ├─ ...
├─ domains
│  └─ orders
│     └─ checkout
│        ├─ src
│        │  ├─ index.ts
│        │  └─ lib
│        │     ├─ domains-orders-checkout.module.css
│        │     ├─ domains-orders-checkout.spec.tsx
│        │     └─ domains-orders-checkout.tsx
│        ├─ tsconfig.json
│        ├─ tsconfig.lib.json
│        ├─ tsconfig.spec.json
│        └─ vite.config.ts
├─ ...
├─ index.html
├─ package-lock.json
├─ package.json
├─ ...
├─ tsconfig.app.json
├─ tsconfig.base.json
├─ tsconfig.json
├─ tsconfig.spec.json
└─ vite.config.ts
Notice the domains/orders/checkout/src/index.ts: this is the public API of the checkout library where you can decide what to export and what should remain private within the library. This conscious process of selecting what to expose and what not leads to a much stronger encapsulation than just a folder structure. It also greatly helps with the maintainability aspect as your app grows.
When generating the library, a TypeScript path mapping is automatically created in the root-level tsconfig.base.json:
{
  "compileOnSave": false,
  "compilerOptions": {
    ...
    "paths": {
      "@awesomereactapp/domains/orders/checkout": [
        "domains/orders/checkout/src/index.ts"
      ]
    }
  },
  "exclude": ["node_modules", "tmp"]
}
In this way, anything that's being exported from the checkout library can be consumed like
import { SomeComponent } from '@awesomereactapp/domains/orders/checkout';
You can also just run linting or testing in isolation for these new libraries:
npx nx test domains-orders-checkout
And obviously, caching (as seen previously) would work on these new libraries as well.
Note,
domains-orders-checkoutis the unique name of the project, composed by its file structure. You can change the name in thedomains/orders/checkout/project.jsonif you'd like.
Hidden gem: Visualize your architecture
Another side-effect of splitting up your codebase into libraries is that your code structure and architecture emerge and becomes visible. Nx comes with a graph command built-in, so you can even visualize it:
npx nx graph
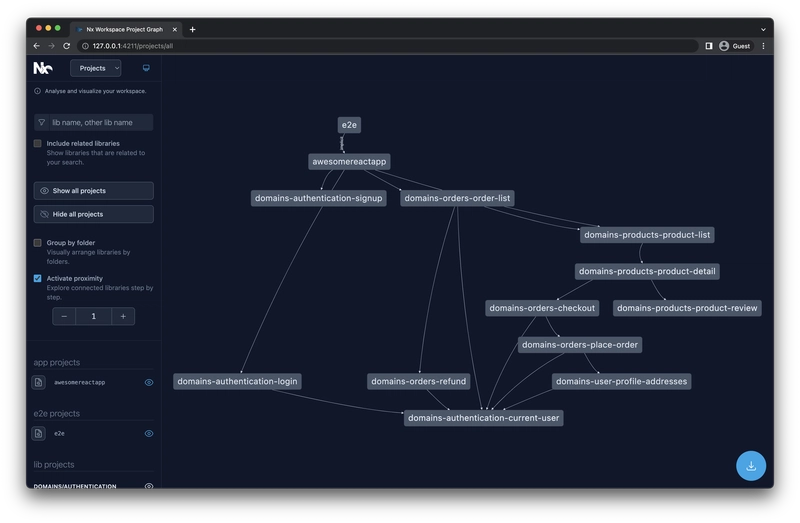
It becomes even more interesting if you select the "Group by folder" checkbox as the domains become visible at that point:

Note this is a hypothetical app to demo some of the features of the Nx graph visualization. Some of the connections might only make a little sense.
Hidden gem: Guard your boundaries
Scaling a software product is more than just the initial structuring and modularization. It consists of a constant ongoing process of ensuring modules stay in shape and don't contain any undesired cross-references or circular dependencies. You could leverage the Nx graph to verify that visually, but that doesn't scale.
To help with that, Nx has a built-in module boundary lint rule. Projects can be assigned "tags", like type:domain, type:utils, type:shared and domain:products, domain:orders, domain:auth. These tags can be assigned in the project.json, like
//
{
  // ... more project configuration here
  "tags": ["domain:products", "type:domain"]
}
Note that
type:domainordomain:productsare really just strings. You can define them however you want.
In the .eslintrc.base.json you can then define the rules. Here for instance we're stating that a library of type:utils can only depend on other utility libraries, while a type:domain can depend on both, other domain libraries as well as utility libraries.
// .eslintrc.base.json
{
  "overrides": [
    {
      "rules": {
        "@nrwl/nx/enforce-module-boundaries": [
          "error",
          {
            "depConstraints": [
              {
                "sourceTag": "type:utils",
                "onlyDependOnLibsWithTags": ["type:utils"]
              },
              {
                "sourceTag": "type:domain",
                "onlyDependOnLibsWithTags": ["type: domain", "type:utils"]
              },
              {
                "sourceTag": "domain:products",
                "onlyDependOnLibsWithTags": ["domain:products", "domain:orders"]
              }
            ]
          }
        ]
      }
    }
  ]
}
If some of these lint rules need to be followed, your editor will show it right in your code, and you can also run lint checks for each PR on CI.
If you're curious, you can read more here: https://blog.nrwl.io/mastering-the-project-boundaries-in-nx-f095852f5bf4
Hidden gem: Just run what changed
In such a modular structure (as shown above) where your code is organized in smaller modules/libraries, it is very common that a given team member just works within a single domain area. Hence, very often PRs just touch a subset of the entire set of libraries. Nx comes with a backed-in command that allows you to take advantage of that on CI, using the so-called "affected commands".
Let's say we make a change in the product-detail library of our application. This would affect all other libraries that depend on it. You can also visualize it by running
npx nx affected:graph

To run tasks only for the affected areas, use:
npx nx affected:<target>
To make a concrete example, running just tests for those projects:
npx nx affected:test
Hidden gem: A dedicated Editor extension
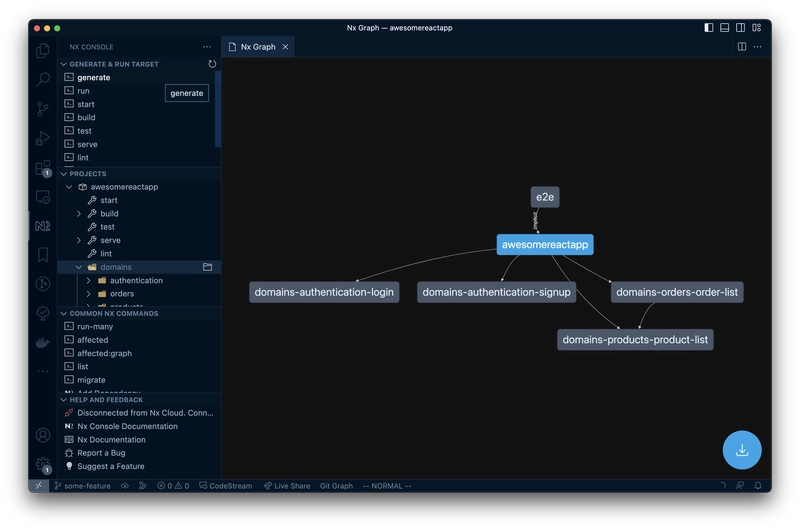
If you are not the "command line interface type" developer and you'd rather prefer something integrated within your IDE, then there's good news. The Nx core team also ships a dedicated VSCode extension: Nx Console.
It has a dedicated view within VSCode to trigger common commands, browse the workspace structure and even inline render the graph.
It also comes with contextual menus to quickly access most of the commonly used functionality:

Here's a walkthrough video showing some of the powerful capabilities of Nx Console:
Hidden gem: Automated Upgrades
To keep workspaces evergreen, Nx comes with automated code migrations that
- upgrade your
package.jsonpackages to the next version - can automatically update your configuration files if necessary
- can automatically update your source files if necessary (in case of breaking changes in the API)
This allows for smooth transitions even if there are breaking changes. Just run
npx nx migrate latest
Nx gathers the currently installed packages and updates them to the latest version. If a package comes with Nx migration scripts, Nx collects them in a migrations.json file. You can inspect and then run them. This dramatically helps to keep your project tooling up to date.
Read more about how Nx migrations work on the docs.
Using CRA? Automatically migrate to Vite + Nx
If you're currently on a CRA setup, you can easily migrate to an Nx + React + Vite-based setup by running the following command in your CRA project:
npx nx init
Read more on the Nx docs: https://nx.dev/recipes/adopting-nx/migration-cra
If for some reason you cannot migrate to Vite just yet, you can pass
--vite=falseto keep a Webpack-based setup for now.
Conclusion
Ready? Give it a try:
npx create-nx-workspace mycoolapp --preset=react-standalone
And let us know what you think :)
Learn more
- 🧠 Nx Docs
- 👩💻 Nx GitHub
- 💬 Nrwl Community Slack
- 📹 Nrwl Youtube Channel
- 🥚 Free Egghead course
- 🧐 Need help with Angular, React, Monorepos, Lerna or Nx? Talk to us 😃
Also, if you liked this, click the ❤️ and make sure to follow Juri and Nx on Twitter for more!

Oldest comments (4)
Great guide!
Thanks, I will try it out
Great article! I'm trying it in a project and... I'm in love 💕
good