Console applications and some History
Console applications are some of the most useful in a programmer’s toolbelt. The terminal is the simplest user interface, but it is still versatile enough that it can serve as an effective front-end for most programs. And because it has no need for graphics, you can save time, money, and space!
The downside, of course, is that the terminal looks and feels as simple as it is to implement. Navigating anywhere requires typing the correct input and hitting the enter key. And if the user makes a typo? They have to type everything again! Even using simple number or yes/no menus feels sluggish because of the need to hit the return key after every input. Fortunately, there’s a way to make the terminal UI sleeker and faster, and that’s with Curses.

Curses is a library that gives you easy and direct control over the terminal screen. It was first written in the late 70’s by Ken Arnold because he found the conventional terminal interface too limiting to make engaging games. (Fun fact, one of the first games he built with curses was Rogue, which went on to become a cultural touchstone for geeks everywhere). Curses has been mostly unchanged since the early 90’s, and can be utilized in pretty much every modern programming language, so it has a pretty strong pedigree.
The One Complicated Thing
That brief history wasn’t just a bit of trivia, it goes a long way toward explaining one of Curses weirdest features. Changing the text on the screen used to take a fair bit of computing power, and if multiple sections of text needed to be updated, there could be a pretty significant delay as the computer ran through all the changes. Ken’s answer to this was to create a buffer that stored what the screen should look like, then update the whole screen at once.
This logic carries over to how Curses works today. When you write something in Curses, it updates the buffer, it DOES NOT display on screen. You have to tell the screen to update in order to see any of your changes. While that may sound like a bit of a hassle, there’s a reason it’s been kept this way for forty years. Since all text on screen is updated at once, your users will never see a half-finished frame. This means that your programs will look cleaner, and simple animations are possible by quickly changing frames.

The 6 Basic Curses Commands
Part of the reason curses is so widely used is because of its simple syntax. All of Curses’ functionality can be accessed through a total of 6 commands. While there are many more that can be used, those methods can all be reproduced using these 5.
- Curses.setpos(int1,int2) – Sets the position of the cursor. The first number is the line (starting from 0 at the top), and the second is the number of characters into the line (starting from 0 on the left).
- Curses.addstr(string) – Writes the text into the buffer, starting from the current cursor position. Any text that already exists in that space will be overwritten.
- Curses.refresh – Displays on screen everything that is currently in the buffer.
- Curses.clear – Removes everything from the buffer.
- Curses.getch – Waits for the user to press any key, returns the character as a string.
- Curses.init_screen – Used to setup which area of the terminal Curses will run on. If given no arguments, it defaults to the entire terminal.
A simple application

First, we require curses so that the app knows that it has access to the Curses library.
We add the strings ‘Hello,World!’ and ‘ Press any key…’. Note that because we did not change the position of the cursor in between these two strings, the second string starts right where the first one lets off. The refresh command only displays what we have already written into the buffer.
The ‘This won’t appear until you press a key’ string is added to the buffer, but there is no refresh following it, so it hasn’t appeared on the screen yet. Once the Curses.getch command is hit, the program stops and waits until a key is pressed.

Pressing the key ‘f’ causes it to be written to the cursors current position (the end of the first line). It also causes the key variable to become the string ‘f’. The position of the cursor is changed to the 6th line down, eleventh character in, and another string is written to the buffer. A refresh then displays all of the changes made to the buffer.

The final getch exists to catch the program before it ends. Once the program ends, the curses window closes and all of the displayed text disappears.
Making Menus

The lower left section of this screenshot shows a simple example of a menu you can make using curses. It displays the elements of an array as a list, and the user can navigate the list and choose one entry. Let’s break down all the steps that are happening to render this menu.
Build our options - For each option, we need a string to display to the user and an object to return.
Keep track of where the Cursor should point – We use a variable called ‘index’ to store the current position of the arrow
Start a Loop – The rest of the logic takes place inside of a loop, this will handle showing the menu to the user and reacting to their inputs.
a. List The Options – For every option in the list, we add its name to a line in the buffer
b. Place the Arrow – We draw the arrow on a line determined by the index
c. Draw the Menu – We use Curses.refresh to display the menu we’ve built
d. Get User Input – Using Curses.getch, we can get input from the user. Notice that we always have to update the screen BEFORE getting input from the user, otherwise the user won’t be looking at the current state of information.
e. Interpret Input – We check if the user wants to change the index or select the current entry. If the user wants to make a selection, the loop ends and the selection value is returned
In the below example, the menu has been broken down across a couple different methods for clarity.
- menu.start takes in arguments for the menu, calls the other methods to do all of the above logic, then finally returns the selected value wherever it was called. (Step 1)
- initialize makes an instance of the menu, and sets the default value of the variables. (Step 2)
- display handles all of the drawing and rendering. (Steps 3a-3c)
- Finally, menu_loop handles the loop and all of the other step 3 logic.
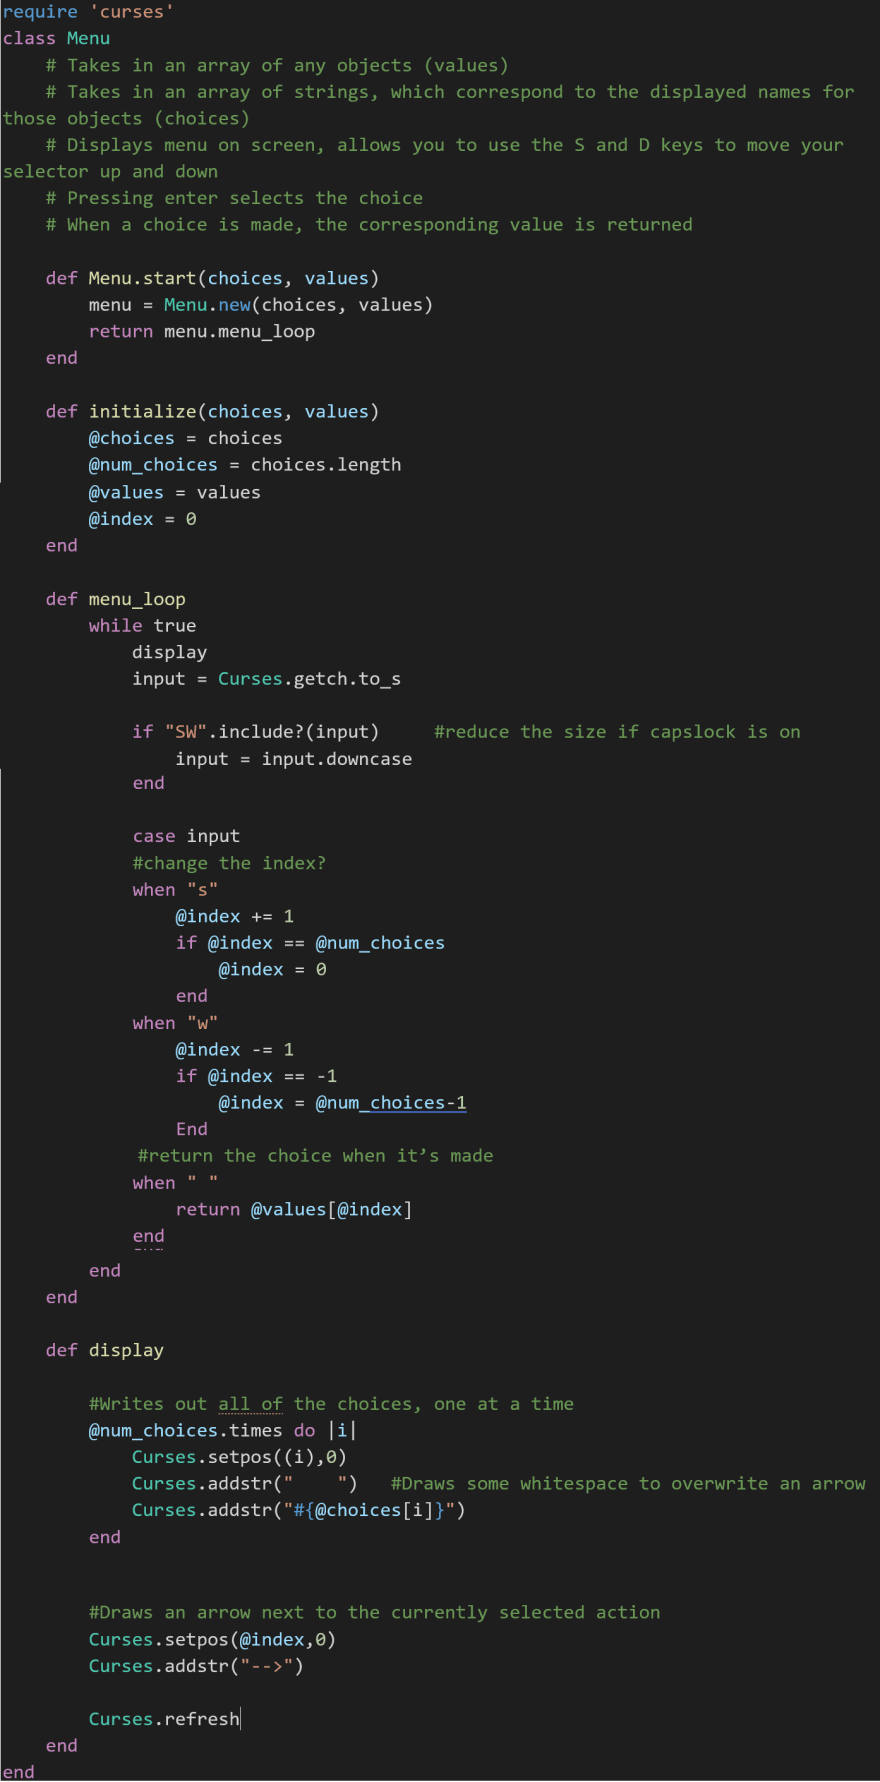
Notice that Curses.clear is never called during the menu loop. This means that whatever is on the screen will stay on the screen while the menu is up. However, this also means that we must manually overwrite text when we want it to disappear: this is why we add some whitespace before each choice to remove the arrow from its last position.
Also notice that we used some additional variables to check the total size of the list. That way, we can easily loop the index around when the user moves it past the end.
Why Menus are Awesome
Let’s take a quick look at some of the advantages this provides over text parsing menus.
- It’s Fast – A problem with text parsing menus is that they require the user to hit Return for every entry. This can slow things down considerably when they make multiple options in succession. Additionally, instead of having to search for the right button for an option, this menu only requires three buttons: (up, down, and select)
- It’s Intuitive – In a text parsing menu, a user might not know whether they should type ‘Spiderman’, ‘Spider Man’, or ‘Spider-Man’. If the user is picking from a menu, and not typing the name, they can’t make this mistake.
- It Protects the Program from Error – Because the menu class can only ever return an object that it was given, you don’t need to verify that the user inputs are appropriate. If the user puts in an incorrect input, that error only needs to be handled inside the menu class, rather than checked for every time the program asks for an input.
- It’s Universal – This menu class can be used regardless of the type of object in the array. When I was making my game, I used this same menu class in my game to handle choosing doors, characters, skills, targets, and equipment. And for most of those selections, I only needed a single line of code to call the menu.
With curses, you can improve your console applications with menus that look and feel much more professional. And if you do it right, it can save you a ton of time and effort dealing with bugs.
More Curses
This post is only meant to be a short introduction to Curses and some of the things it can do. Feel free to use or adapt any of the code provided in this post for your own projects. If you want a more comprehensive look at Curses, including its incredibly useful window commands, I recommend this tutorial.


Top comments (1)
When trying this out in 2023 the behaviour of the first example is a bit different from what I expected because
getchissues an implicit refresh. So "This won't appear until you press a key" actually does appear before the key press.