
☑️ What is MindsDB?
MindsDB is a tool that helps you to leverage machine learning techniques on the data stored inside your database. MindsDB brings machine learning into the database reducing complex workflows and extended durations of processing, creation and deployment. With MindsDB, you can build, train, optimize, and deploy your ML models without the need for other platforms. MindsDB helps you generate forecasts and predictions from your database which can be accessed with the help of a simple query. The revolutionary model of MindsDB helps businesses make decisions faster and more efficiently providing real-time value to the company.
☑️ What will the tutorial entail?
📝 Part 1 : Setting up the requirements
Firstly, we will set up all the tools we will be needing to utilize the functionalities of MindsDB using MongoAPI and get the dice rolling.
- Download MongoDB and MongoDB Compass
- Getting started with MindsDB
- Integrating MindsDB with MongoDB
📝 Part 2 : Generating ML Models
We will see how we can generate ML models in our database itself and go over the queries required to do so. In today's tutorial, we will be generating an ML Model to predict the weather using this dataset.
- Preparing the database
- Understanding our Problem Statement
- Creating the Predictor Model
- Querying the Predictor Model
☑️ Part 1 : Setting up the requirements
👉 Download MongoDB and MongoDB Compass
In this tutorial, we will be using MongoDB as our database and MongoDB Compass to interact with our database and with MindsDB as well. For anyone who is a complete newbie, MongoDB is a cross-platform NoSQL database that is used to store high volumes of data. MongoDB does not use tables and rows like a traditional relational database, instead, the data is organized as collections of documents containing key:value pairs. MongoDB Compass is the GUI for MongoDB so it provides an interface for the user to interact with the database, greatly simplifying things for beginners.
We won’t be diving too deep into the installation of MongoDB. There are two versions of MongoDB available, a free Community Edition and a paid Enterprise Edition. We will be working with the Community Edition as it is more than enough to test out the features of the database. Download the Community Edition of MongoDB and follow the installation steps to ensure correct installation. During the installation you will be provided with an option to download the MongoDB Compass as well. Make sure to select the checkbox or else you can download the MongoDB Compass separately as well and install it.
Once you have downloaded both MongoDB and MongoDB Compass successfully, we can move on to the next step.
NOTE : Previously the Mongo Shell was bundled together with the MongoDB and didn’t need separate installation. However, now, one must download and install the Mongo Shell separately.
You can download the Mongo Shell and follow the installation guide. Make sure you add the MongoDB and Mongo Shell binary files to your environment variables so that you can access them from your command prompt or terminal directly.
👉 Getting started with MindsDB
MindsDB provides all users with a free MindsDB Cloud version that they can access to generate predictions on their database. You can sign up for the free MindsDB Cloud Version by following the setup guide. Verify your email and log into your account and you are ready to go. Once done, you should be seeing a page like this :

If you wish, you can choose to install MindsDB on your local system using docker image or by using PyPI. However, we will be working with Minds DB Cloud in this tutorial.
👉 Integrating MindsDB with MongoDB
MindsDB provides us the ability to integrate with MongoDB using the MongoAPI. We can do so by following the given steps.
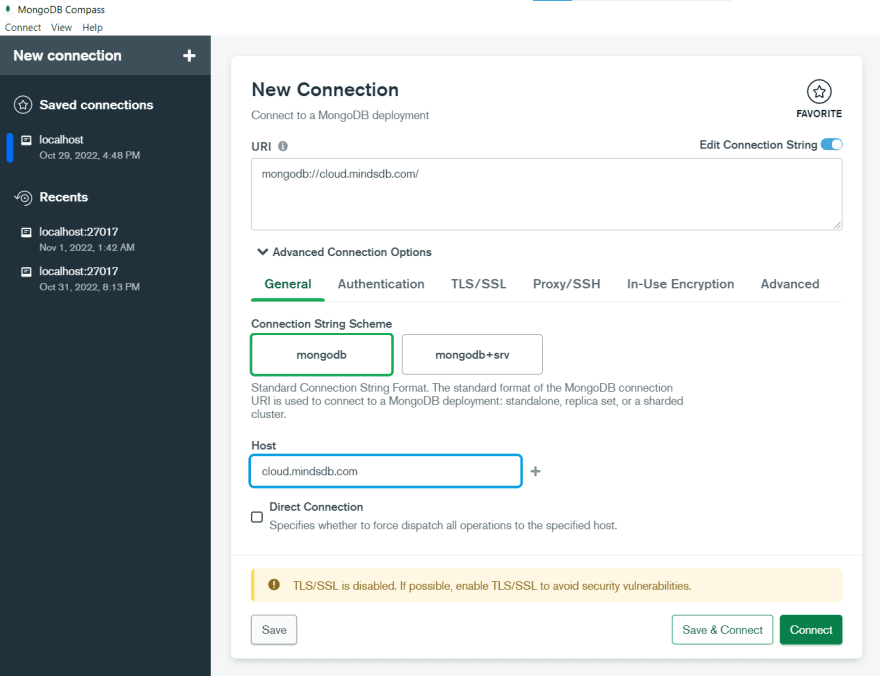
Open your MongoDB Compass. On the left navigation panel, You will have an option for a New Connection. Click on that Option and you will be provided with the details of your connection.
In the URI Section enter the following :
mongodb://cloud.mindsdb.com/
Click on the Advanced Connection Options dropdown. Here your host will be detected as MindsDB Cloud.
In the Authentication option enter your MindsDB Username and Password. Then click on Save and Connect, give your connection a name and select and color.
If you successfully create a connection you will be displayed a page similar to this :

In the bottom panel of this page, you will see the the Mongo Shell bar, enlarge it and type the following queries and click Enter.
> use mindsdb
> show collections

If you get a result like this, it indicates that you have successfully integrated MindsDB with MongoDB. Whew..!! That was quite a task. But don’t worry, the exciting part is yet to come.
☑️ Part 2 : Generating ML Models
👉 Preparing the database
We will be preparing our database on which we can run our queries and perform our forecasts. On the MindsDB Cloud console, click on the last icon in the left navigation bar. You will see a 'Select Your Data Sources' page. We can add a variety of data sources, however, for this tutorial we will be working with .csv files.
Go to the files section and click on Import File. Import your csv file and provide a name for your database table in which the contents of the .csv file will be stored. Click on Save and Continue.

Now we have to save this database that we have just created in our MongoDB database. We will be using the databases.insertOne() command to do so
To do so, go to the Mongo Shell and type the following command :
db.databases.insertOne({
    name: "WeatherDB", // database name
    engine: "mongodb", // database engine
    connection_args: {
        "port": 27017, // default connection port
        "host": "mongodb://cloud.mindsdb.com:27017", // connection host
        "database": "files" // database connection
    }
});
On clicking Enter, you must receive the following response :

If you get such a response, that means your database is all prepped to explore!
📌 Understanding our Problem Statement
Our main goal is to predict the weather and we are going to be using this Kaggle dataset that we saw earlier. Our database consists of various parameters or fields as seen below :
date : The dates at which the weather was recorded
precipitation : All forms of precipitation such as rain or snow that was recorded during the day
temp_max : The maximum temperature recorded on the day
temp_min : The minimum temperature recorded on the day
wind : The wind speed on the particular date
weather : The weather that was finally recorded on that day
To have a glimpse at all our database fields we can run the following query in the MindsDB Console :
SELECT * FROM files.weather LIMIT 10;
We will be given the following output :
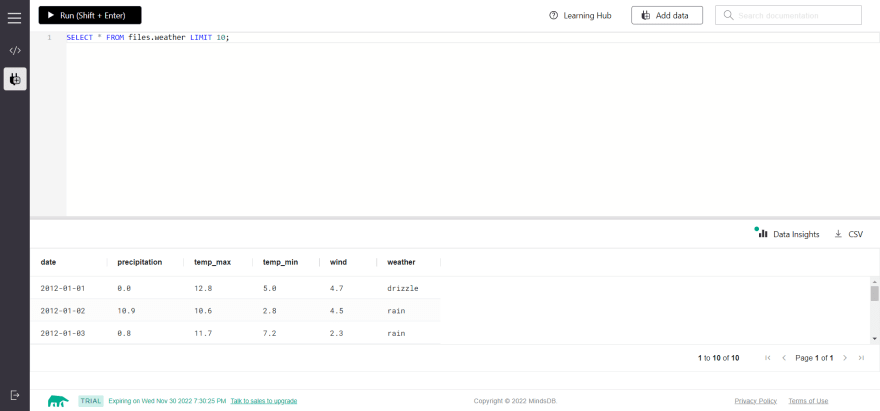
Now let us get familiar with our problem statement and what exactly are we trying to predict. As we can see our database contains several fields such as the date, precipitation, temperature and wind speed. And our final field is the weather that was recorded and that we wish to predict. What we want to do is to create an ML model to tell us what the weather on a particular day will be if we provide the remaining details like the date, precipitation, temperature and wind speed. But how will our ML model be able to achieve this task? That is where the training phase kicks in. On the basis of our given database, we will train our ML Model to learn how the final output of the weather varies according to the values of the remaining fields. And once we have trained our model, we can input the fields in our database and our ML Model will predict what the estimated weather would be in accordance to those parameters.
Sounds overwhelming? Let us see how MindsDB can do that for us in just a few seconds!
👉 Creating the Predictor Model
Now that our database is ready, we can go ahead and create our very first Predictor Model. The Predictor Model is basically a trained Machine Learning Model that can be used to predict or forecast a particular value known as the target variable or target value.
We use the CREATE PREDICTOR command to create and train a ML model. Enter the following command in your MindsDB console :
CREATE PREDICTOR mindsdb.weather_predictor
FROM files
(SELECT * FROM weather)
PREDICT weather;
Here weather_predictor is the name of our Predictor Model and weather is our target value that we want to predict. Click on Run or press Shift+Enter to run our query. If we don't encounter any issues, we will get a Query Successfully Completed message.

And that’s it! We have created and trained a Machine Learning model in just a few lines of code! That is the magic of MindsDB!
👉 Querying the Predictor Model
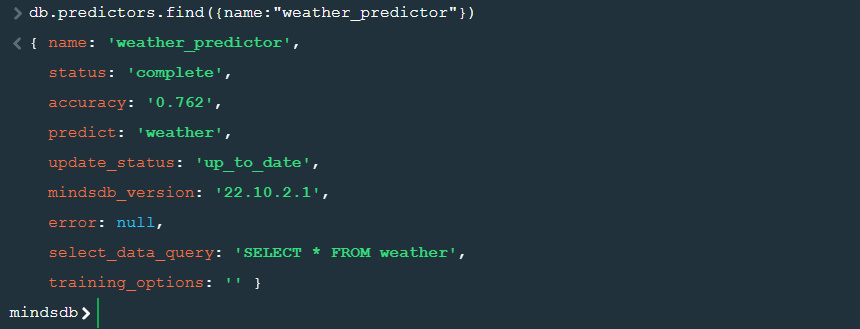
We can see the details of our machine learning model by typing the following command in our Mongo Shell :
db.predictors.find({name:"weather_predictor"})
When we press Enter we get all the details of our Predictor Model like its status, accuracy, target value and errors.
To see the same in our MindsDB Console, enter the following query :
SELECT *
FROM mindsdb.predictors
WHERE name='weather_predictor';

Now finally we can query our ML model to predict the target value of a particular entry.
The syntax for the same is :
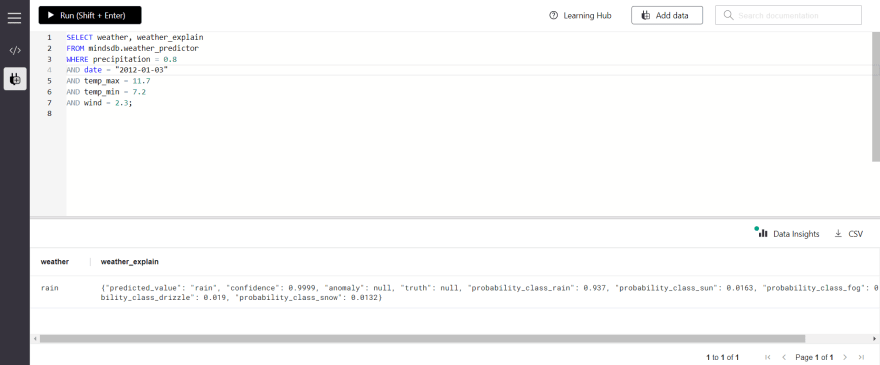
SELECT weather, weather_explain
FROM mindsdb.weather_predictor
WHERE precipitation = 0.8
AND date = "2012-01-03"
AND temp_max = 11.7
AND temp_min = 7.2
AND wind = 2.3;
We will obtain the following prediction for the weather according to our parameters entered :
We can also query our ML model through the Mongo Shell and start generating predictions.
Use the following command :
db.weather_predictor.find({
date:"2012-01-03",
precipitation:"0.8",
temp_max:"11.7",
temp_min:"7.2",
wind:"2.3"})
We are displayed this output:

☑️ Conclusion :
Using MindsDB we have successfully created and trained a Machine Learning model in our database and unlocked the ability to generate in-database forecasts. You can visit the MindsDB Documentation to know the various features of MindsDB.
☑️ What’s Next?
If you enjoyed following along to this tutorial, make sure to Sign Up for a free MindsDB Cloud account and continue exploring! Kaggle is a great resource for you to find similar datasets and you can create and train an ML model of your own with the help of MindsDB. You can also check them out on GitHub.

Top comments (0)