
This post explains how to run GitHub actions on self-hosted scalable runners on AWS spot instances.
Introduction
Last year GitHub released self-hosted action runners which already empower you to run GitHub actions on your own machines. At the time of, the feature was quite limited; it lacked an API and only supported repository level runners. We could already automate the deployment of a single self-hosted runner for one repo with Terraform on AWS. But the clear drawback here is that you will pay AWS for hosting your instances, even if there is no workload to execute. Over the last months, GitHub released an API for self-hosted action runners, and support for org level runners was added. Therefore, now is a good moment to have a second look on how to utilize self-hosted runners, and scale the self-hosted runners up and down based on workload using the GitHub API. Similar to scaling runners for GitHub we wrote an article on how to scale runners for GitLab which Terraform community module you find here.
Why?
Why we are using self-hosted runners? First of all, by running on our own hardware, we created our own trusted environment for our builds that we can connect to networks not available via public runners. Note that because of this reason, we choose to limit the use of self-hosted runners to our private and internal repositories. While using self-hosted runners on public repositories is possible, be aware that any pull request will run on your hardware which could have serious security risks. Therefore you should carefully consider the usage of self-hosted runners in this context. A second advantage of hosting our own runners, is that we can fine-tune the required hardware. Finally, local runners allow you to control, and maybe even save, costs, in contrast to public runners that are not free for non-public repo's. The setup we will show will have almost no costs if there are no builds, and by executing the workflows on AWS spot instances we save again some pennies.
The idea
The GitHub self-hosted action runner is an agent that you need to install on any machine that needs to pickup and execute workflow. To connect the agent to GitHub you can either choose to register the agent on repo level or org level. For registration you request a registration token (API) and this token is used during the setup of agent. This part is easy to automate, so let's have a look how we can orchestrate the process of creating runners.
In GitHub everytime a workflow is triggered, a check run event is created. Can we use this event to decide whether to scale a runner? Yes, if we find a way to receive and listen for the event. Actually, there are two options: using the webhook at the repo or org level, or using the GitHub app. Here, we will use the GitHub app option. The GitHub app can sent a message to our webhook for every check run event and we can easily implement this webhook with a AWS Lambda function. This lambda can verify the event, run some other checks and decide to create a EC2 spot instance to facilitate the execution of the workflow. The EC2 spot instances will be linux based with docker so we can run any containerized workload.
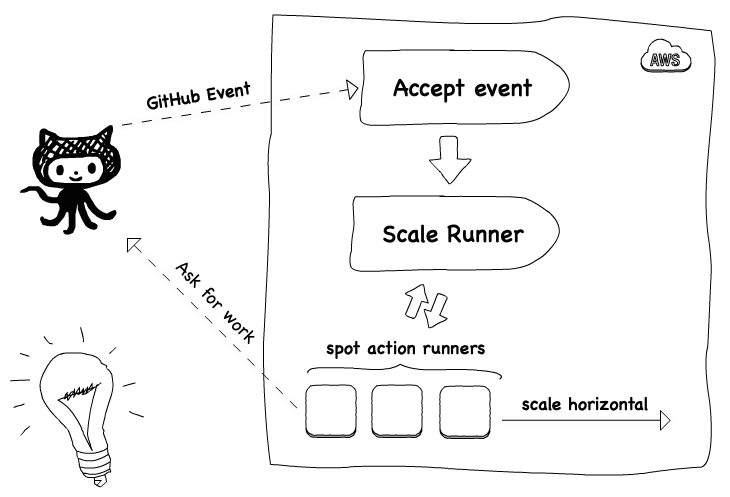
Being able to create runners once a workflow is triggered brings us the possibility to scale up. Question remains now how to scale down? Again we could listen for event and next try to scale down. Since a runner instance is not dedicated to only executing one workload. At the moment another workflow requires a build the, the runner will process this build as well. This makes scaling down based on events less trivial. So we took a slightly different and much simpler approach: every x minutes all runners that are not busy are removed.
You might think why not using Kubernetes? The reasons for us are quite simple. First, we would like to have a solution that could scale really from zero without making any costs. Second, with Kubernetes we enter a other model of running the GitHub agent, which is not supported (yet?). So, this would introduce some extra obstacles as managing docker in docker. Hence, we favoured this simple and straightforward approach.
Architecture
Before we build scalable runners on AWS, we discuss the architecture in a bit more detail. On AWS we need several infrastructure components and a component to orchestrate the life cycle of the action runners. All infra structure will be created using HashiCorp Terraform. The orchestration layer is build with AWS lambda. All the lambda functions are written in TypeScript and compiled to NodeJS single file with zeit ncc.
For the orchestration we build 4 different lambda's: First a lambda to handle the GitHub events, two lambda's for scaling up and down. And a last one to synchronize the runner binary. The self-hosted runners will run on AWS spot instances.

Webhook
This lambda receives events via the API gateway sent via the GitHub App for each check run event. The lambda will check if the event is signed with correct secret. Next it filters only for the check run event that requires an action runner, other events are simply dropped. In other words the we only keep the events that are created once a new workflow is triggered. The events we accept are published on a SQS queue. Messages on the queue are delayed for 30 seconds by default. This allows possible idle action runners to start the workflow execution.
Scale up
This lambda will receive messages from the SQS queue. For each message the lambda first verifies if the workflow has not yet been started. When the workflow is still queued, the lambda will create an AWS spot instance via a launch template. Before creating the instance, a new runner will be registered to GitHub. The token will be temporary stored in the AWS parameter store (SSM). During the boot the AWS instance installs all requirements via a user_data script. The script will install docker, git and the action runner, which is fetched from a S3 bucket. Finally the runner is configured with parameters fetched from the parameter store, and is then ready to consume workloads.
Scale down
This lambda is triggered by a cloud watch event. Every time it runs it will try to remove all the registered runners from GitHub. Only inactive runners can be removed. Trying to remove an active one will simply fail, resulting in a 500 response. For all the removed runners from GitHub the lambda will terminate the EC2 spot instances so the bill stops. The scale up and scale down lambda share the same code base, and are released as one zip.
Update Binary
This lambda will download the action runner binary to avoid unnecessary latency during creation of the runners. We found out in our first week of running our setup that downloading the action runner binary could take up to 15 minutes, therefore we build a simple lambda to cache the artifact in a bucket.
Build it
Time to build the idea. In the next steps we create a GitHub app, setup Terraform, configure an example repo to test our runners.
GitHub app
As mentioned above there are two scenario's two options for running the self-hosted runner, repo level or org level. Our module supports both but for this blog we use the repo level runner as example. The example below is based on the default example in the Terraform module.
The process starts with the event that we need to receive. So first we create a GitHub App. To create an app in your organization, go to you organization settings and select GitHub apps. On the app creation page you only need to fill in the name, homepage, and uncheck the webhook. We will activate the webhook once we know our endpoint.

Next hit create app, you will be redirected to the app overview page. Make a note of the following generated id's, and generate the ssh private key on the bottom of this page.
App ID:         12345
Client ID:      Iv1.abcd1234
Client secret:  some-secret
Lambda artifacts
Before we can actually deploy the infrastructure we need to build or download the lambda functions. You can clone the module repo and use the script in .ci/build.sh to build the 3 lambda zip files. But the easier option is just to download the release artifacts from the repo. We even provide a small utility module to download the artifacts.
Create a new workspace (directory) and add the following terraform code.
module "github-runner_download-lambda" {
  source  = "philips-labs/github-runner/aws//modules/download-lambda"
  version = "0.1.0"
}

  lambdas = [
    {
      name = "webhook"
      tag  = "v0.1.0"
    },
    {
      name = "runners"
      tag  = "v0.1.0"
    },
    {
      name = "runner-binaries-syncer"
      tag  = "v0.1.0"
    }
  ]
}
Next run terraform init && terraform apply the lambda artifacts will be download to your local machine.
Deploy the action runners
Now we will create all required AWS resources and deploy the lambda functions. Besides this module, we also need a vpc as well. We have a VPC with a public terraform AWS VPC module, you can use your own VPC as well. Create a new workspace and the code below to the main.tf.
provider "aws" {
  region  = local.aws_region
  version = "2.61"
}

locals {
  environment = "blog"
  aws_region  = "eu-west-1"
}

module "vpc" {
  source  = "terraform-aws-modules/vpc/aws"
  version = "2.33"

  name = "vpc-blog"
  cidr = "10.0.0.0/16"

  azs             = ["eu-west-1a", "eu-west-1b", "eu-west-1c"]
  private_subnets = ["10.1.0.0/24", "10.0.2.0/24", "10.0.3.0/24"]
  public_subnets  = ["10.1.001.0/24", "10.1.002.0/24", "10.1.003.0/24"]

  enable_nat_gateway = true
  single_nat_gateway = true
  enable_s3_endpoint = true
}
You can already run and apply the terraform code, once we have finished with the setup. We can now add the GitHub action runner module. Events sent to the webhook will be signed with a secret, therefore we generate a password with Terraform random provider. Ensure you set the variables for the lambda zip to the download lambda artifacts, and also add the id's, keys and base64 encoded secret for the GitHub app to the configuration.
resource "random_password" "random" {
  length = 32
}

module "runners" {
  source  = "philips-labs/github-runner/aws"
  version = "0.1.0"

  aws_region  = local.aws_region
  vpc_id      = module.vpc.vpc_id
  subnet_ids  = module.vpc.private_subnets
  environment = local.environment

  github_app = {
    key_base64     = ""
    id             = ""
    client_id      = ""
    client_secret  = ""
    webhook_secret = random_password.random.result
  }

  webhook_lambda_zip                = "lambdas-download/webhook.zip"
  runner_binaries_syncer_lambda_zip = "lambdas-download/runner-binaries-syncer.zip"
  runners_lambda_zip                = "lambdas-download/runners.zip"
  enable_organization_runners       = false
}

output "lambda_syncer_name" {
  value = module.runners.binaries_syncer.lambda.function_name
}

output "webhook" {
  value = {
    secret   = random_password.random.result
    endpoint = module.runners.webhook.endpoint
  }
}
Save your configuration and run terraform init and terraform apply. Once Terraform is finished we will trigger the lambda function for the syncing the distribution one time manually to ensure our cache is filled.
aws lambda invoke --function-name \
  $(terraform output -json lambda_syncer | jq -r) respone.json
The module we released for creating the infrastructure supports IAM permissions boundaries for those who have to run on shared AWS environments. For more details checkout the example.
Configure the GitHub App part 2
Go back to your GitHub app and activate the webhook, and provide the endpoint and secret. Don't forget to save the changes. Now you can subscribe for events. Go to the section permissions and events, grant permission on repo as follow, check your terraform output for the values. (terraform output -json webhook):
- Administration (read, write) - required to register runner.
- Repository permissions Checks (read) - required to get check run events
Scroll all the way to the bottom and check the box to subscribe to the check event.
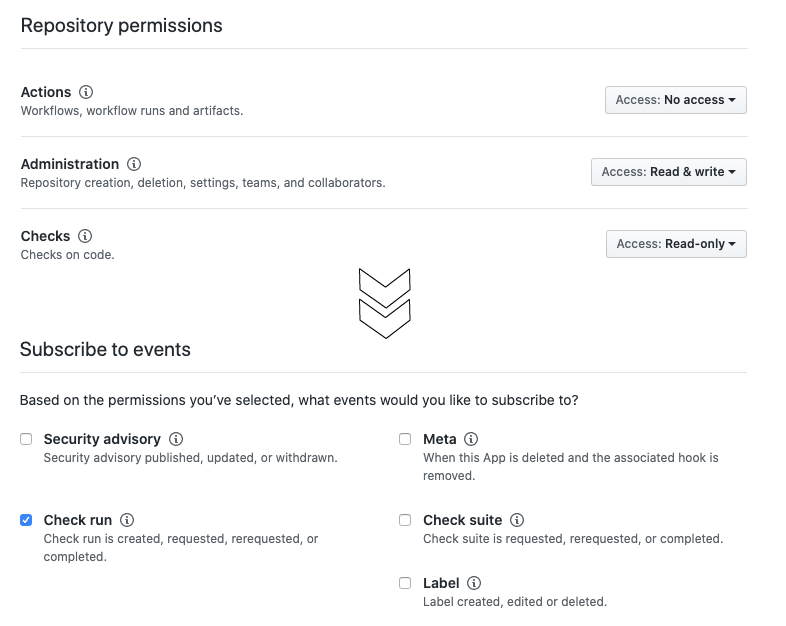
Note: for org level runners you need to grant the administration permission on org level instead of repo level.
Putting all together
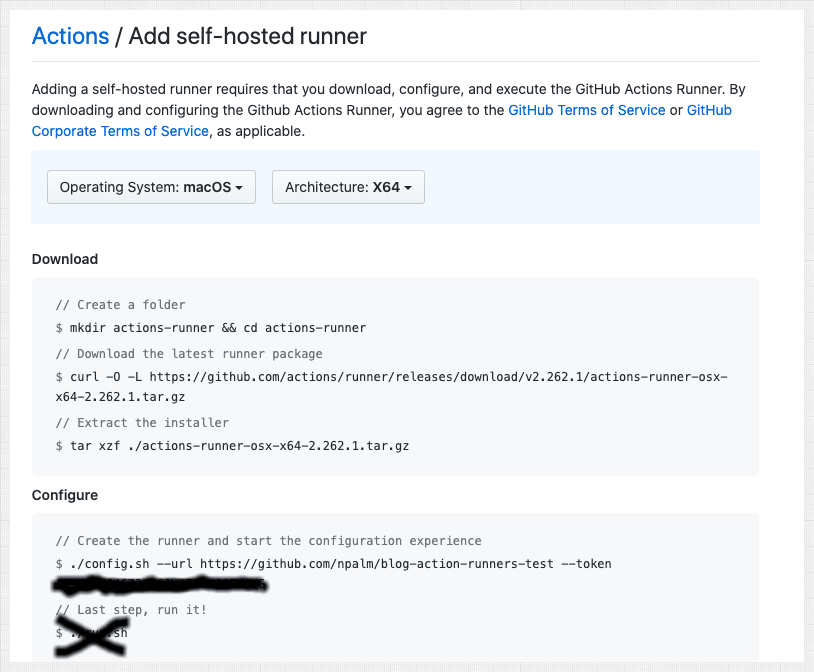
We are almost done; next we configure the self-hosted runner for a test repo. First we create a test repo in GitHub. In case you are using a runner and GitHub cannot find any runner that could run the workflow the build will directly fail. Since the scalable runners only create a runner once an event is received and remove the runners after an idle time, there are no candidate runners registered by default. For the time being we have a work around: register a runner for the repo (or org) which we will never use, and start that runner. The registered runner will prevent the workflow from failing. Be aware that this runner will be removed by GitHub after 30 days. To add this runner, go to your repo settings (or org settings), select actions and choose "Add runner". Run the provided instruction for your OS and give it a descriptive name such as "dummy". In case you provided the terraform module extra labels, provide them here as well.
THe final step is to install the GitHub app we have created. Go to your app settings and select install, now you can choose how to install the app. To only receive relevant events we choose to be repo specific and install the app to our test repo.

That's it, time to test. First create a simple action workflow in an empty directory.
mkdir -p .github/workflows
cat << EOF > .github/workflows/verify.yml
name: verify
on: [push]

jobs:
  cowsay:
    runs-on: self-hosted
    container: npalm/cowsay

    steps:
      - uses: actions/checkout@v2
      - run: cowsay -f ghostbusters "  Who ya gonna call?"
EOF
Initialize your current directory as GitHub repo and push all the content to GitHub.
git init
git remote add origin git@github.com:<YOUR_REPO>
git add --all .github
git commit -m "Test runners" .
git push origin master
After 30 seconds you should see your new spot instance starting in AWS.

A bit later, the runner should be registered to your GitHub repo.

And once registered it should only be a matter of seconds before the build starts.

Every 5 minutes the scale down lambda is executed, and if you not running any job you should see the runner is terminated.

In case you build runners are not starting or registering. The best you can do is follow the trace. In the GitHub app on there is an advanced settings page where you can see the events sent to the webhook. When the event is not accepted double check the endpoint and secret. Next you can check the logs for the webhook and scale up lambda in cloud watch. Finally you can inspect the EC2 user data logging. Access via SSM (MP: should this be ssh?) is by default enabled. Just select connect to the instance and inspect the log /var/log/user_data.log.
Final thoughts
The abilities of GitHub self-hosted runners are already quite neat. But creating the setup as discussed requires some hacks and shortcuts. First of all it would be much easier once GitHub delivers the orchestration component, which will reduce the whole setup to only managing a bit of cloud resources. For example having runners on a Kubernetes cluster including scaling can make it a lot easier to use.
By delivery an API for actions GitHub gives you the option to build your own setup, the fact that we always need to have a runner registered is quite an hack. Also, the way for scaling down will not win a beauty contest but is necessary because the API does not provide an option to verify whether a runner is still active. Furthermore, the cache of the distribution is bit of a hack to work around some crazy slow downloads that we had experienced.
But given all those hacks we are still quite happy with this setup. Until GitHub releases the components need to orchestrate the life cycle of an action runner, we will happily use this setup.
Acknowledgements
The module discussed in this article was developed together with Gertjan Maas.


Top comments (1)
We automated this at sprinters.sh . Each job gets a fresh fast-booting ephemeral runner on EC2 spot. No need to run your won orchestration layer. It's all taken care of for you.