
TLDR;
In this tutorial, you'll learn how to build a web application that allows you to send notifications generated by ChatGPT to your users, using React and NodeJS.
Intro
I have built many products in my life.
In all of them I had to send notifications to the user in some form.
It could be a "Welcome Email" or informing the users they haven't paid their last invoice 😅
But one thing was sure. I am a programmer, not a copywriter.
So how do I come up with the right message for my notifications?

I was playing with GPT+3, more than a year ago, the results were nice, but not something I could use in production with automation.
But ChatGPT changed the game.
What is ChatGPT?
ChatGPT is an AI language model trained by OpenAI to generate text and interact with users in a human-like conversational manner. It is worth mentioning that ChatGPT is free and open to public use.
Users can submit requests and get information or answers to questions from a wide range of topics such as history, science, mathematics, and current events in just a few seconds.
ChatGPT performs other tasks, such as proofreading, paraphrasing, and translation. It can also help with writing, debugging, and explaining code snippets. Its wide range of capabilities is the reason why ChatGPT has been trending.
The main problem is that it's not yet available to use with an API.
But that won't stop us 😈
Novu - the first open-source notification infrastructure
Just a quick background about us. Novu is the first open-source notification infrastructure. We basically help to manage all the product notifications. It can be In-App (the bell icon like you have in Facebook - Websockets), Emails, SMSs and so on.
![]()
I would be super happy if you could give us a star! And let me also know in the comments ❤️
https://github.com/novuhq/novu
Limitation with ChatGPT
As I mentioned before, ChatGPT is not available as a public API.
So, to use it, we have to scrape our way in.
It means we will perform a full browser automation where we log in to the OpenAI website, solve their captcha (for that, you can use 2captcha), and send an API request with the OpenAI cookies.
Fortunately, somebody already built a public library that can do all of that here.
FYI this is not an API, and you will hit a hard limitation if you try to make many requests, and of course, you won't be able to use it for live requests.
If you want to use it, use a queue and do background processing. If you want to know how to do it, write me in the comments, and I will write another article about it.
Project Set up
Here, I'll guide you through creating the project environment for the web application. We'll use React.js for the front end and Node.js for the backend server.
Create the project folder for the web application by running the code below:
mkdir react-chatgpt
cd react-chatgpt
mkdir client server
Setting up the Node.js server
Navigate into the server folder and create a package.json file.
cd server & npm init -y
Install Express, Nodemon, and the CORS library.
npm install express cors nodemon
ExpressJS is a fast, minimalist framework that provides several features for building web applications in Node.js, CORS is a Node.js package that allows communication between different domains, and Nodemon is a Node.js tool that automatically restarts the server after detecting file changes.
Create an index.js file - the entry point to the web server.
touch index.js
Set up a Node.js server using Express.js. The code snippet below returns a JSON object when you visit the http://localhost:4000/api in your browser.
//👇🏻index.js
const express = require("express");
const cors = require("cors");
const app = express();
const PORT = 4000;

app.use(express.urlencoded({ extended: true }));
app.use(express.json());
app.use(cors());

app.get("/api", (req, res) => {
    res.json({
        message: "Hello world",
    });
});

app.listen(PORT, () => {
    console.log(`Server listening on ${PORT}`);
});
Install the ChatGPT API library and Puppeteer. The ChatGPT API uses Puppeteer as an optional peer dependency to automate bypassing the Cloudflare protections.
npm install chatgpt puppeteer
To use the ChatGPT API within the server/index.js, you need to configure the file to use both the require and import keywords for importing libraries.
Therefore, update the server/package.json to contain the type keyword.
{ "type": "module" }
Add the code snippet below at the top of the server/index.js file.
import { createRequire } from "module";
const require = createRequire(import.meta.url);
//...other code statements
Once you have completed the last two steps, you can now use ChatGPT within the index.js file.
Configure Nodemon by adding the start command to the list of scripts in the package.json file. The code snippet below starts the server using Nodemon.
//In server/package.json

"scripts": {
    "test": "echo \"Error: no test specified\" && exit 1",
    "start": "nodemon index.js"
  },
Congratulations! You can now start the server by using the command below.
npm start
Setting up the React application
Navigate into the client folder via your terminal and create a new React.js project.
cd client
npx create-react-app ./
Install React Router - a JavaScript library that enables us to navigate between pages in a React application.
npm install react-router-dom
Delete the redundant files, such as the logo and the test files from the React app, and update the App.js file to display "Hello World" as below.
function App() {
    return (
        <div>
            <p>Hello World!</p>
        </div>
    );
}
export default App;
Navigate into the src/index.css file and copy the code below. It contains all the CSS required for styling this project.
@import url("https://fonts.googleapis.com/css2?family=Space+Grotesk:wght@300;400;500;600;700&display=swap");
* {
    box-sizing: border-box;
    margin: 0;
    padding: 0;
    font-family: "Space Grotesk", sans-serif;
}
body {
    margin: 0;
    padding: 0;
}
textarea,
select {
    padding: 10px 15px;
    margin-bottom: 15px;
    border: 1px solid #ddd;
    border-radius: 5px;
}
.notification__form {
    width: 80%;
    display: flex;
    align-items: left;
    justify-content: center;
    flex-direction: column;
}
.homeContainer h3,
textarea {
    margin-bottom: 20px;
}
.notification__form button {
    width: 200px;
    padding: 15px 10px;
    cursor: pointer;
    outline: none;
    border: none;
    background-color: #82aae3;
    border-radius: 5px;
    margin-bottom: 15px;
}
.navbar {
    width: 100%;
    height: 10vh;
    padding: 20px;
    background-color: #82aae3;
    display: flex;
    align-items: center;
    justify-content: space-between;
}
.homeContainer {
    width: 100%;
    min-height: 100vh;
    display: flex;
    align-items: center;
    justify-content: center;
    flex-direction: column;
}
Update the App.js file to render a Home component as below:
import React from "react";
import { BrowserRouter, Route, Routes } from "react-router-dom";
import Home from "./components/Home";

const App = () => {
    return (
        <BrowserRouter>
            <Routes>
                <Route path='/' element={<Home />} />
            </Routes>
        </BrowserRouter>
    );
};

export default App;
From the code snippet above, I imported the Home component. Create a components folder containing the Home.js file as done below:
cd client
mkdir components
cd components
touch Home.js
Copy the code snippet below into the Home.js file:
import React, { useState } from "react";
const Home = () => {
const [message, setMessage] = useState("");
const [subscriber, setSubscriber] = useState("");
const handleSubmit = (e) => {
e.preventDefault();
console.log({ message, subscriber });
setMessage("");
setSubscriber("");
};
return (
<div className='home'>
<nav className='navbar'>
<h2>Notify</h2>
</nav>
<main className='homeContainer'>
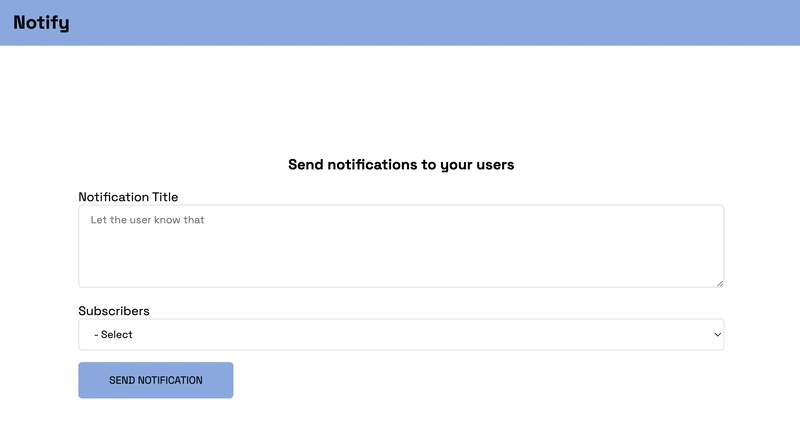
<h3>Send notifications to your users</h3>
<form
className='notification__form'
onSubmit={handleSubmit}
method='POST'
>
<label htmlFor='title'>Notification Title</label>
<textarea
rows={5}
name='title'
required
value={message}
onChange={(e) => setMessage(e.target.value)}
placeholder='Let the user know that'
/>
<label htmlFor='subscriber'>Subscribers</label>
<select
value={subscriber}
name='subscriber'
onChange={(e) => setSubscriber(e.target.value)}
>
<option value='Select'>Select</option>
</select>
<button>SEND NOTIFICATION</button>
</form>
</main>
</div>
);
};
export default Home;
How to add Novu to a React and Node.js application
We will be using Novu to send In-App notifications, but if you want to build your on in-app notifications, feel free to skip this step.
Adding Novu to a React application
Create a Novu project by running the code below within the client folder.
cd client
npx novu init
You will need to sign in with Github before creating a Novu project. The code snippet below contains the steps you should follow after running npx novu init.
Now let's setup your account and send your first notification
❓ What is your application name? Devto Clone
❓ Now lets setup your environment. How would you like to proceed?
   > Create a free cloud account (Recommended)
❓ Create your account with:
   > Sign-in with GitHub
❓ I accept the Terms and Condidtions (https://novu.co/terms) and have read the Privacy Policy (https://novu.co/privacy)
    > Yes
✔️ Create your account successfully.

We've created a demo web page for you to see novu notifications in action.
Visit: http://localhost:57807/demo to continue
Visit the demo web page http://localhost:52685/demo, copy your subscriber ID from the page, and click the Skip Tutorial button. We'll be using it later in this tutorial.

Install Novu Notification package as a dependency in your React project.
npm install @novu/notification-center
Update the components/Home.js file to contain Novu and its required elements from the documentation.
import {
    NovuProvider,
    PopoverNotificationCenter,
    NotificationBell,
} from "@novu/notification-center";
import { useNavigate } from "react-router-dom";

const Home = () => {
    const navigate = useNavigate();

    const onNotificationClick = (notification) => {
        navigate(notification.cta.data.url);
    };
    //...other statements

    return (
        <div className='home'>
            <nav className='navbar'>
                <h2>Notify</h2>
                <NovuProvider
                    subscriberId={"<YOUR_SUBSCRIBER_ID>"}
                    applicationIdentifier={"<YOUR_APP_ID>"}
                >
                    <PopoverNotificationCenter onNotificationClick={onNotificationClick}>
                        {({ unseenCount }) => (
                            <NotificationBell unseenCount={unseenCount} colorScheme='light' />
                        )}
                    </PopoverNotificationCenter>
                </NovuProvider>
            </nav>
            <main className='homeContainer'>...</main>
        </div>
    );
};
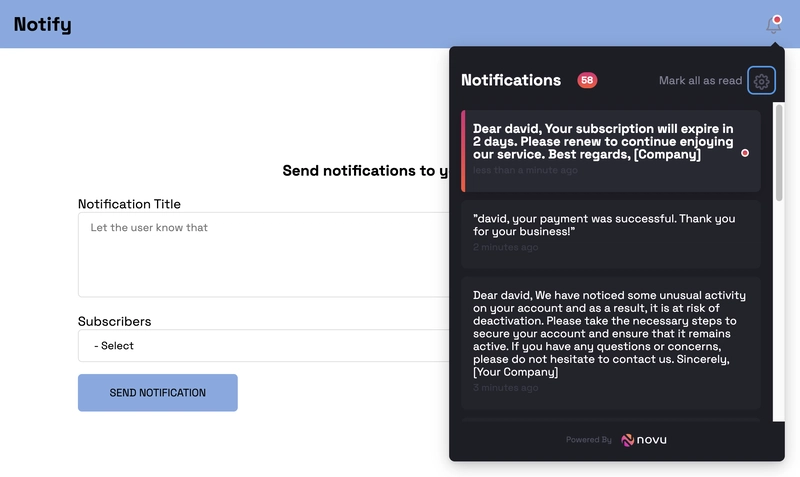
The code snippet above adds Novu's notification bell icon to the navigation bar, enabling us to view all the app notifications.

The NovuProvider component requires your Subscriber ID - copied earlier from http://localhost:52685/demo and your application ID available in the Settings section under API Keys on the Novu Manage Platform.
Next, let's create the notification workflow and template for the application.
Open the Novu Manage Platform in your browser and create a notification template.
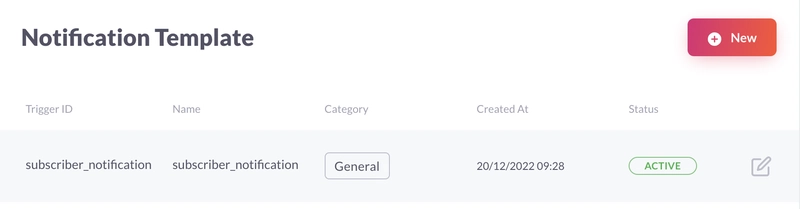
Select the template, click on Workflow Editor, and ensure the workflow is as below:
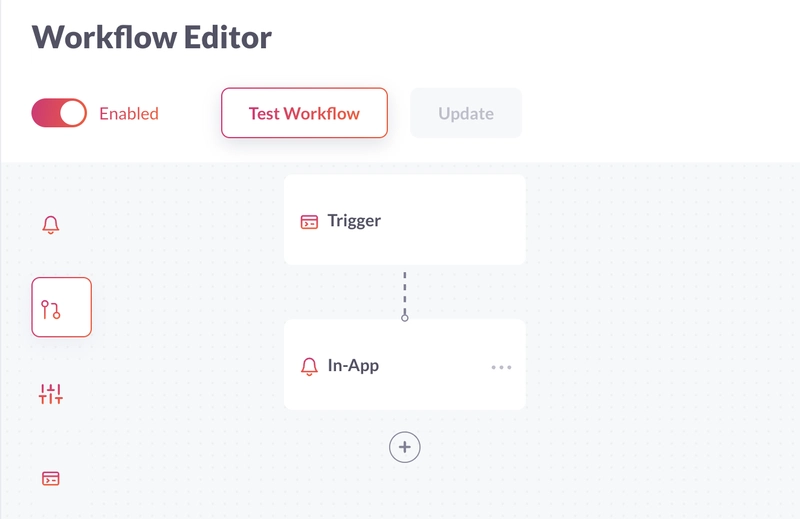
Click on the In-App step and edit the template to contain a message variable, as done below. The message variable will contain the notifications generated by ChatGPT.
{{message}}
Save the template by clicking Update button.
Adding Novu to a Node.js application
Navigate into the server folder and install the Novu SDK for Node.js.
cd server
npm install @novu/node
Import Novu from the package and create an instance using your API Key.
//server/index.js

const { Novu } = require("@novu/node");
const novu = new Novu("<YOUR_API_KEY>");
Congratulations! You've successfully added Novu to your web application. In the upcoming section, you'll learn how to send AI-generated notifications to your users via Novu.
How to send ChatGPT notifications to your users via Novu
In this section, I'll guide you through generating notifications from ChatGPT for different use cases and sending them to your Novu subscribers.
The application will allow you to specify the type of notification you want and select a subscriber that will receive the message.
We've created a form field within the Home.js. Next, let's fetch the list of subscribers and display them within the component.
Getting and displaying your Novu subscribers
Add a route within the index.js file that gets the list of subscribers from Novu.
app.get("/subscribers", async (req, res) => {
    try {
        const { data } = await novu.subscribers.list(0);
        const resultData = data.data;
        //👇🏻 Returns subscibers with an id, and first and last names
        const subscribers = resultData.filter(
            (d) => d.firstName && d.lastName && d.subscriberId
        );
        res.json(subscribers);
    } catch (err) {
        console.error(err);
    }
});
Create a function that sends a request to the /subscribers endpoint and displays the subscribers on page load within the React application.
//👇🏻 State representing the list of subscribers
const [subscribers, setSubscribers] = useState([
    { firstName: "", lastName: "", subscriberId: "Select", _id: "null" },
]);

//👇🏻 Fetch the list of subscribers on page load
useEffect(() => {
    async function fetchSubscribers() {
        try {
            const request = await fetch("http://localhost:4000/subscribers");
            const response = await request.json();
            setSubscribers([...subscribers, ...response]);
        } catch (err) {
            console.error(err);
        }
    }
    fetchSubscribers();
}, []);
Update the select tag within the Home component to render the list of subscribers as below:
<select
    value={subscriber}
    name='subscriber'
    onChange={(e) => setSubscriber(e.target.value)}
>
    {subscribers.map((s) => (
        <option
            key={s._id}
            value={`${s.firstName} ${s.lastName} - ${s.subscriberId}`}
        >{`${s.firstName} ${s.lastName} - ${s.subscriberId}`}</option>
    ))}
</select>
Generating the notifications from ChatGPT
Create a route within index.js that accepts the notification title and subscriber from the user.
app.post("/notify", (req, res) => {
    //👇🏻 Destructure the message and subscriber from the object
    const { message, subscriber } = req.body;
    //👇🏻 Separates the first name and the subscriber ID
    const subscriberDetails = subscriber.split(" ");
    const firstName = subscriberDetails[0];
    const subscriberId = subscriberDetails[3];
    //👇🏻 Added some specifications to the message to enable the AI generate a concise notification.
    const fullMessage = `I have a notification system and I want to send the user a notification about "${message}" can you write me one?
please use double curly brackets for variables.
make it short, and use only one variable for the user name.
Please just write 1 notification without any intro.`;

    //👇🏻 Log the required variables to the console
    console.log({ firstName, subscriberId, fullMessage });
});
Next, let's submit the form details to the /notify route on the server. Create a function that makes a POST request to the endpoint when the form is submitted.
//👇🏻 Makes the POST request
async function sendNotification() {
    try {
        const request = await fetch("http://localhost:4000/notify", {
            method: "POST",
            body: JSON.stringify({
                message,
                subscriber,
            }),
            headers: {
                Accept: "application/json",
                "Content-Type": "application/json",
            },
        });
        const data = await request.json();
        console.log(data);
    } catch (err) {
        console.error(err);
    }
}

//👇🏻 Runs when a user submits the form
const handleSubmit = (e) => {
    e.preventDefault();
    //👇🏻 Calls the function
    sendNotification();
    setMessage("");
    setSubscriber("");
};
Update the /notify route to pass the necessary variables into another function.
app.post("/notify", (req, res) => {
    const { message, subscriber } = req.body;
    const subscriberDetails = subscriber.split(" ");
    const firstName = subscriberDetails[0];
    const subscriberId = subscriberDetails[3];
    const fullMessage = `I have a notification system and I want to send the user a notification about "${message}" can you write me one?
please use double curly brackets for variables.
make it short, and use only one variable for the user name.
Please just write 1 notification without any intro.`;
    console.log({ firstName, subscriberId, fullMessage });

    //👇🏻 Pass the variables as a parameter into the function
    chatgptFunction(fullMessage, subscriberId, firstName, res);
});
Create the chatgptFunction as done below:
//👇🏻 Holds the AI-generated notification
let chatgptResult = "";

async function chatgptFunction(message, subscriberId, firstName, res) {
    // use puppeteer to bypass cloudflare (headful because of captchas)
    const api = new ChatGPTAPIBrowser({
        email: "<YOUR_CHATGPT_EMAIL>",
        password: "<YOUR_CHATGPT_PASSWORD>",
    });
    //👇🏻 Open up the login screen on the browser
    await api.initSession();
    const result = await api.sendMessage(message);
    chatgptResult = result.response;
    //👇🏻 Replace the user variable with the user's first name
    const notificationString = chatgptResult.replace("{{user}}", firstName);

    console.log(notificationString, subscriberId);
}
Finally, let's send the notification to the subscriber via the ID. Create another function that accepts the notificationString and subscriberId and sends the notification.
async function chatgptFunction(message, subscriberId, firstName, res) {
    // use puppeteer to bypass cloudflare (headful because of captchas)
    const api = new ChatGPTAPIBrowser({
        email: "<YOUR_CHATGPT_EMAIL>",
        password: "<YOUR_CHATGPT_PASSWORD>",
    });
    await api.initSession();
    const result = await api.sendMessage(message);
    chatgptResult = result.response;
    const notificationString = chatgptResult.replace("{{user}}", firstName);

    //👇🏻 Pass the necessary variables as parameters
    sendNotification(notificationString, subscriberId, res);
}

//👇🏻 Sends the notification via Novu
async function sendNotification(data, subscriberId, res) {
    try {
        let result = await novu.trigger("<NOTIFICATION_TEMPLATE_ID>", {
            to: {
                subscriberId: subscriberId,
            },
            payload: {
                message: data,
            },
        });
        return res.json({ message: result });
    } catch (err) {
        return res.json({ error_message: err });
    }
}
Congratulations!🎉 You've completed the project for this tutorial.
Conclusion
So far, we have covered
- what ChatGPT is,
- how to communicate with it in a Node.js application, and
- how to send ChatGPT-generated notifications to users via Novu in a React and Node.js application.
This tutorial walks you through an example of an application you can build using Novu and ChatGPT. ChatGPT can be seen as the ultimate personal assistant, very useful in various fields to enable us to work smarter and better.
The source code for this tutorial is available here: https://github.com/novuhq/blog/tree/main/sending-chatgpt-notifications-with-novu
Thank you for reading!
Help me out!
If you feel like this article helped you understand WebSockets better! I would be super happy if you could give us a star! And let me also know in the comments ❤️
https://github.com/novuhq/novu

Check out Postiz - the open-source social media scheduling tool.

Top comments (38)
I appreciate the blog post as an educational demo, but I'm not sure it's a good idea to build anything in production that relies on scraping a research preview that is likely to change and will certainly end up behind a paywall shortly. I imagine that when that happens, they will also be exposing the API for the same or lower cost anyway.
Also, when testing this out, I was not able to get a consistent response from ChatGPT. Often it would ignore the command to not include an intro, which I assume is an issue with its inherent goal of being conversational.
I also thought the temperature (creativity) of ChatGPT resulted in some undesired results. For example, when their subscription was running out, it basically just said "see ya", instead of encouraging the user to update their account.
With the GPT3 API though, I was able to get very consistent results, using a temperature of .35.
For anyone looking to implement this really helpful tutorial, but using GPT3, here is the prompt I used. Providing an example is a great way to ensure you get a consistent output, by the way.
By constructing your prompt in this way, it will finish your text by only adding the notification text, ensuring you never get any intro text like with ChatGPT.
Thank you for posting this!
I disagree with you about production use.
It can be used in production for background processing.
I am building now a notification directory that is mainly built in GPT3.
Do I need people to go around and validate stuff? sure!
It's still pretty crazy.
I'd follow this tute if it were using SolidJS. React is the Windows of JS frameworks, imo
Cool post title, but not so cool implementation.
Just wanted to update you on the latest information regarding ChatGPT's official API's. These API's allow you to send queries and receive results, and to get started, you'll receive $18 in credit.
It's important to note that ChatGPT operates on tokens, with a cost of $0.0200 per 1K tokens (for the Davinci model on which ChatGPT is based). You can use this information to calculate how many tokens you can get with your $18 credit.
For more information, be sure to visit the pricing page.
P.S: This comment is generated using chatGPT.
GPT3 exists for many years now.
But the ChatGPT model is not out yet.
I have tried to compare text-davinci-003 to chatgpt, but it's really on a different level.
I have implemented chatGPT(i.e davinci) in my react-native app and it has been working well so far. However, I would appreciate if you could share any scenarios where you feel the performance of davinci is not up to the mark.
As far as I am aware, chatGPT uses the text-davinci-003 model. Please let me know if this is incorrect.
Thank you for your help!
I have actually tried to run both prompts for notifications in chatgpt and text-davinci-003, and got a lot better one for chatgpt.
It is more aware of the context.
Also chatgpt knows how to answer questions, text-davinci-003 and the rest of the models are more auto-completion models.
This is pretty cool except showcases the archaic and backwards structure behind react language. The actual part what it's doing is understandable but 2/3 of this seems to be copying the terrible react format into the app. I guess with that language if you're not fixing some novice issue they got stuck on for a job, if you chose to use it for some reason, then we'll go back to the raw js days where we just store entire html strings into the .js files and so on. At least with raw javascript you'd be calling the real js function that runs directly ,(just refresh, see it work in real time at least, in the proper code format), not some weird wrapper that then compiles back to javascript first after that weird useless 'addeffect', 'usestate' nonsense, that is a wrapper for other things like session/localstorage. It also tells me how backwards it is that you can press like 'compile' on the react files and some unknown issue could appear, I really don't like touching that junk unless it's like in context someone needs changes or fixes and don't want to rewrite their problematic project so 'just leave the creature alone' sort of thing, even when it'd be beneficial to redo it all in a few days to a property structured language format like real typescript or raw javascript and take those crutches off it.
I would recommend we all start to realize react for what it is and swap to a structured and better toolset that's more complete, like angular, or even just use raw libs alongside with jquery (basically react, in a widely used, better form lol). This goes for monstrosities like Vue which is just react w less support; these types have more jobs, because novices are using it, then getting stuck on it. Lol. Like at least use angular and typescript then, use like a good scalable toolset that has all benefits and has proven itself, formatting where there you're using pure html and js with es6/typescript with a proper file structure, supported for everything, that backcompiles and minifies properly. And of course if you want to add js or anything, you just add it instantly. This tutorial only demonstrates again the hoops people jump thru to use the react JavaScript wrapper, and that 'prey it compiles in this alien format' mentality as any person just hope it will compile then display basic text the way you wanted; instead of view it like 'wow this helps and simplifies things a bit'. Rewritten formats (and tutorials) explaining 'usestate' are just proof that useless wrapper, essentially a reformatting shell like func2 calls func1 etc, should not have been ever made; it is handinhand with any one who wants to make their own programming language and then finds it was too stupid and lofty goal to try to undertake that.
Is this text generated with GPT?
I can't read it 😅
This is by far the most interesting chatGPT application I’ve come across.
Thanks for sharing this!
Thank you so much @sumitsaurabh927! How are you today?
I’m doing good, thanks for asking!
How are you?
im good and you?
fine.you?
There is an extension that can assist you in displaying ChatGPT responses alongside the search results from Google, Bing, and DuckDuckGo. Maybe you should try it: https://chrome.google.com/webstore/detail/chatgpt-for-search-engine/feeonheemodpkdckaljcjogdncpiiban/related?hl=en-GB&authuser=0
Thank you Moni!
Nice
Thank you!
Are you going to use ChatGPT?
Yeah
Heading
Thank you for the wonderful tutorial. Excited to try this out and learn more about Novu.
Thank you Aubrey 🤩
Heading
Heading
Heading
Heading
Heading
Heading!
When you updated your
/notifyendpoint to pass the variables into another method, you trimmed yourfullMessagevariable, losing a key piece of the prompt.I have a notification system and I want to send the user a notification aboutFixed! Sorry for that!
Some comments may only be visible to logged-in visitors. Sign in to view all comments.