
TLDR;
In this article, you'll learn how to build a web application that uses ChatGPT and Stable Diffusion to generate a logo and a befitting domain name for any website description you provide.
Intro
AI is taking over the world. The technologies are rocking our world daily: ChatGPT and Stable Diffusion.
ChatGPT can answer any question in the world using its GPT3.5 model.
Stable Diffusion is a text-to-image model that can convert any text into a picture.
Combining both technologies is the future of AI.
I will show you how to create an entire website branding by combining the two in this article.
I am really excited about this one 🤩
Please click on the "Like" button so I know you like it and you want more.

Novu - the first open-source notification infrastructure
Just a quick background about us. Novu is the first open-source notification infrastructure. We basically help to manage all the product notifications. It can be In-App (the bell icon like you have in Facebook - Websockets), Emails, SMSs and so on.
![]()
I would be super happy if you could give us a star! And let me also know in the comments ❤️
https://github.com/novuhq/novu
What is Stable Diffusion?
Stable Diffusion is a text-to-image latent diffusion model that enables users to generate images within a few seconds based on a given text input. It is also used in processes such as in-painting, out-painting, and generating image-to-image translations.
ChatGPT is also an AI language model trained by OpenAI to generate text and interact with users in a human-like conversational manner. Users can submit requests and get information or answers to questions from a wide range of topics such as history, science, mathematics, and current events in just a few seconds.
At the end of this article, you'll learn how to create images from text using the Stable Diffusion WebUI and send messages to ChatGPT from a Node.js application.
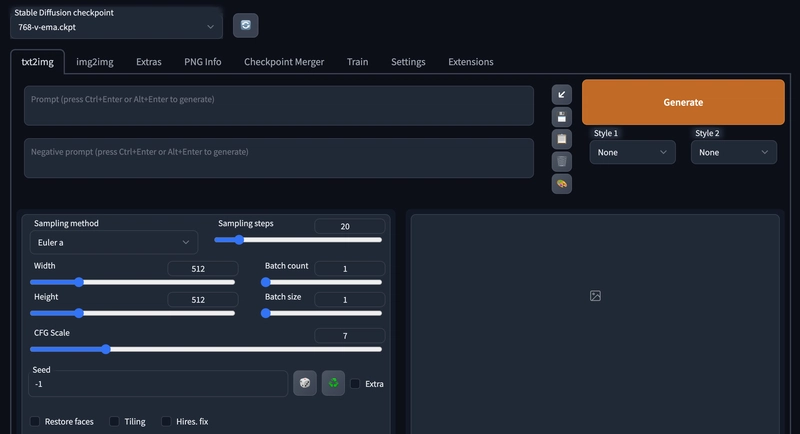
Installing and Running the Stable Diffusion Web UI
You can install Stable Diffusion Web UI on Windows, Linux, and Apple Silicon. Here, I'll guide you through the installation on Apple Silicon.
Prerequisites: Ensure you have Homebrew installed on your computer. It is a package that enables you to install various applications not provided by Apple.
- Open a new terminal window and run the command below to install the WebUI dependencies.
MAC:
brew install cmake protobuf rust python@3.10 git wget
Debian-based:
sudo apt install wget git python3 python3-venv
Red Hat-based:
sudo dnf install wget git python3
Arch-based:
sudo pacman -S wget git python3
- Clone the web UI repository by running the below:
git clone https://github.com/AUTOMATIC1111/stable-diffusion-webui
- We need to download the Stable Diffusion model (large file). Navigate to stable-diffusion-webui/models/Stable-diffusion
cd stable-diffusion-webui/models/Stable-diffusion
Download the model - For our use case we will use Stable Diffusion 1.5 but feel free to download any other version you want.
To download use:
wget https://huggingface.co/runwayml/stable-diffusion-v1-5/resolve/main/v1-5-pruned-emaonly.ckpt
rename the model from v1-5-pruned-emaonly.ckpt to model.ckpt
mv v1-5-pruned-emaonly.ckpt model.ckpt
- Navigate into the
stable-diffusion-webuifolder and run the web UI project to create a virtual environment and install its dependencies.
cd stable-diffusion-webui
./webui.sh
- Visit the local URL -
http://127.0.0.1:7860to interact with the Web UI via its user interface.
- To relaunch the web UI process later, navigate into the
stable-diffusion-webuifolder on your terminal and run the command./webui.sh. If you want to use the Web UI API, add the flag api flag to the command./webui.sh --api
Building the web application
In this section, I'll guide you through creating the project environment for the web application. We'll use React.js for the front end and Node.js for the backend server.
Create the project folder for the web application by running the code below:
mkdir stable-diffusion-app
cd stable-diffusion-app
mkdir client server
Setting up the React application
Navigate into the client folder via your terminal and create a new React.js project.
cd client
npx create-react-app ./
Delete the redundant files, such as the logo and the test files from the React app, and update the App.js file to display "Hello World" as below.
function App() {
    return (
        <div>
            <p>Hello World!</p>
        </div>
    );
}
export default App;
Navigate into the src/index.css file and copy the code below. It contains all the CSS required for styling this project.
@import url("https://fonts.googleapis.com/css2?family=Space+Grotesk:wght@300;400;500;600;700&display=swap");
* {
    box-sizing: border-box;
    margin: 0;
    padding: 0;
    font-family: "Space Grotesk", sans-serif;
}
.app,
.loading,
.result__container > div {
    display: flex;
    align-items: center;
    justify-content: center;
}
.app {
    width: 100%;
    margin: 50px auto;
    flex-direction: column;
}
.app > h1 {
    margin-bottom: 30px;
    color: #2b3467;
}
form {
    display: flex;
    flex-direction: column;
    width: 80%;
}
textarea {
    padding: 20px;
    border: 1px solid #ddd;
    outline: none;
    border-radius: 5px;
    margin: 5px 0px;
    box-shadow: 0 2px 8px 0 rgba(99, 99, 99, 0.2);
}
button {
    margin-top: 15px;
    display: inline-block;
    width: 200px;
    padding: 20px;
    cursor: pointer;
    font-weight: bold;
    border: none;
    border-radius: 5px;
    outline: none;
    font-size: 18px;
    background-color: #f0dbdb;
}
.loading {
    width: 100%;
    height: 100vh;
    background-color: #fefcf3;
}
.result__container {
    display: flex;
    align-items: center;
    flex-wrap: wrap;
    margin-top: 30px;
}
.result__container > div {
    margin: 5px;
    flex-direction: column;
}
.image {
    width: 400px;
    height: 300px;
    margin-bottom: 15px;
}
Update the App.js file to display an input field that allows you to enter the proposed website description.
import React, { useState } from "react";

const App = () => {
    const [description, setDescription] = useState("");

    const handleSubmit = (e) => {
        e.preventDefault();
        console.log({ description });
        setDescription("");
    };

    return (
        <div className='app'>
            <h1>Website Idea Generator</h1>
            <form method='POST' onSubmit={handleSubmit}>
                <label htmlFor='description'>Enter the description</label>
                <textarea
                    name='description'
                    rows={6}
                    value={description}
                    onChange={(e) => setDescription(e.target.value)}
                />
                <button>GENERATE</button>
            </form>
        </div>
    );
};

export default App;

Setting up the Node.js server
Navigate into the server folder within your terminal and create a package.json file.
cd server & npm init -y
Install Express, Nodemon, and the CORS library.
npm install express cors nodemon
ExpressJS is a fast, minimalist framework that provides several features for building web applications in Node.js, CORS is a Node.js package that allows communication between different domains, and Nodemon is a Node.js tool that automatically restarts the server after detecting file changes.
Create an index.js file - the entry point to the web server.
touch index.js
Set up a Node.js server using ExpressJS. The code snippet below returns a JSON object when you visit the http://localhost:4000/api in your browser.
//👇🏻index.js
const express = require("express");
const cors = require("cors");
const app = express();
const PORT = 4000;

app.use(express.urlencoded({ extended: true }));
app.use(express.json());
app.use(cors());

app.get("/api", (req, res) => {
    res.json({
        message: "Hello world",
    });
});

app.listen(PORT, () => {
    console.log(`Server listening on ${PORT}`);
});
Install Axios, the unofficial ChatGPT API library, and Puppeteer. The ChatGPT API uses Puppeteer as an optional peer dependency to automate bypassing the Cloudflare protections.
npm install chatgpt puppeteer axios
To use the ChatGPT API within the server/index.js file, you need to configure the file to use both the require and import keywords for importing libraries.
Therefore, update the server/package.json file to contain the type keyword.
{ "type": "module" }
Add the code snippet below at the top of the server/index.js file.
import { createRequire } from "module";
const require = createRequire(import.meta.url);
//...other code statements
Once you have completed the last two steps, you can now use ChatGPT within the index.js file.
Configure Nodemon by adding the start command to the list of scripts in the package.json file. The code snippet below starts the server using Nodemon.
//In server/package.json

"scripts": {
    "test": "echo \\"Error: no test specified\\" && exit 1",
    "start": "nodemon index.js"
  },
Congratulations! You can now start the server by using the command below.
npm start
How to communicate with ChatGPT in a Node.js application
In this section, you'll learn how to communicate with ChatGPT from the Node.js server via the unofficial ChatGPT library.
The library uses a fully automated browser-based solution that enables us to scrape our way in - meaning it performs a full browser automation that allows us to log in to the OpenAI website, solve the captcha, and send messages via the OpenAI cookies.
You've installed the library in the previous section; next, import the ChatGPT API library into the index.js file as done below. The ChatGPT API uses Puppeteer as an optional peer dependency to automate bypassing the Cloudflare protections.
import { ChatGPTAPIBrowser } from "chatgpt";
We need ChatGPT to generate a domain name for any description specified by the user and to create a prompt for the Stable Diffusion API.
Therefore, create a route on the server that accepts the description from the React app.
app.post("/api", async (req, res) => {
    const { prompt } = req.body;
    console.log(prompt);
});
Create a function within the React app that sends the description to the /api endpoint on the server once the user submits the form.
async function sendDescription() {
    try {
        const request = await fetch("http://localhost:4000/api", {
            method: "POST",
            body: JSON.stringify({
                prompt: description,
            }),
            headers: {
                Accept: "application/json",
                "Content-Type": "application/json",
            },
        });
        const res = await request.json();
        console.log(res);
    } catch (err) {
        console.error(err);
    }
}
Add a loading state within the React app that holds the request status and call the async function once the form is submitted.
const [description, setDescription] = useState("");
const [loading, setLoading] = useState(false);

const handleSubmit = (e) => {
    e.preventDefault();
    //👇🏻 calls the async function
    sendDescription();
    setDescription("");
    setLoading(true);
};
Update the /api endpoint to send the description to ChatGPT and generate a domain name and prompt for Stable Diffusion.
async function chatgptFunction(content) {
    try {
        const api = new ChatGPTAPIBrowser({
            email: "YOUR_CHATGPT_EMAIL_ADDRESS",
            password: "YOUR_CHATGPT_PASSWORD",
        });
        await api.initSession();

        //👇🏻 sends the instruction for the domain name to ChatGPT
        const getDomainName = await api.sendMessage(
            `Can you generate a domain name for a website about: ${content}`
        );
        let domainName = getDomainName.response;

        //👇🏻 sends the instruction for the prompt to ChatGPT
        const generatePrompt = await api.sendMessage(
            `I have a website for ${content}, and I want to generate a logo for it, can you generate a prompt for dall-e for me? make it long like 50 words, you don't need to tell me why you generated the prompt`
        );
        const diffusionPrompt = generatePrompt.response;

        console.log({ domainName, diffusionPrompt });
    } catch (err) {
        console.error(err);
    }
}

app.post("/api", async (req, res) => {
    const { prompt } = req.body;
    const result = await chatgptFunction(prompt);
    res.json({ message: "Retrieved successfully!" });
});
The code snippet above uses Puppeteer to launch the browser and enable you to sign in to your ChatGPT account automatically. After authentication, ChatGPT processes the requests and returns the response.
In the upcoming section, I'll guide you on how to send the generated prompt to the Stable Diffusion API.
How to interact with the Stable Diffusion API
To interact with the Stable Diffusion API, relaunch the web UI process by running the command below:
cd stable-diffusion-webui
./webui.sh --api
You can view the available API endpoints at http://127.0.0.1:7860/docs We'll make use of the /sdapi/v1/txt2img endpoint for the text-to-image conversion.
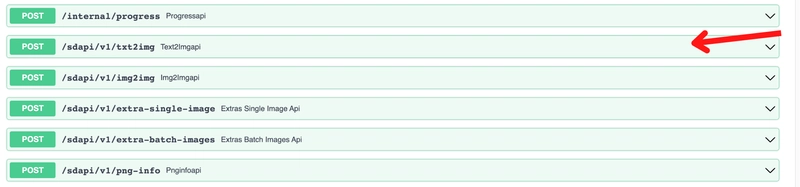
Make a POST request to the /sdapi/v1/txt2img endpoint with the generated prompt as the payload.
async function chatgptFunction(content) {
    try {
        const api = new ChatGPTAPIBrowser({
            email: "asaoludavid234@yahoo.com",
            password: "davidasaolu",
        });
        await api.initSession();

        const getDomainName = await api.sendMessage(
            `Can you generate a domain name for a website about: ${content}`
        );
        let domainName = getDomainName.response;

        const generatePrompt = await api.sendMessage(
            `I have a website for ${content}, and I want to generate a logo for it, can you generate a prompt for dall-e for me? make it long like 50 words, you don't need to tell me why you generated the prompt`
        );
        const diffusionPrompt = generatePrompt.response;

        //👇🏻 Makes a POST request via Axios with the prompt as the payload
        const request = await axios.post("http://127.0.0.1:7860/sdapi/v1/txt2img", {
            prompt: diffusionPrompt,
        });
        //👇🏻 returns the generated logo and the domain name
        let logoImage = await request.data.images;
        return { logoImage, domainName };
    } catch (err) {
        console.error(err);
    }
}
From the code snippet above, the /sdapi/v1/txt2img endpoint accepts a required parameter called prompt - the text description of the image to be generated.
Update the /api endpoint on the Node.js server to save the result and send it to the React.js application.
//👇🏻 holds the results
const database = [];

app.post("/api", async (req, res) => {
    const { prompt } = req.body;
    const result = await chatgptFunction(prompt);
    //👇🏻 saves the result to the database array
    database.push(result);
    //👇🏻 return the result as a response
    res.json({ message: "Retrieved successfully!", result: database });
});
Displaying the results with the React app
Update the sendDescription function to receive the response from the server.
//👇🏻 React state that holds the result
const [result, setResult] = useState([]);

async function sendDescription() {
    try {
        const request = await fetch("http://localhost:4000/api", {
            method: "POST",
            body: JSON.stringify({
                prompt: description,
            }),
            headers: {
                Accept: "application/json",
                "Content-Type": "application/json",
            },
        });
        const res = await request.json();
        if (res.message) {
            //👇🏻 update the loading and result states
            setLoading(false);
            setResult(res.result);
        }
    } catch (err) {
        console.error(err);
    }
}
Create a Loading component that is shown to the user whenever the request is pending.
import React from "react";

const Loading = () => {
    return (
        <div className='loading'>
            <h1>Loading, please wait...</h1>
        </div>
    );
};

export default Loading;
Add the code snippet below to display the component when the request is pending.
if (loading) return <Loading />;
Update the component to render the results generated as done below.
return (
    <div className='app'>
        <h1>Website Idea Generator</h1>
        <form method='POST' onSubmit={handleSubmit}>
            <label htmlFor='description'>Enter the description</label>
            <textarea
                name='description'
                rows={6}
                value={description}
                onChange={(e) => setDescription(e.target.value)}
            />
            <button>GENERATE</button>
        </form>

        <div className='result__container'>
            {result.length > 0 &&
                result.map((item, index) => (
                    <div key={index}>
                        <img
                            src={`data:image/png;base64,${item.logoImage}`}
                            alt={item.domainName}
                            className='image'
                        />
                        <p>Domain: {item.domainName}</p>
                    </div>
                ))}
        </div>
    </div>
);
The code snippet above displays the logo and domain name generated for various requests. Congratulations!🎉 You've completed the project for this tutorial.
Here is a sample of the results gotten for cocktail websites:

Conclusion
So far, you've learnt:
- what Stable Diffusion is,
- how to install and set up Stable Diffusion on your computer
- how to send messages to ChatGPT from a Node.js application, and
- how to generate images from text via the Stable Diffusion API.
This tutorial walks you through an example of an application you can build using Stable Diffusion and ChatGPT. These AI technologies can be used to create powerful applications useful in various fields.
The source code for this tutorial is available here:
https://github.com/novuhq/blog/tree/main/webapp-with-stable-diffusion-and-chatgpt
Thank you for reading!
Help me out!
If you feel like this article helped you, I would be super happy if you could give us a star! And let me also know in the comments ❤️


Top comments (4)
Hi Friends!
If you want to know exactly when I post, just register to my newsletter here
Great article, very detailed.
I do created a GPT-3 chat bot with NextJs.
I would love to have feedback from you.
App: sarcastic-clever-ai.vercel.app/
I love it!
What inspired you?
Your headline is misleading, which is a shame because your actual content is cool, just not at all what you are leading people to believe.
It's also kind of a bummer that you used someone else's content from the /r/StableDiffusion forum and didn't give any credit.