
React makes it intuitive to build real-world web applications. But in reality, you need to use a host of other **services **to get the app in front of real users.
This course walks you through setup and implementation to get your cloud-based application up and running.
You’ll learn to set up:
- Install and configure AWS Amplify into your React applications
- Add services like Authentication, APIs *using *GraphQL, interact and deploy Serverless functions, and store data in Amazon S3.
- Deploy your React application and make it available to all your users.
Part 1
Install & Configure the AWS Amplify CLI
❗ AWS Amplify is a framework in constant change and improvement. If you find something here or in the video that is outdated, or not working, please make sure you check the Official documentation to clear your doubts.
🤔 You can setup your project with a guided help from the Official AWS documentation here
Prerequisites
- Node.js v10.x or later
- npm v5.x or later
git v2.4.1 or later
This tutorial assumes you are familiar with both JavaScript/ES6 and React. If you need to refresh some of the core concepts, we recommend you go through the React official tutorial
Also make sure you have an AWS account. You need one in order to follow all the steps. You can create an AWS account here
🤔 for the next steps, you have also this other video resource and follow the steps: https://www.youtube.com/watch?v=fWbM5DLh25U
Install the CLI
npm install -g @aws-amplify/cli
- Configure the CLI with the user from your AWS account
amplify configure
- This command should open the AWS console. Log in with your account and jump back to the command line
- Specify the AWS reagion closer to you or the one you prefer
- Set the username of the user that we are about to create
Specify the AWS Region
? region:  # Your preferred region
Specify the username of the new IAM user:
? user name:  # User name for Amplify IAM user
Complete the user creation using the AWS console
- This should open the IAM dashboard in our AWS account with pre-configured settings that we can accept by clicking next in all the steps:
Next: PermissionsNext: Review- and finally
Create User
🤔 Amazon IAM (Identity and Access Management) enables you to manage users and user permissions in AWS. You can learn more about Amazon IAM here.
- Now you will see the user created, with an
Access key IDand aSecret access keywhich you need to paste in your command line - Now you need to set a Profile Name (choose the name of your choice)
- and that's it!, you have the AWS Amplify CLI setup and ready to create new projects!
Part 2
Create & Configure an AWS Amplify Project with a React Application
❗ AWS Amplify is a framework in constant change and improvement. If you find something here or in the video that is outdated, or not working, please make sure you check the Official documentation to clear your doubts.
- create a Create-React-App using
npxand run inside the appamplify init
npx create-react-app <YOUR-APP-NAME> # YOUR-APP-NAME can be any name
cd <YOUR-APP-NAME>
- Fron the root of your project, run:
amplify init
You will be prompted for some information about the app:
Enter a name for the project (<YOUR-APP-NAME>)

# All AWS services you provision for your app are grouped into an "environment"
# A common naming convention is dev, staging, and production
Enter a name for the environment (dev)

# Sometimes the CLI will prompt you to edit a file, it will use this editor to open those files.
Choose your default editor

# Amplify supports JavaScript (Web & React Native), iOS, and Android apps
Choose the type of app that you're building (javascript)

What JavaScript framework are you using (react)

Source directory path (src)

Distribution directory path (public)

Build command (yarn run-script build)

Start command (yarn run-script start)

# This is the profile you created with the `amplify configure` command in the introduction step.
Do you want to use an AWS profile
❗ The default build folder for a Create React App application is
publicand notbuild
- the Amplify CLI will infer as much information as it can from the current project setup.
-
A few things happen with this process:
- a directory called
amplifyat the top level of the app, that stores your backend definition - a file called
aws-exportsin thesrcdirectory that holds all the configuration for the services you create and will create with AWS Amplify - it modifies the
.gitignorefile adding some generated files to the ignore list - A cloud project is created in your AWS Amplify console
- a directory called
now let's install the react-amplify libraries needed
npm install aws-amplify @aws-amplify/ui-react
# or
yarn add aws-amplify @aws-amplify/ui-react
❗ the React Library has a new package name! (@aws-amplify/ui-react)
- Now we are ready to add new features to our React app!
Part 3
Use the AWS Amplify withAuthenticator HOC to Implement a React User Authorization Flow
❗ AWS Amplify is a framework in constant change and improvement. If you find something here that is outdated, or not working, please make sure you check the Official documentation to clear your doubts.
- the Amplify CLI comes with commands to help you create and add services to your applications
in this lesson, you will add authentication service to your app
First, in the root of your project, you run:
amplify add auth

? Do you want to use the default authentication and security configuration? Default configuration
? How do you want users to be able to sign in? Username
? Do you want to configure advanced settings?  No, I am done.
- In order to deploy the service, you can run:
amplify push
- this will show you the operation it will execute. This process may take a while depending on the service you are pushing (First time always takes a little more)
$ amplify push
✔ Successfully pulled backend environment dev from the cloud.

Current Environment: dev

| Category | Resource name       | Operation | Provider plugin   |
| -------- | ------------------- | --------- | ----------------- |
| Auth     | <__RESOURCE_NAME__> | Create    | awscloudformation |
? Are you sure you want to continue? Yes
after the process is finished, we can now setup and configure our React app with the new AWS resource.
open
src/index.jsand include the next lines of code:
import Amplify from "aws-amplify"
import awsExports from "./aws-exports"
Amplify.configure(awsExports)
👍 The
aws-exports.jsfile is auto-generated, so you should not edit this file during this steps ( ...or any really XD )
- Now we can go to
src/App.jsto secure our app with our Auth service:
// 1. import the `withAuthenticator` component
import { withAuthenticator } from "@aws-amplify/ui-react"

// 2. Change the default export with a `withAuthenticator` call passing the main component
export default withAuthenticator(App)
- Now we can run our app again and see the new Authentication flow that protects our whole app
yarn start
# or
npm start
- You should be able to see the app loads with an authentication flow in place (auth form)
- If you create a user and log in, even if you refresh the page you will be still logged in, that's because your user sessions is stored in localStorage by the Library itself.
- you are using the default React UI library for the form component, but you can customize it the way you prefer
- Customize the look and feel
- Add/Remove fields
- and also other configurations
- You have access to the
Authclass too, which lets you create your own custom Auth flow -
Authhas over 30 methods includingsignUp,signIn,forgotPasswordandsignOut, that gives you full control over all the Authentication flow.
❗ To include a sign out button, you need to follow other steps rather than adding a second parameter to the
withAuthenticatorHigh-order component (HoC). You can follo the new steps here
Part 4
Manually Sign Up New Users in React with AWS Amplify Auth Class
❗ AWS Amplify is a framework in constant change and improvement. If you find something here that is outdated, or not working, please make sure you check the Official documentation to clear your doubts.
❗ This lesson is using React Class Components. you are free to use the Class syntax or change to use Function components, the core Auth methods will work in both escenarios with a slight different Syntax
- Even you use Class components or function components, here are the
Authmethods you need to perform Sign up, Sign in and Sign out operations - Styling is something you can tweak to match your overall app design, there is no restrictions around this impose by the Amplify framework
Sign up
import { Auth } from "aws-amplify"

async function signUp() {
  try {
    const { user } = await Auth.signUp({
      username,
      password,
      attributes: {
        email, // optional
        phone_number, // optional - E.164 number convention
        // other custom attributes
      },
    })
    console.log(user)
  } catch (error) {
    console.log("error signing up:", error)
  }
}
the Auth.signUp method returns a Promise with a data object of type [ISignUpResult](https://github.com/aws-amplify/amplify-js/blob/4644b4322ee260165dd756ca9faeb235445000e3/packages/amazon-cognito-identity-js/index.d.ts#L136-L139) with a [CognitoUser](https://github.com/aws-amplify/amplify-js/blob/4644b4322ee260165dd756ca9faeb235445000e3/packages/amazon-cognito-identity-js/index.d.ts#L48)
{
  user: CognitoUser
  userConfirmed: boolean
  userSub: string
}
Confirm Sign up
- this is required if you enabled multi-factor auth
import { Auth } from "aws-amplify"

async function confirmSignUp() {
  try {
    await Auth.confirmSignUp(username, code)
  } catch (error) {
    console.log("error confirming sign up", error)
  }
}
- You can also pass custom attributes during the signup process like so:
Auth.signUp({
  username,
  password,
  attributes: {
    email,
    "custom:favorite_flavor": "Cookie Dough", // custom attribute, not standard
  },
})
From the Official docs:
Amazon Cognito does not dynamically create custom attributes on sign up. In order to use a custom attribute, the attribute must be first created in the user pool. To open the User Pool to create custom attributes using the Amplify ClI, run amplify console auth. If you are not using the Amplify CLI, you can view the user pool by visiting the AWS console and opening the Amazon Cognito dashboard.
Sign in
import { Auth } from "aws-amplify"

async function signIn() {
  try {
    const user = await Auth.signIn(username, password)
  } catch (error) {
    console.log("error signing in", error)
  }
}
Re-send confirmation code
import { Auth } from "aws-amplify"

async function resendConfirmationCode() {
  try {
    await Auth.resendSignUp(username)
    console.log("code resent successfully")
  } catch (err) {
    console.log("error resending code: ", err)
  }
}
Sign out
import { Auth } from "aws-amplify"

async function signOut() {
  try {
    await Auth.signOut()
  } catch (error) {
    console.log("error signing out: ", error)
  }
}
- You can even execute a Global sign-out to sign out the user from all its devices
import { Auth } from "aws-amplify"

async function signOut() {
  try {
    await Auth.signOut({ global: true }) // this is the main difference
  } catch (error) {
    console.log("error signing out: ", error)
  }
}
# Part 5
Create & Interact with an AWS AppSync GraphQL API with AWS Amplify
❗ AWS Amplify is a framework in constant change and improvement. If you find something here that is outdated, or not working, please make sure you check the Official documentation to clear your doubts.
AWS Amplify !== AWS AppSync
Appsync is the AWS service focus on creating flexible APIs, and Amplify is the framework that combines multiple AWS tools to help you build any type of Application.
Create a GraphQL API
amplify add api
Select the following options:
- Select GraphQL
- When asked if you have a schema, say No
- Select one of the default samples; you can change this later
- Choose to edit the schema and it will open the new
schema.graphqlin your editor
In this example, we are just adding a new property to our Todo model and save it:
type Todo @model {
  id: ID!
  name: String!
  description: String
  completed: Boolean # 👈🏼 You just need to add this property. the others should be there already
}
🤔 If you want to learn more about GraphQL, you can go to the official documentation! 👉🏼 https://graphql.org/learn/
- after you safe your new GraphQL schema, you can see in the command line that all the resources has been created locally. Now you are ready to push all of it to our AWS account with the command:
$ amplify push
- Now lets go to the AWS Console to interact with our newly created GraphQL API:

- Once you are there, you can search for your newly created GraphQL API, and click to view it
- If you click the
Schemasection, you will see the full generated schema - Now click in
Queriesto start making our first queries withing the AWS console GraphQL Inspector

- You have the API documentation available on the right side of the UI
![AWS Appsync API Documentation Panel]

- The documentations panel is interactive, you can go and click through all the Query and Mutation Definitions to check what is available to do with the API
"The
Schemais like a Restaurant menu, and aQueryis like your order"
- 🤔 The Interface that let you execute queries, and mutations to a GraphQL API is called GraphiQL. It's (in my personal opinion) one of the greatest features about GraphQL as a tool. It makes very easy to test, document and interact with your GraphQL API. Checkout more info here.
- AWS Appsync has it Built-in in the Console to make it more accessible and setup to your needs. (that's awesome!)

Let's start by creating our first mutation by typing the above code in the UI:
mutation create {
  createTodo(
    input: {
      name: "Get Groceries"
      description: "Go to wal-mart"
      completed: false
    }
  ) {
    id
    name
    description
    complete
  }
}
- To execute the mutation, you can either click in the orange play button, or press enter while the cursor is at any point of the mutation

You can repeat the above process with different info as much as you want (in the video Nader creates two todos)
Now lets go and create our First Query
query list {
  listTodos {
    items {
      id
      name
      description
      completed
    }
  }
}
- After you execute the query, you should see in the GraphiQL right side panel the result of the query, which is an array of all the available todos in the system.

- Now that we got some data, we can go and query the data from our React app!
- In
App.js, importAPIandgraphqlOperationfromaws-amplify
🤔 Remember that you need to Configure your React App in order to successfully connect your app with your AWS Amplify Services
import { API, graphqlOperation } from "aws-amplify"
- Now copy the listTodos query from the AWS AppSync console and paste it in the component like so:
const ListTodos = `
  query {
    listTodos {
      items {
        id name description completed
      }
    }
  }
`
- and last lets glue all together in React
❗ the example above is using Functional components, not Class components
import React from 'react'
import { API, graphqlOperation } from "aws-amplify"

const ListTodos = `
  query {
    listTodos {
      items {
        id name description completed
      }
    }
  }
`

export default function App() {
  const [todos, setTodos] = React.useState([]) // important to initialize your state with an empty array!

  React.useEffect(() => {
    async function getTodos() {
      const todoData = await API.graphql(graphqlOperation(ListTodos)) // fetch the list of Todos from your graphQL API
      setTodos(toData.data.listTodos.items) // set the result from your query to your local state
    }

    getTodos() // Async functions are not permitted as `useEffect` functions parameters. that's why I created another async function inside of it instead
  }, [])

  return (
    <div className="App">
      <header className="App-header">
        <img src={logo} className="App-logo" alt="logo" />
        <h1 className="App-title">Welcome to React</h1>
      </header>
      {
        todos.map((todo, i)) => (
          <div>
            <h3>{todo.name}</h3>
            <p>{todo.description}</p>
          </div>
        ))
      }
    </div>
  );
}
- when this is ready, you can go to your command line and run
npm startoryarn startand see the result in the browser (http://localhost:3000/)

Part 6
Create & Interact with a Serverless REST API with AWS Lambda from React
❗ AWS Amplify is a framework in constant change and improvement. If you find something here that is outdated, or not working, please make sure you check the Official documentation to clear your doubts.
AWS Amplify !== AWS AppSync
Appsync is the AWS service focus on creating flexible APIs, and Amplify is the framework that combines multiple AWS tools to help you build any type of Application.
Create a REST API
amplify add api
Select the following options:
? Please select from one of the below mentioned services: REST
? Provide a friendly name for your resource to be used as a label for this category in the project: peopleapi
? Provide a path (e.g., /items): /people (or whatever path you would like)
? Choose a Lambda source: Create a new Lambda function
? Provide a friendly name for your resource to be used as a label for this category in the project: peoplefunction
? Provide the AWS Lambda function name: peoplefunction
? Choose the function runtime that you want to use: NodeJS
? Choose the function template that you want to use: Serverless express function
? Do you want to access other resources created in this project from your Lambda function? y
- This should open your new Lambda function file to start editing (
/amplify/backend/function/peoplefunction/src/app.js) - Now go and replace the generated code on
app.get('/people', ...)with the above code
app.get('/people', function (req, res) {
  const people = [
    {name: "Nader". hair_color: 'brown'},
    {name: "Lilly". hair_color: 'black'},
    {name: "Victor". hair_color: 'blonde'}
  ]

  res.json({
    people
  })
});
- Save this file and go back to the command line and continue with the prompt questions
? Do you want to invoke this function on a recurring schedule? N
? Do you want to edit the local lambda function now? N
? Restrict API access: Y
? Who should have access? (Use arrow key)
❯ Authenticated users only
  Authenticated and Gest users
? What kind of access do you eant for Authenticated users (Use arrow key)
❯ read
  write
  read/write
? Do you want to add another path? N
- With the configuration setup, now you need to push it to your AWS Account with
amplify push - When this is finished, lets jump to
App.js
🤔 Remember that you need to Configure your React App in order to successfully connect your app with your AWS Amplify Services
import { API } from "aws-amplify"
- and last lets glue all together in React
❗ the example above is using Functional components, not Class components
import React from "react"
import { withAuthenticator } from "@aws-amplify/ui-react"
import { API } from "aws-amplify"

function App() {
  const [people, setPeople] = React.useState([]) // important to initialize your state with an empty array!

  React.useEffect(() => {
    async getPeople() {
    const data = await API.get('peopleapi', '/people')
    setPeople(data.people)
    }

    getPeople() // Async functions are not permitted as `useEffect` functions parameters. that's why I created another async function inside of it instead
  }, [])

  return (
    <div className="App">
    <header className="App-header">
        <img src={logo} className="App-logo" alt="logo" />
        <h1 className="App-title">Welcome to React</h1>
    </header>
    {
      people((person, i)) => (
        <div>
          <h3>{ perosn.name }</h3>
          <p>{ person.hair_color }</p>
        </div>
      ))
    }
    </div>
  );
}

export default withAuthenticator(App)
- when this is ready, you can go to your command line and run
npm startoryarn startand see the result in the browser (http://localhost:3000/)

- Now go one level further, and query data from another API and return it through our own API
- install
axiosas a dependency off your lambda function code, you should navigate to the function's package project and install it as below
cd amplify/backend/function/peoplefunction/src
yarn add axios
now open your Lambda function code (/amplify/backend/function/peoplefunction/src/app.js) and updated with the code below
var axios = require("axios")

app.get("/people", function (req, res) {
  // const people = [
  //   {name: "Nader". hair_color: 'brown'},
  //   {name: "Lilly". hair_color: 'black'},
  //   {name: "Victor". hair_color: 'blonde'}
  // ]

  axios
    .get(`https://swapi.co/api/people/`)
    .then((response) => {
      const people = response.data.results
      res.json({
        people,
        error: null,
      })
    })
    .catch((err) => {
      res.json({
        error: err,
        people: null,
      })
    })
})
- save the file and go back to the command line
- With the Lambda function updated, you need to push it to your AWS Account again with the command
amplify push(You should see theFunctionresource with the operation set toUpdate) - when this is ready, you can go to your command line and run
npm startoryarn startand see the result in the browser (http://localhost:3000/) - When the app loads, we should now see the data being returned from the Star Wars API.

Part 7
Store Data in Amazon S3 with React
❗ AWS Amplify is a framework in constant change and improvement. If you find something here that is outdated, or not working, please make sure you check the Official documentation to clear your doubts.
What the freak is S3??
- from the official docs:
AWS Amplify Storage module provides a simple mechanism for managing user content for your app in public, protected or private storage buckets. The Storage category comes with built-in support for Amazon S3.
- to get started with adding storage to our app, lets go to the command line and type:
amplify add storage

? Please select from one of the below mentioned services (Use arrow keys)
❯ Content (Images, audio, video, etc.)
  NoSQL Database
? Please provide a friendly name for your resource that will be used to lael this category in the project: <YOUR_PREFERED_NAME>
? Please provide a bucket name: <YOUR_PREFERED_NAME>
? Who should have access: (Use arrow key)
❯ Auth users only
  Auth and Guest users
? What kind of access do you want for Authenticated users (Use arrow key)
  read
  write
❯ read/write
- With the configuration setup, now you need to push it to your AWS Account with
amplify push - When this is finished, lets jump to
App.js
🤔 Remember that you need to Configure your React App in order to successfully connect your app with your AWS Amplify Services
❗ the example above is using Functional components, not Class components
import React from "react"
import logo from "./logo.svg"
import "./App.css"
import { withAuthenticator } from "@aws-amplify/ui-react"
import { Storage } from "aws-amplify"

function App() {
  const [media, setMedia] = React.useState({})

  function handleChange(e) {
    const file = e.target.files[0]
    setMedia({
      fileUrl: URL.createObjectURL(file),
      file,
      filename: file.name,
    })
  }

  async function saveFile() {
    Storage.put(media.filename, media.file)
      .then(() => {
        console.log("successfully uploading file!")
        setMedia({})
      })
      .catch((err) => {
        console.log("error uploading file!", err)
      })
  }

  return (
    <div className="App">
      <header className="App-header">
        <img src={logo} className="App-logo" alt="logo" />
        <h1 className="App-title">Welcome to React</h1>
      </header>
      <input type="file" onChange={handleChange} />
      <img src={media.fileUrl} />
      <button onClick={saveFile}>Save File</button>
    </div>
  )
}

export default withAuthenticator(App)
- when this is ready, you can go to your command line and run
npm startoryarn startand see the result in the browser (http://localhost:3000/) - When you add a file and save it, you should be able to see the successful message in the console

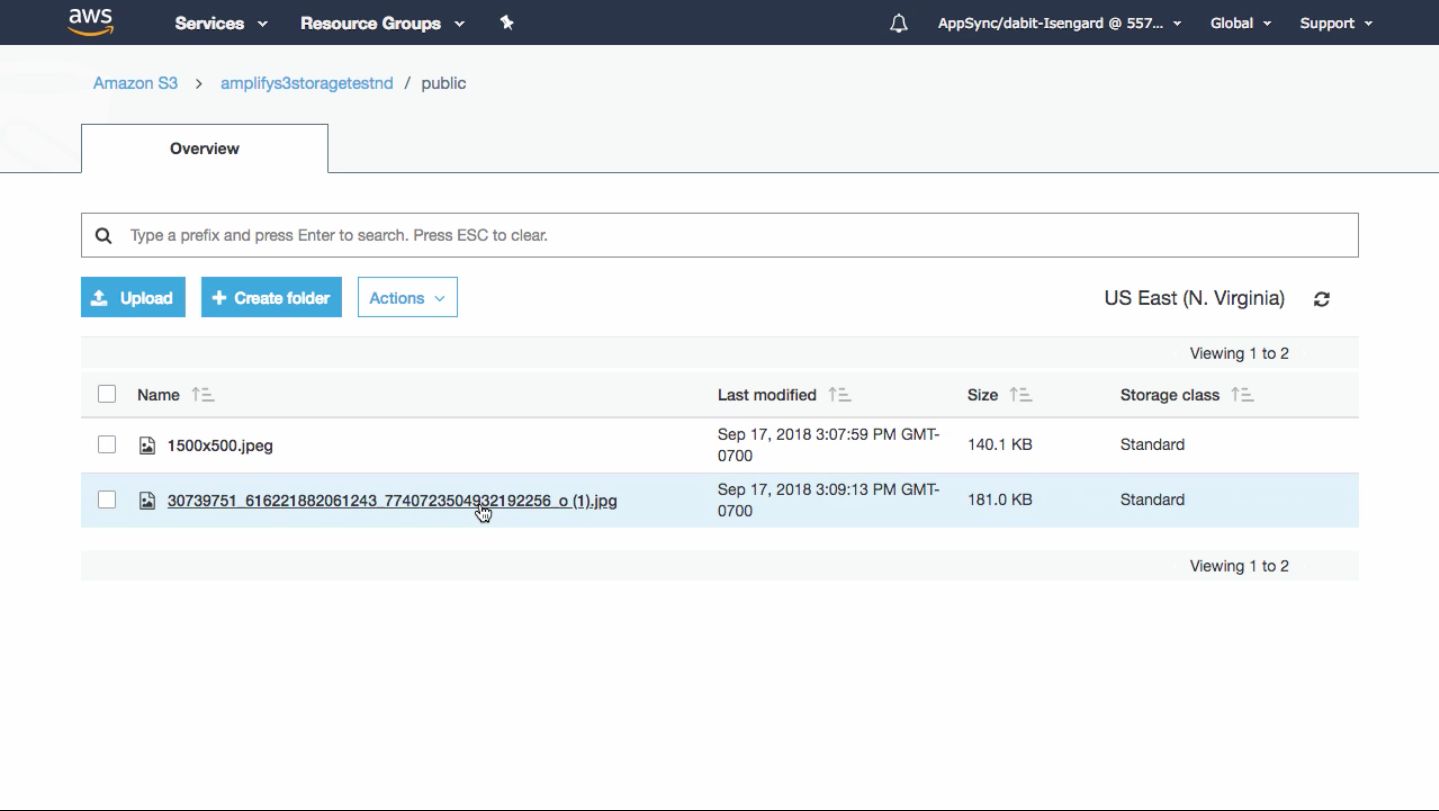
- The file should be in the bucket you just create it in your AWS Amazon account. You can search for it in the AWS Console
![AWS Console Bucket public folder]https://res.cloudinary.com/hanii/image/upload/v1665366417/p10_e4wez4.jpg)
- Copy one of the file's names to your clipboard, and go back to the
App.jsfile. Lets see how we can retrieve a file from our bucket - Lets update our code to the above:
import React from "react"
import logo from "./logo.svg"
import "./App.css"
import { withAuthenticator } from "@aws-amplify/ui-react"
import { Storage } from "aws-amplify"

function App() {
  const [fileUrl, setFileUrl] = React.useState("")

  React.useEffect(() => {
    Storage.get("IMAGE_URL_YOU_COPIED")
      .then((data) => {
        setFileUrl(data)
      })
      .catch((err) => {
        console.log("error fetching image")
      })
  }, [])

  return (
    <div className="App">
      <header className="App-header">
        <img src={logo} className="App-logo" alt="logo" />
        <h1 className="App-title">Welcome to React</h1>
      </header>
      <img src={fileUrl} />
    </div>
  )
}

export default withAuthenticator(App)
when this is ready, you can go to your command line and run
npm startoryarn startand see the result in the browser (http://localhost:3000/)-
amplify add storage
- content
- change name
- use bucket name (unique)
- auth users only
- read/write
amplify push
in App.js add an input handler (follow the guide)
open the bucket
-
update the app to get files?
- maybe check the guides and see what is up to date
Final Part
Deploy Your React Application to AWS Using the Amplify CLI
❗ AWS Amplify is a framework in constant change and improvement. If you find something here that is outdated, or not working, please make sure you check the Official documentation to clear your doubts.
It's time to publish our app!! 🎉
- From teh official docs:
Deploy and host your app using either Amplify Console or Amazon CloudFront/S3. The Amplify Console offers fully managed hosting with features such as instant cache invalidation and atomic deploys. For more control with setting up a CDN and hosting buckets, use CloudFront and S3.
amplify add hosting
? Select the environment setup: (Use arrow key)
❯ DEV (S3 only with HTTP)
  PROD (S3 with CloudFront using HTTPS)
? hosting bucket name
? index doc of the website `index.html`
? error doc of the website `index.html`
- when this is ready, you can go to your command line and run
amplify publishto deploy our new setup - Your app should launch in a new window!! 🎉


Top comments (0)