
Have you ever needed a server to deploy a web app, complete a lab or something else? I have had need to do both, and AWS always came through for me.
In this tutorial, you will learn how to set up and connect to your own AWS Linux EC2 instance to meet your needs for a server.
Let's go...
What is an EC2 Instance?
An Amazon EC2 instance is a virtual server in the AWS cloud. With the Amazon EC2 service, you can configure your instance to run operating system or applications of your choice.
Overview
When launching an instance, you have to secure it using security groups(which acts like a virtual firewall to control traffic to and from your instance) and key pairs(a proof of identity).
Here is an architectural diagram of what we will be setting up:

Prerequisites:
- An AWS account
- Create key pair and security group by following instructions found here
To avoid being billed unnecessarily, please ensure to terminate you instance when you complete this tutorial. Instructions for that are included in the last step here.
Step 1: Launch Your Instance
There are several ways to launch an EC2 instance, but in this tutorial, we will use the AWS console.
Here are the steps:
Open the EC2 console at AWS console link
From the dashboard, click on Launch instance

Next, enter a name for your server.
Under the Application and OS Images (Amazon Machine Image), select the "Quick Start" tab and select the Ubuntu image. This will be the OS for your instance.
Under the Amazon Machine Images(AMI) section, pick an option with the "free tier eligible" label for now.

Next, under Instance type, choose an option that has "free tier eligible" too. These instance types are hardware configurations for your server.
Under Key pair(login) choose a key pair you create before, or create one at this step.
Warning: If you launch your instance without a key pair, then you can't connect to it.

-
Next, we have to configure Network settings
- Choose "select existing security group"
- From the "Common security groups" dropdown, pick the security group you configured earlier from the Prerequisites section of this blog. If you didn't do that, go here.
In order to easily access your access your instance, check to see whether the "Auto-assign public ip" is enabled. If not, enable it to allow a public Ip to be associated with your instance when it is launched.

Keep the other default selections, review the configurations for your instance and confirm instance launch.
On the Instances screen, you could monitor the status of your instance. It may take some time for the instance to launch. Just wait until the state changes to "running."
Also wait for the Status check to pass before attempting to connect to it.
Step 2: Connect to Your Instance (via SSH)
You can't connect to your instance unless:
- You have the
.pemfile for the key pair you used to create the instance.
- Your security group is configured to allow you to connect via SSH from your computer.
...so ensure that you have these setup correctly.
- In the Instances page, select your instance and copy the Public IP address.

- Head over to your terminal and let's connect to our instance.
The syntax for connecting to the instance is:
$ ssh -i <path_to_pem_file> user@<Instance_public_ip>
In my case, it was:
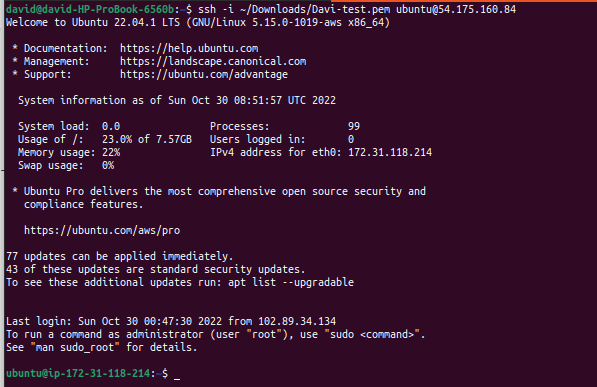
$ ssh -i ~/Downloads/Davi-test.pem ubuntu@54.175.160.84
Successful connection should look something like this:
If ssh complains about the key permission, ensure to change the permission of the .pem file to 400, using chmod. For example, by running:
sudo chmod 400 <path_to_pem_file>)
If you still can't connect to your instance, see Troubleshoot Connecting to Your Instance for assistance.
Step 3: Clean Up Your Instance
- Head over to your EC2 instances page and select the instance you just created.
- Click on the "Instance state" dropdown and select Terminate instance.
- Amazon will then shutdown and terminate your instance. You will no longer be able to connect to it after termination.
Conclusion
Congratulations! You just provisioned a server in the AWS cloud.
I hope you enjoyed the tutorial.
If you have any questions or had any difficulty following along, kindly drop a comment below or reached out to me on LinkedIn. Till we meet again...
Stay awesome!
~ David Omokhodion.


Top comments (0)