
Introduction
It can often be difficult to manage multiple machines on a daily basis. While Secure Shell (SSH) is a good choice for remote access, the protocol itself has some drawbacks in both convenience and security.
For instance, remote machines need to have a public IP address and a forwarded port in order to access them, which exposes them to the internet, or at least a larger network. This is especially concerning if you use a password for authentication instead of a public and private key pair. Furthermore, if you don’t know the remote machine’s public key in advance, you might be vulnerable to a "man-in-the-middle" attack. And many remote machines you want to access either don’t have public IP address, or they have a dynamic IP address you might not know.
In addition, SSH requires one connection per remote session. If a user needs to run a single command across hundreds or even thousands of machines, they must first establish a connection to each machine with a TCP handshake, which is less efficient.
NKN Shell, or nsh, is an alternative to SSH that provides a convenient and secure way to run remote commands. nsh takes advantage of NKN’s global public network which provides secure and decentralized data transmission. The architecture uses unique addresses that contain a public key used for both routing and end-to-end encryption without any public key infrastructure (PKI). The network also does not require the remote server to have a public IP address. The remote server only needs to have Internet access and be able to establish outbound HTTP and websocket connections. As a result, your remote machines are not exposed to the open Internet.
In this tutorial you will use the NKN shell daemon and the NKN Shell Client Xterm applications to execute commands on a remote machine. To do so, you will install and configure the NKN Shell daemon on a remote machine with internet access, generate a key pair, and make your connection from a client.
Prerequisites
To follow this tutorial you will need the following:
- One Ubuntu 18.04 server set up by following the Ubuntu 18.04 initial server setup guide, including a non-root
sudo-enabled user and a firewall. - A Web browser installed on your local machine.
Step 1 — Installing NKN Shell Daemon on a Remote Server
First, install the NKN shell daemon (nsd) on your server. This application will invoke nkn-multiclient, which will connect to NKN's public network and obtain an address for routing. The daemon will then listen for incoming shell commands from authenticated and whitelisted clients, execute those commands, and then send back results.
Start by downloading the latest pre-built nshd binary from GitHub:
wget https://github.com/nknorg/nkn-shell-daemon/releases/latest/download/linux-amd64.tar.gz
Decompress the file:
tar -zxvf linux-amd64.tar.gz
Then move the files into the /usr/local/bin directory so they are available system wide:
sudo mv ./linux-amd64/* /usr/local/bin/
Next, you'll configure this to run as a daemon process using Systemd so that it will restart if the server is reset.
Create a file called nshd.service in /etc/systemd/system:
sudo nano /etc/systemd/system/nshd.service
Add the following service definition to the file to configure the service:
[Unit]
Description=NKN Shell Daemon
After=network.target

[Service]
Type=simple
User=root
Group=root
Restart=always
ExecStart=/usr/local/bin/nshd

[Install]
WantedBy=multi-user.target
Learn more about Systemd unit files in Understanding Systemd Units and Unit Files.
Save the file and exit the editor. Then enable and start the nshd service with the following commands:
sudo systemctl enable nshd.service
sudo systemctl start nshd.service
Run the following command to ensure the service is active and started:
sudo systemctl status nshd.service
You'll see that the status is active:
● nshd.service - NKN Shell Daemon
   Loaded: loaded (/etc/systemd/system/nshd.service; enabled; vendor preset: enabled)
   Active: active (running) since Wed 2020-02-19 19:16:02 UTC; 7s ago
 Main PID: 3457 (nshd)
    Tasks: 10 (limit: 1152)
   CGroup: /system.slice/nshd.service
           └─3457 /usr/local/bin/nshd

Feb 19 19:16:02 your_hostname systemd[1]: Started NKN Shell Daemon.
Feb 19 19:16:03 your_hostname nshd[3457]: Create directory /etc/nshd/
Feb 19 19:16:03 your_hostname nshd[3457]: Create password and save to file /etc/nshd/wallet.pswd
Feb 19 19:16:03 your_hostname nshd[3457]: Create wallet and save to file /etc/nshd/wallet.json
Feb 19 19:16:03 your_hostname nshd[3457]: Create authorized pubkeys file /etc/nshd/authorized_pubkeys
Feb 19 19:16:03 your_hostname nshd[3457]: Listening at d46567b883a3070ee3fe879d9fa2d5dc55a95f79ff2797c42df36c6979e5c4Aba
In order to connect to your server, you'll need to get its NKN address, which you can find in the output of the previous command. You can also run the following command to obtain the address:
nshd addr
You'll see your address appear:
e70ca28ede84fc0659f2869255e8a393aef35b4fa5a7e036f29127c7dba75383
Take note of this address as you will need it to connect to your server.
Now that the daemon is running and listening, you can configure the web-based client to talk to the server.
Step 2 — Configuring Permissions for NKN Shell Client
You'll need a compatible client that can connect to the remote machine. In this tutorial you'll use NKN Shell Client Xterm, a web-based NKN shell client. There are a few different ways to run it:
- Use the hosted version at https://nsh.nkn.org/. Note that while this web page is hosted on a server, it’s actually a pure local web app that runs in your browser.
- Get the source code and host it yourself.
- Use the nShell Chrome extension.
In this tutorial you'll use the hosted version. On your local machine, open your web browser and navigate to https://nsh.nkn.org. You'll see a welcome screen:

Click Generate New Key Pair. Your keys will be generated and displayed as shown in the following image:
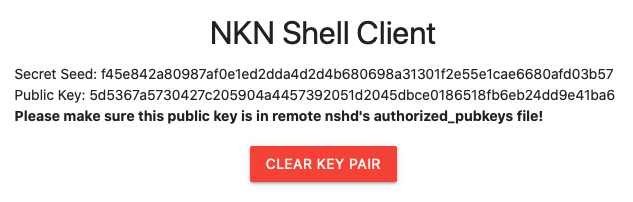
Note: When you generate a new key pair, you will see a Secret Seed. Keep this secret seed secure and safe, just like you would with your SSH private key. Anyone who has this secret seed can use it to regenerate your public key and then run commands on your remote machines. Your browser will remember this seed, but you should copy it somewhere safe so you can use it again on a new machine.
Save the Secret Seed somewhere safe. You can use it later to regenerate your public key so you can connect from a different client machine.
Since this is a new key pair, you must add the Public Key to the file /etc/nshd/authorized_pubkeys on your server.
/etc/nshd/authorized_pubkeys has a similar role as the ~/authorized_keys file which controls which SSH public keys can log in. The authorized_pubkeys file can specify which user is associated with a key. For security purposes, you'll want to log in using a non-root user in this tutorial, so you'll associate the generated public key with your sammy user you created in the Initial Server Setup guide in this article's prerequisite.
To associate a user with the public key, you'll need to get the user id (UID) and group id (GID) of this user. Execute the following command on your server while logged in as the sammy user:
id
You'll see the UID and GID of the user:
uid=1000(sammy) gid=1000(sammy) groups=1000(sammy),27(sudo)
Now open the authorized_pubkeys file in your editor:
sudo nano /etc/nshd/authorized_pubkeys
Add a single line containing the public key, uid, and gid, separated by spaces:
5d5367a5730427c205904a4457392051d2045dbce0186518fb6eb24dd9e41ba6 1000 1000
Save the file.
Verify that the file contains the correct content:
cat /etc/nshd/authorized_pubkeys
You'll see your key printed on the screen:
5d5367a5730427c205904a4457392051d2045dbce0186518fb6eb24dd9e41ba6 1000 1000
Then restart the nshd daemon to apply the changes:
sudo systemctl restart nshd.service
Now let's test it out by connecting to the server and running a command.
Step 3 — Sending a Command to the remote machine and receive a response
In NKN Shell Client, enter your remote nshd address from Step 1, as well as an optional client identifier:
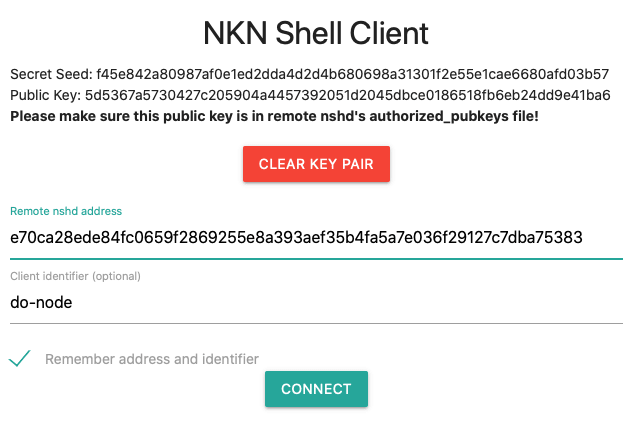
Click Connect to initiate the connection.
You'll be connected to your remote machine and shown a terminal prompt within the browser. From here you can use it just like SSH. For example, execute the following command to switch to the /etc/nshd directory:
cd /etc/nshd
Then list its contents:
ls
You'll see the contents of the directory:
authorized_pubkeys wallet.json wallet.pswd
You can disconnect by typing exit. When you need to reconnect, revisit the web interface and enter your connection details. If you generate a new key pair, you'll need to add the new public key to your server.
Conclusion
In this tutorial, you installed and configured nsh to securely and conveniently send commands to a remote machine. nsh is a great way to access your remote machines when you need to quickly run a command to get the latest status of a service or peek at some configuration settings. The application is based on NKN’s global public network, and it’s free to use so you can incorporate it into your own application or workflow today.
You can also explore nkn-tunnel which supports original SSH or any other TCP based applications.
The post was initially posted on DigitalOcean's blog: How To Use nsh to Run Secure Remote Commands On Ubuntu 18.04

Top comments (0)