
Moving a Linux installation from one machine to another is actually relatively easy to do, but there aren’t many articles online that walk through the whole process. Unlike some other operating systems (I’m looking at you Windows) Linux is by default fairly uncoupled from the hardware it is running on. That said, there are still a few gotchas that need to be watched out for, especially when it comes time to configure the bootloader. This post takes you through the whole process and assumes minimal Linux experience: if you’re comfortable with basic shell commands you should be able to follow along.
Since there are a lot of different reasons to want to clone a system we’ll be focusing on actually understanding what each step is doing so that you can adapt what I’ve described to your situation. While I’m assuming you’re using physical machines here, this procedure works just as well with VMs, whether run locally via something like VirtualBox or VMs provided by a cloud provider like Amazon AWS. If you find yourself needing to move from one cloud provider to another, you can adapt the steps in this guide to make that happen, just keep in mind that on a cloud VM it may be difficult to boot into a livecd so you will probably need to instead attach two hard drives to the VM–one with a fresh Ubuntu install that can act as your “livecd” and an empty one will be used as the restore target.
I’ve listed out the commands to clone a system with minimal explanation as a reference below. If you know your way around Linux you may be able to just run through these commands, adapting as needed to fit your situation. If you’d like more detail, keep reading and we’ll go over exactly what each command is doing (and why it’s needed) below.
-
Bind-mount the source drive to a new location so that we don’t end up in an infinite copy loop while copying
/dev/zero, etc.:mount --bind / /mnt/src -
tarup the source filesystem:tar -C /mnt/src -c . > source-fs.tarand copy the resulting
source-fs.taronto a USB drive or network share that you can access from the destination machine. On the dest machine boot from a live-cd (I used the Ubuntu install disc)
-
Partition the drive on the destination machine. The easiest way to do this is to use
gparted(included on the Ubuntu live-cd). How you partition will differ depending on whether you want to use MBR or EFI mode:MBR mode: just create one big ext4 partition on your target drive, and use use
gparted‘s ’Manage Flags’ right click menu to add thebootflagEFI mode: create one 200-500MB vfat/fat32 partition (use
gparted‘s ’Manage Flags’ right click menu to addbootandespflags), and create one ext4 partition in the remaining space. -
Once booted into the live-cd, mount your destination filesystem. I’m mounting mine at
~/dest.mount /dev/<some-disk> ~/dest -
Use
tarto extract your image onto the destination filesystem, (usingpvto provide a progress meter since this can take a while):pv < [image-file] | tar -C ~/dest -x -
chrootinto the newly extracted filesystemcd ~/dest for i in /dev /dev/pts /proc /sys /run; do sudo mount --bind $i .$i; done mkdir -p ./boot/efi # skip if using MBR mode sudo mount /dev/<your-efi-partition> ./boot/efi # skip if using MBR mode sudo chroot . -
Run
grub-installfrom inside the chroot:apt install grub-efi-amd64-bin # skip if using MBR mode grub-install /dev/<your-boot-drive> # use the whole drive (e.g. sda, not sda1)
Step 1: Bind mount the root filesystem
The first command we run is mount --bind / /mnt/src. In Linux-land filesystems are accessed by mounting them to a path (usually under /media or /mnt). Here we’re using something called a bind mount, which allows you to “bind” a mount point to another mount point. In other words, you can access the same folder at two locations. In this instance, we are telling the system to make the / folder available at /mnt/src as well. If you write a file to /test-file, you’ll see that it’s also available at /mnt/src/test-file.
Why is this needed you ask? Well, when a Linux system boots it creates some virtual filesystems that many Linux programs rely on. One of the more commonly used ones is the /dev folder, which is how Linux addresses the physical hardware installed in your system. The files in the /dev folder aren’t real files though, so it doesn’t make sense to copy them to another system–that system will have it’s own /dev that reflects it’s own hardware. More importantly for our current purposes, /dev also contains some special “files” such as /dev/zero, which returns an infinite amount of zeros, and it’ll take more time than any of us have to copy an infinite amount of zeros.
Bind mounting / to /mnt/src allows us to sidestep this issue: this system’s /dev will still exist at /dev, but you won’t find a corresponding /mnt/src/dev/zero folder, so copying from /mnt/src avoids starting an infinitely long copy process.
Step 2: tar up the source file system
Now that we’ve got the filesystem bind-mounted we can start preparing our image. All we really need to do here is save the contents of the root filesystem (excluding special filesystems such as /dev) into a tar archive:
tar -C /mnt/src -c . > source-fs.tar
The -C flag tells tar to change directories to /mnt/src, -c tells tar to use ‘create’ mode (as in, create a tar archive, not extract one) and the . tells it to do so in the current directory (which is now /mnt/src thanks to our -C flag). We then use shell redirection via the > sign to write the output to the file source-fs.tar. Make sure source-fs.tar is not on the same drive you are copying from or you may kick off another infinite loop!
NOTE: In this example I’m just writing the image to a file, but if you wanted you could also stream the filesystem directly to another machine over the network. The most common way to to this is to use
sshand a shell pipe like so:tar -C /mnt/src -c . | \ ssh <some-other-machine> 'tar -C <some-folder-on-the-other-machine> -x'This uses a shell pipe to send the output of
tarinto the ssh command, which takes care of setting up an encrypted connection to the other machine, and then runstar -C <some-folder-on-the-other-machine> -xon the other machine, connecting the stdin oftaron the remote machine to the stdout oftaron the sending machine.
Step 3: On the dest machine boot from a live-cd
On the destination machine (the machine we want to clone our system to), we need to boot into an operating system that is not running off of the system’s primary hard drive, so that we can write our cloned image into the new drive. I usually just grab the latest Ubuntu live-cd from Ubuntu’s website website and write it to a USB via Etcher or the dd command. Ubuntu provides directions on how to prepare an Ubuntu LiveUSB here.
If you don’t like Ubuntu any Linux livecd should work fine, just make sure it has a partitioning tool like gparted (gui) or fdisk (cli).
Step 4: Partition the drive on the destination machine
Here is where things start to get a little tricker. There are two common ways to boot a Linux system, MBR (an older method) or EFI (a newer method), and each have different partitioning requirements. If possible you’ll want to use EFI, but if you have an older machine that doesn’t support EFI mode you may need to use MBR. The easiest way to check if a machine supports EFI mode is to boot into the Ubuntu livecd and check if a directory called /sys/firmware/efi exists:
$ ls /sys/firmware
acpi  devicetree  dmi  efi  memmap
If there’s no efi folder in /sys/firmware then you’re on an MBR machine. If there is an efi folder present, then you’re on an EFI machine and we’ll need to create an EFI partition as well as a root partition.
From the Ubuntu livecd open a terminal and let’s fire up gparted on the drive we’re going to partition:
sudo gparted
Using the selector in the upper left, choose the drive you’re going to be restoring to. On my system this is /dev/nvme0n1, but depending on the hardware in you’re machine you may have a different designation such as /dev/sda.
Once you have your drive selected, choose Device -> Create Partition Table from the Device menu. You’ll be greeted with a scary looking screen like the following:
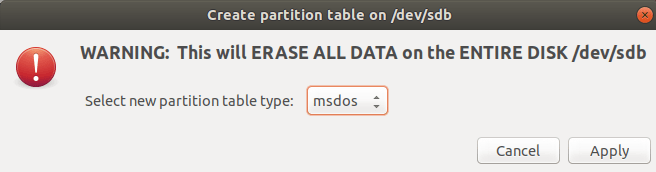
Make sure you have the right drive selected here, because, as the window above indicates, as soon as you hit apply gparted will proceed to erase everything on that drive.
Because the MBR approach is how MS-DOS historically loaded itself, some tools (including gparted) refer to MBR partition layouts as msdos. If your system is an MBR system, then leave that unchanged, otherwise select gpt from the list since GPT is the hard-drive layout that works with EFI. For the rest of this step, we will proceed with an EFI based install. If you’re doing an MBR install then you can skip the create EFI partition portion.
In the next screen we’ll need two create two partitions, one ~500MB EFI partition (this can be smaller if you need to save space, but things may break if you make it less than 200MB) and a second partition filling up the remainder of the drive. This second partition is the partition we will restore our clone into.
Let’s start by creating the EFI partition. Use the menus to choose Partition -> New, and in the screen that follows set the size to 500MB, and set the file system to fat32 which is the filesystem type EFI requires. Repeat the process for the second partition, but this time do not enter a size and choose ext4 for the filesystem type.
When you’re finished your partition layout should look similar to the below:

Go ahead and use the Edit -> Apply all Operations menu to write the new partition table. Once that’s completed we have to set some partition flags to make the drives properly bootable. To do this, right click on the first fat32 partition and choose ‘Manage Flags’. Click the checkmark next to boot (which may also automatically check the ‘esp’ flag) and hit Close.
Keep track of the device names (they will show in the Partition column with names that start with /dev/) as you will need them for the next step.
Step 5: Mount the destination filesystem
At this point our target system is prepared and we are ready to restore the image onto this machine. Before we can do anything with the new hard drive layout we need to mount it.
Boot back into the Ubuntu livecd if you’re not already in it, and open up a terminal window. We’ll first create a mount point (an empty directory) where we’ll mount the two drives. I’m using ~/efi and ~/dest
mkdir ~/efi
mkdir ~/dest
And then mount the drives to them. On my system the drive I was partitioning was /dev/sdb, so my EFI and data partitions are /dev/sdb1 and /dev/sdb2 respectively. Your system may assign different identifiers, make sure to use the names shown by gparted in the Partition column:
mount /dev/sdb1 ~/efi
mount /dev/sdb2 ~/dest
Step 6: Use tar to extract your image to the destination filesystem
Now that we have all our mount points set up, we can do the reverse of the image creation process from step 2 to duplicate our source machine’s filesystem onto the new machine. Since this can take a while I like to use a tool called pv (pv stands for pipe viewer) to provide a progress meter. You can install pv by doing sudo apt update && sudo apt install pv.
Once pv is installed, we can start the restore process. First, find a way to get the Ubuntu livecd access to the source image we created in Step 2. Most likely this means plugging a USB drive into the machine. Once you have access to the image file run the following command, replacing [image-file] with the path to your source tar file:
pv < [image-file] | tar -C ~/dest -x
The above command is saying to take the contents of [image-file] and send it to pv over stdin. pv reads the data from the file, prints out a nice progress meter, and then sends the data it’s reading to tar via a shell pipe (the | symbol). -C then tells tar to first change directories to ~/dest (where we mounted our destination partition in the previous step), and the -x tells tar to run in extract mode.
This may take a while, but when the process completes you will have completely restored all the files that originally lived on the source machine onto the new machine. Getting the files there is only half the battle however, we still need to tell Linux how to boot into this filesystem, which we’ll do in the next step.
Step 7: chroot into the newly extracted filesystem to install a bootloader
At this point we have all the files we need on the new system, but we need to make the new system bootable. The easiest way to do this is to piggyback off of the Ubuntu livecd’s kernel, and use the chroot command to make our current Linux installation (the Ubuntu livecd) pretend like it’s the installation we just copied over to the new machine.
For this to work we have to use our helpful friend mount --bind again to do the reverse of what we did in step 1. This time rather than avoiding copying these special filesystems, we instead want to give the chroot-ed installation temporary access to the special filesystems that our Ubuntu livecds created so that it can act as a functional Linux installation.
First, change directories to where the new installation is mounted (~/dest if you followed the example above):
cd ~/dest
Then we’ll use mount ---bind to give the chroot access to the linux special directories:
for i in /dev /dev/pts /proc /sys /run; do sudo mount --bind $i .$i; done
NOTE: We use a
forloop here to save ourselves some typing, but the above line is just telling the system to run the commandsudo mount --bind <input-dir> ./<input-dir>for each of the special directories listed between theinand the;. In other words, the single line above is equivalent to running the following:sudo mount --bind /dev ./dev sudo mount --bind /dev/pts ./dev/pts sudo mount --bind /proc ./proc sudo mount --bind /sys ./sys sudo mount --bind /run ./run
If installing in EFI mode we also need to give our chroot access to the EFI partition we mounted earlier. mount --bind comes to the rescue again here, we simply bind mount the livecd mount point into the /boot/efi directory inside the chroot (/boot/efi is where grub expects to find the EFI partition).
cd ~/dest
mkdir -p boot/efi
mount --bind ~/efi boot/efi
Now that we have access to the Linux special folders (and the EFI partition), we can use the chroot command to actually use our source installation:
sudo chroot ~/dest
At this point you should have a shell inside the same Linux environment you originally copied. Try running some programs or looking at some files that came from your old machine. GUI programs may not work properly, but other then that you should have a fully functional copy of your old installation. Booting into an Ubuntu livecd and running the above chroot commands every time you want to use this machine is not very practical though, so in the next step we’ll install the grub bootloader to make it into a full-fledged bootable Linux installation.
Step 8: Run grub-install from inside the chroot
Grub is the most common Linux bootloader and is what we’ll use here. Grub has an MBR flavor and an EFI flavor. If the machine you cloned from was running Ubuntu it most likely already has grub installed, but may not have the EFI version of grub installed. Run the following to install the EFI version (feel free to skip if you’re doing an MBR clone):
apt install grub-efi-amd64-bin # skip if using MBR mode
If your source distro is not Ubuntu based make sure to fully install grub via your distro’s package manager first.
Once you have grub fully installed then you just need to run grub-install against the drive you installed to. In my case that’s /dev/sdb, but this may be different on your machine. If unsure fire up gparted as we did in Step 4 and check the names listed in the partition column there.
Next we install grub to our drive, thereby making it bootable. Be careful to install grub to a drive and not to a partition. Partitions will usually have a number on the end while a drive will usually end with a letter (e.g. /dev/sdb, not /dev/sdb1).
grub-install /dev/sdb
update-grub
If all went well you will see messages saying grub was successfully installed. When you see this feel free to reboot and check out your freshly cloned installation.
If you got error messages and are installing in EFI mode it’s possible grub tried to use MBR mode. It might be worth a try running grub-install this way to force EFI mode:
grub-install --target=x86_64-efi
Wrapping up
That’s it, at this point you should have a fully operational clone of your original system, and hopefully also have a solid understanding of each step in the clone process and why it’s needed. Once you realize that a Linux installation is really just a filesystem and a mechanism for booting it, tools like Docker start to make a bit more sense: a docker image is basically just fancy version of the tar image we created here, with some changes to handle docker layers and make the image files easier to distribute.
In fact, just as we were able to “run” the system we installed via chroot before we actually made it bootable, you can convert the tar image we created into a docker container quite easily:
docker import [image-file]
99% of the time you’re better off just using a Dockerfile and docker’s own tooling to build your images, but if you need a quick and dirty way to “dockerize” an existing server you could do this without even having to shut down the existing server!
Similarly, the docker export command can export a tarball like the one we created for any docker image. Once you extract it you could use the same mount --bind and chroot dance we did above to get a shell inside the “container.” If you wanted to get a bit crazy, you could even use the steps from this guide to restore a tarball exported from a docker image onto a physical machine and run it on bare metal. In real life this won’t work with many/most docker images because (for space conservation reasons) many docker images strip out some of the files needed to support physical booting, so you may be asking for trouble if you try this in real life.

Top comments (0)