Originally published on my blog
TL;DR
In this post, I'm going to show you step by step how to build a Cordova plugin for Android that shows a native Toast popup.
You can check out the source code of the plugin here and the source of the demo Ionic app that's using this plugin here.
In case you're looking for the guide on how to write the Cordova plugin for the iOS platform, I wrote about it here.
plugin.xml
We start the process of plugin building by creating the plugin.xml file:
<?xml version='1.0' encoding='utf-8'?>
<plugin id="cordova-android-toast" version="1.0.0" xmlns="http://apache.org/cordova/ns/plugins/1.0" xmlns:android="http://schemas.android.com/apk/res/android">
    <name>AndroidToast</name>

    <description>Android Toast Plugin</description>
    <license>Apache 2.0</license>
    <keywords>android, toast</keywords>

    <engines>
      <engine name="cordova" version=">=3.0.0" />
    </engines>

    <js-module name="AndroidToast" src="www/AndroidToast.js">
        <clobbers target="AndroidToast" />
    </js-module>

    <platform name="android">
        <config-file target="config.xml" parent="/*">
            <feature name="AndroidToast">
                <param name="android-package" value="com.nikolabreznjak.AndroidToast" />
            </feature>
        </config-file>

        <source-file src="src/android/AndroidToast.java" target-dir="src/com/nikola-breznjak/android-toast" />
    </platform>
</plugin>
In this file you basically define:
- the platform this plugin supports (
<platform name="android">) - where the source files of your plugin will be (
source-fileelements) - where is the JavaScript file that will be the bridge from Cordova to native code (
js-moduletagsrcproperty) - what will be the plugin's name by which you'll reference it in the Cordova/Ionic code (
<clobbers target="AndroidToast" />)
www/AndroidToast.js
Next comes the so-called 'bridge' file that connects the native and JavaScript side. It is common to put this file in the www folder. The contents of this file is as follows:
var exec = cordova.require('cordova/exec');

var AndroidToast = function() {
    console.log('AndroidToast instanced');
};

AndroidToast.prototype.show = function(msg, onSuccess, onError) {
    var errorCallback = function(obj) {
        onError(obj);
    };

    var successCallback = function(obj) {
        onSuccess(obj);
    };

    exec(successCallback, errorCallback, 'AndroidToast', 'show', [msg]);
};

if (typeof module != 'undefined' && module.exports) {
    module.exports = AndroidToast;
}
We created the AndroidToast function, which in other programming languages would basically be a class, because we added the show function on its prototype. The show function, via Cordova's exec function, registers the success and error callbacks for the AndroidToast class and the show method on the native side that we'll show now shortly. Also, we pass in the msg variable as an array to the native show function.
src/android/AndroidToast.java
The 'native' code is written in Java:
package com.nikolabreznjak;

import org.apache.cordova.CordovaPlugin;
import org.apache.cordova.CallbackContext;
import org.json.JSONArray;
import org.json.JSONObject;
import org.json.JSONException;
import android.content.Context;
import android.widget.Toast;

public class AndroidToast extends CordovaPlugin {
    @Override
    public boolean execute(String action, JSONArray args, CallbackContext callbackContext) throws JSONException {
        if ("show".equals(action)) {
            show(args.getString(0), callbackContext);
            return true;
        }

        return false;
    }

    private void show(String msg, CallbackContext callbackContext) {
        if (msg == null || msg.length() == 0) {
            callbackContext.error("Empty message!");
        } else {
            Toast.makeText(webView.getContext(), msg, Toast.LENGTH_LONG).show();
            callbackContext.success(msg);
        }
    }
}
In the implementation file, we define our functions. We only have the show and execute functions in our example. When writing Cordova plugins for Android, every function from the bridge file has to call the exec function, which then calls the execute function on the native side. Then, based on the action parameter, we decide which function needs to be called. In our case, if we determine that the show action was called, we pass through the arguments to the private show function, which then uses the native Toast.makeText function to display the Toast message.
When displaying the Toast, our show method needs access to the app's global Context, which can be obtained using the webView object that we get from extending CordovaPlugin. This represents the running Cordova app, and we can get the global Context from there using: webView.getContext(). Other parameters to the makeText function define the text that we want to show and the duration of how long we want to show it.
At this point you could customize the toast as much as the native Toast component allows, there are no restrictions even though this is used via Cordova as a kind of a 'wrapper'. Some additional stuff that you could do is listed in the official documentation.
package.json
In earlier versions of Cordova, this file wasn't required. You can generate it automatically with the help of the plugman package (install it with npm install plugman -g in case you don't have it):
plugman createpackagejson /path/to/your/plugin.
If you're in the plugin folder, then the command is: plugman createpackagejson .. The package.json file in my case now looks like this:
{
    "name": "cordova-android-toast",
    "version": "1.0.0",
    "description": "Android Toast Plugin",
    "cordova": {
        "id": "cordova-android-toast",
        "platforms": [
            "android"
        ]
    },
    "keywords": [
        "android",
        "toast",
        "ecosystem:cordova",
        "cordova-android"
    ],
    "engines": [{
        "name": "cordova",
        "version": ">=3.0.0"
    }],
    "author": "Nikola Brežnjak<nikola.breznjak@gmail.com> (http://www.nikola-breznjak.com/blog)",
    "license": "Apache 2.0"
}
Using the plugin
First, you need to install it. If you're using Ionic:
ionic cordova plugin add cordova-android-toast
If you're using Cordova:
cordova plugin add cordova-android-toast
In the code, you would show the toast message like this:
constructor(platform: Platform, statusBar: StatusBar, splashScreen: SplashScreen) {
        platform.ready().then(() => {
            var androidToast = new AndroidToast();
            androidToast.show(
                'This is some nice toast popup!',
                function(msg) {
                    console.log(msg);
                },
                function(err) {
                    console.log(err);
                }
            );

        });
    }
If you're using the newest (currently 3) version of Ionic, then you would have to add this line: declare var AndroidToast: any; after the imports in app.component.ts (or any other file where you'll use the plugin) before actually using it. If you're using Ionic 1, you don't need to do this.
As a final note, make sure you're accessing the plugin after the platform.ready() fires, just so you make sure that the plugin is ready for use.
Running the demo locally
Clone this repo:
git clone https://github.com/Hitman666/cordova-android-toast.git
CD into the cloned project
cd cordova-android-toast
Install the dependencies:
npm install && bower install
Add the Android platform (please note that this process may take a while to complete):
ionic cordova platform add android
Add the plugin:
ionic cordova plugin add cordova-android-toast
Run the project on the device (if you have it connected):
ionic cordova run android
Run the project on the emulator:
ionic cordova emulate android
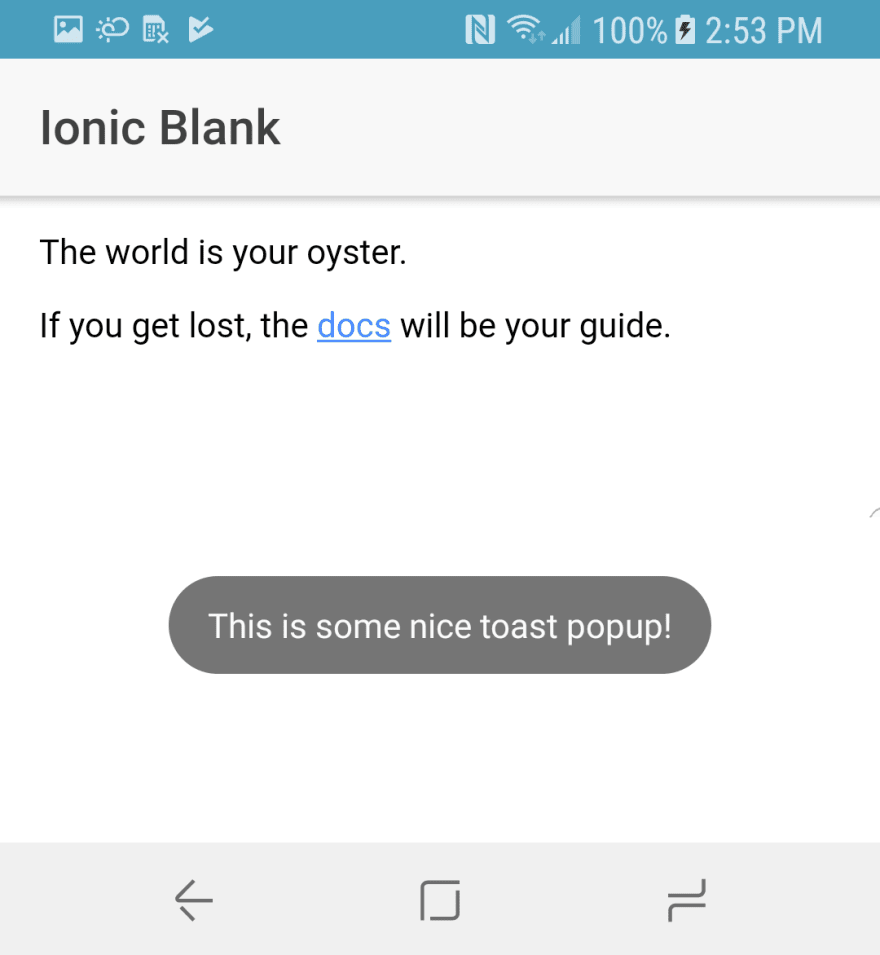
You should see something like this once the app runs on your device:
Conclusion
I hope this post gave you enough information so that you'll be dangerous enough to go and fiddle with the Android Cordova plugin building yourself 💪
If you have any questions, feel free to reach out.


Top comments (0)