
TL;DR
See a practical example of how to write and execute postman collections inside a Docker container. Source code https://github.com/NikiforovAll/testing-with-newman-demo.
Introduction
What is Automated Testing?
Tests are automated by creating test suites that can run again and again. Postman can be used to automate many types of tests including unit tests, functional tests, integration tests, end-to-end tests, regression tests, mock tests, etc. Automated testing prevents human error and streamlines testing.
Postman offers a comprehensive API testing tool that makes it easy to set up automated tests. Organizing your requests into Postman Collections enables you to run and automate a series of requests.
An Example
Let's say we want to start refactoring of some microservice called "Order Service". Before we start the refactoring we want to make sure that we don't break anything in the meantime. A very common migration strategy is to invest time into writing tests to lower the risk of regression bugs and migration errors. We will use postman and cover "Order Service" with automated API tests to ensure a successful migration.
In this example, "Order Service" is quite small and has one responsibility of order processing.
Use cases:
- As a user I want to be able to create orders so it is possible to buy goods for money
- As a user I want to close order
- As a user I expect order status to be completed when someone successfully pays for it.


public static class OrderApiRoutes
{
    public static WebApplication MapOrderApiRoutes(this WebApplication app)
    {
        app.MapPost("/orders/", CreateOrder);
        app.MapGet("/orders", GetOrders);
        app.MapGet("/orders/{id}", GetOrderById).WithName(nameof(GetOrderById));
        app.MapPut("/orders/{id}/cancel", CancelOrderById);

        return app;
    }

    private static async Task<IResult> CancelOrderById(ulong id, IMongoClient mongoClient)
    {
        var db = mongoClient.GetOrderCollection();
        var order = await db.Find(x => x.Id == id).FirstOrDefaultAsync();

        if(order is null)
        {
            return Results.NotFound();
        }
        order.Cancel();
        await db.ReplaceOneAsync(x => x.Id == id, order);

        return Results.NoContent();
    }

    private static async Task<Order> GetOrderById(ulong id, IMongoClient mongoClient)
    {
        var db = mongoClient.GetOrderCollection();

        return await db.Find(x => x.Id == id).FirstOrDefaultAsync();
    }

    private static async Task<IResult> CreateOrder(
        Order order, IMongoClient mongoClient, Generator idGenerator)
    {
        order = order with
        {
            Id = idGenerator.NextLong(),
            CreatedAt = DateTime.Now
        };

        var db = mongoClient.GetOrderCollection();

        await db.InsertOneAsync(order);

        return Results.CreatedAtRoute(nameof(GetOrderById), new { id = order.Id });
    }

    private static async Task<IEnumerable<Order>> GetOrders(IMongoClient mongoClient)
    {
        var db = mongoClient.GetOrderCollection();

        return await db.Find(x => true).ToListAsync();
    }
}
Please see source code for more details: https://github.com/NikiforovAll/testing-with-newman-demo
Writing requests
Personally, I'm a big fan of Postman because it has an intuitive UI that drastically improves your performance. I recommend you invest some time into learning it.
I will keep it straightforward and will show you how to create order in the system and then close it. Before we start sending HTTP requests we want to create "Postman Collection" and "Postman Environment".
- See: "Creating your first collection"
- Create "testing-with-newman" collection
- Add folder "main-flow"
- Create environment "testing-with-newman" and add
base-urlandrabbitmq-hostvariables. Select newly created environment on the top-right.
- Add "Create Order" request to the main-flow folder. As you can see, we want to send HTTP POST to
{base-url}/orderswith the JSON body. Now, we are ready to send the request and see how it works.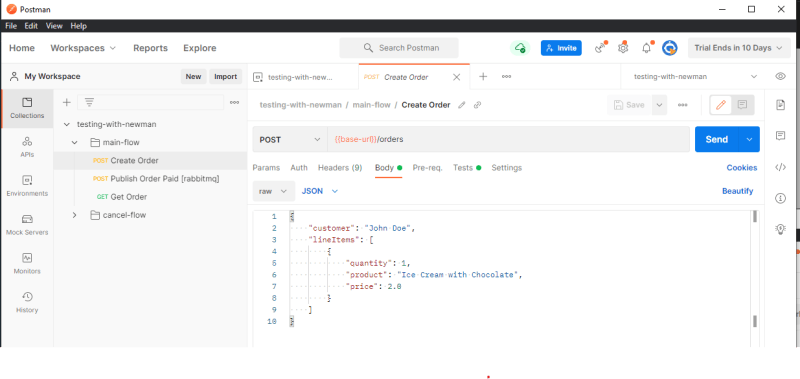
- Start the server
cd ./src/OrderService && dotnet runand send HTTP request through Postman UI. It looks like the order has been accepted and "201 CREATED" was returned. You can check the "Location" header to see the address of the created resource.
- Once we are comfortable with Postman and "Order Service" we can start writing "Postman Tests" to verify expected behavior. Tests are written based on JavaScript. Postman UI helps you to write tests by providing tons of examples, see the right sidebar. Down below, we make sure that the order request return status is 201 and the customer field contains "John Doe". As you can see, we also writing "orderId" into the environment variable to use it in the next requests.
pm.test("Status code is 201", function () {
    pm.response.to.have.status(201);
});

pm.sendRequest(pm.response.headers.get("Location"), function (err, res) {
    pm.test("Order created", function () {
        pm.expect(res.code).to.eql(200);
        pm.environment.set("orderId", res.json().id);
        pm.test("Order has customer", function () {
            pm.expect(res.json().customer).to.eql('John Doe');
        });
    });
});
Writing requests. Publish to RabbitMQ
Also, you can publish messages to RabbitMQ from Postman. It is possible because RabbitMQ exposes HTTP client that enables management. To publish a message, you need to specify an exchange in the URL {rabbitmq-host}/api/exchanges/%2F/amq.default/publish and provide the message as part of JSON body. Note %2F is the url-encoded default Virtual Host "/".
{
    "properties": {
        "content_type": "application/json"
    },
    "routing_key": "order-paid",
    "payload": "{\"orderId\": \"244165178826752\"}",
    "payload_encoding": "string"
}
Because publishing a message it is by nature async operation. All we can do at this point is to verify that it was routed (stored in a queue).
pm.test("Is Routed", function () {
    var jsonData = pm.response.json();
    pm.expect(jsonData.routed).to.eql(true);
});
Finally, we want to see that the order has been completed as the result of the previous operation, we do it by sending GET {base-url}/orders/{orderId} and running the tests:
pm.test("Status code is 200", function () {
    pm.response.to.have.status(200);
});

pm.test("Order is Completed", function () {
    pm.expect(pm.response.json().status).to.eql("Completed");
});
That was "main-flow". I suggest you check "cancel-flow" on your own. Let's see how to run Postman collections from CLI.
Running Postman Collections from CLI via newman
You can export collections and environments from Postman UI and use exported files locally. We are going to set up collection run inside docker-compose
Running postman collections inside Docker has many benefits:
- Easy to write integration tests. Testing allows you to learn how the system works. Huge productivity boost. Try it and you will like it.
- Short feedback cycle. You can use it during your inner developer-loop.
- Integration testing could be outsourced to a different team/people.
Here is docker-compose.postman.yml:
version: "3.4"
services:
  main-flow:
    image: postman/newman_alpine33
    command:
      run testing-with-newman.postman_collection.json
      --environment testing-with-newman.postman_environment.json
      --folder main-flow
      -r cli
      --delay-request 500
      --iteration-count 1
      --color on
    volumes:
      - ./tests/postman:/etc/newman
    networks:
      - newman-tests
  cancel-flow:
    image: postman/newman_alpine33
    command:
      run testing-with-newman.postman_collection.json
      --environment testing-with-newman.postman_environment.json
      --folder cancel-flow
      -r cli
      --iteration-count 1
      --color on
    volumes:
      - ./tests/postman:/etc/newman
    networks:
      - newman-tests

networks:
  newman-tests:
    external: true
    name: newman-tests
To run an e2e scenarios - execute
docker compose -f docker-compose.postman.yml up main-flow
docker compose -f docker-compose.postman.yml up cancel-flow


Running newman as part of the continuous integration process. GitHub Actions example
One of the greatest benefits of newman is that you can use it as part of your CI. Down below you can find GitHub corresponding workflow:
name: tests
on:
  push:

jobs:
  build:
    runs-on: ubuntu-latest
    steps:
      - uses: actions/checkout@v2
      - name: Setup network
        run: docker network create newman-tests
      - name: Build the docker-compose stack
        run: docker-compose -f docker-compose.override.yml -f docker-compose.yml up -d
      - name: Check running containers
        run: docker ps -a
      - name: Check logs
        run: docker-compose logs order-service
      - name: Run test suite main-flow
        run: docker-compose -f docker-compose.postman.yml up main-flow
      - name: Run test suite cancel-flow
        run: docker-compose -f docker-compose.postman.yml up cancel-flow
💡 Hint: to run github actions locally use https://github.com/nektos/act

Summary
Writing tests is what makes a good developer an excellent developer. In this blog post, we've covered how to set up integration tests as runnable postman collections inside Docker.

Top comments (0)