
Note - Unfortunately this no longer works due to movement in the WSL offering for Windows 11 Dev Channel. Am leaving this here incase some of the workarounds for issues below help others in their projects!
I needed to record a demo on a Mac, I don't own a Mac and was contemplating borrowing one from a friend. Then I realised, I finally had an excuse to give this a go! I've been itching to since I read - Accelerated KVM guests on WSL 2, an awesome write-up on how to run accelerated KVM guests on WSL2 from @unixterminal
This is a walkthrough of how I used the excellent work of @unixterminal and @FoxletFox and got my 3 year old XPS Intel i7 to run MacOS on Windows 10! Without their writeups and scripting this post probably wouldn't exist.
I am still stunned how good the performance is having run through this! I've tried a couple of other Linux distro's too, seriously slick.
Before starting check out the requirements from the top of the "Accelerated KVM guests on WSL2" post. One thing that's not obvious is your CPU needs to support virtualisation. Unless you're running an Intel CPU from the early 2000s or even earlier you should be OK. If your CPU does support virtualization it might not be enabled in your BIOS, it's worth a check before you start. If you're already running a hypervisor, it's likely this is good to go.
You'll also need to be running a windows insider build of Windows 10. The insiders Fast ring which is mentioned in the pre-requisites is now the Dev channel. One of the features required didn't come into Windows 10 until build 19619 and the nested virtualisation support for AMD didn't come in until build 19636 either, so that's a must if you are on AMD too. The windows insider page currently lists 19042.423 as the highest build available in Beta and 19041.423 as Release Preview, so for the moment this will not work correctly without using the Dev channel.
The insider channel renaming is described here. Dev channel is described as Ideal for highly technical users. Insiders in the Dev Channel will receive builds that is earliest in a development cycle and will contain the latest work-in-progress code from our engineers. These builds will have rough edges and some instability that could block key activities or require workarounds.
With this in mind, think twice about running the Dev channel on your main machine, or if you wouldn't consider yourself a highly technical user! If you're OK with that, dive right in :
- Follow the steps in "Accelerated KVM guests on WSL2" until you reach the section titled Important note about building a module in WSL: Time was fairly tight for getting this up and running, I wasn't going to be tweaking performance and I didn't want to keep loading the KVM for Intel module manually, so:

KVM for Intel processors was selected as above, note that the AMD selection is below it.
- Carry on from "Exit the Virtualization" paragraph until you get to this command:
kvm-ok
If you've followed the steps carefully and hit all the pre-reqs when you execute kvm-ok you should see:
INFO: /dev/kvm exists
KVM acceleration can be used
If not you are likely to see:
INFO: Your CPU does not support KVM extensions
KVM acceleration can NOT be used
If you are seeing the above you are definitely running a Windows 10 Dev channel, run back through the steps once more, you might have missed something.
- Check nested KVM is OK
If you're getting "KVM acceleration can be used" you can proceed with the steps in the post.
The next steps is:
cat /sys/module/kvm_intel/parameters/nested
When executing this command N was being returned. Having traced back through the steps it was time for a search which yielded an issue from the WSL github repo. So reverting back to the step Install your kernel in WSL 2 and enable nested KVM the .wslconfig was changed to:
nestedVirtualization=true
kernel=C:\\Users\\<username>\\bzImage
debugConsole=true
pageReporting=true
kernelCommandLine=intel_iommu=on iommu=pt kvm.ignore_msrs=1 kvm-intel.nested=1 kvm-intel.ept=1 kvm-intel.emulate_invalid_guest_state=0 kvm-intel.enable_shadow_vmcs=1 kvm-intel.enable_apicv=1
You'll need to restart WSL once more and check the command once more.
Note the command line args are almost identical to those added to kvm_intel.conf, I haven't investigated why the nested setting isn't picked up from the conf file.
Also note that setting debugConsole opens up the WSL debug console, you can turn this and pageReporting off later by removing them from the .wslconfig file and restarting WSL. I left it in for a while in case I needed to troubleshoot further.
The check for nested KVM now returned a Y as required:
cat /sys/module/kvm_intel/parameters/nested
Y
- Config X for WSL2.
Having run a far few X servers in the past I just wanted something that just worked without a lot of setup. Therefore, I went for X410 which is £9ish in the Microsoft store, but as I'm planning to use this until GUI support comes out later in the year, it was worth the price for the easy setup.
Install as normal in the store then add the environment variable in the steps to your .bashrc:
cd ~
nano .bashrc

Once nested KVM is up and running and you've configured WSL to send X output to windows, you are ready to try a distro. If you keep following the post at this point you'll set up an Ubuntu 20.10 daily build. I ran through this as a check to see if everything was working, the steps for this were exactly the same as in the post.
- Setup for MacOS VM
The MacOS-Simple-KVM GitHub repo is linked from the original post. It is described as "set up a simple macOS VM in QEMU, accelerated by KVM." If you ran through setting up the Ubuntu 20.10 daily build in step 4 you'll already have seen QEMU being mentioned. You might be thinking, why are there two types of virtualization technologies? The key part is in how KVM and QEMU differ, which is summed up nicely in this post. KVM uses the CPU virtualization extensions for Intel and AMD, and QEMU is performing the virtual hardware emulation, or to put it another way, KVM is QEMU's "go faster stripes"!
The steps were followed as listed but with the following tweaks. First clone the git repo in, make sure to use the linux filesystem as it is faster at the moment on wsl2 than windows (/mnt).
This walkthrough is using Ubuntu so it's the top line to install QEMU, Python and Pip if you haven't already got them:
sudo apt-get install qemu-system qemu-utils python3 python3-pip
Run jumpstart.sh to fetch the MacOS media of your choice:
./jumpstart.sh --mojave
I also went with Mojave.
Now create a hard disk, I went with 32GB, I wanted to try and go a little lower but on investigation I found some issues logged where less than 32GB looked to be creating issues for other users:
qemu-img create -f qcow2 MacOS.qcow2 32G
Note I've changed the name of my disk, by this point I had a few VM's setup so wanted to make it more obvious!
Edit basic.sh to add the VM disk into the VM :
    -drive id=SystemDisk,if=none,file=MacOS.qcow2 \
    -device ide-hd,bus=sata.4,drive=SystemDisk \
Now make sure the X server from step 4 is running as QEMU will try and use graphics mode by default. If it isn't running when you run basic.sh in this next step it'll have for a minute or so then fail:
./basic.sh
The VM boots but there are some errors:

The top section boxed in red is caused by the -cpu line in basic.sh. The standard settings in the basic.sh file are sending instructions around performance enhanced features to the host CPU which it cannot understand. The box in green are errors related to sound, I'm not so worried about those, and explain my sound related issues with Ubuntu above. You can edit basic.sh further to straighten these out, but the VM still booted with these errors present.
The VM boots to the Clover boot manager, where you can use your keyboard to hit return (no mouse at this point) and "Boot macOS Install from macOS Base System" will begin:

The macOS utilities screen is now displayed and you should have mouse support. If your mouse pointer is out of synchronisation with the one on the VM you will need to adjust the settings in the basic.sh file. Shut the VM down using the apple icon top left and edit basic.sh in nano once more:

The usb device line needs to be altered from usb-mouse to usb-tablet. Run basic.sh once more and your mouse should now align.

As mentioned in the steps from the macOS-Simple-KVM instructions, you need to partition the disk first. If you enter Disk Utility, find your QEMU HARDDISK from the left hand menu and Erase it and partition it.
You can now return back to the macOS Utilities menu and choose Reinstall macOS, from here it is the same as a standard reinstall, this does take quite a while! No further tweaks were required from this point on:

You can move in and out of fullscreen with ctrl+alt+backspace and remove the VM banner with "Machine View" at the top with ctrl+alt+F.
If you now leave your setup as-is with no further tweaks you will be sent into the Clover bootloader each time you reboot or run your VM:

I've got a few more options to choose from than you will have as I'd been playing around with things before I took this. The key thing is you need to use the arrow keys to choose "Boot macOS from macOS", this will boot your install and you are good to go!

Top comments (58)
Finally it's running ! Very, very slow as of now but still it runs:

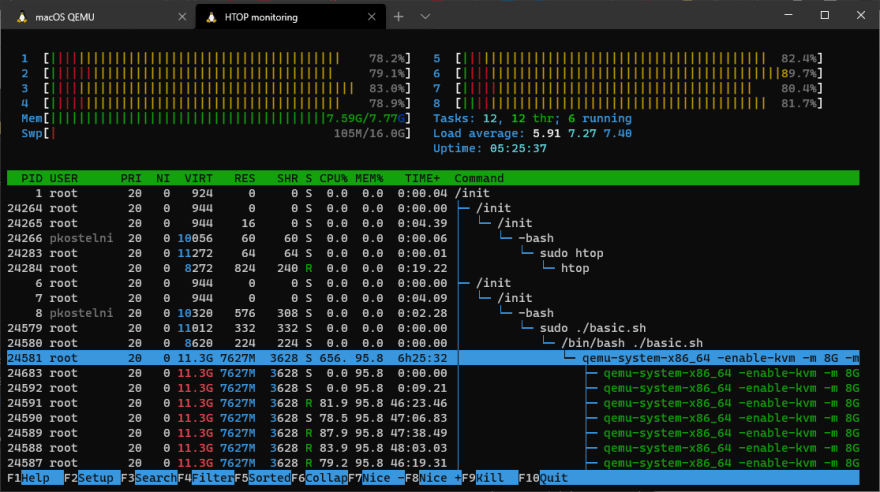
and here some Statistics from HTOP (inside the wsl2 Ubuntu 20.04):
And here are my Settings:
.wslconfig
and here the customized basic.sh:
next step: Speedup that thing!
love this :) many thanks for sharing.
Wish I had something running AMD to help in the hunt for speedup tweaks. Will contact a couple of local user groups in the case anyone has something going spare.
I was hoping to join in the optimization testing (3950X w/64GB RAM to play with) but so far I haven't made it past the first reboot when installing. It always stalls at:
"Initialized /dev/rdisk4 as a 10 MB case-insensitive HFS Plus volume".
@pkostelnik I'm using your wsl and basic files... can you share what you changed with the custom kernel?
Might be able to help there @pkostelnik didn't use a custom kernel, I think that's what is meant in the first comment, no special build
it does work with and without the Kernel. I build mine along the tutorial from: Hayden Barns but simply changed from KVM for Intel to KVM for AMD and build it. (not as module).

But it took a couple of hours (i belive) to install the MacOS in the box and also the boot takes about 15min and yes you are not really able to work with but for me it's quite the first step as an engineering sample not even a PoC that it will work. ;-)
After some checks, seems like kvm is installed but not working ... trying now with a custom kernel and KVM_AMD as module!
Edit:
@nicole and @ciparis it seems like KVM (not as Module) is enabled in the system but didn't used. That`s why the catalina is sooo slow.
just installed over night the insider 20211.1000 now it's a bit faster but still slow:


my ubuntu Ubuntu 20.04.1 LTS linux kernel:
Ok, next step/s tweaks. Reached up to maybe 30% speedup of the machine:
Mine is FINALLY working!
I ended up bailing on macOS-Simple-KVM (I could just never get past the first reboot). I tried everything -- new kernels, various options, nothing worked.
I found another, more complicated approach using OpenCore instead of Clover that ended up working out. Piling on extra RAM helped greatly with performance, as did using as many AMD processor flags as I could for KVM options. I'm pretty happy with where it ended up (using Catalina) but might try Mojave just to compare performance.
Thanks for this guide, Nicole! This post led me down a rabbit hole but it was a good one.
Great news! Many thanks for the update. That's interesting, am still trying to get my hands on an AMD machine to have a go at this.
@pkostelnik yeah dbus is a great shout, same IPC etc, did you check the performance gain after the full kernel compile or with both together?
@nicole Not really because there is only a slightly speedup between this changes maybe 10-15%
@ciparis would you mind to share your configuration please.
Here's the guide I followed:
github.com/kholia/OSX-KVM
I used the 2 networking lines from macOS-Simple-KVM rather than the method he listed, which did not work in WSL2. I've added a few more processor flags to my launch shell script (and changed the name for ease of typing) :
.wslconf borrowed and modified from yours (I'm pretty sure some of those AMD settings are non-functional) --note that the number of processors is inherited from the host and does not need listing here. When building my own kernel I had to use the 104 one -- the available 128 option failed to mount my C drive after building. I probably didn't need to go that route at all, since the current Insider dev build (20211.1005) has nested KVM support out of the box.
Launch script from this tutorial with my additions to the flags (I think svm is critical for AMD) and adjustments to RAM/Proc
It's possible (likely?) that I could trace my original installation-reboot issue by comparing the launch file with the one from macOS-simple-kvm.
That list of processor flags provide a big performance gain, but I'm not done yet. My next step is to place all of the AMD processor flags into the options line and then systematically remove the ones that cause errors -- this is similar to the process used for the huge long list of Intel flags at the bottom of the Accelerated KVM Guests post, and my performance with the graphical Ubuntu shell he walks through the installation of at the bottom is fantastic. Granted that's has a much lighter overhead then macOS.
@ciparis i'm sure there is also a huge difference with the vCPU which he uses for QEMU.
I also use the switch -deamonize to free the WSL console for htop and other monitoring.
Here's the list of every AMD CPU flag (from /proc/cpuinfo) that is accepted without error by QEMU:
Performance remains good; I should probably benchmark between this list and the previous one.
@pkostelnik What version of macOS are you using?
I just tried Mojave and it ran much slower than Catalina (the opposite of what I expected). For whatever reason, Catalina is faster on my Ryzen setup. Still laggy, but usable.
@ciparis trying actually both catalina (which started with clover) and also mojave, but trying now to change to opencore.
Just trying on my HP Pavillion Gaming 15-EC0002 (or so) with Windows 10 insider (DEV Channel).
AMD Ryzen 3750H Mobile
16GB and some SSD
got Clover to boot and also installed MacOS (Mojave) now.
just got to change some things from Intel to AMD.
As of today no special Kerlen were needed!
My .wslconfig:
System is slow but still rebuilding!


Edit: It seems like 4 or 6GB are too less for MacOS.. trying to tweak up that thing ;-)
Still installing, in the time between i tried to build a KVM Kernel but... not even one worked as expected so back to basic.
here the actual TOP from the same Distribution:
Hmm... always running on:
still stuck at the same stage ...
even with a rebuild kernel and 8GB + 4core/8Thread (Memory and CPU changed in .wslconfig and also in the basic.sh)
Many thanks for the update on the kernel and your .wslconfig file :)
Thanks for the note on memory too, I think I read something like that on a forum, 8GB was good, if I recall correctly. I just tried to find where I might have seen it but I can't sorry!
Well, I'm 90 minutes in, but it's unclear to me where jumpstart.sh and basic.sh come from. They're just used like they should be present, but from whence do they originate?
Thanks for any help!
No problem! This bit of text from the post :-
The MacOS-Simple-KVM GitHub repo is linked from the original post. It is described as "set up a simple macOS VM in QEMU, accelerated by KVM
Has a link on the "MacOS-Simple-KVM" words taking you to a GitHub repo.
I then start talking about QEMU, move past that and you'll see this paragraph :-
The steps were followed as listed but with the following tweaks. First clone the git repo in, make sure to use the linux filesystem as it is faster at the moment on wsl2 than windows (/mnt).
This might be where there's some confusion. Once you clone the GitHub repo linked to off of "MacOS-Simple-KVM" using your wsl session you need to cd into it. The files you mention are in there.
I hope that is clearer, if so I'll update the post accordingly :)
Thanks! I did go back and spot it but appreciate the prompt followup!
I'm trying this on an i7-4770K before making the leap on the Ryzen 3970X!
Sounds like a plan :) glad you spotted it!
Found it! It's the KVM Repro mentioned about half way through...
How did you get on, did you get it up and running?
I bought and installed the X server and got it as far as booting Clover and the original BaseImage.img, but it would hang a ways into the text boot at one of the meeting/rendezvous/sync points in startup. So close, but so far!
Appreciate the write-up! I may give it another shot on the AMD when it enters Beta... I've been waiting on AMD sub-virtualization just for WSL2 under HyperV for a while now!
Did you ever get it past hang after clover?
It's 3am, and my eyes are getting blury.
And THEN,
Using the config.plist that they provided ( and they admitted it needed work ) I spent a good hour getting it tweaked with:
opencore.slowgeek.com/
After that it was a matter of selecting which virtual "CPU" I wanted and I think I selected Skylake-Client?
mankier.com/7/qemu-cpu-models#Desc...
This list is to select what the cpu is that's being mimiced in the VM, and NOT what hardware model you have on your host machine.
Not to brag, but it's freaking Blazing fast now.
wow awesome if u have a guid/gist please share
Wow this post is so good, i spent a good chunk of time and was finally able to install catalina, updating it to BIGSUR as we speak.
I am new to kvm and unfortunately the qemu documentation is really crap.
May be someone can guide me:
1) how can i connect a usb device to the macos running
2) what is a nice setting for CPU, right now i just removed the thread option and added 6 cores, its not really fast but its ok
If you've followed this write up then your virtual disks should be in the folder so yes you can delete it and the bulk of the setup and used data is gone.
It's been a while since I tried this, been waiting for a new laptop so can check it out on Windows 11 but am sure had USB mouse and keyboard running and all was good. What's not working?
so If i am to insert my iphone, I cant connect the usb ports, I see that in WSL2 in general its not possible however some people have used usb over TCP to do that.
Secondly for some reason. once i installed everything and tried to restart the machine it doesnt start anymore :(
hey I found out the issue my cpu settings were incorrect :)
oh also how do u uninstall this just by deleting osx simple kvm folder?
Mid 2021 (fresh WSLg install on a new AMD system) I'm having some unusual trouble with this. Two things: 1) the VM can't connect to the Internet. The MacOS installer (Reinstall) actually requires a connection to get started. It says "Recovery server could not be contacted" in a message box and sends me back to the menu. (I.e. in the Network Utility there's no response to the Ping function. I feel like you guys would've spoken about network stuff more if you'd encountered this... or you all have something else set up that made this a nonissue.) and 2) the installer UI runs super fast. (I.e. keyboard input is nigh impossible and animations are 10 times faster than they ought to be. Shouldn't a VM have a virtual real-time clock?)
I'm sharing this here because I think anyone doing this now will encounter these troubles, and I've sunk a lot time into trying harebrained fixes (classic Linux-hole wasting-time pattern) to no avail. I've posted a question on Reddit that's gotten some up-votes already (UPDATE: my posts were yanked for "too little information" provided, so I can't recommend these Reddit forums) (reddit.com/r/bashonubuntuonwindows...) that includes a link to a more detailed post on r/hackintosh that looks like it's unlisted, IOW waiting for mod approval that may never come.
Hey Mick, many thanks for the update. I haven't had to set this up since the end of 2020, so it's been a few releases for me too. I'm wiping my current setup in a couple of weeks, will try this again then.
Do you think it’d be possible to enable gpu acceleration on OSX through WSL 2 gpu support?
Maybe in the future as soon as the GPU (let's talk about something like "passthrew") will get full support in WSL.
That’ll be a grand day.
Thanks so much for this write-up. I finally got to the installation step - Cataina is installing now. Appreciate all the follow-up you've done in the comments to help people get things working. I managed to make it to the install thanks to your guide plus comments of others, and I'm hoping to be running and testing MacOS before the night is out. Since my wife runs a Mac for her work, I need to learn a bit more about MacOS since I provide tech support. Your guide saves me needing my own Apple hardware, and with 2 kids starting college this year I can't express how much help that is.
So glad you found this useful !
It seems that the dev channel is locked into wanting to upgrade to windows 11. And I haven't found a way to get access to previous dev channel windows builds otherwise. It seems I need at least the old dev channel build 19619 iso to get past kvm-ok. My system is stuck on 19044, and doesn't support upgrading to windows 11 because of the TPM requirement. Thoughts?
Well, I decided to be bold and upgrade my bios and eventually upgrade to windows 11 build on the dev channel.
I have mojave installing now, although it says it will take 14 hours so that doesn't bode well. Guess I'll check it in a couple days and see what happens.
Thanks for the tutorial BTW. Was just was I was looking for to get started with this.
I had the same issues on the first reboot as MichaelF reported in his comment. So I tried the OSX-KVM he referenced and its working great! Installing Xcode 11.1 now and seeming like it will be completely usable for my purposes.
For reference, I'm on Windows 11 build 22504, Intel i7-6700, and running the Ubuntu 20.04 and Mojave vms using X410.
Thank for this article. I made to the point where QEMU runs with KVM (? probably) but whenever I try to boot Ubuntu or Windows install, I end up with a GSOD with HYPERVISOR_ERROR message.
I will try now with OSX-KVM to see if there is any difference. If not, I'll try different kernel versions.
I'm on Ryzen 3600.
EDIT: Tried OSX-KVM with 4.19.104 kernel and default build 21354 but still got GSOD with same error.
EDIT 2: Managed to boot up to the High Sierra installer but on shutting down GSOD HYPERVISOR_ERROR appeared. Setting kvm=off on the main file (OpenCore-Boot.sh) managed to reduce that error.
I will now try Catalina with various options including kvm=off and other tweaks to see if I can get rid of that error.
EDIT 3: Installing Catalina, no GSOD so far.
Nice writeup! I had recently installed macos on virtualbox using this repo github.com/myspaghetti/macos-virtu.... I was wondering, if running it through KVM improves any performance. Though, I have also installed macos on qemu on a Linux distro, and it is more performant than the virtualbox one. Have you ever tried the virtualbox solution?
Hey Piyush, I haven't tried the virtualbox solution, my understanding is KVM should give you an increase, but if you're working with really old hardware, there is a limit to what you can achieve. Your link has this section - github.com/myspaghetti/macos-virtu... which seems to suggest that this may be the case. Just to add, I love virtualbox as a goto for new users, so easy to manage :)