
Introduction
For products involving deliveries, ride-hailing, ecommerce, and logistics, it is important include an optimized last-mile delivery tracking experience. NextBillion.ai provides a set of mapping and location-based service APIs and SDKs that allow developers to easily integrate maps and last mile tracking into the product.
This blog was orginally published HERE
In this example, we will go through the steps to create a Swiggy like last mile delivery tracking experience with the NextBillion API and SDK using VueJS.
By the end of this tutorial you should be able to;
- Create a Map using NextBillion SDK in VueJS
- Add custom Markers on the NextBillion Map
- Get location address and discover locations using NextBillion API
- Use NextBillion Directions API to get and render directions for live order tracking.
Prerequisite
To follow this tutorial you must have
Basic understanding on Vue. VueJs Docs are a great place to start learning Vue.
NextBillion API host url and API key. Create a NextBillion account by visiting the Get API key page in NextBillion docs.
Setup
Now that we have NextBillion API host and API key, let us setup our Vue project with NextBillion SDK.
I’ll assume that as a foundation you have node.js installed on your system and you will use the node package manager (npm) to install the Vue CLI globally.
$ npm install -g vue
Create the default boilerplate project using Vue CLI in a directory where you want to manage your project.
1. npm init vue@latest
You will be prompted to add a project name and some project settings. Select the options as per your requirements. I will use nbai as my project name. After the project is created, change directory to the project, install dependencies and start the dev server.
1. npm install
2. npm run dev
Visit http://localhost:3000 from your browser and you should be able to see the default Vue application running.
Let us now add NextBillion SDK and some other dependencies to our project.
1. # NextBillion SDK
2. npm install nbmap-gl
3.
4. # TailwindCSS for styling.
5. npm install -D tailwindcss postcss autoprefixer
6.
7. # Fontawesome icons for map markers
8. npm i --save @fortawesome/fontawesome-svg-core
9. npm i --save @fortawesome/free-solid-svg-icons
10. npm i --save @fortawesome/free-regular-svg-icons
11. npm i --save @fortawesome/free-brands-svg-icons
Note: See TailwindCSS docs and FontAwesome docs for their respective setup documentation. You can use alternative styling and icon options as well.
Adding NextBillion SDK
Create a .env file with VITE_NEXTBILLION_API_KEY and VITE_NEXTBILLION_API_HOST values.
Now modify src/main.js file to integrate the NextBillion SDK.
1. javascript
2. import nextbillion from 'nbmap-gl'
3. nextbillion.setApiKey(import.meta.env.VITE_NEXTBILLION_API_KEY)
4. nextbillion.setApiHost(import.process.env.VITE_NEXTBILLION_API_HOST)
Now that our basic setup is complete, let’s start building.
Creating a Map Component
We will create a Vue Component (NBapiMAP) for our Map which will be responsible for:
- Rendering the map using NextBillion SDK.
- Given a geo-location, render Marker on the map.
- Given origin and destination, render directions for order tracking.
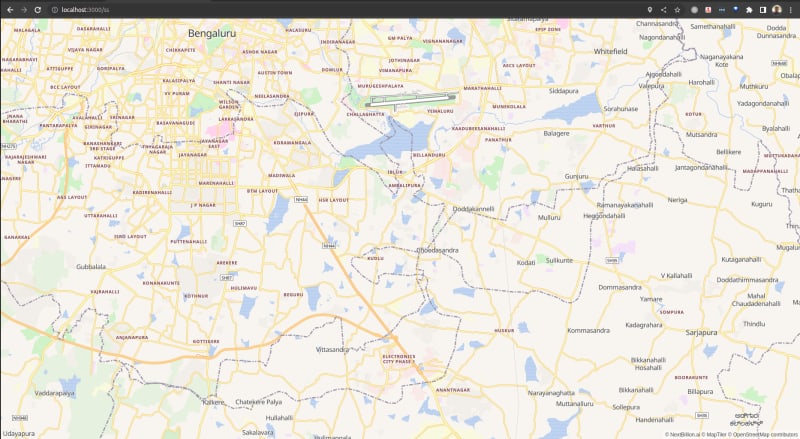
Displaying the Map
Lets start with simple component which renders the map using NextBillion SDK when mounted to the DOM.
1. <template>
2. <div class="map-container" id="map"></div>
3. </template>
4. <script>
5. import nextbillion from "nbmap-gl";
6. import { decodePolyline } from "nbmap-gl/src/maps/decoder";
7. export default {
8. name: "NBaiMap",
9. props: {
10. center: {
11.     lat: 28.6139,
12.     lng: 77.209,
13. },
14. zoom: Number,
15. }
16. data() {
17. return {
18.     map: null
19. }
20. },
21. methods: {
22.     mapClicked: function(event) {
23.     this.$emit("update-location", event.lngLat);
24. },
25. _renderMap: function () {
26.     this.map = new nextbillion.maps.Map(document.getElementById("map"), {
27.     zoom: this.zoom || 12,
28.     center: this.center,
29. });
30. }
31.     this.map.on("click", this.mapClicked)
32. },
33. mounted() {
34.     this._renderMap();
35. }
36. }
37. </script> <style lang="postcss" scoped>
38. /* The map container will expand to its parent's height and width*/
39. .map-container {
40. @apply w-full min-h-full;
41. }
42. </style>
This component takes two props center and zoom for rendering the map. Notice that we have added a click event handler to the map. The component will emit a custom event update-location with LatLng whenever the map is click. We can use this to set user or store locations.
Lets use the NBaiMap in another component to render the Map. Create a file src/views/MapPage.vue and add following content to it.
1. <template>
2. <div class="h-screen flex flex-col flex-1">
3. <div class="h-full flex flex-1 flex-grow">
4. <NBaiMap ref="map" v-if="haveLocation" :center="userLocation"></NBaiMap>
5. </div>
6. </div>
7. </template>
8. <script>
9. import NBaiMap from "@/components/NBaiMap.vue";
10. export default {
11. name: "MapPage",
12. components: {
13. NbaiMap,
14. },
15. data() {
16. return {
17. haveLocation: false,
18. userLocation: {
19.     lat: null,
20.     lng: null,
21. },
22. };
23. },
24. methods: {
25. geolocationSuccess: function (geolocation) {
26.     this.haveLocation = true;
27.     const { latitude, longitude } = geolocation.coords;
28.     this.userLocation.lat = latitude;
29.     this.userLocation.lng = longitude;
30. },
31. },
32. mounted() {
33.     if (window.navigator.geolocation) {
34.     window.navigator.geolocation.getCurrentPosition(this.geolocationSuccess);
35. }
36. },
37. };
This page gets user location from window.navigator.geolocation.getCurrentPosition browser API.
Adding Markers to the Map
Let us now add a method to render Marker with custom font-awesome icon.
1. ...
2. methods: {
3. // ...
4. _renderMarker: function (postion, icon) {
5. const marker = new nextbillion.maps.Marker({
6. position: position,
7. map: this.map,
8. });
9. // Change the icon if provided
10. if (icon !== null){
11. const markerElement = marker.getElement();
12. markerElement.style.backgroundImage = null;
13. markerElement.innerHTML = ``;
14. }
15. return marker;
16. },
17. // ...
18. }
19. ...
The method _renderMarker takes position (Object with lat and lng keys) and icon (font-awesome icon class) and renders the icon on given position.
Lets render default Markers on map click by listenting to update-location event from NBaiMap,
1. <template>
2. ...
3. <NBaiMap @update-location="renderMarker"></NBaiMap>
4. ...
5. </template>
6. <script>
7. //...
8. methods: {
9. renderMarker: function (event) {
10. this.$refs.map._renderMarker({lat: event.lat, lng: event.lng})
11. }
12. }
13. //...
14. </script>
Now click on the map and a marker should be rendered where you clicked.
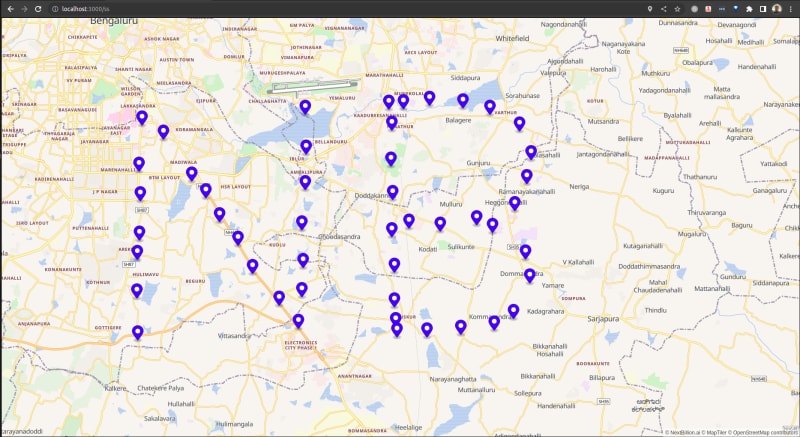
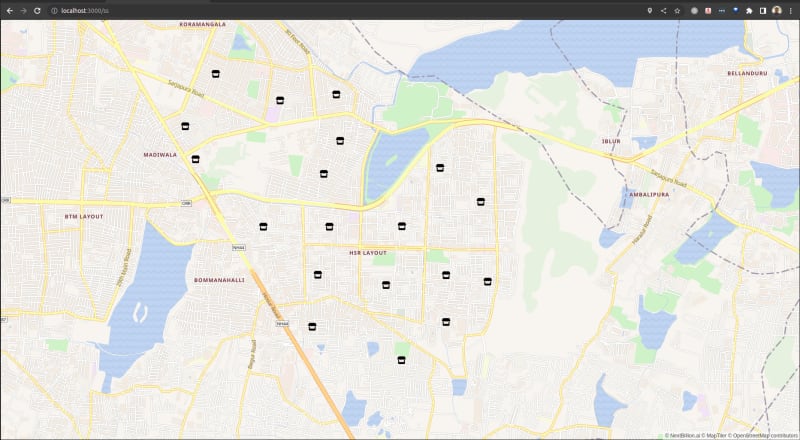
We can also render custom Markers by passing _renderMarker with font-awesome icon class as secondary argument. For example, let’s add multiple stores with fa-store icon.
this.$refs.map._renderMarker({lat: event.lat, lng: event.lng}, 'fa-store')
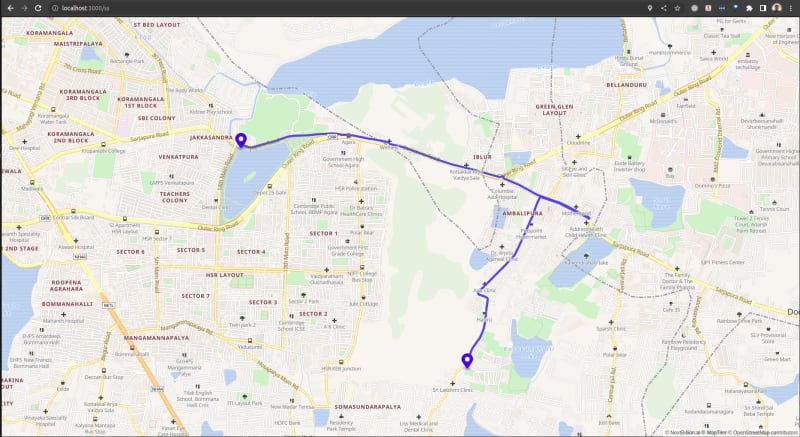
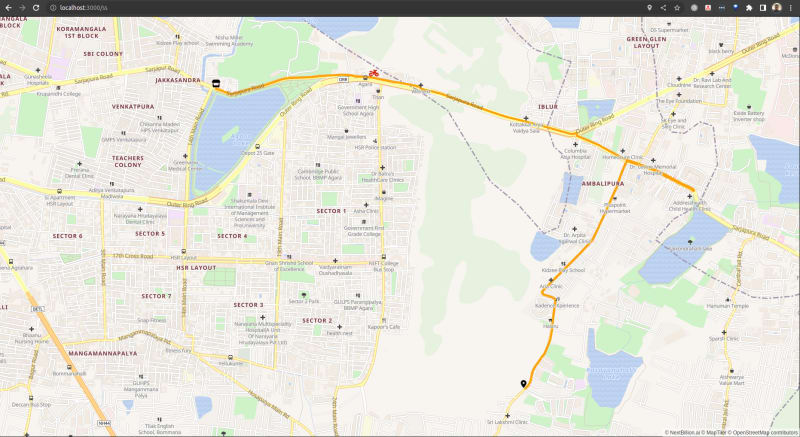
Fetching and displaying Directions
Add a method to render Directions given origin and destination coordinates. We will add a Polyline for route as we can use it to modify the strokeColor and strokeWidth of the route.
1. <script>
2. import { decodePolyline } from "nbmap-gl/src/maps/decoder";
3. //...
4. data() {
5. // ...
6. origin: null,
7. destination: null,
8. originMarker: null,
9. destinationMarker: null,
10. deliveryExecutiveMarker: null,
11. // ...
12. },
13. methods: {
14. _fitBounds: function (bounds, options) {
15. if (!options) {
16. options = {};
17. }
18. options.padding = 100;
19. this.map.map.fitBounds(bounds, options);
20. },
21. renderDirections: async function (origin, destination) {
22. const directions = await nextbillion.api.Directions({
23. origin,
24. destination,
25. steps: true,
26. });
27. const coords = decodePolyline(directions.routes[0].geometry, 5);
28. const path = [coords.map((item) => ({ lat: item[0], lng: item[1] }))];
29. new nextbillion.maps.Polyline({
30. path: path,
31. strokeWeight: 5,
32. map: this.map,
33. });
34. this.originMarker = this._renderMarker(origin);
35. this.destinationMarker = this._renderMarker(destination)
36. this._fitBounds([origin, destination], {});
37. this.origin = origin;
38. this.destination = destination;
39. this.$emit("update-path-duration", directions.routes[0].duration);
40. }
41. }
42. </script>
Let’s add some helper methods to our NBaiMap to add and remove custom origin, destination and live tracking Markers.
1. methods: {
2. // ...
3. _addOriginMarker: function (loc) {
4. if (this.originMarker === null) {
5. this.originMarker = this._renderMarker(loc, "fa-store");
6. }
7. },
8. _removeOriginMarker: function () {
9. if (this.originmarker !== null) {
10. this.originMarker.remove();
11. this.originMarker = null;
12. }
13. },
14. _addDestinationMarker: function (loc) {
15. if (this.destinationMarker === null) {
16. this.destinationmarker = this._renderMarker(loc, "fa-location-dot");
17. }
18. },
19. _removeDestinationMarker: function () {
20. if (this.destinationMarker !== null) {
21. this.destinationMarker.remove();
22. this.destinationMarker = null;
23. }
24. },
25. _addDeliveryMarker: function (loc) {
26. if (this.deliveryExecutiveMarker === null) {
27. this.deliveryExecutiveMarker = this._renderMarker(loc, "fa-moped");
28. }
29. },
30. _removeDeliveryMarker: function () {
31. if (this.deliveryExecutiveMarker !== null) {
32. this.deliveryExecutiveMarker.remove();
33. this.deliveryExecutiveMarker = null;
34. }
35. },
36. // ...
37. }
We can also change the route color by passing strokeColor: "#f59e0b" to nextbillion.maps.Polyline.
Add methods to move a marker. This will be used to move the live location marker and update the estimated delivery time.
1. methods: {
2.  // ...
3.  _moveMarker: function (markerRef, loc) {
4.  if (markerRef !== null) {
5.  markerRef.moveTo(loc);
6.  }
7.  },
8.  updateLiveLocation: function(loc) {
9.  this._moveMarker(this.deliveryExecutiveMarker, loc);
10.     const directions = await nextbillion.api.Directions({
11.     origin: loc,
12.     destination: this.destination,
13.     })
14.     this.$emit("update-path-duration", directions.routes[0].duration)
15.     }
16.     // ...
17.     }
You can see the complete component at github link.
Getting User and Store Location
Let us now use our NBaiMap component and create SetAddress component to get user and store location. I will use localStorage to save these locations. You would want to store these locations to your database using a backend server.
Add basic template and methods. Styles are removed for brevity.
1. <template>
2. <div class="h-screen flex flex-1 flex-col">
3. <div class="header">Set {{ addressKey }} Address</div>
4. <div class="address-controls-container">
5. <div v-if="!addressSet" class="search-container">
6. <div class="input z-index-50">
7. <input id="searchbox" class="input-box" v-model="q" />
8. <div class="suggestion-container" v-show="showSuggestions">
9. <div class="suggestion">
10. <div v-for="place in suggestions" :key="place" @click="flyToLocation(place)">{{ place.address.label }}</div>
11. </div>
12. </div>
13. </div>
14. <button class="search-btn" @click="discover">Search</button>
15. </div>
16. <div v-else class="flex my-auto">
17. <div class="selected-address">{{ address.address.label }}</div>
18. <button class="btn" @click="confirmLocation">Confirm</button>
19. <button class="btn" @click="resetLocation">Change</button>
20. </div>
21. </div>
22. <div class="">
23. <NBaiMap @update-location="setNewAddress" ref="map" :center="userLocation" :zoom="14"></NBaiMap>
24. </div>
25. </div>
26. </template>
1. <script>
2. import NBaiMap from "@/components/NbaiMap.vue";
3. export default {
4. name: "SetAddress",
5. components: {
6. NbaiMap,
7. },
8. props: {
9. addressKey: {
10. type: String,
11. default: "Home",
12. },
13. },
14. data() {
15. return {
16. q: "",
17. userLocation: {
18. lat: null,
19. lng: null
20. }
21. }
22. },
23. methods: {
24. confirmLocation: function () {
25. localStorage.removeItem(this.addressKey);
26. localStorage.setItem(this.addressKey, JSON.stringify(this.address));
27. this.$emit("address-set");
28. },
29. resetLocation: function () {
30. if (this.marker) {
31. this.marker.remove();
32. }
33. this.addressSet = false;
34. this.address = null;
35. },
36. renderMarker: function (loc) {
37. if (this.marker) {
38. this.marker.remove();
39. }
40. this.marker = this.$refs.map.renderMarker(loc);
41. },
42. geolocationSuccess: function (geolocation) {
43. const { latitude, longitude } = geolocation.coords;
44. this.userLocation.lat = latitude;
45. this.userLocation.lng = longitude;
46. },
47. flyToLocation: function (place) {
48. this.address = place;
49. this.addressSet = true;
50. this.showSuggestions = false;
51. this.$refs.map.map.flyTo({
52. center: place.position,
53. zoom: 14,
54. });
55. this.renderMarker(place.position);
56. },
57. },
58. mounted() {
59. if (window.navigator.geolocation) {
60. window.navigator.geolocation.getCurrentPosition(this.geolocationSuccess);
61. }
62. }
63. }
64. </script>
Let’s add the discover method to fetch address suggestions using NextBillion discover API.
1. methods : {
2. // ...
3. discover: async function () {
4. const resp = await axios.get(`https://${import.meta.env.VITE_NEXTBILLION_API_HOST}/h/discover`, {
5. params: {
6. key: import.meta.env.VITE_NEXTBILLION_API_KEY,
7. q: this.q,
8. at: `${this.userLocation.lat},${this.userLocation.lng}`,
9. },
10. });
11. this.suggestions = resp.data.items;
12. this.showSuggestions = true;
13. },
14. // ...
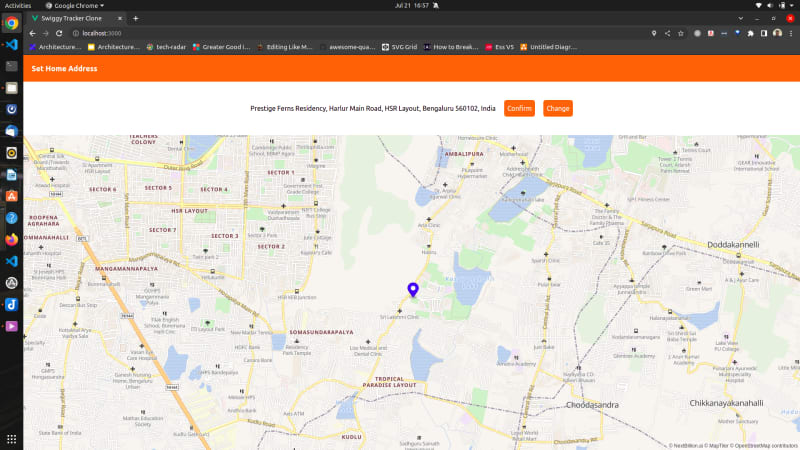
15. }
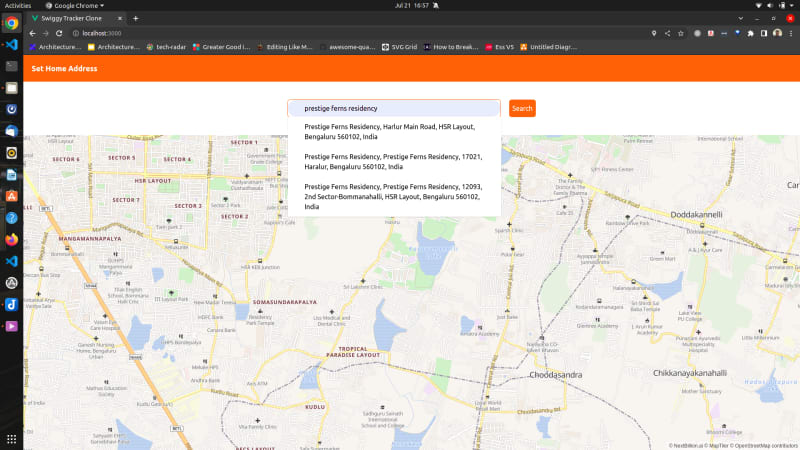
We can select any suggested location to render a Marker on the Map and confirm the store or home location.
Creating the Order Tracking Component
Let us now put everything together and create an Order Tracking screen. We will use the NBaiMap component created in above section to create a live order tracking component. I am using the storeLocation and homeLocation saved to localStorage from previous step. You will want to save these loctions to your backend and fetch them to get Directions.
1. <template>
2. <div class="h-screen flex flex-col flex-1">
3. <div class="h-full flex flex-1 flex-grow">
4. <NBaiMap @update-path-duration="updatePathDuration" ref="nbaimap"></NbaiMap>
5. </div>
6. <div class="delivery-time-container">
7. <div class="delivery-time">
8. <div class="delivery-duration">{{ duration }}</div>
9. <div class="text-sm">mins</div>
10. </div>
11. <div v-if="homeAddress.address !== undefined" class="delivery-address">
12. Delivering to - {{ homeAddress.address.label }}
13. </div>
14. </div>
15. </div>
16. </template>
17. <script lang="ts">
18. import NBaiMap from "@/components/NBaiMap.vue";
19. export default {
20. name: "OrderTracking",
21. components: {
22. NBaiMap,
23. },
24. data() {
25. return {
26. duration: 0,
27. storeAddress: {},
28. homeAddress: {},
29. };
30. },
31. methods: {
32. updatePathDuration: function (duration) {
33. this.duration = Math.floor(duration / 60);
34. },
35. renderDirections: async function () {
36. this.$refs.nbaimap.renderDirections(
37. this.storeAddress.position,
38. this.homeAddress.position
39. );
40. },
41. updateLiveLocation: async function () {
42. // fetch live location from your backend
43. let liveLocationLatLng = await axios.get('backend-url');
44. this.$refs.nbaimap.updateLiveLocation(liveLocationLatLng)
45. }
46. },
47. mounted() {
48. const storeAddress = JSON.parse(localStorage.getItem("Store"));
49. const homeAddress = JSON.parse(localStorage.getItem("Home"));
50. // or fetch these locations from backend
51. if (storeAddress === null || homeAddress === null) {
52. this.$router.push({ name: "home" });
53. return;
54. }
55. this.storeAddress = storeAddress;
56. this.homeAddress = homeAddress;
57. this.renderDirections();
58. },
59. };</script>
Watch the demo on Youtube
Thats it! We can now use the OrderTracking component anywhere throughout our application for last mile delivery status.
Next Steps
The full code for this example project can be found at Github Repo URL. Clone the project and get mapping!
In our subsequent articles, we’ll be looking into optimizing delivery and delivery tracking using NextBillion Route Optimization

Top comments (0)