
When designing and creating your own website, you’ll find yourself using CSS, a language for creating style sheets. Style sheets are used to describe the presentation of HTML documents and how elements get displayed.
CSS and styling elements really is the backbone for a lot of user experiences visually speaking; raw HTML will only get you so far.
This guide is top-to-bottom (mostly) explanation about what CSS really is, how it’s used, and common concepts and properties to understand, so you can make your own beautiful webpages.
What is CSS, and what is it used for?
CSS stands for “Cascading Style Sheets”, which is a mechanism for adding style to web documents, such as adjusting fonts, colours, spacing, layout, and much more. (We’ll get back to that “cascading” part soon!)
CSS is built up on “rulesets” which target elements in a HTML document through selectors. Selecting an element to be styled looks like this:
body {
  background: black;
}
This snippet would select the body element, and turn the background to “black”. body can be replaced with any element you want to select, and then you can add declarations through properties and values inside the curly braces.
This is what your average HTML element looks like under the hood:
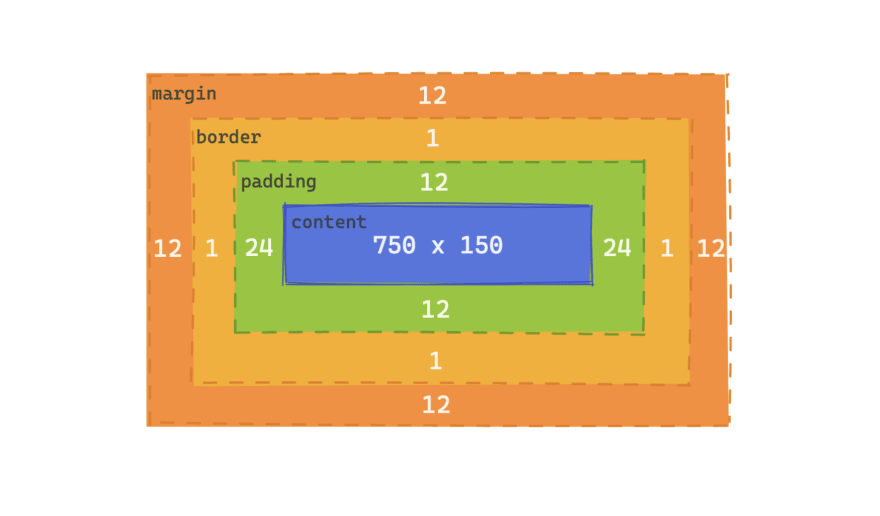
This is known as the “box model”. Abstractly speaking, when making a website, you’re essentially structuring and styling numerous boxes.
You’ve got the actual size of your element (in this case, 750 pixels wide by 150 pixels tall), then padding on the outer edge of the element to increase its internal size.
The border wraps around the padding (the space inside the element), and on the very outside is the margin (the space outside the element).
Adding CSS to a HTML document
There are a few ways to include CSS styling in a HTML document, but the two most common methods are:
- creating a
.cssfile with all of your rulesets, then referencing that CSS file as a stylesheet in the<head>of your document
<link href="./style.css" rel="stylesheet" />
- including CSS rulesets directly in the HTML document in the
<style>tag, also in the<head>of your document
  <style>
    .class {
      color: pink;
    }
  </style>
Creating & building up rulesets
When styling any element through CSS, the foundation is built up of “rulesets”, which include a selector to access an element (or multiple that meet the requirements of the selector) to be styled.
After the selector, everything between the curly braces is known as a “declaration block”, which can contain one or more declarations. Declarations are a key/value pair, consisting of the CSS property as the key, and a value for the property.

Selecting an element
There are a few ways to “select” an element to be styled in CSS, depending on your requirements. You can find a full list of selectors here.
-
Element type selector (
element)- Selects all elements that have the specified node name
-
input { background: red; }will match any<input>elements on the page, making the backgroundred
-
Class selector (
.class)- Selects all elements that have a class matching the selector
- HTML elements can have a
classattribute, including a list of “classes” delimited by spaces - An element in the document like
<h1 class='bold'></h1>could be selected in CSS through.bold
-
ID selector (
#id)- Selects all elements that have an
idattribute matching the selector value - HTML elements can have an
idattribute - An element in the document like
<div id='article'></div>could be selected in CSS through#article
- Selects all elements that have an
Once you’ve selected an element, you can start adding declarations to change its styling. Note that if you don’t select a valid element, there will be no effect. You can use “Inspect Element” to see what styling is applied on an element to troubleshoot these issues.
Common properties for declarations
Some inspiration for understanding what you can style through these “declarations”. You can see an entire list of CSS properties here.
Colours
color: adjusts the foreground colour of an element. The colour of text elements will depend on the color value.
background: adjusts the background colour of an element
Fonts
font-size: changes the size of font for text, specified in pixels or other units
font-family: defines the type of font used for the text in the element (e.g., Arial, monospace font, etc)
Structure
display: used for adjusting the layout mode elements use, for positioning and structure
padding: adds internal space to an element, making it appear bigger
margin: adds external space around an element, pushing other elements away
border: applies a customisable border around an element
Sizing
height: adjusts the height of an element, specified in pixels or relative units
width: adjusts the width of an element, specified in pixels or relative units
Digging deeper in core concepts
Cascading
They don’t call it “Cascading Style Sheets” for nothin’!
The cascade describes how CSS declarations and rulesets are applied to a HTML document, including how conflicts between two declarations on the same element get handled (i.e., one ruleset sets margin-left to 0, but another sets it to 12px), and which gets priority.
It controls the order in which CSS declarations are applied, which is dictated by three other concepts:
-
Importance
- Where is the declaration applied? Browsers have default styling which is applied by default, but has the lowest importance, meaning they’ll be overridden.
-
Specificity
- How “detailed” is the selector that the declaration is in? Less specific selectors will take lower priority in being applied.
-
Source order
- Last resort, when two declarations affect the same element in the same way: which was declared first within the file?
Inheritance
Inheritance controls what happens if there’s no value for a specific property on an element. Essentially, if you set a CSS property like color on an element, any child elements will inherit the colour from the parent unless child elements have explicitly defined a colour.
There’s a distinction between inherited and non-inherited properties; non-inherited properties (such as border) will use the initial value for that property, not to be confused with the browsers default style sheet. All properties specify an initial value.
If you want to explicitly define that an element should inherit a property from its parent, almost all CSS properties include an inherit value (e.g., color: inherit), which will set the value of the property to the computed value of that property in the parent. This works for both inherited and non-inherited properties.
Specificity
The more specific a selector is, the more precedence it has over other declarations. Specificity is a weight given to all declarations, determined by 3 factors:
- the number of element types in the selector
- the number of classes in the selector
- the number of IDs in the selector
If multiple declarations have equal specificity, the last declaration found in the CSS gets applied to the element.


Top comments (2)
This is a really good introduction to using CSS.
Really interesting.
Thanks for sharing!