While the JavaScript Canvas API has tremendous potential for rich, performant animations, every step of the work has to be achieved manually. With the amount of effort it takes to make an animation, a ready-made library can make the work more efficient.
In this tutorial, we will build a micro-library in vanilla JavaScript intended for the creation of HTML5 canvas animations. We will then use this library to make an animated banner composed of text, images, and shapes.
Below is a quick CodePen of the final animation we will build.
Working with the Canvas API is different from working with the HTML DOM or SVG DOM APIs, in that you do not have an organized hierarchy of elements. Instead, you have a element, which contains a bitmap that you can render graphics on using the API’s methods.
While the element can be cleared and redrawn with each animation frame, it will not remember the state of its bitmap from one frame to the next — so you have to create your own methods for storing the state of each image, shape, or text box between frames. This is where JavaScript objects come in.
JavaScript Objects
For this library, we will create a JavaScript object for each graphic element. Each object will store the properties of its corresponding graphic, such as position, speed, and color. It will also be tethered to its own personal element, which can be used to render a visual representation of the object. By wiring an object to each piece of the animation, the object’s properties allow the program to remember the state of its corresponding shape, image, or text between frames. The canvas forgets, but our objects will not.
How we want this to work
The goal of the library is to create and animate graphic elements — shapes, text, and images.
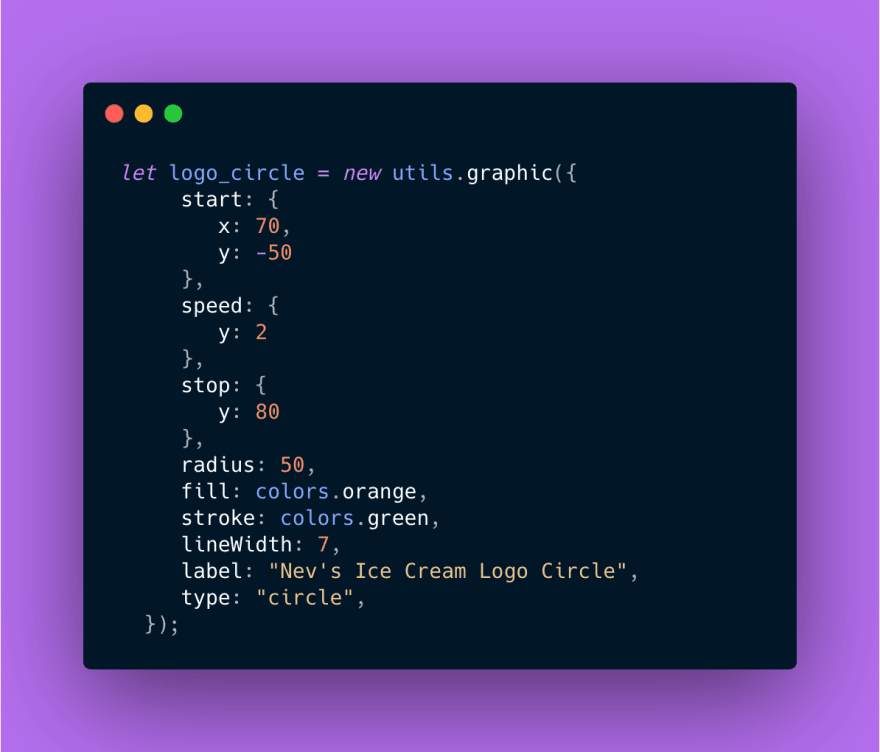
Here is an example of how we would create an object. Notice how we assign it properties. Once we declare it as a new utils.graphic, it should call methods that add a newcanvas element — a layer, if you will — to a central staging element in the DOM.
Then we should be able to render and animate the object by calling an animate method:
logo_circle.animate();
And clicking a “restart” button — or the stage element itself —should call a reset method:
logo_circle.reset();
That is how it should work — you should create the object and call the methods, and the library should take care of the details.
Let’s get started.
Step 1: Write the Markup and CSS
For the HTML markup, we will create a button and a container for all our elements. The container will have an id of stage.
<div id="stage"></div>

<button id="restart">Restart</button>
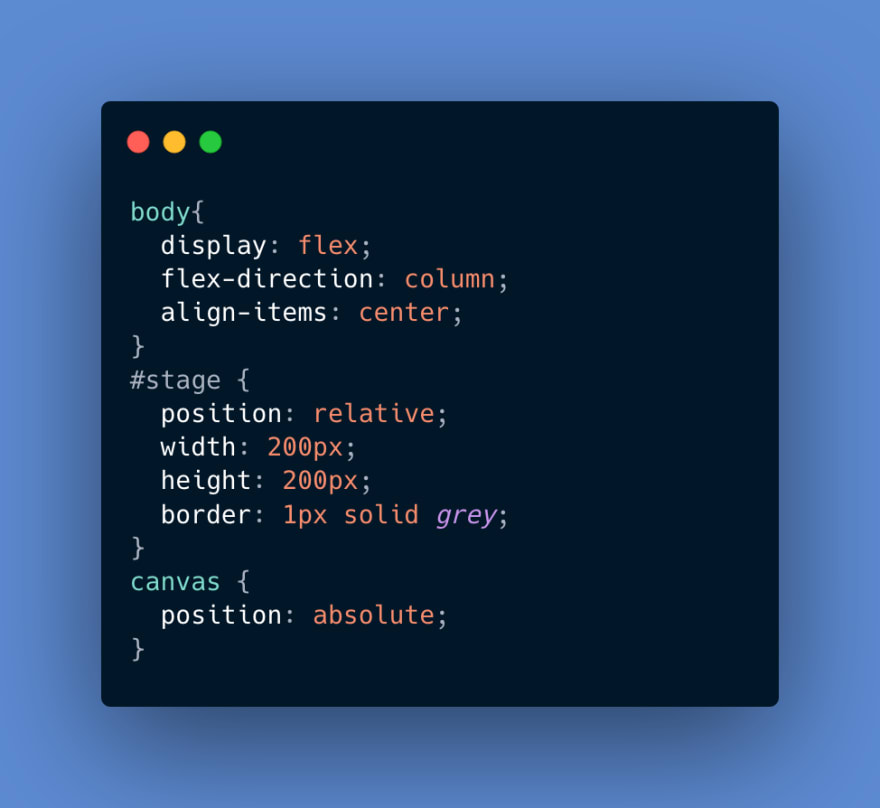
Now let’s write CSS styles that achieve the following:
set the dimensions and border of the stage container
give the stage container position:relative so that our canvas layers will be stacked inside it
style the body to center our elements
allow canvas layers to stack on top of each other by giving them position:absolute
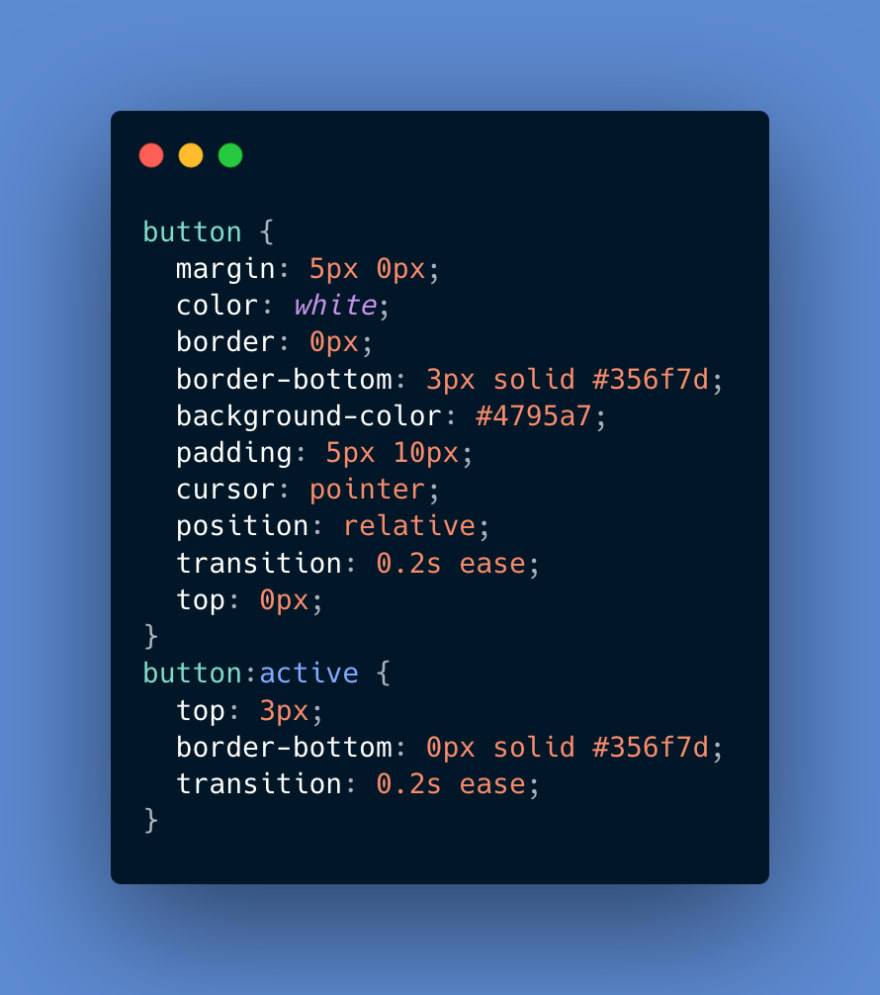
Now let’s create a nice-looking style for the button that restarts the animation. Below is a close-up of the button followed by its CSS.

Step 2: Make the JavaScript Wrapper
On to the JavaScript. Let’s create a wrapper that will hold our library’s contents. We will start with an empty object named utils.
let utils = {};
Let’s add an immediately-invoked function expression (IIFE), which serves as our wrapper.
let utils = {};

(function(){

})();
The empty utils object then gets passed into our wrapper. Once inside, it will be known as pen.
let utils = {};

(function(pen){

})(utils);
The wrapper allows us to define variables and methods within an enclosed namespace.
Step 3: Set the Stage
Our first task is to tell our module where to add the canvas layers, so let’s plan to write a method that does that based on an id that gets passed in. Since our target element has an id of stage, we should be able to call the method like this:
utils.setStage('stage');
We also want to be able to set the background-color of the stage as follows:
utils.setBackgroundColor('lightpink');
Let’s build up our code so it can handle this. Within our wrapper, let’s add a variable called stage.
(function(pen) {

  let stage = null;

})(utils);
Now, let’s write a quick method called setStage, which sets the stage variable when called.
(function(pen) {

   let stage = null;

    pen.setStage = (stageId) => {
        stage = document.getElementById(stageId);
      };
})(utils);
Because setStage can be called from outside the wrapper, it allows us to switch the DOM element we are drawing to, thus opening the possibility of handling multiple banners.
Finally, let’s write the method for setting the background color of the stage element.
(function(pen) {

    let stage = null;

     pen.setStage = (stageId) => {
        stage = document.getElementById(stageId);
      };

     pen.setBackgroundColor = function(color) {
         if (stage) {
             stage.style.backgroundColor = color;
         }
      }

    })(utils);
Step 4: Build the Graphic Constructor
Now let’s create a constructor function for the graphic elements we will add. The constructor will have several purposes:
creating an array for tracking animation frame requests
creating a new canvas element for each graphic, setting its properties, and appending it to the stage
obtaining our context — essentially a bundle of drawing methods for the new canvas
adding canvas and context as properties to our graphic object
adding all properties from the passed-in object
setting a new cur property for storing the state of the graphic
Starting the constructor
Let’s start by defining the constructor function for a graphic object. Notice how it is attached to our main pen object.
pen.graphic = function(o={}) {

};
Our constructor accepts one object as a parameter and sets it to an empty object if the parameter is absent.
Creating an array for tracking frame requests
Within the constructor, let’s create an array for tracking animation frame requests. This will become important if you press the “restart” button when an animation is in progress. We will use this later.
pen.graphic = function(o={}) {

       this.reqIds = [];
}
Create a canvas element
Now let’s create a new canvas layer for this object.
pen.graphic = function(o={}) {

       this.reqIds = [];

       this.canvas = document.createElement('canvas');
}
Set canvas properties
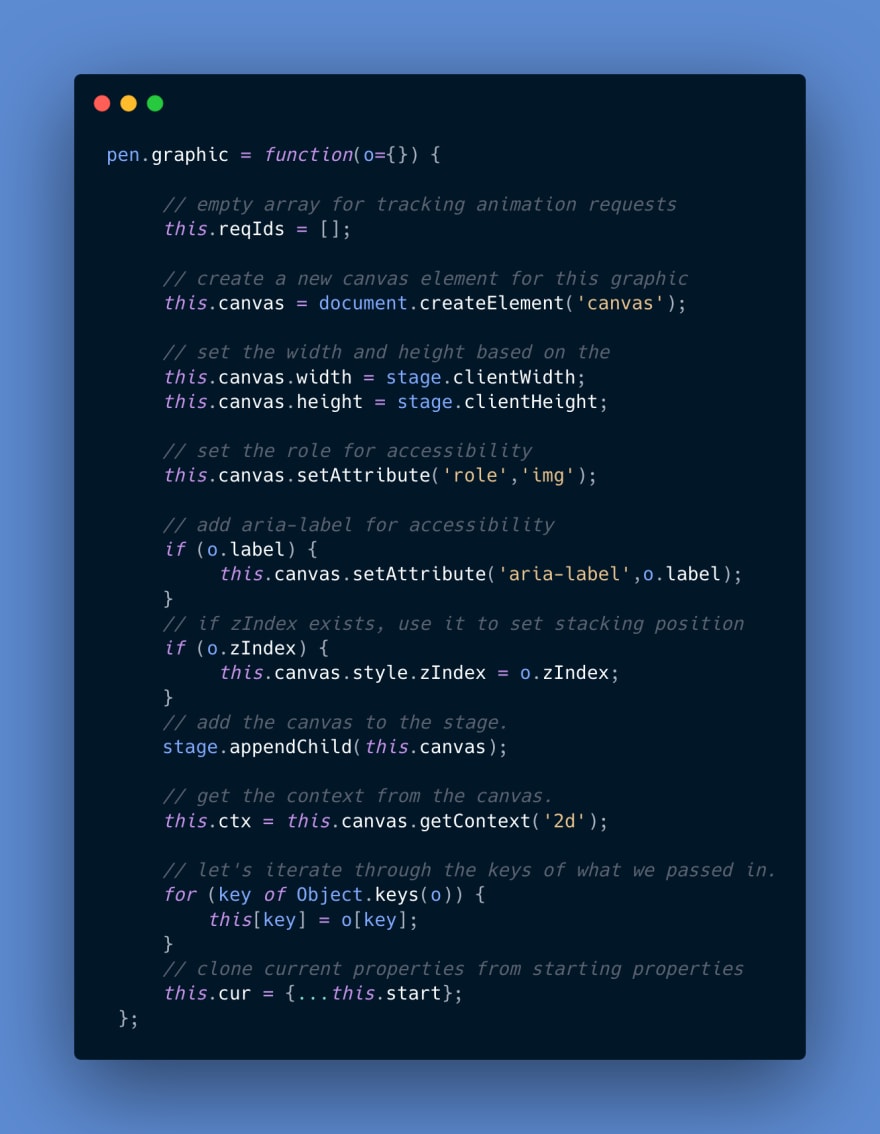
In the same constructor, let’s set the canvas width and height equal to the clientWidth and clientHeight of the current stage element, respectively. And because each canvas is intended as a visual, we will give it a role of img.
this.canvas.width = stage.clientWidth;

this.canvas.height = stage.clientHeight;
Because each canvas is intended as a visual element, we will give it a role of img.
this.canvas.setAttribute('role','img');
If the passed-in object has a label property, let’s use that to set the aria-label attribute of the canvas for accessibility.
if (o.label) {
  this.canvas.setAttribute('aria-label', o.label);
}
And if the object has a zIndex property, let’s add that to the style attribute of the canvas.
if (o.zIndex) {
    this.canvas.style.zIndex = o.zIndex;
 }
Now let’s append our canvas to the stage element.
stage.appendChild(this.canvas);
Next, let’s grab the context reference for the canvas so we can access the drawing methods.
this.ctx = this.canvas.getContext('2d');
Now that we’ve established the graphic object’s canvas and context, let’s iterate through all the properties of the parameter object and add them to the graphic object.
for (key of Object.keys(o)) {
    his[key] = o[key];
}
Set the current property
Because the canvas does not intrinsically store its state, we will keep track of the properties that animate with a property called cur. It has three possible inner properties: x, y, and alpha. At the outset, we will make its properties equal to those of start.
this.cur = {...this.start};
To keep start from changing along with cur, we use spread ... syntax to break it into key-value pairs — and then use curly braces to rebuild these parts into a new object. This way, we avoid syncing the two properties.
The full constructor for the graphic object is below.
Step 5: Plan the Methods
Now that we have built a constructor for our JavaScript objects, let’s start writing some methods:
four render methods that can draw out the shape, text, or image based on its object’s properties
updateProps, which updates the properties of the object before the next animation frame is drawn
checkCanvasAlpha, which updates the globalAlpha property of the object’s canvas rendering context if its alpha value is changing
animate, which changes how the object is represented on its canvas —and then calls itself if another frame is needed
cancelFrames, which cancels any remaining frame requests if our animation has been restarted
reset, which returns the object and its canvas to their original states
To give every object we create access to all these methods, we will attach each method to the prototype *of the graphic object — a template of sorts that the object inherits. We can attach a method to a prototype using this syntax:
 pen.graphic.prototype.methodname = function() {

};
Let’s apply this method in the next step.
Step 6: Write the Shape Rendering Methods
Let’s write rectRender and circleRender, which will render the two types of shapes we need for our banner.
Rectangle
The rectRender method involves setting the fillStyle and then calling fillRect.

Circle
The circleRender method is more complex— as it involves using the center coordinates, radius, fill, and stroke properties. Notice that it uses the arc method to draw an arc that is 2π radians, or 360 degrees.

Step 7: Write the Text and Image Methods
Text
The textRender method involves setting a couple new properties, such as font and textAlign.

Image
The imageRender method will have an inner render() function that it calls either right away or after it loads the image.
This render function also checks for a scale property. If one exists, it will multiply the image width and height by the scale value. For instance, if a scale value of 0.75 is passed in, the image’s width and height will be resized to 75% of its natural dimensions

Because we cannot move forward until the image data first loads, we check to see if we have an Image object with a src. If not, we do the following:
create a new Image() object,
set its src attribute,
listen for an image onload event,
and call therender() function when the image loads.
If the image and its src are already defined, that means the image data has been loaded, so we render it immediately. Here is how it plays out in code:

And below is the complete imageRender method.
Step 7: Write the Update and Alpha Check Methods
Let’s now write a method for updating the properties of the object that should be changing. These properties may include x, y, oralpha.
So let’s now iterate through the properties in the object’s speed attribute using for...in syntax.
pen.graphic.prototype.updateProps = function() {

    for (prop in this.speed) {

    }
}
Compare current and ending values
Once we lock onto a property, we will compare its value in cur with its value in stop. If cur is not at the stop value yet, we capture how far away they are in diff.
If the diff is less than the absolute value of thespeed for this property, that’s close enough — so we set it to the stop value. If not, we increment the current property by the speed value.
let diff = Math.abs(this.cur[prop] - this.stop[prop]);

if (diff <= Math.abs(this.speed[prop])) {

      this.cur[prop] = this.stop[prop];
    }
    else {

     this.cur[prop] += this.speed[prop]
}
This way, the difference between start and stop does not have to be divisible by speed for the stop value to be reached. Full method below.

The alpha check
Let’s write a quick method for transferring an object’s current alpha value to the globalAlpha property of its canvas rendering context.

Step 8: Write the Animate Method
Now let’s write the animate method, which will clear the canvas, update the object, render one frame, delay if necessary, and request that it be called again if needed.
Adding delay values for some objects help to choreograph their movements so they don’t all rush in at once .Let’s start by writing a promise-based helper function for the delay called sleep.
const sleep = (ms) => new Promise(resolve => setTimeout(resolve, ms));
We will enclose this helper in a newanimate method, which isasync so we can use await sleep later.

Before moving ahead, let’s equip ourselves with one other helper function that checks on properties that are changing to see if another animation frame is needed. This will return a boolean value.
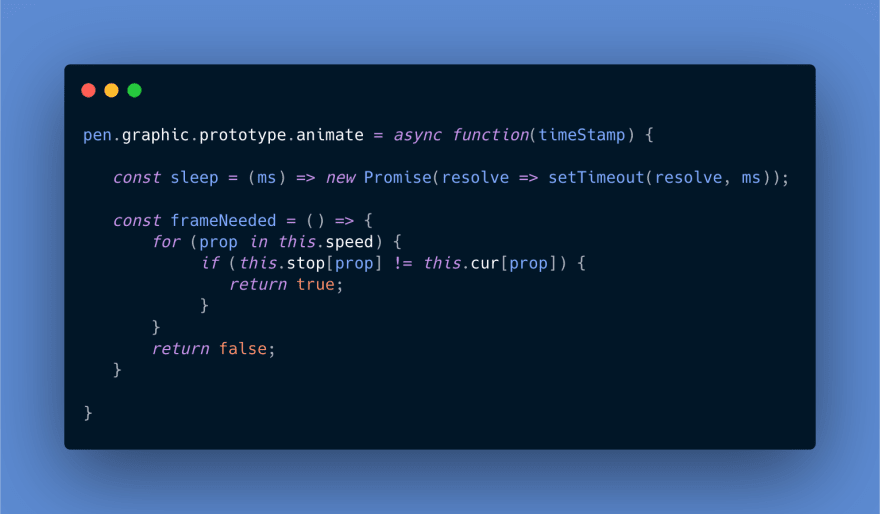 The frameNeeded function.
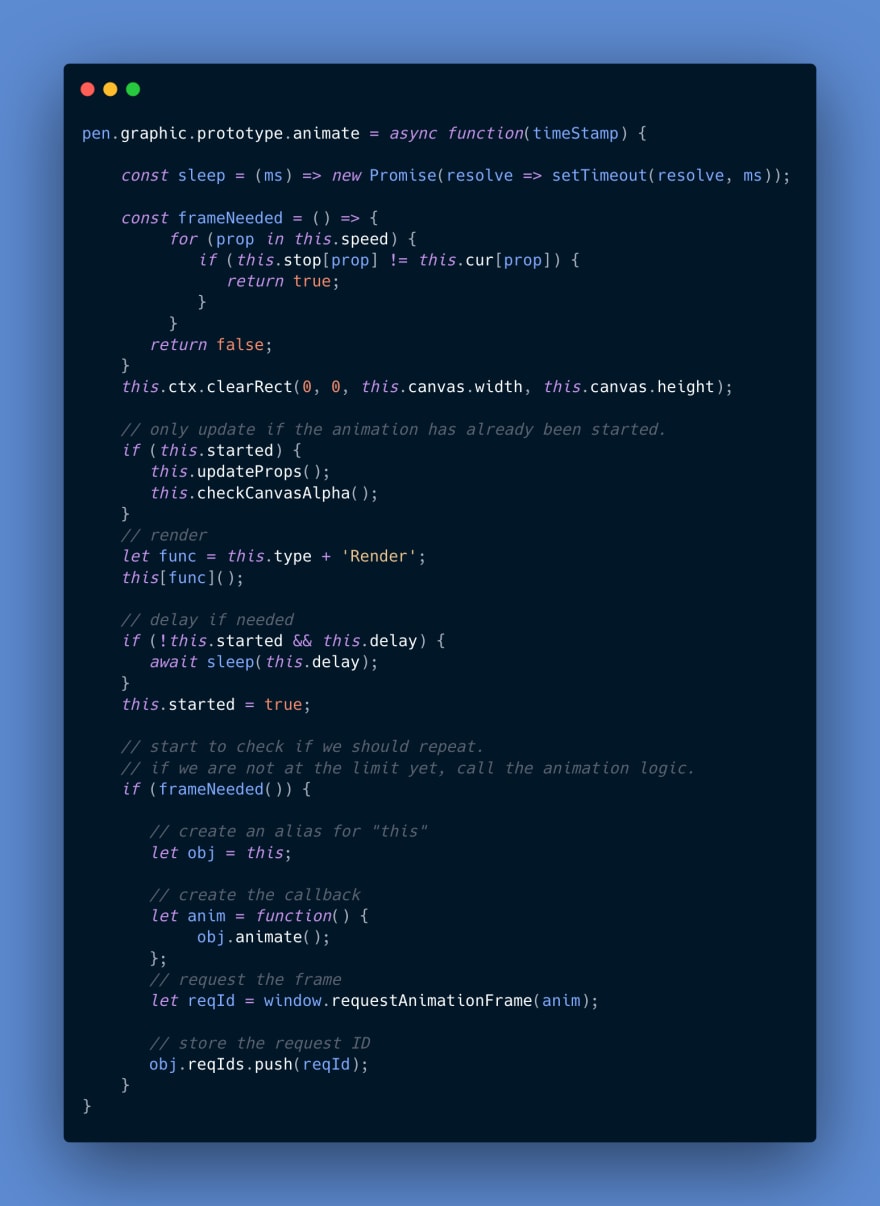
Now that we have created our helpers, let’s go ahead and clear our canvas element.
this.ctx.clearRect(0, 0, this.canvas.width, this.canvas.height);
So the first frame of this animation always reflects the initial properties, let’s update our properties only if the first frame has passed. We use this.started to check on this.
if (this.started) {
         this.updateProps();
         this.checkCanvasAlpha();
}
Next, let’s assemble the name of the render function by concatenating type with the string "Render". After that, we’ll call the function.
let func = this.type + 'Render';

this[func]();
If this animation has not been flagged as started and a delay value exists, we delay. The await blocks further progress on this method until the delay ends. Once it ends, we flag the animation as having started.
if (!this.started && this.delay) {
   await sleep(this.delay);
}

this.started = true;
At this point, we can now check if another animation frame is needed. If it is, we request another animation frame. Below is how this part of the method looks.

Notice that we call obj.animate() within the anim function, which then gets passed into window.requestAnimationFrame. When it comes time for the next frame, the anim function will kick off as a callback.
As a result, this animation method will pass a call to itself into window.getAnimationFrame. These frame requests continue until the properties that are changing reach their stopping point, or until the animation restarts. We also collect request ID’s so we can cancel our frame requests if the animation is restarted.
Here is the whole method.
Step 9: Write the Frame Cancel and Reset Methods
If the user resets the animation, we want to cancel all frame requests. So let’s write a cancelFrames method that will be called when we trigger a reset.
Here we have a while loop that runs as long as we have request ID’s in our reqIds array. We pop each reqID off the array and then use it to cancel the animation frame.

Reset
Below is the reset method, which will do the following:
reset the started flag to false.
return all cur attributes to their starting values
sync the globalAlpha of the rendering context with the cur.alpha value, if it exists
call the cancelFrames method we just wrote.
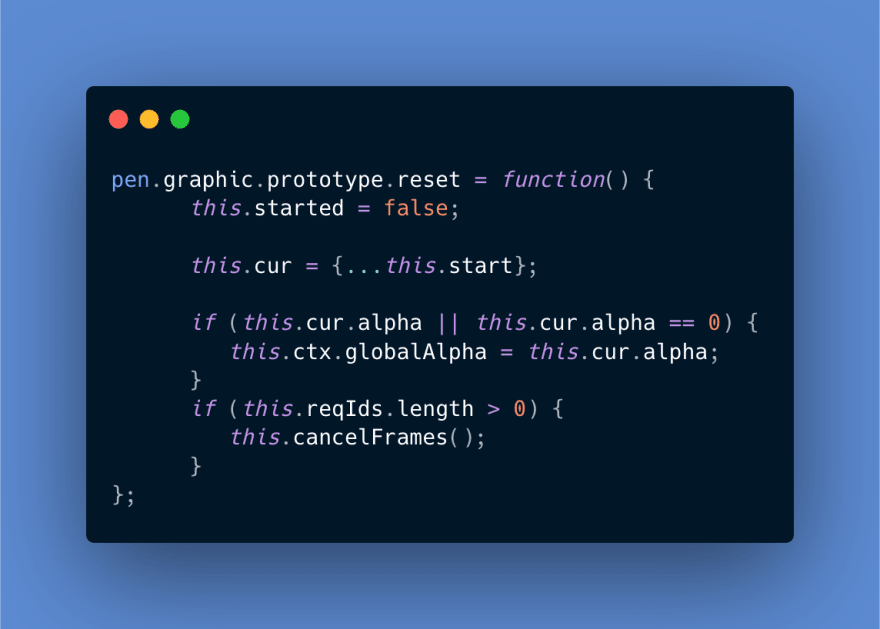
Now let’s go back and replacethis.cur = {...this.start} within our original graphic constructor. In addition to resetting the cur properties, this will also initialize the canvas rendering context and the started flag. We can add it right at the end of the constructor, as shown below.
pen.graphic = function(o = {}) {

   // hidden code

   for (key of Object.keys(o)) {
       this[key] = o[key];
   }

   this.reset();
};
Congratulations!
You have finished the micro-library. Now let’s put it to work by creating the banner.
Step 10: Lay the groundwork for the banner
Our banner will have a logo made of several parts:
a circle that descends from above
a rectangle that rises from below
text saying “Nev’s” that slides in diagonally
text saying “Ice Cream” that fades in
a small ice cream cone image that fades in
In addition, there will be two elements outside the logo:
a large three-scope cone that slides in from the right
text saying “42 Flavors!” that slides in from the left
We are now outside of the library, so if you are working with files rather than a code sandbox, I recommend writing this banner-specific logic in a new JavaScript file.
Set the stage, colors, and constants
Let’s start by creating a new wrapper for our banner logic.
let demo = {};

(function(pen) {

})(demo);
Now let’s set the stage and background color.
let demo = {};

(function(pen) {

  utils.setStage('stage');

  utils.setBackgroundColor('lightpink');

})(demo);
Next, let’s initialize a colors constant to store hex codes.
let demo = {};

(function(pen) {

      utils.setStage('stage');

      utils.setBackgroundColor('lightpink');

      const colors = {
          orange: '#ffc44e',
          green: '#4795a7',
          darkgreen: '#356f7d',
      };

})(demo);
And while staying in the wrapper, let’s create aliases for the image URLs, which point to the image files in the public GitHub repository for this demo.
const small_cone_src = 'https://raw.githubusercontent.com/nevkatz/canvas-demos/main/demo1/images/cone-small-vert.png';

const large_cone_src = 'https://raw.githubusercontent.com/nevkatz/canvas-demos/main/demo1/images/ice-cream.png';
With our foundational code in place, let’s create our seven JavaScript objects.
Step 11: The Three-Scoop Cone
Below is the code for our large ice cream cone with a few notable properties:
a descriptive label so screen readers pick it up.
aspeed property with x since it slides in horizontally from the right.
a scale property of 0.75 to make the image width and height 75% of the image’s natural dimensions.

Notice in particular two other properties:
a type property that determines the rendering method
a label property that sets the aria-label attribute of its element.
Step 12: The Logo Circle
For our circle, the speed property only contains y since it drops from above while keeping its horizontal position.

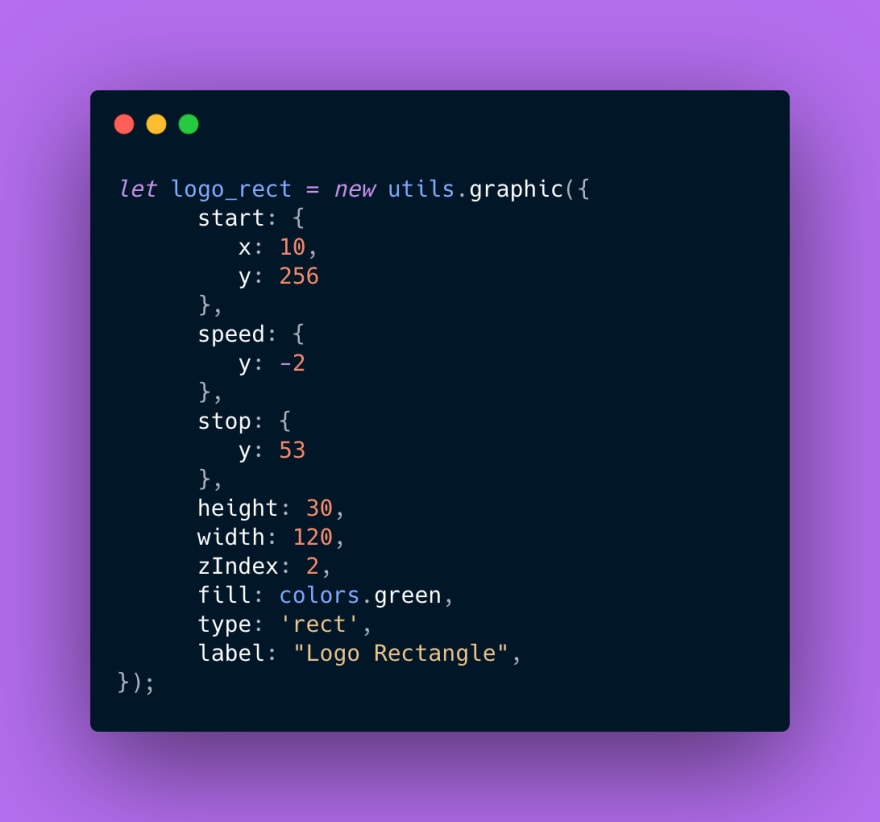
Step 13: The Logo’s Rectangle
The rectangle's y value of its speed is negative since it is moving up.
Step 14: The Ice Cream Text
Notice that the “Ice Cream” text stays in the same spot the whole time. The only property changing is its alpha.

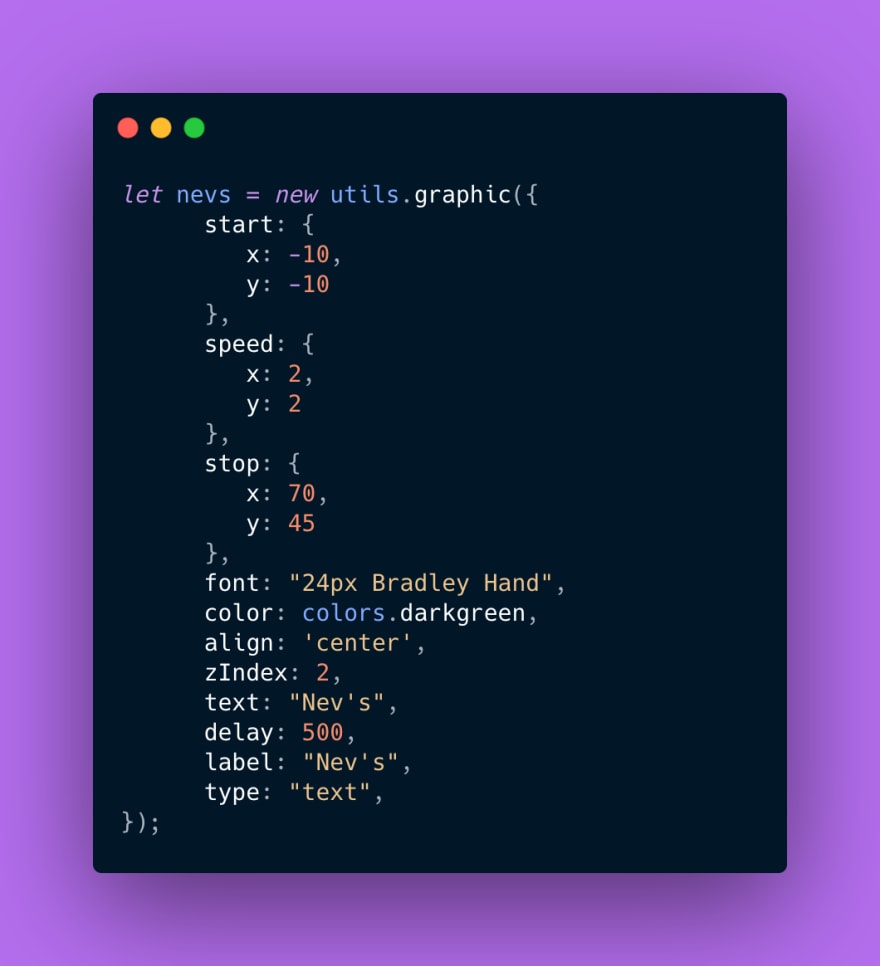
Step 15: The Nev’s Text
Below is the code for the “Nev’s” text in the logo. The negative coordinates within the start property will make the text start out off-stage. After a half-second delay, it will slide diagonally into place.
Step 16: The Logo’s Small Ice Cream Cone
Below is the code for the small ice cream cone. We will use the threealpha values here to modify the globalAlpha property of the <canvas> element.
 The object for the small ice cream cone in the logo.
Step 17: The “42 Flavors!” Text
Below is the code for the “42 Flavors!” text. Notice the long delay value because it has to slide in.

Step 18: The Kickoff Method
Having initialized all seven objects, let’s now write a kickoff method called init. This will be the one method we attach to our inner pen object so we can call it from the outside. Here is the method shell with an array containing the objects we just created.
pen.init = function() {

    let arr = [logo_rect,
               logo_circle,
               flavors,
               large_cone,
               nevs,
               ic_text,
               small_cone];

};
While staying within this method, we will iterate through the array using for...of and call the animate method on each object. This is what starts the animation when a user first lands on the page.
for (o of arr) {
    o.animate();
}
The click listener
Because the animation can happen fast, it helps if the user can restart it — either by clicking the restart button or the image itself. Here is the plan.
Grab references to the restart button and stage with querySelectorAll
Loop through both elements with for...of
For each element, listen for a click event.
Handle a click by calling animate and then reset on each JavaScript object.
let els = document.querySelectorAll('#restart,#stage');

for (el of els) {
    el.addEventListener('click', function() {
        for (o of arr) {
          o.reset();
          o.animate();
        }
    });
}
Below is the entire init method.

After writing the init method, you can now call demo.init() outside your wrapper to make your animated banner come to life.
The Finished Banner
Below is the completed Pen once again so you can compare it with your work. The code for this tutorial is also available for download on GitHub.
The Takeaway
If you want to design HTML5 animations at a reasonable pace, you can benefit from having a library to reach for. While third party libraries abound, you can also build a lightweight, custom-made library like this one that is tailored to your project’s needs.
Thanks for reading, and I hope you found this helpful.
Elsewhere
Below are two other JavaScript articles that you may enjoy reading.
Create Your Own HTML5 Canvas Toolkit With Vanilla JavaScript
7 Tricks I Use To Rewrite JavaScript Code From My Early Days

Top comments (2)
Hi there, we encourage authors to share their entire posts here on DEV, rather than mostly pointing to an external link. Doing so helps ensure that readers don’t have to jump around to too many different pages, and it helps focus the conversation right here in the comments section.
If you choose to do so, you also have the option to add a canonical URL directly to your post.
Hi Sloan,
Thanks for your feedback. I have replaced my earlier post here with the entire article. I agree, as I do think this will be a better experience for people.
In case others are interested in adapting a medium article to dev.to, I used medium exporter, a medium-to-markdown cli tool, which is covered in this article. It worked fine and got me 90% of the way there - then it was a matter of adding some syntax highlighting code and reworking the CodePen embeds. I believe I added the canonical URL and am about to test it.
To others, let me know if you would like to see additional articles on HTML5 Canvas and what other topics you would be interested in seeing tutorials on.
Best,
Nevin