
The Shopify team recently announced updates to their Storefront APIs that makes it possible for store owners to access and manage their entire store and inventory via the new APIs.
This unlocks another level of use cases for store owners on the Shopify platform, like:
- You can set up a Shopify store (as a backend service) and use any frontend tech of your choice to build your store.
- You can have a Shopify powered e-commerce site without having a Shopify site.
- You can sell products (in your Shopify store) from any application, website, video game, etc.
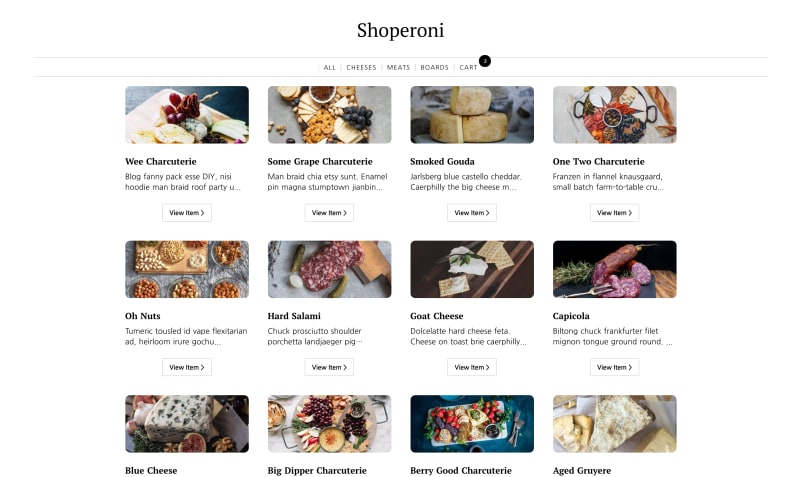
This is indeed exciting and like everyone else who's keen on trying out new things, I took the APIs for a spin and it resulted in this Shopify Gridsome Starter Template.
You can go ahead and check it out, or you can follow along in this post and I'll try to explain my process to you.
Getting started
Before we jump into things, here's a list of things you might want to have in place first:
- Create a Shopify partner account if you don't have one.
- Log in to your partner account and create a Shopify development store (to test your implementations)
- Generate your API credentials to make authenticated requests to your Storefront APIs.
- Create products and product variants in your store. This could be dummy products you got off an API.
- Create a private app on your Shopify admin dashboard. This will represent your client application from where you'll be making requests.
With all that done, you're now ready to start using your store data in any client application of your choice.
Authentication
All you need to make authenticated requests to your Storefront API is a storefront access token which is available on the Shopify admin section of your app. To authenticate a request, pass this in the header of your API calls:
headers: {
    "Content-Type": "application/graphql",
    "X-Shopify-Storefront-Access-Token": process.env.SHOPIFY_STOREFRONT_ACCESS_TOKEN,
}
You can learn more about authorization and scopes on the Shopify docs but this was all the authentication I needed to get things done. Next, let's take a look at how we can retrieve data from the store.
Products
Get all products
Before we go any further, it's worth mentioning that the Storefront APIs are completely GraphQL based. There's no REST alternative so all the sample snippets we'll use here will be in GraphQL.
So, to get a list of all the products in your store, you need to make a post request to your Shopify store endpoint with a query like this:
{
  products(first:5) {
    edges {
      node {
        id
      }
    }
  }
}
In the snippet above, we are querying the products field. Without any arguments, this will return all the products available in your store. However, we've specified that we want only the first 5 products by providing the first argument to the products query.
What if you're making this request from your favorite Frontend framework like Next.js or Nuxt.js? what would it look like. In my case, I'm working on a Gridsome project, so i'll go into the gridsome.server.js file and write this Query:
const fetch = require("node-fetch");
module.exports = function(api) {
  api.loadSource(async actions => {
    const query = `{
      products(first: 10) {
        edges {
          node {
            id
            handle
            description
            title
            images(first: 1) {
              edges {
                node {
                  src
                  altText
                }
              }
            }
          }
        }
      }
    }`;

    const response = await fetch(process.env.SHOPIFY_STORE_URL, {
      method: "post",
      headers: {
        "Content-Type": "application/graphql",
        "X-Shopify-Storefront-Access-Token":
          process.env.SHOPIFY_STOREFRONT_API_TOKEN
      },
      body: query
    })
      .then(res => res.json())
      .then(data => console.log(data));
  });
};
The fields we've defined in the query above are the fields we'll get back in the response with their respective values. You can add more fields like variants, collections, etc., depending on your needs. I've kept it minimal to keep the snippets neat and readable. You can find the rest of this file here if you'd like a more comprehensive look.
The way that Gridsome works is, now that we've fetched all the product data, we can create a Product Collection and pass the product data into the Collection like this:
const collection = actions.addCollection({
  typeName: "Product"
});
for (const product of productData) {
  collection.addNode({
    id: product.id,
    title: product.title,
    handle: product.handle,
    description: product.description,
    images: product.images.edges[0].node.src,
    altText: product.images.edges[0].node.altText
  });
}
The result of creating this Collection is that now, we can access the products from all our projects components and pages as this.$page.product. This way, we can use it in all the places we need it within the Gridsome app.
Get a particular product
What if you want to request for a single product?. The products have unique identifiers that we can use to query for them. As a result, you can run this query:
{
  node(id: "Z2lkOi8vc2hvcGlmeS9Qcm9kdWN0LzMTA2NzM0MzA=") {
    id
    ... on Product {
      title
    }
  }
}
This query will run against your Product schema and return the particular product with the ID specified at the node query root. Here's a sample response for the query above:
{
  "data": {
    "node": {
      "id": "Z2lkOi8vc2hvcGlmeS9Qcm9kdWN0LzMTA2NzM0MzA=",
      "title": "Aged Gruyeye"
    }
  }
}
Okay, enough about requesting for products. Let's take a look at how to manage the shopping cart when your users start making that decision to buy.
Cart
This was the trickiest part for me. There's a lot of moving pieces to tie together when dealing with the cart API. Hopefully, this explainer makes it more approachable for you. The first thing to note is that a cart doesn't exist until a product has been selected to be added to the cart (i.e a user clicks Add To Cart on your site).
Create cart
When that happens, then you can send a request to Shopify to create a cart with the selected item. The call to create a cart ultimately requires two fields, the id of the selected product and its quantity. Consider this mutation:
const { postToShopify } = require("./postToShopify");

// Create a cart with a single item
exports.createCartWithItem = async ({ itemId, quantity }) => {
  try {
    const response = await postToShopify({
      query: `
        mutation createCart($cartInput: CartInput) {
          cartCreate(input: $cartInput) {
            cart {
              id
              createdAt
              updatedAt
              lines(first:10) {
                edges {
                  node {
                    id
                    quantity
                    merchandise {
                      ...
                    }
                  }
                }
              }
              estimatedCost {
                totalAmount {...}
                subtotalAmount {...}
                totalTaxAmount {...}
                totalDutyAmount {...}
              }
            }
          }
        }
      `,
      variables: {
        cartInput: {
          lines: [
            {
              quantity,
              merchandiseId: itemId
            }
          ]
        }
      }
    });

    return response;
  } catch (error) {
    console.log(error);
  }
};
The mutation above will create a cart and return values for all the specified fields in the response. Note that the snippet has been truncated to keep it consice and readable, the rest of the file is available here. If you're also wondering what the postToShopify import is, it's a utility function we use to make requests to Shopify, also available here.
Here's something I missed that took a while to figure out. The product
idi.e theitemIdin the snippet above is not the product's ID (product.node.id) as you'd think. Instead, it's the ID of the selected product variant. If the product has no variants, thevariantsfield will still be available in the product data with one item. And you can access it withproduct.variants[0].node.id. This is the ID you should be adding to the cart (or using to create a cart).
Add items to cart
In the case where a cart already exists and you'd like to add items to it, you'll need to supply
- The
cartIdwhich is returned in the first call to create a cart, - The
idof the product you're adding to the cart and - It's
quantity.
Here's a sample mutation that takes the 3 required fields and adds the selected product to the cart whose ID equals the supplied cartId:
const { postToShopify } = require("./postToShopify");

exports.addItemToCart = async ({ cartId, itemId, quantity }) => {
  try {
    const shopifyResponse = postToShopify({
      query: `
        mutation addItemToCart($cartId: ID!, $lines: [CartLineInput!]!) {
          cartLinesAdd(cartId: $cartId, lines: $lines) {
            cart {
              id
              lines(first: 10) {
                edges {
                  node {
                    id
                    quantity
                    merchandise {
                      ...
                    }
                  }
                }
              }
              estimatedCost {
                totalAmount {...}
                subtotalAmount {...}
                totalTaxAmount {...}
                totalDutyAmount {...}
              }
            }
          }
        }
      `,
      variables: {
        cartId,
        lines: [
          {
            merchandiseId: itemId,
            quantity
          }
        ]
      }
    });

    return shopifyResponse;
  } catch (error) {
    console.log(error);
  }
};
If the cart exists, as it should in our case, Shopify will find the cart with the ID that equals the ID we supplied in the cartId variable and then add the selected product to it as a line item. Again, the snippet is truncated so the whole file is available here.
Remove items from cart
So we've created a cart, and added items to the cart. Let's find out how to remove an item from it. I certainly change my mind a lot when shopping online so I'd like the ability to remove things I don't want any more from the cart.
As you might expect, this request won't be very different from the last one that adds an item to the cart. In this case, we just want to get rid of an item. So, specify the ID (lineId) of the line item (product variant) you want to get rid of and the ID of the cart (cartId) you want to remove it from and it'll be done. Here's how:
const { postToShopify } = require("./postToShopify");

exports.removeItemFromCart = async ({ cartId, lineId }) => {
  try {
    const shopifyResponse = await postToShopify({
      query: `
        mutation removeItemFromCart($cartId: ID!, $lineIds: [ID!]!) {
          cartLinesRemove(cartId: $cartId, lineIds: $lineIds) {
            cart {
              id
              lines(first: 10) {
                edges {
                  node {
                    id
                    quantity
                    merchandise {
                      ...
                    }
                  }
                }
              }
              estimatedCost {
                totalAmount {}
                subtotalAmount {}
                totalTaxAmount {}
                totalDutyAmount {}
              }
            }
          }
        }
      `,
      variables: {
        cartId,
        lineIds: [lineId]
      }
    });

    return shopifyResponse;
  } catch (error) {
    console.log(error);
  }
};
The mutation above will successfully remove the selected product whose line ID equals the lineId specified in the request from the cart whose cart ID equals the cartId specified in the request.
That's it! that's how far I've come in working with the Storefront API.
Here's the live site I built in this process to give you a general idea of how it all works together.
If you're keen on getting your hands on the source code, it's also available here on Github
Thoughts?
Generally, I love the idea that I now have a Gridsome e-commerce site powered by Shopify. I get all the benefits of working with Vue.js plus all the added benefits of having a Shopify powered backend system. The API took me a while to figure out (maybe because I was new to it), but it works! and that's exciting! Looking forward to hearing what y'all think about it.

Top comments (0)