Last mile delivery marketplaces make it easy to order delivery food from a mobile device and have it delivered to a user’s door while it’s still hot.
Marketplaces like Deliveroo, Postmates, or Uber Eats use your device’s location to serve you a list of restaurants that are close enough and open so you can get your delivery as soon as possible.
w to
This realtime experience between the customer, restaurant, and driver relies on transactional push notifications to move the order from the kitchen to the table seamlessly. Customers want push notifications to alert them when their order is on its way and when they need to meet the driver at the door.
Setting up push notifications can be confusing and time consuming. However, with Pusher’s Push Notifications API, the process is a lot easier and faster.
In this article, we will be considering how you can build apps on iOS that have transactional push notifications. For this, we will be building a make-belief food delivery app.
Prerequisites
- A Mac with Xcode installed. Download Xcode here.
- Knowledge of using Xcode.
- Knowledge of Swift.
- A Pusher account. Create one here.
- Basic knowledge of JavaScript/Node.js (Check out this tutorial).
- Cocoapods installed on your machine.
Once you have the requirements, let’s start.
Building our application – Planning
Before we start building our application, we need to do some planning on how we want the application to work.
We will be making three applications:
- The backend application (Web using Node.js).
- The client application (iOS using Swift).
- The admin application (iOS using Swift).
The backend application
This will be the API. For simplicity, we will not add any sort of authentication to the API. We will be calling the API from our iOS applications. The API should be able to provide the food inventory, the orders, and also manage the orders. We will also be sending push notifications from the backend application.
The client application
This will be the application that will be with the customer. This is where the user will be able to order food from. For simplicity, we will not have any sort of authentication and everything will be straight to the point. A customer should be able to see the inventory and order one or more from the inventory. They should also be able to see the list of their orders and the status of each order.
Building the backend application (API)
The first thing we want to build is the API. We will be adding everything required to support our iOS applications and then add push notifications later on.
To get started, create a project directory for the API. In the directory, create a new file called package.json and in the file paste the following:
 {
      "main": "index.js",
      "scripts": {},
      "dependencies": {
        "body-parser": "^1.18.2",
        "express": "^4.16.2"
      }
    }
Next run the command below in your terminal:
$ npm install
This will install all the listed dependencies. Next, create an index.js file in the same directory as the package.json file and paste in the following code:
     // --------------------------------------------------------
    // Pull in the libraries
    // --------------------------------------------------------

    const app = require('express')()
    const bodyParser = require('body-parser')

    // --------------------------------------------------------
    // Helpers
    // --------------------------------------------------------

    function uuidv4() {
      return 'xxxxxxxx-xxxx-4xxx-yxxx-xxxxxxxxxxxx'.replace(/[xy]/g, function(c) {
        var r = Math.random() * 16 | 0, v = c == 'x' ? r : (r & 0x3 | 0x8);
        return v.toString(16);
      });
    }


    // --------------------------------------------------------
    // In-memory database
    // --------------------------------------------------------

    var user_id = null

    var orders = []

    let inventory = [
        {
            id: uuidv4(),
            name: "Pizza Margherita",
            description: "Features tomatoes, sliced mozzarella, basil, and extra virgin olive oil.",
            amount: 39.99,
            image: 'pizza1'
        },
        {
            id: uuidv4(),
            name: "Bacon cheese fry",
            description: "Features tomatoes, bacon, cheese, basil and oil",
            amount: 29.99,
            image: 'pizza2'
        }
    ]


    // --------------------------------------------------------
    // Express Middlewares
    // --------------------------------------------------------

    app.use(bodyParser.json())
    app.use(bodyParser.urlencoded({extended: false}))


    // --------------------------------------------------------
    // Routes
    // --------------------------------------------------------

    app.get('/orders', (req, res) => res.json(orders))

    app.post('/orders', (req, res) => {
        let id = uuidv4()
        user_id = req.body.user_id
        let pizza = inventory.find(item => item["id"] === req.body.pizza_id)

        if (!pizza) {
            return res.json({status: false})
        }

        orders.unshift({id, user_id, pizza, status: "Pending"})
        res.json({status: true})
    })

    app.put('/orders/:id', (req, res) => {
        let order = orders.find(order => order["id"] === req.params.id)

        if ( ! order) {
            return res.json({status: false})
        }

        orders[orders.indexOf(order)]["status"] = req.body.status

        return res.json({status: true})
    })

    app.get('/inventory', (req, res) => res.json(inventory))
    app.get('/', (req, res) => res.json({status: "success"}))


    // --------------------------------------------------------
    // Serve application
    // --------------------------------------------------------

    app.listen(4000, _ => console.log('App listening on port 4000!'))
The above code is a simple Express application. Everything is self-explanatory and has comments to guide you.
In the first route, /orders, we display the list of orders available from the in-memory data store. In the second route, the POST /orders we just add a new order to the list of orders. In the third route, PUT /orders/:id we just modify the status of a single order from the list of orders. In the fourth route,GET /inventory we list the inventory available from the list of inventory in the database.
We are done with the API for now and we will revisit it when we need to add the push notification code. If you want to test that the API is working, then run the following command on your terminal:
$ node index.js
This will start a new Node server listening on port 4000.
Building the client application
The next thing we need to do is build the client application in Xcode. To start, launch Xcode and create a new ‘Single Application’ project. We will name our project PizzaareaClient.
Once the project has been created, exit Xcode and create a new file called Podfilein the root of the Xcode project you just created. In the file paste in the following code:
    platform :ios, '11.0'

    target 'PizzareaClient' do
      use_frameworks!
      pod 'PusherSwift', '~> 5.1.1'
      pod 'Alamofire', '~> 4.6.0'
    end
In the file above, we specified the dependencies the project needs to run. Remember to change the target above to the name of your project. Now in your terminal, run the following command to install the dependencies:
$ pod install
After the installation is complete, open the Xcode workspace file that was generated by Cocoapods. This should relaunch Xcode.
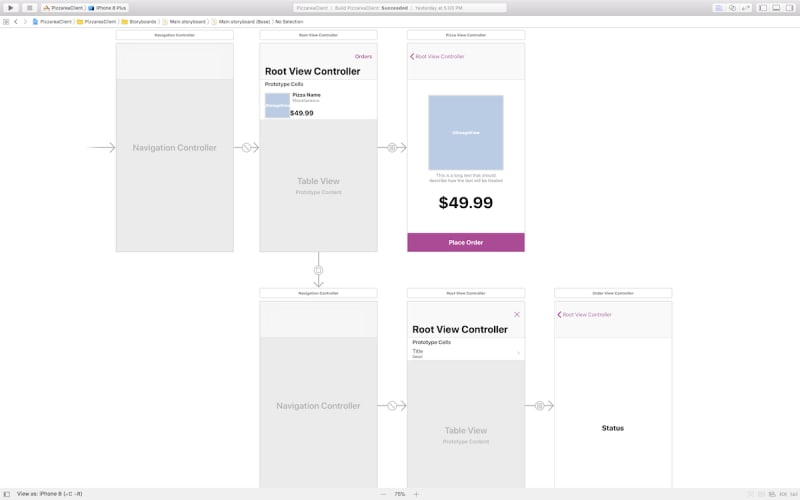
When Xcode has been relaunched, open the Main.storyboard file and in there we will create the storyboard for our client application. Below is a screenshot of how we have designed our storyboard:
The first scene is the navigation view controller which has a table view controller as the root controller. The navigation controller is the initial controller that is loaded when the application is launched.
Creating the pizza list scene
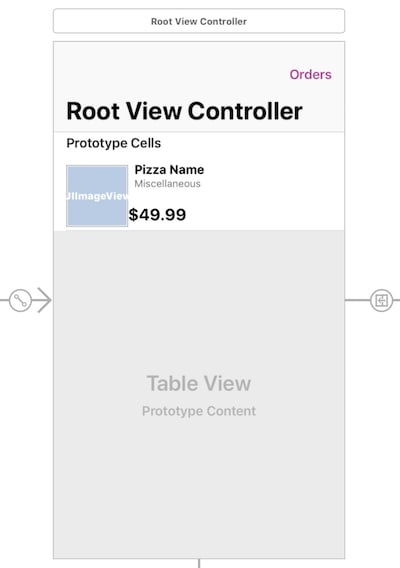
The second scene is the view controller that lists the inventory that we have available.
Create a new file in Xcode called PizzaTableListViewController.swift, make it the custom class for the second scene and paste in the following code:
    import UIKit
    import Alamofire

    class PizzaListTableViewController: UITableViewController {

        var pizzas: [Pizza] = []

        override func viewDidLoad() {
            super.viewDidLoad()

            navigationItem.title = "Select Pizza"

            fetchInventory { pizzas in
                guard pizzas != nil else { return }
                self.pizzas = pizzas!
                self.tableView.reloadData()
            }
        }

        private func fetchInventory(completion: @escaping ([Pizza]?) -> Void) {
            Alamofire.request("http://127.0.0.1:4000/inventory", method: .get)
                .validate()
                .responseJSON { response in
                    guard response.result.isSuccess else { return completion(nil) }
                    guard let rawInventory = response.result.value as? [[String: Any]?] else { return completion(nil) }

                    let inventory = rawInventory.flatMap { pizzaDict -> Pizza? in
                        var data = pizzaDict!
                        data["image"] = UIImage(named: pizzaDict!["image"] as! String)

                        return Pizza(data: data)
                    }

                    completion(inventory)
                }
        }

        @IBAction func ordersButtonPressed(_ sender: Any) {
            performSegue(withIdentifier: "orders", sender: nil)
        }

        override func numberOfSections(in tableView: UITableView) -> Int {
            return 1
        }

        override func tableView(_ tableView: UITableView, numberOfRowsInSection section: Int) -> Int {
            return pizzas.count
        }

        override func tableView(_ tableView: UITableView, cellForRowAt indexPath: IndexPath) -> UITableViewCell {
            let cell = tableView.dequeueReusableCell(withIdentifier: "Pizza", for: indexPath) as! PizzaTableViewCell

            cell.name.text = pizzas[indexPath.row].name
            cell.imageView?.image = pizzas[indexPath.row].image
            cell.amount.text = "$\(pizzas[indexPath.row].amount)"
            cell.miscellaneousText.text = pizzas[indexPath.row].description

            return cell
        }

        override func tableView(_ tableView: UITableView, heightForRowAt indexPath: IndexPath) -> CGFloat {
            return 100.0
        }

        override func tableView(_ tableView: UITableView, didSelectRowAt indexPath: IndexPath) {
            performSegue(withIdentifier: "pizza", sender: self.pizzas[indexPath.row] as Pizza)
        }

        override func prepare(for segue: UIStoryboardSegue, sender: Any?) {
            if segue.identifier == "pizza" {
                guard let vc = segue.destination as? PizzaViewController else { return }
                vc.pizza = sender as? Pizza
            }
        }
    }
In the viewDidLoad method, we call the fetchInventory method that uses Alamofire to fetch the inventory from our backend API then we save the response to the orders property of the controller.
The ordersButtonPressed is linked to the Orders button on the scene and this just presents the scene with the list of orders using a named segue orders.
The tableView* methods implement methods available to the UITableViewDelegate protocol and should be familiar to you.
The final method prepare simply sends the pizza to the view controller on navigation. This pizza is only sent over if the view controller being loaded is the PizzaViewController though.
Before we create the third scene, create a PizzaTableViewCell.swift class and paste in the following:
    import UIKit

    class PizzaTableViewCell: UITableViewCell {

        @IBOutlet weak var pizzaImageView: UIImageView!
        @IBOutlet weak var name: UILabel!
        @IBOutlet weak var miscellaneousText: UILabel!
        @IBOutlet weak var amount: UILabel!

        override func awakeFromNib() {
            super.awakeFromNib()
        }
    }
⚠️ Make sure the custom class of the cells in the second scene is PizzaTableViewCell and that the reusable identifier is Pizza.
Creating the pizza view scene
The third scene in our storyboard is the Pizza view scene. This is where the selected inventory can be viewed.
Create a PizzaViewController.swift file, make it the custom class for the scene above and paste in the following code
   import UIKit
    import Alamofire

    class PizzaViewController: UIViewController {

        var pizza: Pizza?

        @IBOutlet weak var amount: UILabel!
        @IBOutlet weak var pizzaDescription: UILabel!
        @IBOutlet weak var pizzaImageView: UIImageView!

        override func viewDidLoad() {
            super.viewDidLoad()

            navigationItem.title = pizza!.name
            pizzaImageView.image = pizza!.image
            pizzaDescription.text = pizza!.description
            amount.text = "$\(String(describing: pizza!.amount))"
        }

        @IBAction func buyButtonPressed(_ sender: Any) {
            let parameters = [
                "pizza_id": pizza!.id,
                "user_id": AppMisc.USER_ID
            ]

            Alamofire.request("http://127.0.0.1:4000/orders", method: .post, parameters: parameters)
                .validate()
                .responseJSON { response in
                    guard response.result.isSuccess else { return self.alertError() }

                    guard let status = response.result.value as? [String: Bool],
                          let successful = status["status"] else { return self.alertError() }

                    successful ? self.alertSuccess() : self.alertError()
                }
        }

        private func alertError() {
            return self.alert(
                title: "Purchase unsuccessful!",
                message: "Unable to complete purchase please try again later."
            )
        }

        private func alertSuccess() {
            return self.alert(
                title: "Purchase Successful",
                message: "You have ordered successfully, your order will be confirmed soon."
            )
        }

        private func alert(title: String, message: String) {
            let alertCtrl = UIAlertController(title: title, message: message, preferredStyle: .alert)

            alertCtrl.addAction(UIAlertAction(title: "Okay", style: .cancel) { action in
                self.navigationController?.popViewController(animated: true)
            })

            present(alertCtrl, animated: true, completion: nil)
        }
    }
In the code above, we have multiple @IBOutlet‘s and a single @IBAction. You need to link the outlets and actions to the controller from the storyboard.
In the viewDidLoad we set the outlets so they display the correct values using the pizza sent from the previous view controller. The buyButtonPressed method uses Alamofire to place an order by sending a request to the API. The remaining methods handle displaying the error or success response from the API.
Creating the orders list scene
The next scene is the Orders list scene. In this scene, all the orders are listed so the user can see them and their status:
Create a OrderTableViewController.swift file, make it the custom class for the scene above and paste in the following code:
    import UIKit
    import Alamofire

    class OrdersTableViewController: UITableViewController {

        var orders: [Order] = []

        override func viewDidLoad() {
            super.viewDidLoad()
            navigationItem.title = "Orders"

            fetchOrders { orders in
                self.orders = orders!
                self.tableView.reloadData()
            }
        }

        private func fetchOrders(completion: @escaping([Order]?) -> Void) {
            Alamofire.request("http://127.0.0.1:4000/orders").validate().responseJSON { response in
                guard response.result.isSuccess else { return completion(nil) }

                guard let rawOrders = response.result.value as? [[String: Any]?] else { return completion(nil) }

                let orders = rawOrders.flatMap { ordersDict -> Order? in
                    guard let orderId = ordersDict!["id"] as? String,
                          let orderStatus = ordersDict!["status"] as? String,
                          var pizza = ordersDict!["pizza"] as? [String: Any] else { return nil }

                    pizza["image"] = UIImage(named: pizza["image"] as! String)

                    return Order(
                        id: orderId,
                        pizza: Pizza(data: pizza),
                        status: OrderStatus(rawValue: orderStatus)!
                    )
                }

                completion(orders)
            }
        }

        @IBAction func closeButtonPressed(_ sender: Any) {
            dismiss(animated: true, completion: nil)
        }

        override func numberOfSections(in tableView: UITableView) -> Int {
            return 1
        }

        override func tableView(_ tableView: UITableView, numberOfRowsInSection section: Int) -> Int {
            return orders.count
        }

        override func tableView(_ tableView: UITableView, cellForRowAt indexPath: IndexPath) -> UITableViewCell {
            let cell = tableView.dequeueReusableCell(withIdentifier: "order", for: indexPath)
            let order = orders[indexPath.row]

            cell.textLabel?.text = order.pizza.name
            cell.imageView?.image = order.pizza.image
            cell.detailTextLabel?.text = "$\(order.pizza.amount) - \(order.status.rawValue)"

            return cell
        }

        override func tableView(_ tableView: UITableView, heightForRowAt indexPath: IndexPath) -> CGFloat {
            return 100.0
        }

        override func tableView(_ tableView: UITableView, didSelectRowAt indexPath: IndexPath) {
            performSegue(withIdentifier: "order", sender: orders[indexPath.row] as Order)
        }

        override func prepare(for segue: UIStoryboardSegue, sender: Any?) {
            if segue.identifier == "order" {
                guard let vc = segue.destination as? OrderViewController else { return }
                vc.order = sender as? Order
            }
        }
    }
The code above is similar to the code in the PizzaTableViewController above. However, instead of fetching the inventory, it fetches the orders and instead of passing the pizza in the last method, it passes the order to the next controller. The controller also comes with a closeButtonPressed method that just dismisses the controller and returns to the inventory list scene.
Creating the Order Status Scene
The next scene is the Order scene. In this scene, we can see the status of the order:

⚠️ The scene above has an invisible view right above the status label. You need to use this view to create an @IBOutlet to the controller.
Create a OrderViewController.swift file, make it the custom class for the scene above and paste in the following code:
    import UIKit

    class OrderViewController: UIViewController {

        var order: Order?

        @IBOutlet weak var status: UILabel!
        @IBOutlet weak var activityView: ActivityIndicator!

        override func viewDidLoad() {
            super.viewDidLoad()

            navigationItem.title = order?.pizza.name

            activityView.startLoading()

            switch order!.status {
            case .pending:
                status.text = "Processing Order"
            case .accepted:
                status.text = "Preparing Order"
            case .dispatched:
                status.text = "Order is on its way!"
            case .delivered:
                status.text = "Order delivered"
                activityView.strokeColor = UIColor.green
                activityView.completeLoading(success: true)
            }
        }
    }
In the code above, we are doing all the work in our viewDidLoad method. In there we have the ActivityIndicator class, which we will create next, referenced as an @IBOutlet.
Creating other parts of the application
We are using a third-party library called the ActivityIndicator but since we the package is not available via Cocoapods, we have opted to creating it ourselves and importing it. Create a new file in Xcode called ActivityIndicator and paste the code from the repo here into it.
Next, create a new Order.swift file and paste in the following code:
    import Foundation

    struct Order {
        let id: String
        let pizza: Pizza
        var status: OrderStatus
    }

    enum OrderStatus: String {
        case pending = "Pending"
        case accepted = "Accepted"
        case dispatched = "Dispatched"
        case delivered = "Delivered"
    }
Finally, create a Pizza.swiftand paste in the following code:
    import UIKit

    struct Pizza {
        let id: String
        let name: String
        let description: String
        let amount: Float
        let image: UIImage

        init(data: [String: Any]) {
            self.id = data["id"] as! String
            self.name = data["name"] as! String
            self.amount = data["amount"] as! Float
            self.description = data["description"] as! String
            self.image = data["image"] as! UIImage
        }
    }
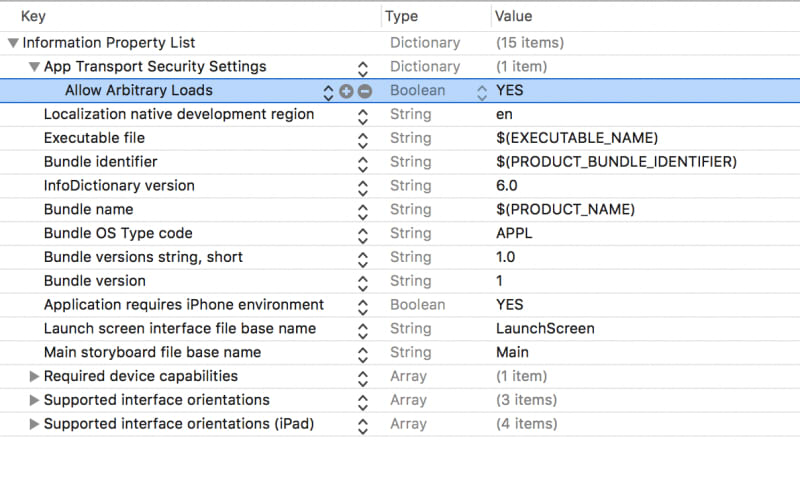
That is all for the client application. One last thing we need to do though is modify the info.plist file. We need to add an entry to the plist file to allow connection to our local server:
Let’s move on to the admin application.
Building the admin application
Launch a new instance of Xcode and create a new ‘Single Application’ project. We will name our project PizzaareaAdmin.
Once the project has been created, exit Xcode and create a new file called Podfile in the root of the Xcode project you just created. In the file paste in the following code:
    platform :ios, '11.0'

    target 'PizzareaAdmin' do
      use_frameworks!
      pod 'PusherSwift', '~> 5.1.1'
      pod 'Alamofire', '~> 4.6.0'
    end
In the file above, we specified the dependencies the project needs to run. Remember to change the `target*` above to the name of your project*. Now in your terminal, run the following command to install the dependencies:
$ pod install
After the installation is complete, open the Xcode workspace file that was generated by Cocoapods. This should relaunch Xcode.
When Xcode has been relaunched, open the Main.storyboard file and in there we will create the storyboard for our client application. Below is a screenshot of how we have designed our storyboard:
food-delivery-notifications-swift-app-flow
Above we have a navigation view controller that is the initial view controller.
Creating the orders list scene
The orders list scene is supposed to show the list of the clients orders and from there we can change the status of each order when we want.
Create a new file in Xcode called OrdersListViewController.swift, make it the custom class for the second scene and paste in the following code:
    import UIKit
    import Alamofire

    class OrdersTableViewController: UITableViewController {

        var orders: [Order] = []

        override func viewDidLoad() {
            super.viewDidLoad()

            navigationItem.title = "Client Orders"

            fetchOrders { orders in
                self.orders = orders!
                self.tableView.reloadData()
            }
        }

        private func fetchOrders(completion: @escaping([Order]?) -> Void) {
            Alamofire.request("http://127.0.0.1:4000/orders").validate().responseJSON { response in
                guard response.result.isSuccess else { return completion(nil) }

                guard let rawOrders = response.result.value as? [[String: Any]?] else { return completion(nil) }

                let orders = rawOrders.flatMap { ordersDict -> Order? in
                    guard let orderId = ordersDict!["id"] as? String,
                          let orderStatus = ordersDict!["status"] as? String,
                          var pizza = ordersDict!["pizza"] as? [String: Any] else { return nil }

                    pizza["image"] = UIImage(named: pizza["image"] as! String)

                    return Order(
                        id: orderId,
                        pizza: Pizza(data: pizza),
                        status: OrderStatus(rawValue: orderStatus)!
                    )
                }

                completion(orders)
            }
        }

        override func numberOfSections(in tableView: UITableView) -> Int {
            return 1
        }

        override func tableView(_ tableView: UITableView, numberOfRowsInSection section: Int) -> Int {
            return orders.count
        }

        override func tableView(_ tableView: UITableView, cellForRowAt indexPath: IndexPath) -> UITableViewCell {
            let cell = tableView.dequeueReusableCell(withIdentifier: "order", for: indexPath)
            let order = orders[indexPath.row]

            cell.textLabel?.text = order.pizza.name
            cell.imageView?.image = order.pizza.image
            cell.detailTextLabel?.text = "$\(order.pizza.amount) - \(order.status.rawValue)"

            return cell
        }

        override func tableView(_ tableView: UITableView, heightForRowAt indexPath: IndexPath) -> CGFloat {
            return 100.0
        }

        override func tableView(_ tableView: UITableView, didSelectRowAt indexPath: IndexPath) {
            let order: Order = orders[indexPath.row]

            let alertCtrl = UIAlertController(
                title: "Change Status",
                message: "Change the status of the order based on the progress made.",
                preferredStyle: .actionSheet
            )

            alertCtrl.addAction(createActionForStatus(.pending, order: order))
            alertCtrl.addAction(createActionForStatus(.accepted, order: order))
            alertCtrl.addAction(createActionForStatus(.dispatched, order: order))
            alertCtrl.addAction(createActionForStatus(.delivered, order: order))
            alertCtrl.addAction(createActionForStatus(nil, order: nil))

            present(alertCtrl, animated: true, completion: nil)
        }

        private func createActionForStatus(_ status: OrderStatus?, order: Order?) -> UIAlertAction {
            let alertTitle = status == nil ? "Cancel" : status?.rawValue
            let alertStyle: UIAlertActionStyle = status == nil ? .cancel : .default

            let action = UIAlertAction(title: alertTitle, style: alertStyle) { action in
                if status != nil {
                    self.setStatus(status!, order: order!)
                }
            }

            if status != nil {
                action.isEnabled = status?.rawValue != order?.status.rawValue
            }

            return action
        }

        private func setStatus(_ status: OrderStatus, order: Order) {
            updateOrderStatus(status, order: order) { successful in
                guard successful else { return }
                guard let index = self.orders.index(where: {$0.id == order.id}) else { return }

                self.orders[index].status = status
                self.tableView.reloadData()
            }
        }

        private func updateOrderStatus(_ status: OrderStatus, order: Order, completion: @escaping(Bool) -> Void) {
            let url = "http://127.0.0.1:4000/orders/" + order.id
            let params = ["status": status.rawValue]

            Alamofire.request(url, method: .put, parameters: params).validate().responseJSON { response in
                guard response.result.isSuccess else { return completion(false) }
                guard let data = response.result.value as? [String: Bool] else { return completion(false) }

                completion(data["status"]!)
            }
        }
    }
The code above is similar to the code in the PizzaListTableViewController in the client application and has been explained before.
There is a createActionForStatus which is a helper for creating and configuring UIAlertAction object. There is a setStatus method that just attempts to set the status for an order and then the updateOrderStatus method that sends the update request using Alamofire to the API.
Next, create the Order.swift and Pizza.swift classes like we did before in the client application:
    // Order.swift
    import Foundation

    struct Order {
        let id: String
        let pizza: Pizza
        var status: OrderStatus
    }

    enum OrderStatus: String {
        case pending = "Pending"
        case accepted = "Accepted"
        case dispatched = "Dispatched"
        case delivered = "Delivered"
    }


    // Pizza.swift
    import UIKit

    struct Pizza {
        let id: String
        let name: String
        let description: String
        let amount: Float
        let image: UIImage

        init(data: [String: Any]) {
            self.id = data["id"] as! String
            self.name = data["name"] as! String
            self.amount = data["amount"] as! Float
            self.description = data["description"] as! String
            self.image = data["image"] as! UIImage
        }
    }
That's all for the admin application. One last thing we need to do though is modify the info.plist file as we did in the client application.
Adding Push Notifications to our food delivery iOS app
At this point, the application works as expected out of the box. We now need to add push notifications to the application to make it more engaging even when the user is not currently using the application.
⚠️ You need to be enrolled to the Apple Developer program to be able to use the Push Notifications feature. Also Push Notifications do not work on Simulators so you will need an actual iOS device to test.
Pusher’s Push Notifications API has first-class support for native iOS applications. Your iOS app instances subscribe to Interests; then your servers send push notifications to those interests. Every app instance subscribed to that interest will receive the notification, even if the app is not open on the device at the time.
This section describes how you can set up an iOS app to receive transactional push notifications about your food delivery orders through Pusher.
Configure APNs
Pusher relies on Apple Push Notification service (APNs) to deliver push notifications to iOS application users on your behalf. When we deliver push notifications, we use your APNs Key. This page guides you through the process of getting an APNs Key and how to provide it to Pusher.
Head over to the Apple Developer dashboard by clicking here and then create a new Key as seen below:
When you have created the key, download it. Keep it safe as we will need it in the next section.
⚠️ You have to keep the generated key safe as you cannot get it back if you lose it.
Creating your Pusher application
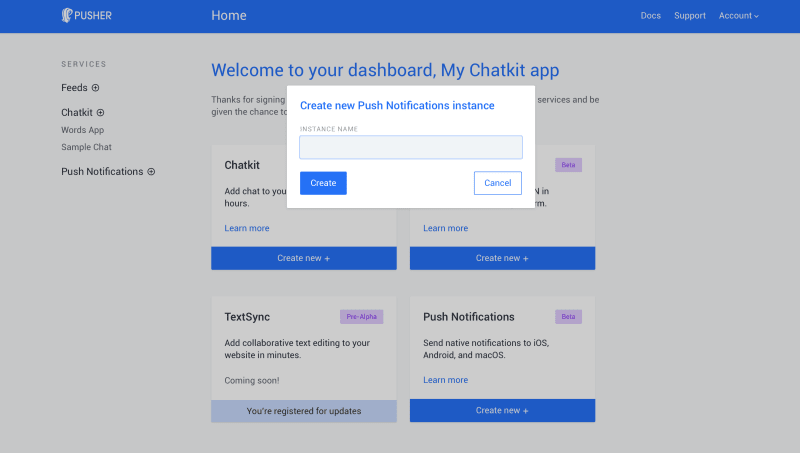
The next thing you need to do is create a new Pusher Push Notification application from the Pusher dashboard.
When you have created the application, you should be presented with a Quickstart wizard that will help you set up the application.
In order to configure Push Notifications you will need to get an APNs key from Apple. This is the same key as the one we downloaded in the previous section. Once you’ve got the key, upload it to the Quickstart wizard.
Enter your Apple Team ID. You can get the Team ID from here. Click on the continue to proceed to the next step.
Updating your client application to support Push Notifications
In your client application, open the Podfile and add the following pod to the list of dependencies:
pod 'PushNotifications'
Now run the pod install command as you did earlier to pull in the notifications package. When installation is complete, create a new class AppMisc.swift and in there paste the following:
    class AppMisc {
      static let USER_ID = NSUUID().uuidString.replacingOccurrences(of: "-", with: "_")
    }
In the little class above, we generate a user ID for the session. In a real application, you would typically have an actual user ID after authentication.
Next open the AppDelegate class and import the PushNotifications package:
import PushNotifications
Now, as part of the AppDelegate class, add the following:
    let pushNotifications = PushNotifications.shared

    func application(_ application: UIApplication, didFinishLaunchingWithOptions launchOptions: [UIApplicationLaunchOptionsKey: Any]?) -> Bool {
      self.pushNotifications.start(instanceId: "PUSHER_NOTIF_INSTANCE_ID")
      self.pushNotifications.registerForRemoteNotifications()
      return true
    }

    func application(_ application: UIApplication, didRegisterForRemoteNotificationsWithDeviceToken deviceToken: Data) {
      self.pushNotifications.registerDeviceToken(deviceToken) {
        try? self.pushNotifications.subscribe(interest: "orders_" + AppMisc.USER_ID)
      }
    }
** 💡 Replace PUSHER_PUSH_NOTIF_INSTANCE_ID with the key given to you by the Pusher application.**
In the code above, we set up push notifications in the application(didFinishLaunchingWithOptions:) method and then we subscribe in the application(didRegisterForRemoteNotificationsWithDeviceToken:) method.
Next, we need to enable push notifications for the application. In the project navigator, select your project, and click on the Capabilities tab. Enable Push Notifications by turning the switch ON.
Updating your admin application to support Push Notifications
Your admin application also needs to be able to receive Push Notifications. The process is similar to the set up above. The only difference will be the interest we will be subscribing to in AppDelegate which will be orders.
Updating your API to send Push Notifications
Push Notifications will be published using our backend server API which is written in Node.js. For this we will use the Node.js SDK. cd to the backend project directory and run the following command:
$ npm install pusher-push-notifications-node --save
Next, open the index.js file and import the pusher-push-notifications-node package:
    const PushNotifications = require('pusher-push-notifications-node');

    let pushNotifications = new PushNotifications({
        instanceId: 'PUSHER_PUSH_NOTIF_INSTANCE_ID',
        secretKey: 'PUSHER_PUSH_NOTIF_SECRET_KEY'
    });
Next, we want to add a helper function that returns a notification message based on the order status. In the index.js add the following:
    function getStatusNotificationForOrder(order) {
        let pizza = order['pizza']
        switch (order['status']) {
            case "Pending":
                return false;
            case "Accepted":
                return `⏳ Your "${pizza['name']}" is being processed.`
            case "Dispatched":
                return `😋🍕 Your "${order['pizza']['name']}" is on it’s way`
            case "Delivered":
                return `🍕 Your "${pizza['name']}" has been delivered. Bon Appetit.`
            default:
                return false;
        }
    }
Next, in the PUT /orders/:id route, add the following code before the return statement:
  let alertMessage = getStatusNotificationForOrder(order)

    if (alertMessage !== false) {
       pushNotifications.publish([`orders_${user_id}`], {
            apns: {
                aps: {
                    alert: {
                        title: "Order Information",
                        body: alertMessage,
                    },
                    sound: 'default'
                }
            }
        })
        .then(response => console.log('Just published:', response.publishId))
        .catch(error => console.log('Error:', error));
    }
In the code above, we send a push notification to the **orders_${user_id}** interest (user_id is the ID generated and passed to the backend server from the client) whenever the order status is changed. This will be a notification that will be picked up by our client application since we subscribed for that interest earlier.
Next, in the POST /orders route, add the following code before the return statement:
    pushNotifications.publish(['orders'], {
        apns: {
            aps: {
                alert: {
                    title: "⏳ New Order Arrived",
                    body: `An order for ${pizza['name']} has been made.`,
                },
                sound: 'default'
            }
        }
    })
    .then(response => console.log('Just published:', response.publishId))
    .catch(error => console.log('Error:', error));
In this case, we are sending a push notification to the orders interest. This will be sent to the admin application that is subscribed to the orders interest.
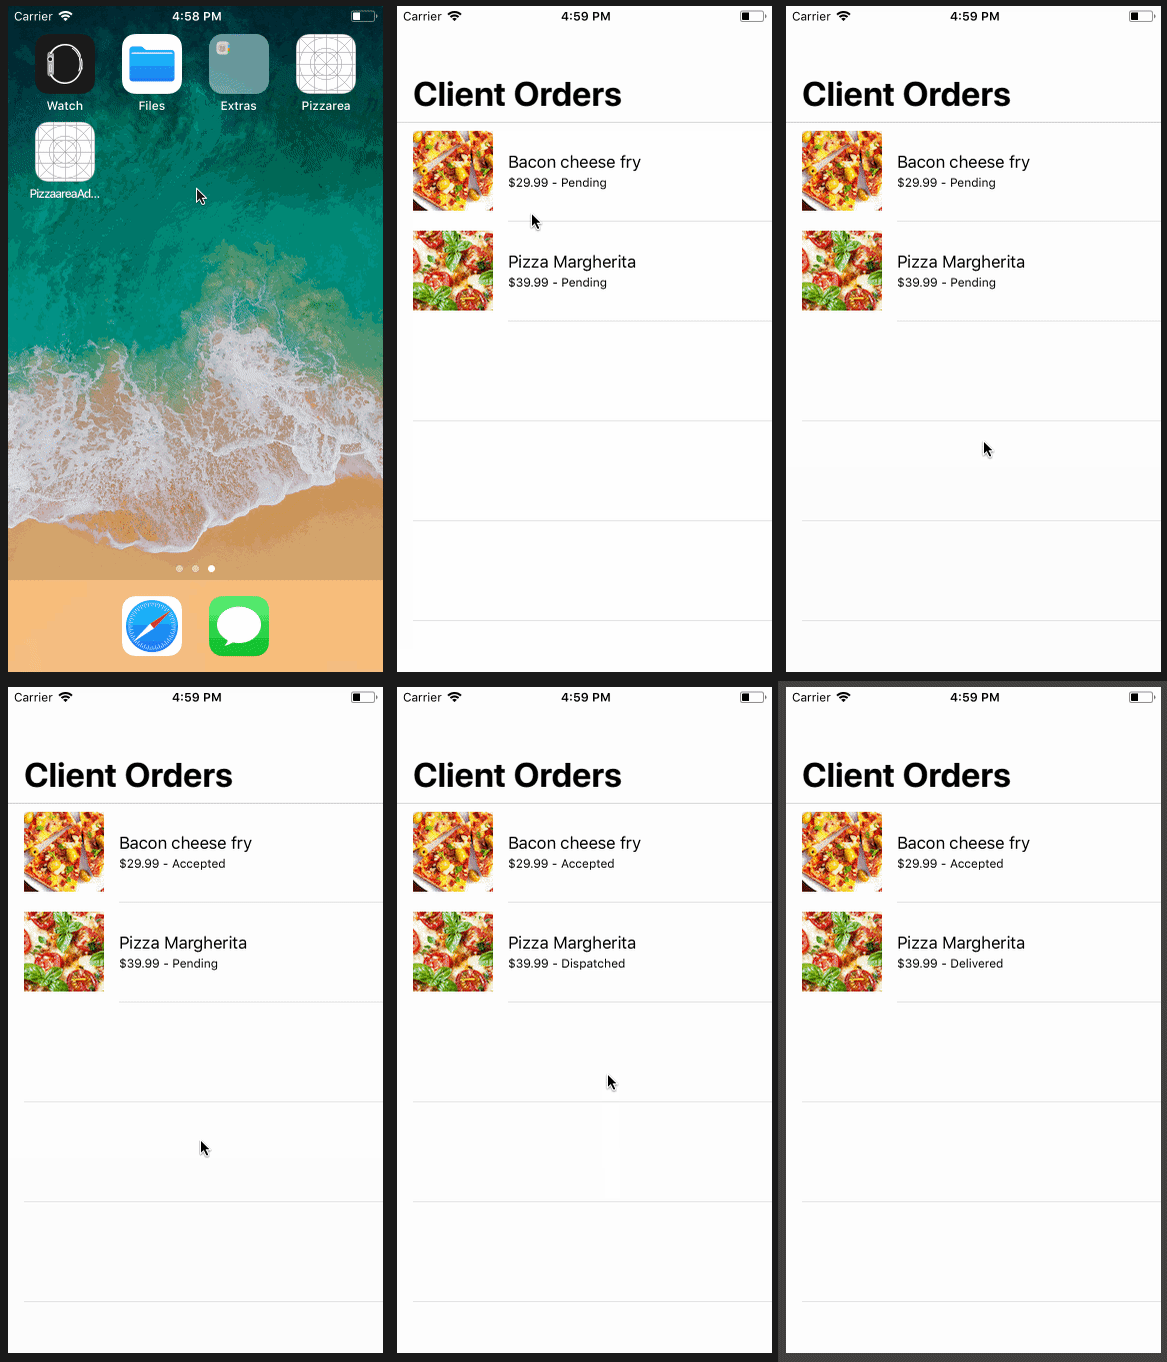
That’s all there is to adding push notifications using Pusher. Here are screen recordings of our applications in action:
Conclusion
In this article, we created a basic food delivery system and used that to demonstrate how to use Pusher to send Push Notifications in multiple applications using the same Pusher application. Hopefully you learnt how you can use Pusher to simplify the process of sending Push Notifications to your users.
This post first appeared on the Pusher blog.






Top comments (0)