Introduction
This is a guide to creating a new Vue project using Vue CLI v3.x. Coming from Vuejs v2.x, it might be a bit overwhelming since there are quite a few options available to choose from. In this guide you will be shown:
- How to create a simple project with the bare minimum
- How to add plugins after the project has been created
- How to save your preferences so you can quick-select them the next time you create a project and
- How to use the Vue UI to create and manage projects
Creating a project with the bare minimum
Even for a Vue project where you don't need anything else like Vue Router or Vuex, you will still need Babel. You might also need a linter, but that's not exactly necessary and depends on whether you use one.
# Create a new project with 'vue create project-name'
vue create sample-project
After running this command, Vue will create a new project in the current directory with the name sample-project. But before creating the project, it presents a series of options. These options look like the following for me:

These options that are presented to us are called presets. A preset contains various plugins/options that are bundled together with other configuration options so that selecting a preset would mean selecting all those options.
For example, there is a preset called default which is the preset available when we create a project for the first time. It has babel and eslint as options/features. So if we select this default preset, our project named sample-project would be created and have babel and eslint installed during project creation. Of course, it's not necessary to select a preset. As can be seen from the picture above, we can also manually select what options and plugins we want. A preset is there to save us some time and make project creation faster. Here you can select the default preset since we are creating a project with the bare minimum.
Navigate with your arrow keys and press enter to select a preset or select the option to manually select your options if you don't want eslint that comes along with babel in the default preset.
Creating your own presets
Selecting an option and navigating the options list
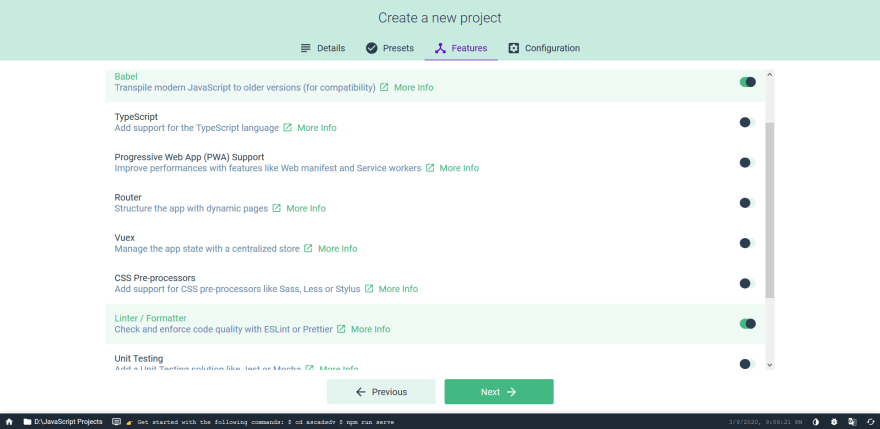
Instead of selecting a preset, if you choose to pick the options manually, you will be presented with a list of all the options available. I was a bit confused when navigating and interacting with the options/features list. If you are as well, here's a short explanation:
- Pressing
awill toggle all the options. So pressing it the first time will select all of them and pressing it again will deselect all options. - Pressing
spacewill select an option while pressingenterwill finalize your selection. Make sure you don't mix these two up! You'll either have to start again or spend time removing/installing features. Pressingspaceonly selects the option that is highlighted, you can still pressspaceto deselect that particular option and continue selecting your features. Pressingenterwill finalize your selections and Vue will move ahead to create your project with the features that are selected on the list. - Pressing
iwill invert your selections. For example, if you have selected Router and TypeScript from the features list, pressingiwill invert your list. This means Router and TypeScript will be deselected and all other options will be selected.
Extra options when selecting certain features
Usually, after selecting the features you want and pressing enter, you are asked where you want your config files to be kept - in dedicated config files or in package.json.
But before being asked where you want to save your config files, if you have selected features like linting or CSS preprocessors, then you will be asked to pick one among them. For example, if you select linting, you will be provided with the following options:

After manually selecting the features you want, selecting your linter, preprocessor, etc of choice (if you did pick options like the linter and CSS preprocessor features) and selecting where you want to store your config files, you will see an option which will ask you whether you want to save whatever you have selected till now as a preset.
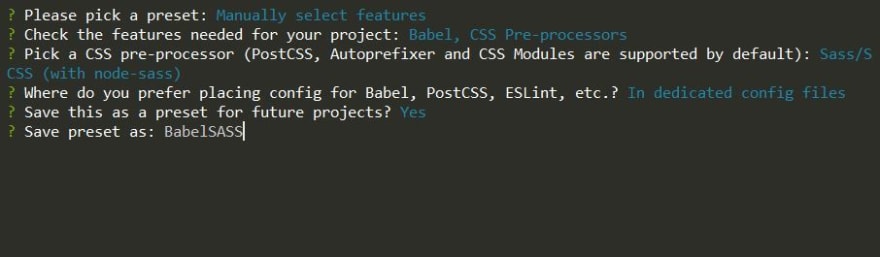
So if I save my choice of CSS preprocessor and Babel as a preset and give it a name, that means the next time I create a Vue project, I only have to select this preset at the start and it will automatically select the rest of the options (including the option about config files) for me and create the project.
So to create your own preset - manually select the features you want, select all the options, and then go for saving your choices as a preset and give it a name. That's it, you now have your own preset.
Adding a plugin after your project has been created
During project creation, you can select the features you want to add to your project. These features are implemented as plugins since Vue CLI uses a plugin-based architecture.
If you look for the features you added during project creation in your project's package.json, you will find they begin with @vue/cli-plugin-. Taking TypeScript as an example, if we install TypeScript as a package using npm, we would see something like this in the package.json:
{
    "dependencies": {
        "typescript": "3.8.3"
    }
}
On the other hand, adding TypeScript as a feature during project creation with the Vue CLI, you get something like this:
{
    "devDependencies": {
        "@vue/cli-plugin-typescript": "^4.2.0"
    }
}
Note that the version number of the packages are from installing them normally at the time of writing this post.
Now, although you have all the features/plugins you want in your project, there might come a time when you need a feature that you didn't need before or didn't think you'd need. All it takes is a command to add the package:
vue add vuetify
Here we add the Vuetify plugin to our project. You can add any other plugin you need with the same command - vue add plugin-name.
You can find the documentation for the core Vue CLI plugins here. There are also other official plugins besides these which also have good documentation.
Using Vue UI to create a new project
Along with creating a project with the CLI commands, there's also a GUI available for creating new projects and managing existing ones.
For existing projects, you can add and delete plugins, dependencies among other things. You can also update existing plugins and dependencies to the latest version.
To use the GUI, enter the following command in the console:
vue ui
The GUI will open in your browser.
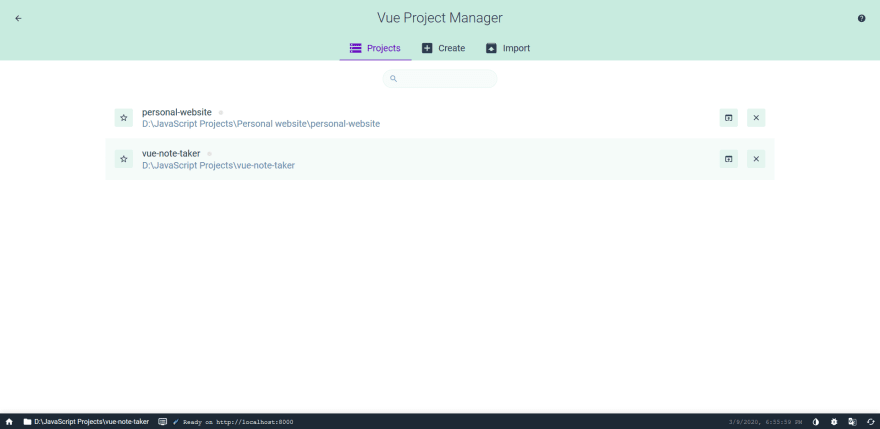
The Projects tab shows the existing Vue projects. The Create tab is the one we need. Clicking it, select the folder you want to create your project in and click to start creating a new project at that location.
Give a name to the project folder, select the options you want, and move on to the next step. The steps that follow are the same as the one in the CLI version:
- Select a preset or manually select features
- If you selected features manually, you may save them as a preset
- A new project is created
Wrapping up
This is it for this guide. I hope this post will help you in creating projects with the Vue CLI. If you have any questions or suggestions, feel free to talk in the comments below.

Top comments (1)
👍