Please check the previous part to know the background of this project.
In this part, we'll dive into code and deploy a simple API to AWS Lambda and Api Gateway.
I'll be using Python Flask framework for defining the APIs and Serverless framework to manage the infrastructure and deployment.
Please make sure you have Python3 and relatively newer version of nodejs installed and working to follow along.
The first step is to create a new project folder and initialise package.json file which will be used to define and install Serverless plugins.
$ mkdir api-exchange-server
$ cd api-exchange-server

$ npm init
$ # Enter all the way to generate package.json file
Installing Serverless CLI.
$ npm install -D serverless # Although better to install this globally
If Serverless CLI is installed globally then you don't need to prefix the serverless commands with ./nodes_modules/.bin/.
Let's create a new project
$ ./node_modules/.bin/serverless
Name the project serverless-project. Ignore the project name as we'll move the files to the current folder.
We'll just copy the files that we need from the generated project.
$ mv serverless-project/serverless.yml .
$ mv serverless-project/.gitignore .
$ rm -rf serverless-project
After removing the folder generated by the Serverless CLI, this is how the structure looks like
$ ls -la
total 336
drwxr-xr-x    7 nmn  staff     224  1 Jan 09:00 .
drwxr-xr-x   15 nmn  staff     480  1 Jan 08:53 ..
-rw-r--r--    1 nmn  staff     192  1 Jan 08:58 .gitignore
drwxr-xr-x  386 nmn  staff   12352  1 Jan 08:54 node_modules
-rw-r--r--    1 nmn  staff  156725  1 Jan 08:54 package-lock.json
-rw-r--r--    1 nmn  staff     271  1 Jan 08:54 package.json
-rw-r--r--    1 nmn  staff    3206  1 Jan 08:58 serverless.yml
Let's open the folder in your favourite text editor.
To connect AWS Lambda to Flask handlers, we'll need to install serverless-wsgi plugin to do the necessary transformation.
$ ./node_modules/.bin/serverless plugin search -q wsgi
1 plugin(s) found for your search query "wsgi"

serverless-wsgi - Serverless plugin to deploy WSGI applications (Flask/Django/Pyramid etc.) and bundle Python package

To install a plugin run 'serverless plugin install --name plugin-name-here'

It will be automatically downloaded and added to your package.json and serverless.yml file
As stated by the really useful help message, we'll install this plugin.
$ ./node_modules/.bin/serverless plugin install --name serverless-wsgi
Next, we'll create a simple flask Api which will return the environment variables in json. As this code will run on Lambda, you'll be able to see all the environment variables available for the function.
File -> New -> "api.py"
import os
from flask import Flask, jsonify

app = Flask(__name__)


@app.route("/", methods=["GET"])
def environ():
    return jsonify({k:v for k, v in os.environ.items()})
Just noticed that we haven't installed Flask yet so let's create a requirements file and install it in a new virtualenv.
$ python3 -m venv venv
$ source venv/bin/activate
$ pip install flask
$ pip freeze > requirements.txt
With the project completed, we can test the Api by running it locally.
$ FLASK_APP=api.py flask run
Next we need to tell/configure Serverless framework to connect Lambda to Flask App. There are few ways to setup the integration.
Here we'll be using AWS Lambda Proxy integration for the API handler.
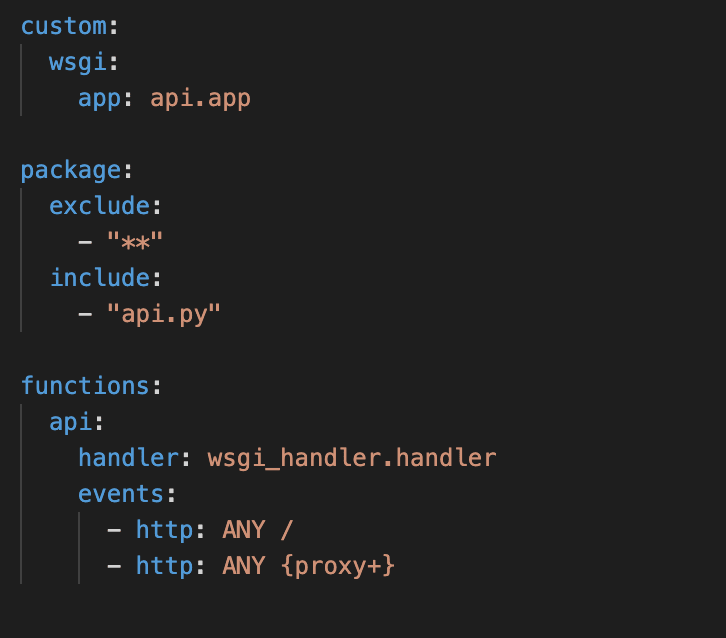
functions:
  api:
    handler: wsgi_handler.handler
    events:
      - http: ANY /
      - http: ANY {proxy+}
We also need to tell wsgi plugin where to find the Flask API, so let define a custom section for this.
custom:
  wsgi:
    app: api.app
Although the wsgi plugin can manage python dependencies, I had better luck with using a different plugin serverless-python-requirements so we'll install it as well
$ ./node_modules/.bin/serverless plugin install --name serverless-python-requirements
Now let's try packaging up the app.
$ ./node_modules/.bin/serverless package
If successful, the generated zip file will be placed in .serverless folder. If we examine that file, we'll find that it contains all the files in the current folder including the giant venv and node_modules folder 😱.
I'm sure python requirements folder is right up there as well.
Luckily, we can configure what to include in the zip file so we'll exclude everything and just add the file that we need to run the application. Note that the plugin will still take care of all the python dependencies defined in requirements.txt file.
package:
  exclude:
    - "**"
  include:
    - "api.py"
This is what it looks like with the changes that we made in the serverless.yml file.
You can also check the complete file.
That should be everything to deploy on AWS Lambda. The next step requires an AWS profile with appropriate permissions to deploy and create Lambda resources.
Note that this is where you may be charged.
$ AWS_PROFILE=myprofile ./node_modules/.bin/serverless deploy -v
It will take some time to create all the resources before printing out the endpoints that it generated for the Api Gateway.

You should be able to hit the above endpoint via curl or open it up directly in the browser. There you can see all the environment variables available to your lambda function.
curl -v https://mcb1lbc2ti.execute-api.us-east-1.amazonaws.com/dev
# or
open https://mcb1lbc2ti.execute-api.us-east-1.amazonaws.com/dev
Once you are done with it, don't forget to remove the setup.
$ AWS_PROFILE=myprofile ./node_modules/.bin/serverless remove -v

Top comments (0)