The continuation of this tutorial is here connect to firebase and persist data
In this following tutorial, we will build a simple REST web service using java with spring boot.
Here is the complete video if you like to watch the video instead.
What is a Web Service?
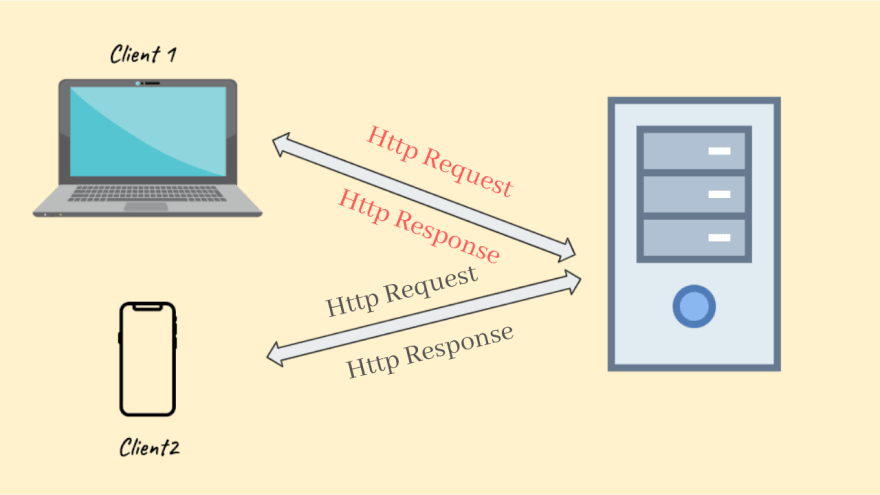
Web Service is a standard or common way of communication between a client and a server.
The above diagram shows the pictorial representation of a web service call, the clients a computer, or a phone are basically clients, when you try to perform open facebook app your mobile phone app, it sends a web service request (Http Request) to get the data to show on your feed.
There are in general two kinds of web services in usage
- SOAP (Simple Object Access Protocol).
- REST (REpresentational State Transfer).
SOAP: SOAP as the name says it's an access protocol to make requests and receive responses based on a protocol that will be defined between the client and the server.
There are many caveats of using SOAP one of it is you can only transfer and receive XML data when using a SOAP web service. Hence restful web services came into existence.
REST: Rest as the name says its a state of transferring data between clients and servers, there are no set protocols attached to it, you can send any kind of data, XML, JSON, TEXT, FILE format data using REST web services, in most cases, you will be using JSON format.
SPRING BOOT makes it so much easier to build REST web services from the ground up, it provides a lot of configuration inbuilt so that you can build web services/ microservices rapidly, it also provides inbuilt tomcat server which removes the hassle of having a server install in and deploy your JAR/WAR file like the old times, we will see how to build the rest web service using Spring boot, Java and maven build tool.
Using the spring tool suite we can create a sample spring boot project. Go to File -> New -> Other Project and select Spring boot-> Spring boot Starter project it will create you a default spring boot project.
Follow the steps on STS/eclipse and you will have your demo application created and you should be able to see a java file named DemoApplication.java (Demo is the name of the project) which will look something like this.
package com.example.demo;

import org.springframework.boot.SpringApplication;

import org.springframework.boot.autoconfigure.SpringBootApplication;

@SpringBootApplication

public class DemoApplication {

    public static void main(String[] args) {

        SpringApplication.run(DemoApplication.class, args);

    }

}
@SpringBootApplication annotation takes care of three annotations combined
@Configuration: Tags the class as a source of bean definitions for the application context.
@EnableAutoConfiguration: Tells Spring Boot to start adding beans based on classpath settings, other beans, and various property settings. For example, if spring-webmvc is on the classpath, this annotation flags the application as a web application.
@ComponentScan: Tells Spring to look for other components, configurations, and services in the base package in our case com.example.demo letting it find the controllers.
If you have never used Spring MVC you might have not known of these annotations. Spring boot starter project also creates a POM.XML like below which will have all the required dependencies except spring-boot-starter-web dependency which we need to add for creating Rest web service.
<?xml version="1.0" encoding="UTF-8"?>

<project xmlns="http://maven.apache.org/POM/4.0.0"xmlns:xsi="http://www.w3.org/2001/XMLSchema-instance"xsi:schemaLocation="http://maven.apache.org/POM/4.0.0https://maven.apache.org/xsd/maven-4.0.0.xsd">

    <modelVersion>4.0.0</modelVersion>

    <parent>

        <groupId>org.springframework.boot</groupId>

        <artifactId>spring-boot-starter-parent</artifactId>

        <version>2.2.2.RELEASE</version>

        <relativePath/> <!-- lookup parent from repository -->

    </parent>

    <groupId>com.example</groupId>

    <artifactId>demo</artifactId>

    <version>0.0.1-SNAPSHOT</version>

    <name>demo</name>

    <description>Demo project for Spring Boot</description>

    <properties>

        <java.version>1.8</java.version>

    </properties>

    <dependencies>

        <dependency>

            <groupId>org.springframework.boot</groupId>

            <artifactId>spring-boot-starter-web</artifactId>

        </dependency>

        <dependency>

            <groupId>org.springframework.boot</groupId>

            <artifactId>spring-boot-starter</artifactId>

        </dependency>

        <dependency>

            <groupId>org.springframework.boot</groupId>

            <artifactId>spring-boot-starter-test</artifactId>

            <scope>test</scope>

            <exclusions>

                <exclusion>                 <groupId>org.junit.vintage</groupId>

            <artifactId>junit-vintage-engine</artifactId>

                </exclusion>

            </exclusions>

        </dependency>

    </dependencies>

    <build>

        <plugins>

            <plugin>                <groupId>org.springframework.boot</groupId>

                <artifactId>spring-boot-maven-plugin</artifactId>

            </plugin>

        </plugins>

    </build>

</project>
Now we will go ahead and create a controller class that will have our REST endpoints, which will look something like below.
package com.example.demo.controller;

import org.springframework.web.bind.annotation.DeleteMapping;

import org.springframework.web.bind.annotation.GetMapping;

import org.springframework.web.bind.annotation.PostMapping;

import org.springframework.web.bind.annotation.PutMapping;

import org.springframework.web.bind.annotation.RequestBody;

import org.springframework.web.bind.annotation.RequestHeader;

import org.springframework.web.bind.annotation.RestController;

import com.example.demo.object.Person;

@RestController

public class UserController {

    @GetMapping("/getUserDetails")

    public String getUserDetails(@RequestHeader String name) {

        return "Requesting Details of User"+name;

    }

    @PostMapping("/createUser")

    public String createNewUser(@RequestBody Person person) {

        return "Created new User "+person.getName();

    }

    @PutMapping("/updateUser")

    public String updateUser(@RequestBody Person person) {

        return "Updated user "+person.getName();

    }

    @DeleteMapping("/deleteUser")

    public String deleteUser(@RequestBody Person person) {

        return "Deleted User "+person.getName();

    }

}
HTTP Methods: There are four main HTTP methods that we use in common for web service calls they are
- GET (used to retrieve existing data).
- POST (used to create/insert new data).
- PUT (used to update existing data).
- DELETE (used to delete data).
We have implemented all these methods in the above UserController class.
@RestController lets the spring boot application that this class is a controller class having rest endpoints so that spring configures this class to its HTTP routes.
@GetMapping, having this annotation makes the corresponding method is called when a get call is made to the endpoint /getUserDetails.
Similarly @PostMapping, @PutMapping, @DeleteMapping calls the corresponding methods/functions when those methods are used.
@RequestHeader captures the data sent in the header parameters and @RequestBody captures the data sent in the body of the Rest Call.
That is all you need to bring up the service, set up the run configurations in STS or whichever IDE you might be using pointing to the DemoApplication.java class as the main class, it boots up the spring application using inbuilt tomcat and your services will be available on PORT 8080 by default.
You can follow through this video if you need any help in getting it up and running
The continuation of this tutorial is here connect to firebase and persist data


Top comments (4)
Super bro
Thank you 🙏
Very useful... pls create some posts of spring boot for kotlin.. :)
Thank you, I will try!