I tried various ways in the past to keep a record of my expenses. It started with maintaining a record in a book. But this wasn’t an ideal solution and involved manual work. I tried using everyone’s favorite — spreadsheets, but it failed me. I still had to manually enter the information of my expenses. I also tried various apps, but none of them catered to my needs. They all lacked the option to customize the way I wanted to upload the information.
I built an app!
I came across the article Automatically Adding Expense Receipts to Google Sheets with Telegram, Mindee, Twilio, and n8n 🧾 that showed how to build a Telegram bot to track expenses. This article inspired me to create an app for managing my expenditures. But creating a mobile app would mean designing the user interface of the app and transforming the design into a functional app. This was going to be a long process, and I was looking for a less complicated and faster solution, and that is when I learnt about Bravo Studio. With Bravo Studio, you can convert your Figma designs into a mobile app. I had never used a no-code platform to build a mobile app, and Bravo Studio piqued my interest.
I ended up creating an app that captures the image of a receipt and stores the information parsed from it in Airtable. I am now storing my data in my Airtable account, and I can use it the way I want. I would also have the flexibility to add more features that I might need in the future.
If you’re struggling with managing expenses like me, and if you want to build your custom app, follow along with this article.
In this article, we will learn to build an expense tracker app using no-code tools and platforms. We will start by designing our application in Figma and converting it into an app using Bravo Studio. We will use Typeform to collect the images of the receipts, Mindee to extract the information from the receipts, and Airtable to store all the information. We will use n8n to connect these different services and make the app functional.
Prerequisites
Figma
Figma is a prototyping tool. We will use Figma to design the user interface of our application. If you don’t have an account on Figma, go ahead and create one.
Bravo Studio
Bravo Studio is a no-code tool to build native applications. We will use Bravo Studio to transform our Figma design into a mobile app. Create an account on Bravo Studio if you don’t have one. To test our application on a real device we will use Bravo Vision.
Typeform
Our application needs an input field that will allow the users to upload images, as well as trigger our n8n workflow. We will use Typeform to handle that. Create an account on Typeform and make a form with the question type ‘File Upload’.
Note: You need to have a premium account on Typefrom to access the ‘File Upload’ question type. If you don’t have a premium account, use the code n8nxTypeform_2021 to get free access for a month.
Mindee
Once we have the image of the receipt, we need a service to extract the information from it. We will use Mindee to extract information like merchant name, amount, date of purchase, etc. from the image. You will need an account on Mindee to access the Expense Receipts API.
Airtable
Our app will use Airtable as the database to store and retrieve information from. We will need an Airtable account to create a base and connect it with Bravo Studio. Sign in to your Airtable account and open this base. Click on the Copy base button on the top right corner to copy the base in your account.
Note: If you change the name of the columns, or the name of the Table, make sure to make the changes in the n8n workflow accordingly.
n8n
Our application is using different services like Typeform, Mindee and Airtable. n8n will connect these services together and make our app functional. Follow the instructions mentioned in the documentation to install and spin-up an n8n instance on your machine. You can also sign-up for n8n.cloud to get early access to our hosted service.
This workflow was built in n8n version 0.101.0.
Quickstart
We often tend to jump to the results before committing to the steps of the experiment if we are aware of the subject. If you already know how to work with Bravo Studio and n8n, you can follow the quick-start instructions below to get to the endgame. If something is unclear or you want to learn more about how it works, feel free to dig deeper into the sections that follow.
Typeform
- Create a form in Typeform with the question type ‘File Upload’.
- Enter Upload Receipt in the text box where it indicates ‘Type question here…’.
- Publish the Typeform and copy the link under the ‘SHARE’ tab.
Figma
- To duplicate this Figma Design open it in a new tab.
- Click on the down chevron next to Expense Tracker and select ‘Duplicate to your Drafts’ from your dropdown list.
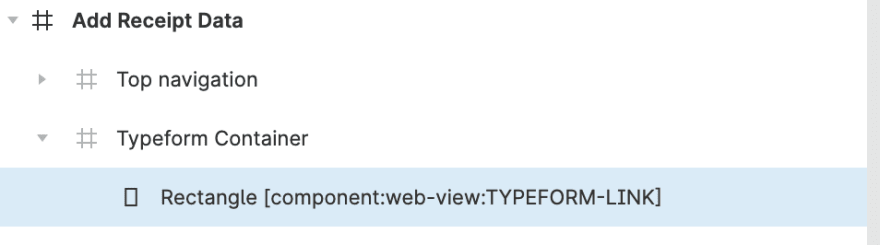
- Replace ‘TYPEFORM-LINK’ in Add Receipts Data > Typeform Container > Rectangle[component:web-view:TYPEFORM-LINK] with your form’s link.
n8n
Install n8n, and copy and paste the workflow from the workflow page. Configure the credentials for the following nodes:
- Typeform Trigger node (Get Receipt): configure Access Token credentials and make sure to select your form from the Form dropdown list.
- Mindee node (Extract Information): configure credentials for the Expense Receipts API.
- Airtable node (Store Information): configure credentials and enter the application id and the table name in the Base ID and Table field respectively.
Save the workflow and set it to active.
Bravo Studio
- Create an app in Bravo Studio by importing the Figma design from step 2.
- Add Airtable as a data library in Bravo Studio. You can follow the instructions mentioned in the official documentation.
- Bind the data from your Airtable base to your Bravo Studio app. You can learn how to do that from the documentation of Bravo Studio.
NOTE : If you were successfully able to follow the steps mentioned above, you can jump directly to the Testing the Application section before going through the conceptual sections.
Creating the User Interface
To add the expense in our app, a user will upload an image of the receipt. We will use a Typeform form to get the image of the receipt from the user. Create a form in Typeform with the question type ‘File Upload’. Publish the Typeform and copy the link under the ‘SHARE’ tab. We will use this link in Figma to embed the form.
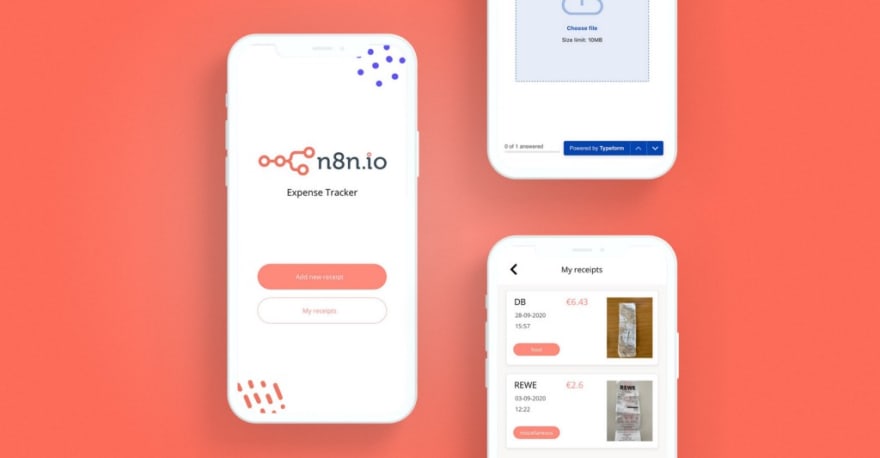
We want to create an app with our custom design and functionality. We will use Figma to design the prototype of the app. Below is the screenshot of the app’s design created in Figma.
Our app will have three screens:
- A welcome screen which gives the user an option to either add a new receipt or view the stored receipts.
- An ‘Add Receipt Data’ screen that will allow the user to upload new receipts using the form we created in Typeform.
- A ‘Review Added Receipts’ screen to view all the receipts added by the user.
The design that we create in Figma should be compatible with Bravo Studio. To design a Bravo Studio app in Figma there are a few things to consider:
- Containerize your design: To make our Figma app design adaptable in Bravo Studio, wrap the layers in containers. These containers are frames that divide an app screen into separate blocks based on the intended behavior of the design. In our app, we will need to create the following containers:
- Main Container : The Welcome Screen contains a container that consists of all the layers and the ‘App Buttons’ container.
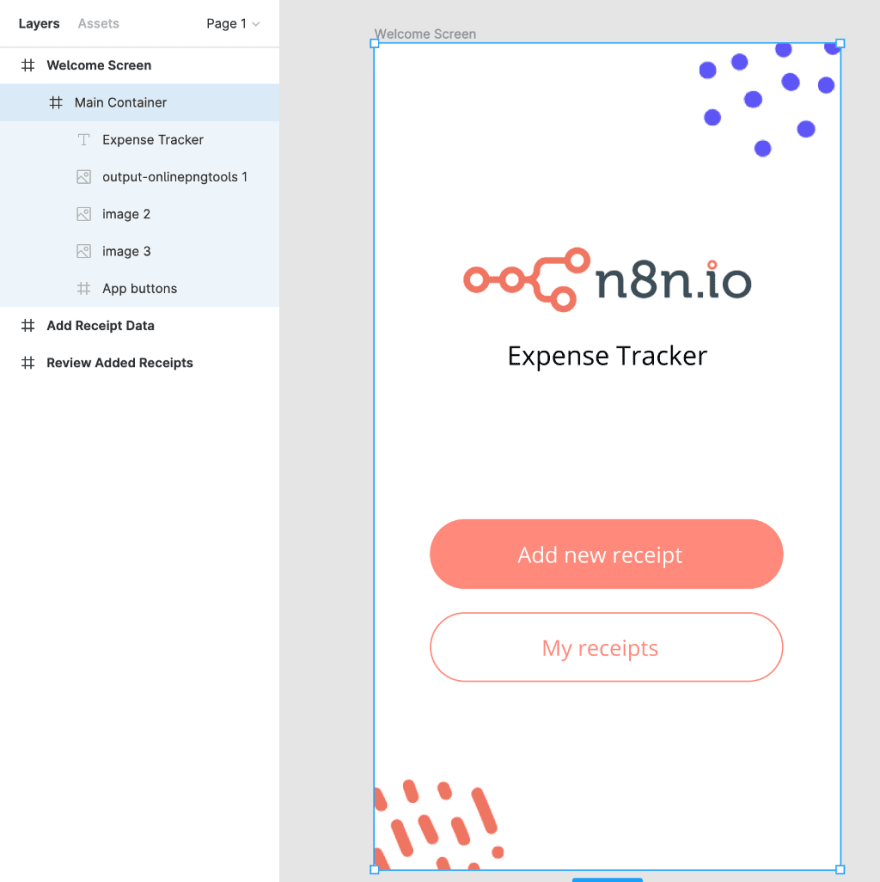
- App Buttons : This container consists of the ‘Add new receipt’ and ‘My receipts’ button on the Welcome Screen.

- Top navigation : We need a container that helps us navigate back to the welcome screen. The Top navigation container will contain an image for the back button and the title of the screen. We will add this container to the Add Receipt Data screen and the Review Added Receipts screen.
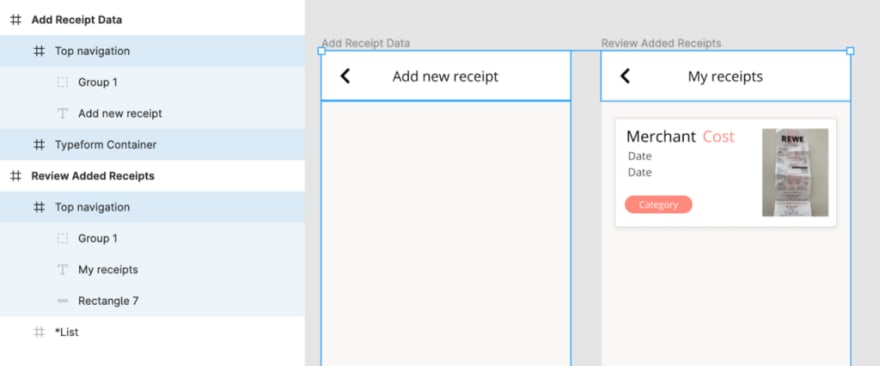
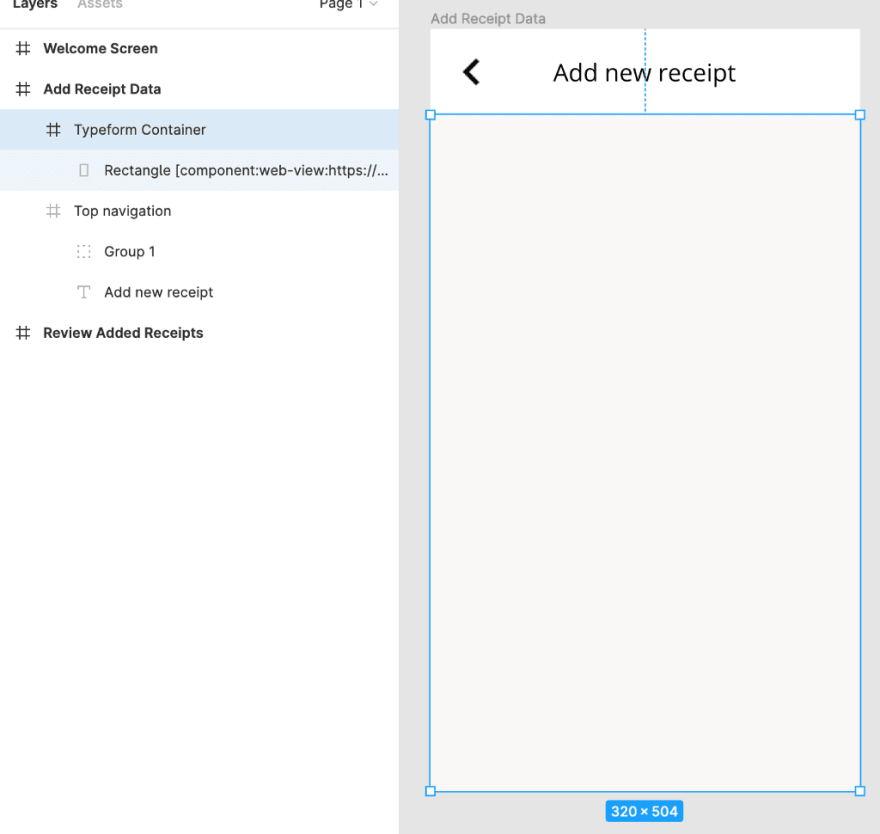
- Typeform Container : The Typeform Container contains a rectangle layer that will render the Typeform. We will add this container to the ‘Add new receipt’ screen.
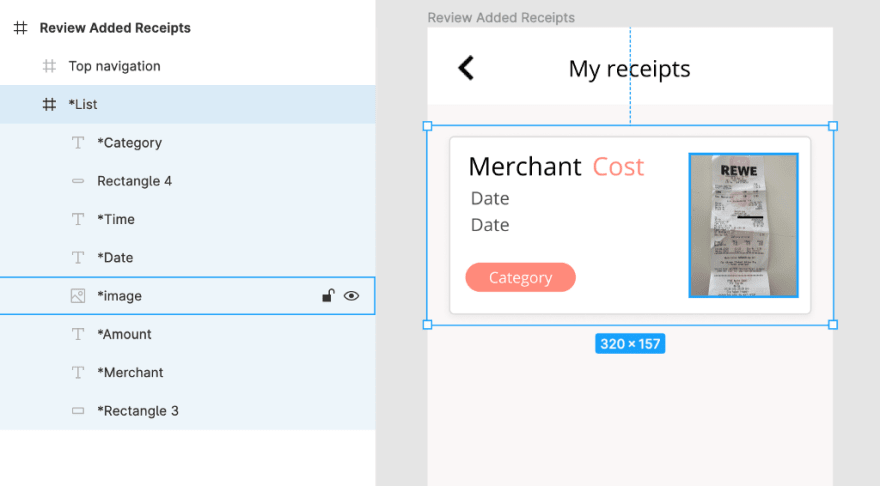
- *List: This container consists of the layers that will render the receipts information such as the merchant name, amount, date, time, category, and image of the receipt. We will add this container to the ‘My receipts’ screen.
- Use Bravo Tags: A Bravo Tag is a text string that converts the layer into a mobile component. For each container and layer, you want to convert to a mobile component, use the appropriate Bravo Tags. In our design, we will use the [component:web-view:URL] tag to embed the Typeform in the Typeform Container. Replace ‘URL’ with the URL of the Typeform you created earlier.
Note: The name of the List container and the layers inside the container starts with an asterisk (*). Bravo Studio recognizes such containers and layers as a list.
After designing the application in Figma, the next step is to use this design in Bravo Studio to create a native application. In Bravo Studio, click on the Import Figma File button and copy and paste the link of your Figma design in the input field to create a new project.
Congratulations! The user-interface of your application is ready.
Connecting with Airtable
In Bravo Studio we can use a custom API or Airtable to connect our application with a database. The application we built uses Airtable as the database. Hence, we will connect Airtable with our application.
In Bravo Studio, add a new data collection by clicking the ‘+ New Collection’ button on the Data Library page. Select Airtable, and follow the instructions as shown in the video, in the Airtable API Wizard, enter the base URL and your Airtable API Key. You can learn more about Using the Airtable API Wizard from the documentation here.
Click on Advanced view and make a GET request for ‘Expenses — List’. Select ‘All’ from the data.records[] dropdown list in the Response Data section.
Navigate to the ‘Projects’ page and select the app that we created. We will bind the data from the Airtable base with the respective components of the ‘Review Added Receipts’ screen. Select the ‘Review Added Receipts’ screen and select the ‘Expenses Tracker’ Airtable base. Select ‘GET Expenses — List’ in the Select Request section of Data Binding. Select the *List component and select Records from the dropdown list below Get Expenses — List. Expand the *List component and map each element to their corresponding field. You can learn more about this from the documentation.
The video below shows the steps to bind the data to components.
Building the workflow
Creating a backend for applications can get complicated when it comes to connecting different services together. You have to write functions to make API calls to each service, and pass information from one service to another in the proper format. But n8n makes it easy to create the backend and stitch different services together. You also get a visual representation that helps you in designing the application logic.
In n8n, you will use the following nodes to build the backend logic:
- Typeform Trigger node (Get Receipt)
- HTTP Request node (Get Image)
- Mindee node (Extract Information)
- Set node (Set Information)
- Airtable node (Store Information)
Our workflow will look like the image below.

1. Typeform Trigger node (Get Receipt)
The Typeform Trigger node will trigger the workflow whenever the user submits a new receipt. Add the Typeform Trigger node and configure the credentials by following the instructions in the documentation here.
Select the form that you created for the application from the Form dropdown list.
Rename the node as Get Receipt, and save the workflow.
Click on the Execute Node button to execute the node. Upload an image of a receipt using the Typeform. You will notice that the Typeform Trigger node triggers the workflow when the form is submitted.
2. HTTP Request node (Get Image)
The HTTP Request node is used to make an HTTP request to APIs and websites. It can return data in JSON, String as well as Binary format. Add an HTTP Request node in n8n that will make a GET request to fetch the image we uploaded using the Typeform. In the URL parameter of the node, add the following expression: {{$node["Get Receipt"].json["Upload receipt"]}}. This expression will get the URL of the image that we uploaded using Typeform.
Select ‘File’ from the Response Format dropdown list and rename the node to Get Image. Click on Execute Node to run the node. In the output, you will notice that the node returns the image of the receipt.
3. Mindee node (Extract Information)
The Mindee API enables to extract information from an image and transform it into usable data. We will use the Mindee node in n8n to extract data from an image of a receipt. The node will extract the merchant name, the amount, the date and time the expense was incurred, and its category.
Add the Mindee node in the n8n workflow, and configure the credentials as mentioned in the documentation.
Rename the node to Extract Information, and click on Execute Node to run the node. You will notice that the node extracts the information from the image and transforms it into usable data that can be added to Airtable.
4. Set node (Set Information)
The Set node allows us to set the workflow data. We will reference the data from the Mindee node and the Typeform Trigger node in the Set node and set the parameters.
Add the Set node in your n8n workflow and add the parameters with the following properties.
-
Amount : The type of this field should be Number and it’s value should be
{{$node["Extract Information"].json["total"]}} -
Merchant : The type of this field should be String and it’s value should be
{{$node["Extract Information"].json["merchant"]}} -
Date : The type of this field should be String and it’s value should be
{{$node["Extract Information"].json["date"]}} -
Time : The type of this field should be String and it’s value should be
{{$node["Extract Information"].json["time"]}} -
Receipt URL : The type of this field should be String and it’s value should be
{{$node["Get Receipt"].json["Upload receipt"]}} -
Category : The type of this field should be String and it’s value should be
{{$node["Extract Information"].json["category"]}}
Note: The value in the Name field should be the same as the column name of your Airtable base.
Toggle the Keep Only Set to true. This ensures that only the data that we set in this node gets passed on to the next nodes in the workflow. Click on the Execute Node button to run the node.
5. Airtable node (Store Information)
Airtable is a spreadsheet-database hybrid, with the features of a database but applied to a spreadsheet. The Bravo Studio app will get the data from the Airtable base to display it to the user. But before connecting the app with Airtable, in the front-end, we need to connect Airtable with your backend.
The n8n workflow will store the data extracted by the Mindee node and the URL of the image in Airtable. Create a base in Airtable similar to this template base if you haven’t already created one.
In n8n, add the Airtable node and configure the credentials following the instructions mentioned here. Select ‘Append’ from the Operation dropdown list. To get the Application ID, go to https://airtable.com/api and select the base. Copy and paste the ID in the Base ID field in n8n. Enter the name of your base in the Table field.
Click on Execute Node to run the node. On successful execution, you will notice that a new row gets added to your Airtable base.
Testing the application
Congratulations! You have successfully built the application. Now let us test our application and see how it would work in the real world.
In n8n, on the top right corner, toggle Active to true. This will set our workflow to active and execute the workflow every time a new receipt is submitted to Typeform.
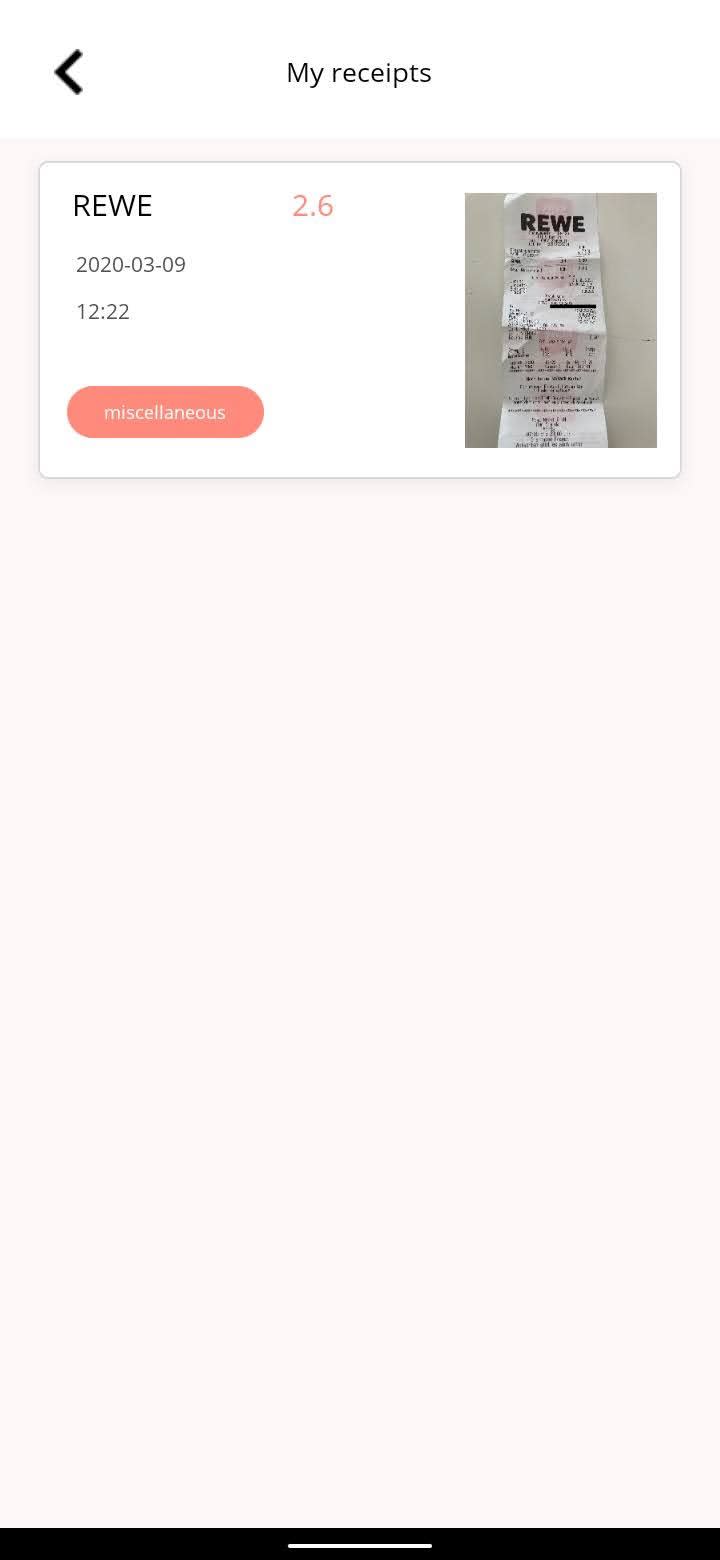
Open the Bravo Vision app on your device and select the Expense Tracker app. Click on the Add new receipt button and submit an image of the receipt.
If you don’t have a receipt at hand now, feel free to use the following image of the receipt for testing.

You can see the new receipt and the information on the ‘My Receipts’ screen.
What’s next?
You can extend the workflow and send an email every time you add a new expense, using either the Send Email node or the Gmail node. You can also use the Twilio node or the Vonage node to send an SMS when a new expense gets added.
You can also create a new workflow that will send you a weekly or monthly notification about the expenses you made during that period. This workflow can be built using the Cron node to trigger the workflow weekly or monthly, the Airtable node to read the data, and the Function node to calculate the sum of the expenses. To send a push notification, you can use the Pushover node.
Summary
In this article, you learned how to build an application. You learned to design an app in Figma that is compatible with Bravo Studio. You also created the front-end of the app using Bravo Studio. You stitched different services together using n8n to get the desired output. Lastly, you learned how to bind data to your app in Bravo Studio.
I plan to add more features to the app that will help me build a healthy habit of keeping track of my expenses and help me manage them.
I’d love to hear about how you extend the app using n8n! If you run into any issues while following the tutorial, feel free to me on Twitter or ask for help on our forum 🧡
Further Reading
If you would like to dig deeper and learn more about the topics discussed in the article, consult the following resources:
- Setting up your Figma File: You can read more about making a Bravo Studio compatible Figma design on Bravo Studios’ official documentation.
- Bravo Tags Master List: Bravo Studio also has various other Bravo Tags that you can use to add more components to your app.
- n8n documentation: Check out the official documentation of n8n for more tutorials and reference information
- n8n integrations: You can extend the functionality of your app by different nodes. Check out the list of all the integrations that n8n provides.
- n8n workflows: n8n has an extensive library of workflows ready for you to use.
- Automatically Adding Expense Receipts to Google Sheets with Telegram, Mindee, Twilio, and n8n: If you are interested in building a Telegram bot instead of the application, check out this article.
This post originally appeared on the n8n.io blog.

Top comments (0)