
This article is an attempt to help beginners, like myself, understand fundamental things about SwiftUI. This is the type of article I wish existed when I was just starting. Hope it’ll save you some time and struggle.
Feel free to leave a comment with corrections or general feedback.
Prerequisites
In order to really understand state management in SwiftUI, and in order to follow along with this article, you need to know a couple of things:
- Difference between value type and reference type
- What property wrappers are and roughly how they work
If you don’t feel confident enough about those topics, please take a moment to read these documents:
Otherwise, let’s dive in.
Application Pipeline
On a very high level, every app is a pipeline that takes some event as an input (user gesture, system notification, timer, etc.) and produces an output, most often by drawing something on the screen.
Different frameworks have different intermediate steps between input and output. In SwiftUI, the pipeline looks roughly like this:

Ephemeral Views
Take a look at the Re-create Views step in the pipeline. By Views, I mean our custom structs with the body property, just to be clear.

It’s one of the crucial points when it comes to understanding the application state in SwiftUI. A lot of other concepts are direct consequences of this fact:
Views are disposed of and re-created every time an event occurs and the observed state changes.
This means we cannot reliably keep any data within our views. We need some other (external) place to store the application state.
Luckily, SwiftUI has built-in storage outside of the view hierarchy which we can use: SwiftUI State. This state is managed entirely by the framework, and we access it only through the provided API.
Triggering View Re-creation
From the pipeline, you can also see that the only way to make SwiftUI re-create our views and, eventually, to re-render the screen is to update the observed data.

This means that we, somehow, need to tell SwiftUI to look for changes in some properties of our view and when they occur — re-create the view.
@State
So, to recap:
- We need a way to put data in SwiftUI state which lives outside of our views
- We need to tell SwiftUI to observe changes in some properties, so the framework knows when to re-create views and re-render
@State property wrapper solves both problems at once. Let’s look at the simple app and its state layout.

@State creates an observable container for our property and puts it outside of the view. SwiftUI now keeps the connection between our view and the observed data. So that next time this view is re-created, it can inject the data into the corresponding property of the view.
Demo
Notice that Counter view has init() with print() inside.
Every time the Random button is pressed you see a message in the XCode console, meaning the Counter view was re-created, but the count keeps the same number because it’s stored outside of the view and injected every time the view is created.
View Re-creation vs. View Disappearance
It’s worth mentioning the distinction between SwiftUI disposing of an old version of a view before creating a new one and your code intentionally excluding a view from rendering.
In the latter case, SwiftUI will notice that the view is not a part of the rendered screen anymore and will release all the values it kept for this view in the state. The next time your code decides to show the view again, its properties will be put back in the state with their initial values.
Here is a demo of this effect.
shameless plug
I try to regularly post useful dev content on my Twitter, feel free to follow me there 😉
@State With Reference Types
A common misconception is that you cannot use @State with reference types like classes. You definitely can, there is no technical limitation to do it.
You just need to keep in mind that the property you wrap with @State will hold a reference, and a reference will be the only thing SwiftUI will store in the state and observe for changes.
Remember that if you update a property of a reference type, its reference does not change. So to SwiftUI, it will look like nothing happened.
But @State does not care what to wrap with an observable container and put in the state, it’ll do it just the same way it does for value types.

If you try to run this code you’ll see that it does not work.
Here, I’m updating the count property by using increment() and it updates as it should. The only thing is that reference that lives in SwiftUI state does not ever change, so the view is never re-created, and the screen is never updated.
Logically, to fix this example we need to update the reference every time we hit the button.
This works, but in most cases, it’s not quite the solution we really want. Re-creating an instance every time might be wasteful in a lot of cases, not to mention that code written this way does not communicate the intent really well. We want to increment the count on a counter, not a brand new counter every time.
ObservableObject, @ObservedObject and @Published
These three play together to give us a way to change individual properties of a reference type and still communicate changes to SwiftUI, so it knows to re-render.
ObservableObject is a protocol you adopt on your reference type and @ObservedObject is a property wrapper for a view property, which holds a reference.
By using @ObservedObject on a property, you are basically saying to SwiftUI to go and look inside the object that the property holds a reference to. Look inside and subscribe to changes from properties that are marked with @Published.
@Published wraps a property on a reference type with the observable container, just like @State does it for view properties.
This is how it looks in the code of the Counter app.
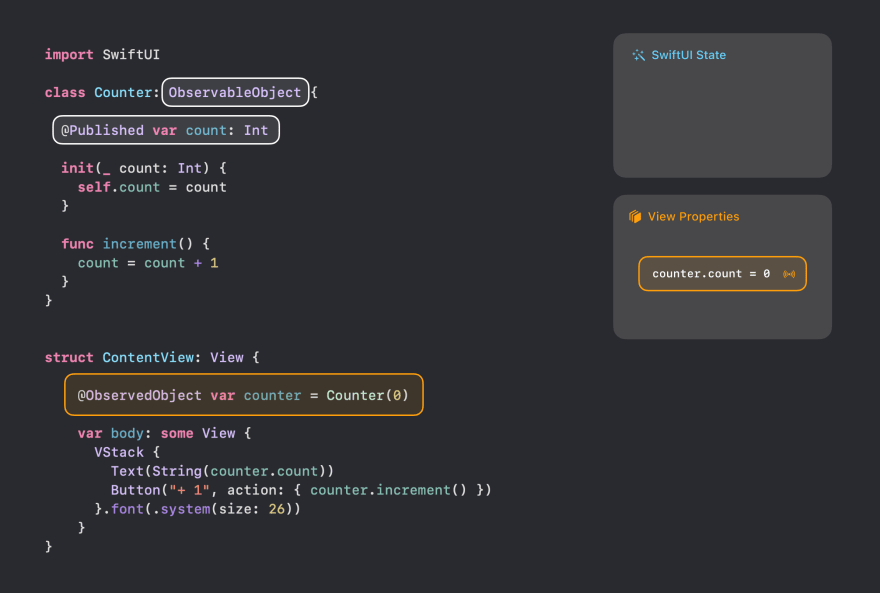
Now it works with just calling increment(), without re-creating the counter every time.
Unfortunately, this approach has a flaw and you can see it in the image above. SwiftUI State is empty. @ObservedObject does not put data outside of the view as @State does. And in case an object is created within a view, every time the view is re-created the object will be re-created as well.
Here is a demo of this effect.
Notice how the counter at the top resets every time the Random button is pressed. When we update the random property, SwiftUI executes the body of the ContentView and re-creates CounterView along the way. The newly created CounterView ends up with a fresh instance of the Counter every single time.
@StateObject
This is where @StateObject can help us out. It does all the same things as @ObservedObject but additionally puts observed properties into the state outside of the view hierarchy.

Below, watch a demo with the Random button, where it uses the @StateObject on the counter property this time.
When to use @ObservedObject instead of @StateObject?
It might seem that we just need to use @StateObject all the time and forget about @ObservedObject. But there is a very good use case when you need both.
Use @StateObject in the view which creates an object. Use @ObservedObject when the view receives objects from outside.
Consider this example:

Notice that even though two views reference and observe at the same Counter instance, SwiftUI state keeps only one value for the count property. This is because we’ve used @ObservedObject on the CounterView, which does not put anything into the state.
Thank you for reading, I hope it was helpful! 🙌
My Twitter in case you'd like to reach out.

Top comments (0)