
Out of the box, Kentico Kontent does not provide a menu/navigation editor (which is kind of logic since Kontent is not a website builder), so you'll have to build one yourself.
Together with my colleagues at Aviva Solutions, I've been trying to come up with a way to accomplish this, and after discovering a couple of methods, this one was the most elegant and robust (in our opinion). With this method, the content editor is in control of how and in which order the navigation items are being displayed.
Also, this method enables you to build multiple menus, e.g. a header menu and a footer menu.
First: I'm assuming that you're using Content Types as a way to create your page templates (e.g. you've built a homepage template, content-page template, about-us template, etc.)
1. Setup in Kentico Kontent
To build our menu-builder we need to create two new content types:
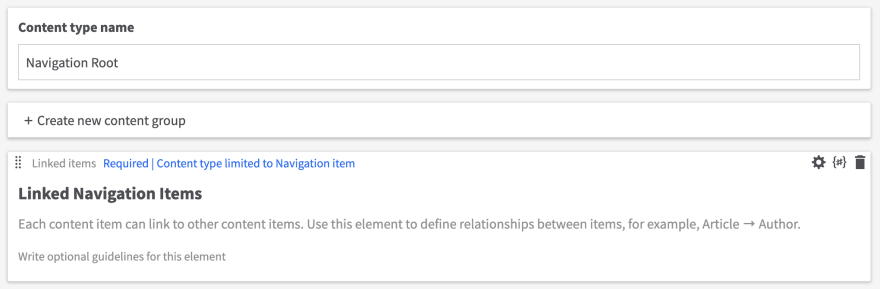
1.1 Navigation Root
This is our navigation container, and only contains a linked items element. You can use this content type to create one or multiple menus like your header and footer navigation.
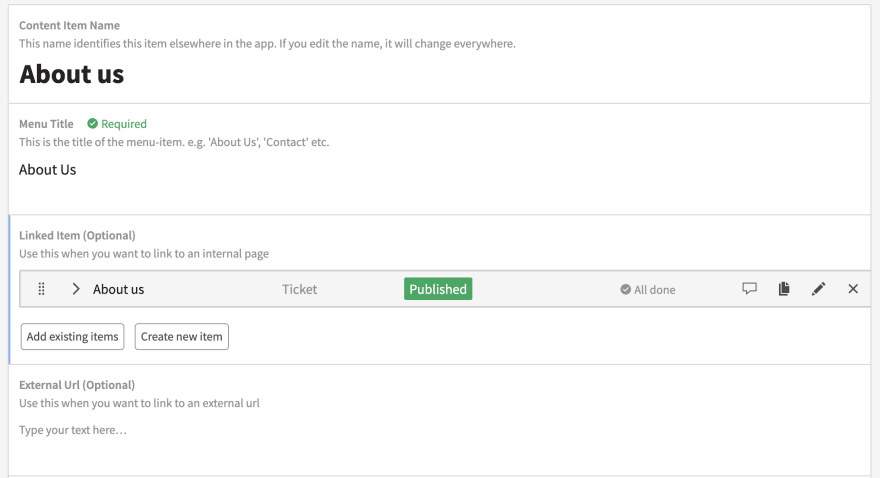
1.2 Navigation item
A navigation item is where the actual linking to a specific page/template OR an external URL happens. A navigation item consists of the following content elements:
- Menu title (text element): This is the actual name of the menu item (e.g. home, about us, contact etc.)
- Linked item (linked items element): This is the place where you link to the specific page.
- External URL (text element): Can be used if you want to link to an external source.

1.3 Putting it together
Now we can create our actual navigation in Kentico Kontent. First, we need to create Navigation Items.
Note: If you want to link to the homepage/index, it's recommended to mark it as an external URL, and use "/" as the URL.
Another note: The Navigation Items can either contain a Linked Item OR an external URL. Not both!
Then we can create the navigation container, in this case, I call it the Header navigation. In this container, we can drop the previously created Navigation Items.

2. Build navigation components in GatsbyJS
Now we have laid down the structure in Kentico Kontent, it's time to source the data with GraphQL, and build our components in GatsbyJS.
We can use the GrapQL filter functionality to get our early created Navigation Root item with its codename, like so:
allKenticoCloudItemNavigationRoot(
          filter: { system: { codename: { eq: "header_navigation" } } }
        ) {
           ...
          }
If we, for example, called our Navigation Root item Footer menu, we'd probably need to filter on the codename "footer_menu". See where I'm getting at?
Next, we can source the previously defined Menu title, Linked Item and the External URL, map it, and parse the data into the navigationLink component, which I'm also gonna cover in this article.
import React from 'react';
import { graphql, StaticQuery } from 'gatsby';
import NavigationLink from './navigationLink';

const Navigation = ({ data }) => {
  const navItems =
    data.allKenticoCloudItemNavigationRoot.nodes[0].elements
      .linked_navigation_items;

  return (
    <nav className="navigation">
      <ul>
        {navItems.map((item, i) => {
          return <NavigationLink key={i} {...item} />;
        })}
      </ul>
    </nav>
  );
};

export default props => (
  <StaticQuery
    query={graphql`
      {
        allKenticoCloudItemNavigationRoot(
          filter: { system: { codename: { eq: "header_navigation" } } }
        ) {
          nodes {
            elements {
              linked_navigation_items {
                elements {
                  menu_title {
                    value
                  }
                  external_url {
                    value
                  }
                  linked_item {
                    ... on KenticoCloudItemAboutPage {
                      id
                      elements {
                        url_slug {
                          value
                        }
                      }
                    }
                  }
                }
              }
            }
          }
        }
      }
    `}
    render={data => <Navigation data={data} {...props} />}
  />
);
If you have defined multiple page templates, you'll need to define them all in the query as I did in this example with ... on KenticoCloudItemAboutPage{.
The next step is to build the links. Since we're using GatsbyJS, we can use it's Link component to route internal links. However, we also must take into account that we can't use the Link component for external URLs.
As you can see in my example, I'm first checking if the navigation item is an external URL. If it's not, we can directly assume it's an internal link, and parse our values into Gatsby's Link component.
However, if it's an external URL, we need to check if we're dealing with a link to the homepage (which we can parse into a Link component), or if it's an external URL (which we need to parse into an anchor tag). Therefore I'm also checking if the external URL is identical to "/".
import React from 'react';
import { Link } from 'gatsby';

const NavigationLink = props => {
  const externalUrl = props.elements.external_url.value;
  const menuTitle = props.elements.menu_title.value;

  if (!externalUrl) {
    const linkedItemVal = props.elements.linked_item;
    if (linkedItemVal[0].elements === undefined) {
      return null;
    } else {
      const linkedItem = linkedItemVal[0].elements.url_slug.value;
      return (
        <li>
          <Link activeClassName="active" to={`/${linkedItem}/`}>
            {menuTitle}
          </Link>
        </li>
      );
    }
  } else {
    if (externalUrl === '/') {
      return (
        <li>
          <Link activeClassName="active" to={externalUrl}>
            {menuTitle}
          </Link>
        </li>
      );
    } else {
      return (
        <li>
          <a href={externalUrl}>{menuTitle}</a>
        </li>
      );
    }
  }
};

export default NavigationLink;
Summary & Alternatives
As you can see, it's pretty easy to build your manageable navigation with Kentico Kontent. Although it's not perfect, it's (in my opinion at least) still much better than the alternative methods, which are:
Build it yourself with plain HTML
It's possible to just build your navigation with plain old' HTML, however, this could be a potential nightmare to maintain it. For example: when one or multiple URL slug's changes, you'll need to dive into the code to fix this.
Use taxonomies
Kentico Kontent supports taxonomies, which is a nice way to categorize certain content items. It could also be (ab)used to build your navigation with taxonomies. You can use a Taxonomy Group to make your tree structure and then tag your content items individually with the corresponding taxonomy items. This could be maintained by a content editor, however, this could also be a potential nightmare to maintain when you have lots of content items.
Header image by Joseph Barrientos on Unsplash


Top comments (0)