
When I first started learning Full Stack JS development, I could barely understand the difference/relationship between a server and a client. I remember my first CRUD application was a mess. After I developed the server (back-end), I could not understand the step of sending the data to the client (front-end). So literally all I did was to export the functions that directly manipulate the database and use them on the client (basically compromising all the data).
You need bartenders and attendees to get the party going 🎆
It was only a matter of time until I wrapped my head around the difference/relation between the client and the server, and that they are two totally different things.
When you are browsing the internet with your own computer searching for news or whatever, you are always being the client. The server is just another computer waiting for you to ask for something so they can grab it for you. Think of it as a party. If someone invites you to a party, as an attendee, you are a client. The server in this analogy is the bartender. If you need a drink or food, bartenders are the ones who will serve you (servers).
You need a drink 🍺? you gotta ask for it!
In such parties, you can imagine how busy the servers can be. If you need something, you (the client) have to go to the bartender (the server) and ask for what you need. The server then can go and get you what you asked for.
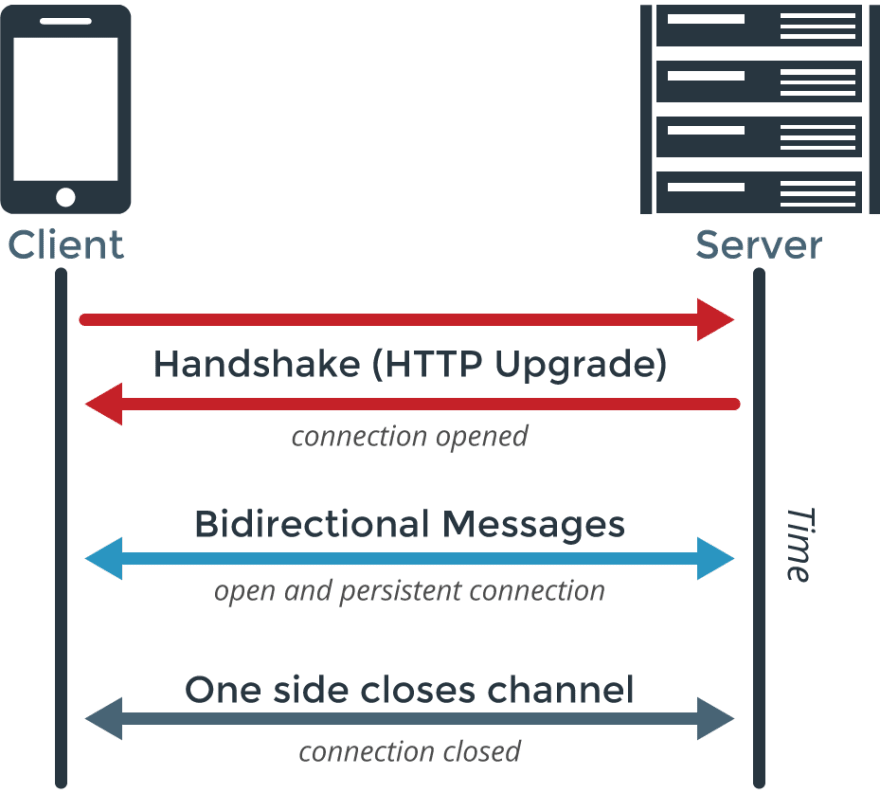
The most common protocol used for communications between clients and servers is HTTP. HTTP is a request-response based communication. If the client needs a certain piece of data, it has to send a REQUEST (req) to the server. The server then reads the req and sends a RESPONSE (res) containing the data the client asked for. This is usually referred to as a handshake. The server can pretty much do nothing if the client does not initiate the response.
Lets create an express server with Nodejs and see how that works.
(express uses REST API which is also based on http)
- Open your terminal
- Go to the directory (folder) where you want to save the file
- Run the command
npm init -y - Run
npm i express
Now if you open the folder, you will see a package.json file.
Create a server.js file and write the following:
const express = require('express')  // Import express
const app = express()  // create the express app


app.get('/server', (req, res) => {  // the location of the server (localhost:port/server)
    res.send('response')
})

app.listen(5000, () => {  // listen to port 5000 (localhost:5000/)
    console.log('listening ...')
})
As you can see, we set up a server at port 5000 and it receives requests at /server endpoint. If we get a request from the client to that endpoint, out server will send the string "response" as a response.
To run the server now, go to the terminal and run node server.js
Now that our server is ready, lets do the client work.
Open your browser and go to the url localhost:5000/server. By visiting the page, you are basically sending the server a request and waiting for it response. Once the page loads, you should see your response. (The screen should show response).
You can make as many endpoints as you want and have each end point serve different response.
Remember when I said the server can only send data as a response? so the client has to be the one sending the request. if you try to edit the code and send two reponses instead of one:
app.get('/server', (req, res) => {  // the location of the server (localhost:port/server)
    res.send('response')
    res.send('another response')
})
Save the code and run node server.js again. Then go back to your browser and visit localhost:5000/server. You can only see the first response ("response"). If you have a look at your terminal, you will see the following error: Error [ERR_HTTP_HEADERS_SENT]: Cannot set headers after they are sent to the client. With HTTP, if you want to send another response, you need another request (sure one response can be more than just a string).
(Go here if you want to know more about RESTful API).
So what's exactly websockets? VIP bartenders?
Ok I admit. The bartenders analogy only takes us so far. Websocket connections are a bit more advanced and complex. I will keep it as simple as I can.
We agreed before that HTTP protocol is req-res based protocol. So for each response, you need a request. This is the main issue websockets (ws) connections solve.
With a ws connection, the client does not have to initiate the connection and send a request every time to receive a response. Instead, when the client first connects to the server, it establishes a bidirectional connection with the server. Once the connection is established, the server or the client can reach each other without the server having to wait for a request. So, the client can also receive something it did not know it would be coming. (did this remind you of messaging apps??).
A chat app is a perfect example to know the difference.
Imagine yourself as the client and your friend as the server. If you are only texting your friend, you have to send a message (a request), and wait for your friend to message back (a response). Where as if you call him, you can both talk and hear each other instantaneously.
(disclaimer: even messaging apps are built with web socket connections. I just used it as an analogy to explain the difference).
The picture below shows the difference between the regular HTTP connection and a websocket connection. A ws connection is closed when any of the two sides disconnects.
Lets build a simple chat app to see an example of a WS connection 👽
Lets first prepare our server. The one we just built was an express server built with regular REST api. We need to change that.
To build a WS connection, we need to install two extra npm modules
- Go to the terminal
- Run
npm i http socket.io
Edit server.js to the following:
const express = require('express')
const app = express()
var http = require('http').createServer(app);  // build http server on top of the express one
var io = require('socket.io')(http);  // build a WS server on top of the http one.


// this runs whenever a client establishes a WS connection with the server
io.on('connection', (client) => {
    console.log('a user connected')

    // this runs whenever the client sends something on the chat channel
    client.on('chat', (data) => {
        console.log('Message received -->', data)

        // this emits data back to all the users on the chat channel
        io.emit('chat', data)
    })
});


// Now make our new WS server listen to port 5000
io.listen(5000, () => {
    console.log('Listening ... 🚀 ')
})
Great! Now our server can handle real time data transfers and establish bidirectional connections. Lets take a moment to explain things here.
socket.io is a javascript library for ws connections. There is a lot to it but lets understand it as simply as possible. After establishing the bidirectional connection. The user/s subscribe to named channels. The server later can choose to send certain data to certain channels. In the example above, we made a channel called "chat". Now once we work on the client in a bit, we will be able to send data to this channel. Once we do, the data first goes to the server. then the server emits (sends; io.emit('chat', data)) the same data again to the channel chat. This way not only the one who sent the data can receive it, but all those subscribing to the chat channel.
Socket.io makes it super easy to establish WS connections. As you can see, we prepared a chat server with just a few lines of code. Now lets see how this looks like on the client side. We will make it just as simple and create a minimal react chat app for the client.
Socket.io on the client side (React).
Lets first generate the usual React template and add the needed modules.
- Go to your terminal
- Make a new directory and cd into it (
mkdir client; cd client) - Run
npx create-react-app my_app - (once this is done)
- Run
npm i socket.io-client
After you run these commands in order, open your React app and lets edit /src/App.js:
import React, { useState } from 'react';  // do NOT forget to import useState
import logo from './logo.svg';
import './App.css';

//Import Socket.io
import openSocket from 'socket.io-client';


function App() {
  // this is where we will be storing the message the user can create before we send it
  const [newMessage, setMessage] = useState('')

  // these are where all the messages will be.
  // It will first be an empty array but we will
  // fill it up everytime the server sends us something
  const [allMessages, setAllMessages] = useState([])

  // Establish a WS connection with the server
  const socket = openSocket('http://localhost:5000');  // <-- make sure the port is the same

  // this subscribes to the 'chat' channel
  // Whenever there are new messages, we put them in the array hook.
  socket.on('chat', (data) => {
    setAllMessages([...allMessages, data])
  })

  // this function runs onClicking the send button
  const sendMessage = () => {
    console.log('SENT')

    // it emits the new message written by the user to the 'chat' channel
    socket.emit('chat', newMessage);

    // clear the message from the text input after sending
    setMessage('')
  }

  return (
    <div className="App">
      <header className="App-header">
        <img src={logo} className="App-logo" alt="logo" />
        <div>
          <h2>Chat Messages</h2>
          <div>
            {/* This is where we will be displaying all the messages */}
            {
              allMessages.map(message => {
                return <div>{message}</div>
              })
            }
          </div>
          <input onChange={(e) => setMessage(e.target.value)} placeholder="type your message .." />
          <button onClick={() => sendMessage()}>↪</button>
        </div>
      </header>
    </div>
  );
}

export default App;
Sweet! This looks really simple and it will get the job done.
All we did in this piece of code is:
- Establish a WS connection with our server
- Create a text input /
send messagebutton - Display the messages in a
<div> - Send any new message to the server (which will resend it to the
chatchannel) - Subscribe to the
chatchannel to get all the messages
Amazing 🙂 Now if we run this, we should have a working chat app!
go to the terminal and run npm start
(make sure that your server is also running. Navigate to the server directory and run node server.js)
After your React app runs, you should see it at http://localhost:3000. Try opening the same url in more than one tab and send messages from different tabs.
You will see that all the tabs will update instantaneously.
Socket.io makes WS connections incredibly simple. and they are proven to be more efficient on heavy loads. So if you are expecting a lot of traffic on the server, websocket connections manage just well.
Notice that if you refresh the page, all the messages will be deleted. That is because your server is not storing any message. We have no database to write messages to or fetch old messages from. Our server simply acts as a bridge between users on our chat app.
I am on a lifetime mission to support and contribute to the general knowledge of the web community as much as possible. Some of my writings might sound too silly, or too difficult, but no knowledge is ever useless.If you like my articles, feel free to help me keep writing by getting me coffee :)


Top comments (11)
Great article!
Small typo though (sorry) ...
In all the example code you've used port 5000 but then, near the end of the article, it says:
"After your React app runs, you should see it at localhost:3000."
Maybe I should have made this more clear.
Here is the thing,
Since the client and the server are two different things, they also run on two different ports.
When you do
create-react-app, by default your app (client) will run onport 3000where as for the server, we choose to run it onport 5000Thanks Mustafa. Apologies, I jumped the gun and hadn't tested it for myself first. 🤦♂️
I've run through the process now and did find that the following command doesn't work:
npm create-react-app my_appThe "npm" should be "npx". i.e:
npx create-react-app my_appFor npm use the following command:
npm init react-app my_appSource: github.com/facebook/create-react-app
Once again, great article!
you are so right. I meant type
npx. Thanks again!Can you write a blog on how to get started with react?? Because i have learnt nodejs and now want to learn react.
I just read this too:
dev.to/0xbanana/top-beginner-react...
I will try and craft something. Meanwhile, I find Wes Bos to be a great teacher. Look for his course online: React for beginners
Thanks
Amazing article 🔥🔥
To the best of my abilities, I break concepts down and make them sound as silly as possible.
It doesn't work good for me, for 1-3 messages it works good, but when I have more then 3 it takes too long to send message, so I gotta refresh page.