
In this tutorial, you are going to learn how to deploy a MySQL database server in a Kubernetes Cluster set up in a local machine, this is one of many ways to persist data in Kubernetes.
Kubernetes is a tool for automating deployment, scaling, and management of containerized applications.
Get familiar with some terminologies and kubernetes objects that will be used through this tutorial:
-
Docker Image: A collection of files that packs together all the necessities needed to set up a completely functional container, -
Container: An instance of an image, a running image, -
Node: A Kubernetes Object, a virtual machine that runs a container and provide resources, -
Kubernetes Cluster: A collection of nodes and configurations to manage them, -
Pod: A Kubernetes object, a running container, the smallest deployable units of computing that can be created and managed in kubernetes, -
Deployment: A Kubernetes Object, that monitors set of pods, it make sure that those pods are running and make sure to restart pods if they are down, -
Service: A Kubernetes Object that provides a way to access a running container(pod), -
Persistent Volume: A Kubernete object, is a piece of storage in the cluster, -
Persistent Volume Claim: A request for the Persistent Volume storage, -
Kubernetes Config file: A file that tells Kubernetes about the different Objects to be created. It's written in YAML syntax.
Technically, you will create a Deployment that will manage a Pod running a container of a MySQL docker image, then you will create a Service that will permit access to the pod. This pod will request for storage (using Persistent Volume Claim) to a storage resource (Persistent Volume).
A Persistent Volume can be created statically or dynamically. In the next phase of this tutorial, you learn how to do it statically.
For this tutorial to go smooth, you will need to install:
- Docker in your machine, click HERE to install;
- Local Kubernetes Cluster via
Minikube, click HERE to install minikube, - Optionally, you can create a Docker Hub account HERE
1. Build a Persistent Volume (PV)
First, create a working directory and navigate in:
$ mkdir mysql-kube
$ cd mysql-kube/
Create a yaml file named mysql-pv.yaml, put in the following:
apiVersion: v1
kind: PersistentVolume
metadata:
  name: mysql-pv
  labels:
    type: local
spec:
  storageClassName: manual
  capacity:
    storage: 5Gi
  accessModes:
    - ReadWriteOnce
  hostPath:
    path: "/mnt/data"
Save and close the file.
This yaml file once applied in kubernetes, will provision a Persistent Volume, for the MySQL database server Pod. The persistent volume will not depend on the pod's lifecycle. This means that anytime the pod restarts due to a crash or a malfunction, the provisioned storage will survive.
2. Build a Persistent Volume Claim (PVC)
In the working directory mysql-kube/, create a file named mysql-pvc.yaml, put the following:
apiVersion: v1
kind: PersistentVolumeClaim
metadata:
  name: mysql-pv-claim
spec:
  storageClassName: manual
  accessModes:
    - ReadWriteOnce
  resources:
    requests:
      storage: 5Gi
Up there, you created the file that will provision a storage when applied, this file on the other hand will create a Persistent Volume Claim that will be used by the MySQL Pod to request for that provisioned storage.
3. MySQL pod's deployment
Here you are going to create a file named mysql-deployment.yaml in the same directory, mysql-kube/. Create the file and put the code below:
apiVersion: apps/v1
kind: Deployment
metadata:
  name: mysql
spec:
  selector:
    matchLabels:
      app: mysql
  strategy:
    type: Recreate
  template:
    metadata:
      labels:
        app: mysql
    spec:
      containers:
        - image: mysql:8.0
          name: mysql
          env:
            - name: MYSQL_ROOT_PASSWORD
              value: password
          ports:
            - containerPort: 3306
              name: mysql
          volumeMounts:
            - name: mysql-persistent-storage
              mountPath: /var/lib/mysql
      volumes:
        - name: mysql-persistent-storage
          persistentVolumeClaim:
            claimName: mysql-pv-claim
This file will create a deployment object to manage a Pod running a container of MySQL docker image and in its specifications, there is a reference to the Persistent Volume Claim that the pod will use to request for the Persistent Volume.

Before applying this deployment file, create a service object that will permit other pods to access the MySQL database pod that will be created.
Still in the mysql-kube/ directory, create a yaml file named mysql-service.yaml and put the code below:
apiVersion: v1
kind: Service
metadata:
  name: mysql
spec:
  ports:
    - port: 3306
  selector:
    app: mysql
  clusterIP: None
Save the file, make sure that your Kubernetes cluster is up and running. Open the terminal and navigate to mysql-kube/ run the following:
$ minikube start

Minikube quickly sets up a local Kubernetes cluster on macOS, Linux, and Windows.
Now, let's tell Kubernetes that we want to use all config files created. Run these commands in the mysql-kube/ in the sequential order below:
- Step 1: Create the Persistent Volume ```
$ kubectl apply -f mysql-pv.yaml

- **Step 2**: Create the Persistent Volume Claim
$ kubectl apply -f mysql-pvc.yaml

- **Step 3**: Create the Deployment
$ kubectl apply -f mysql-deployment.yaml

- **Step 4**: Create the Service
$ kubectl apply -f mysql-service.yaml

This sequence of commands created a `Persistent Volume`, a `Persistent Volume Claim`, a `Deployment` that manages a `Pod` running a `container` of a mysql docker image and a `Service` that permits access to that Pod.
Check if your kubernetes objects were successfully created with:
- **Deployment**
$ kubectl get deployments

- **Pod**
$ kubectl get pods

- **Service**
$ kubectl get services

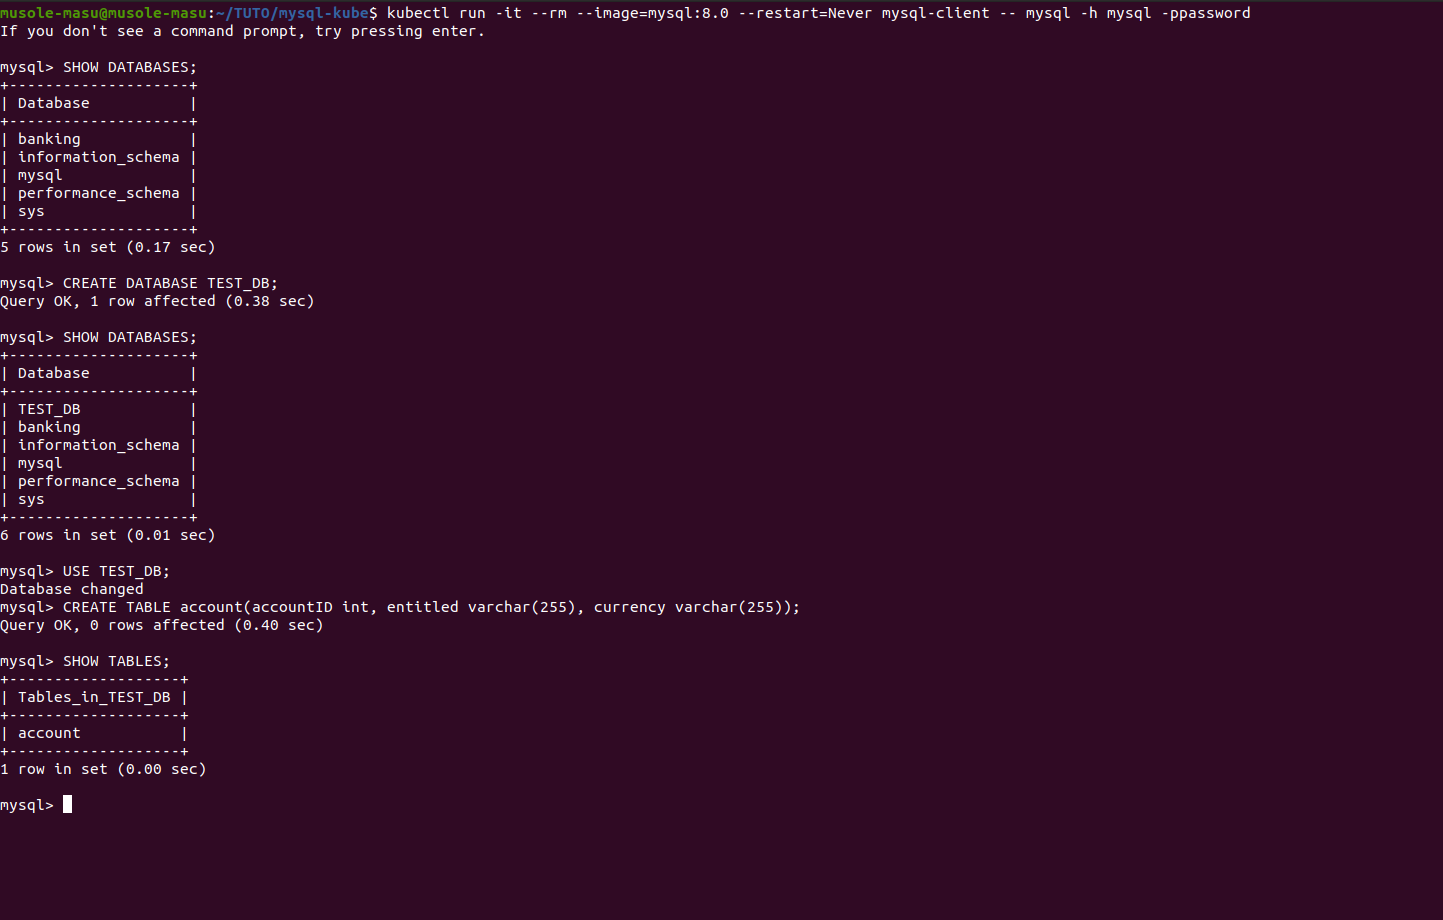
You did great so far, now run a test to create a Pod running a MySQL container that connects to the MySQL database server Pod as a client;
$ kubectl run -it --rm --image=mysql:8.0 --restart=Never mysql-client -- mysql -h mysql -password="password"
This command runs the MySQL container in an interactive mode, which allows you to execute commands at the time of running the container.
A MySQL shell will open and you could create new databases, new tables, insert data to tables and do more SQL commands.
##4. Conclusion
With this, you learnt through kubernetes Objects how to deploy a MySQL database server in a Kubernetes Cluster using a static method of provisioning storage.
Also you tested how to connect a client to that deployed server, by executing SQL commands when running the container in interactive mode.
If you have questions, comments, please feel free to reach out here or on my [Twitter](https://twitter.com/MusoleMasu); I will be more than happy to answer.
See you soon..

Top comments (3)
Hello, Sir
It's a great tutorial. and I did go through it step by step.
However maybe there is a small typo at the last command which will lead it fails.
very interesting post, now I would be interested to know what happens if I have two nodes... and I create a pod with MYSQL, and its volume...
If this pod is installed on node1 and the volume is on node1... data is created... and then it crashes... this pod is moved to node2... what happens to the data?
Interesting post. Can we have RBAC details also here,what kind of roles are required here in K8s env.