
In this tutorial, we are going to build out our API Spec using a Library, Security Scheme, and DataType in API Designer. This API will integrate directly with Twilio and will allow you to send an SMS to a phone number by simply passing a simple POST request with your desired Message and ToPhoneNumber. In Anypoint Studio, we will build out the integration with our Twilio Client ID and Secret which will NOT be exposed to the API Consumer. This means that users interacting with our API only need to be issued a client ID and client secret from our API and can then send text messages without needing to expose our private credentials.
First, log into Anypoint Platform, and go to the Design Center. Click on the Create New button at the top right and click Create API Specification. Name your application SendSMSAPI or whatever you wish, choose Text Editor, RAML 1.0, and Save location: Design Center. Then click Create Specification.
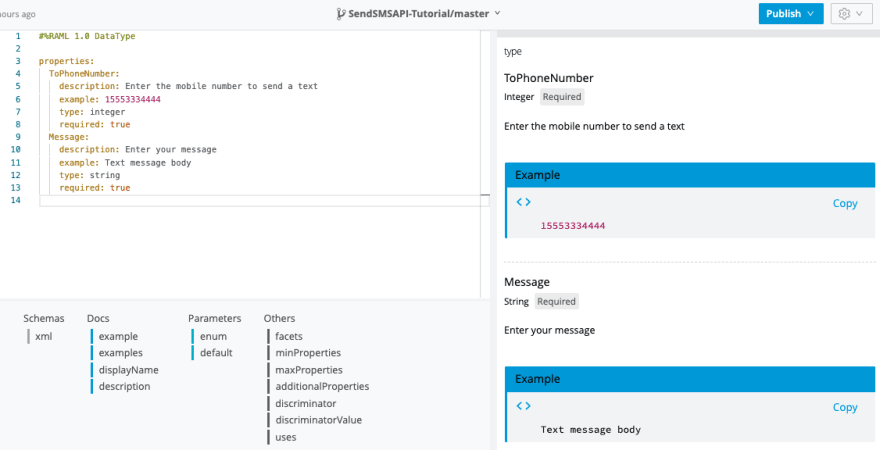
When you first open up API Designer, you will be placed into the root file which contains your RAML code. We are going to first create a Library and DataType before we start building out our root file. The library will allow us to abstract our RAML code out of our root file. After we add our library, we are going to assign our endpoint with a DataType which sets rules on how we are allowed to interact with our API. Create a new file by clicking the + and call it library.raml and make sure to set the Library DataType in the dropdown menu. Copy and paste the below code into your library.raml file:
#%RAML 1.0 DataType
properties:
 ToPhoneNumber:
   description: Enter the mobile number to send a text
   example: 15553334444
   type: integer
   required: true
 Message:
   description: Enter your message
   example: Text message body
   type: string
   required: true
As you can see, we set each of the fields to be required, or else the API will return a 400 response. We also defined that each value must be an integer for the phone number and string for the message. You can see the changes reflected on the preview window on the right-hand side of API designer.
Finally, we have to add our Library and DataType to our root raml file. Add the following code to your root raml file:
mediaType: application/json
uses:
 library: library.raml
/text:
 type: library.text
As you can see, we are importing our library.raml file in our root file, and are referencing the text variable under type: library.text. We are defining that /text will be our endpoint, and that the endpoint should follow the rules set in the library under library.text.
When you save your root file, and enable the mocking service on the top right, you will see a preview of your API on the right-hand side of the screen. You can see with DataTypes and Libraries, that we were able to abstract all of the code out of the main raml file. Additionally, the mocking service window still generates all of the previews needed to properly interface with the API.

Next, create a new file, and call it securityScheme.raml and make sure to select the Security Scheme option from the drop-down menu. Copy and paste the following code into your securityScheme.raml file:
#%RAML 1.0 SecurityScheme
type: Basic Authentication
describedBy:
 headers:
   client_id:
     type: string
   client_secret:
     type: string
 responses:
   401:
     description: Unauthorized or invalid client application credentials
   500:
     description: Bad response from authorization server, or WSDL SOAP Fault error
Once we deploy our API later in this tutorial, you will find the same RAML code located above under the API Specification snippet in API Manager. This code will generate when you apply a new policy to your already deployed API.

Next, go into your library.raml file and paste the following code under usage:
securitySchemes:
 clientIDrequired: !include securityScheme.raml
Now navigate back to your root raml file, and added the following code under the title variable:
securedBy:
 - library.clientIDrequired
This code will now secure the entire API with Basic Authentication security, which means users will have to provide a client_id and client_secret that’s issued to them by API manager
Now it's time to try out the API. Enable the mocking service, and click the send button to send a test payload. If you get the desired 200 OK response, you’ve done it! Now click the Publish button, and publish your API Specification to Exchange.
Open up Anypoint Studio and go to File -> New Mule Project. Enter your project name, and click the green plus button to import your API from Exchange. Search for your API in the search bar, then click the Add > button.
When you add the API Specification to your, Anypoint Studio will automatically apply scaffolding to your project using API Kit. Scroll down to the post:\text:application\json flow, we are going to build out our Twilio integration in this flow. The first step is to add an HTTP listener connector to the flow. Set the Path to: /text and when setting up the HTTP Listener config use:
Protocol: HTTPS
Host: 0.0.0.0
Port 8082
To set up HTTPS, you will need to generate a keystore on your local machine. It’s super easy to do, and is just one line in the terminal. For instructions, please click here to see how to generate a keytool keystore.
Once you have generated your keystore, in the TLS section of the HTTP Listener, under Key Store Configuration, set:
Type: JKS
Path: yourkeystore.jks
KeyPassword: YourPassword
Password: Password
Click Test Connection to verify that it worked correctly.
Next, drag the HTTP Request Connector into your flow and set the HTTP Request config to:
Protocol: HTTP
Host: 0.0.0.0
Port: 8081
Click Save. Go to the Request section, and for Method type: POST and for the URL type:
http://api.twilio.com/2010-04-01/Accounts/YOUR-ACCOUNT-SID-GOES-HERE/Messages.json
Don't forget to put in your account SID from Twilio in the URL. Then go to the Request body and add the following code:
output application/x-www-form-urlencoded
---
{
    "To":payload.ToPhoneNumber,
    "From": 14085835493,
    "Body":payload.Message
}
Next, under headers enter the code below. Make sure to press the fx button to allow you to enter your DataWeave code. Keep in mind where it says Account SID and Auth Token, you will get those both from your Twilio Dashboard. We combine both of the token values into the basic authorization format by using base64 encoding.
import toBase64 from dw::core::Binaries
output application/java
var concat = "ACCOUNT-SID" ++ ":" ++ "AUTH TOKEN"
var base64 = toBase64(concat)
---
{
    "Authorization" : "Basic " ++ base64
}
In order to deploy your application, you must first setup API Autodiscovery so we can assign security policies to our API. Log into Anypoint Platform and go to API Manager. In API Manager, click on the Manage API button, and click Manage API from Exchange. Find the API you created, and make sure to check the box saying you are using Mule 4 and above. Click Save, then click on the API and copy and paste the Autodiscovery API ID.
Go back into Anypoint Studio, and click on the Global Elements tab. Click the Create button, and search for API Autodiscovery. Paste in your API ID into the window and select your main flow under flow name.
Now right-click on your project folder, and click Anypoint Platform, Deploy to Cloudhub.

In order for API to autodiscover, we need to include our anypoint platform client ID and secret under Properties upon deployment. See the screenshot below.


To find your client id and secret, go to Anypoint Platform, navigate to Access Management, Environments, and click on whatever environment you are deploying on (whether that is Sandbox, Production etc), and copy and paste your client id and secret into the corresponding fields on the deployment screen. Finally, click the deploy button! Nice work.
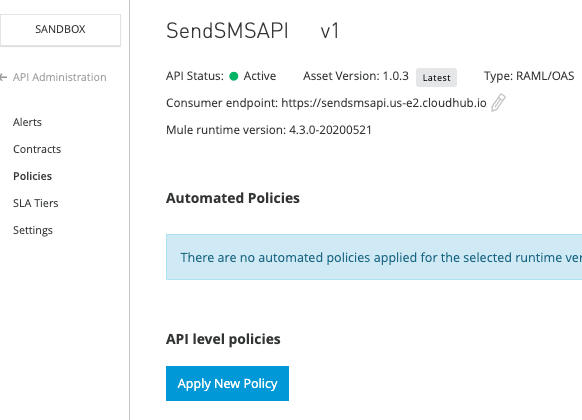
Navigate to Anypoint Platform, and go to API Manager. Click on your now Active API and got to Policies, then click the Apply New Policy button. Select the Client ID enforcement policy, leave all the settings as default.
When you apply this API level policy, making any POST request to your API endpoint will result in an error if you don’t include the proper headers. To grab your client ID and client secret for your API, go to Exchange, search for your API, and click Request Access. Enter your API Instance, your Application, and then click Request Access. This will generate your unique client ID and client secret that you will use to send POST requests to your API.


As you can see from the screenshot below, you will get a 401 unauthorized response if you don’t include the proper client_id and client_secret headers in your request.
However, when you enter both of the headers correctly based off the keys you get from Exchange, your text message will successfully be sent through Twilio.


We hope that this tutorial was helpful and helped walk you through the main steps of designing, developing, and deploying an API. Now that you have a good idea on how to build your first RAML specification and successfully deploy, take a look at our developer tutorials homepage where you can find more tutorials related to API design and development. Please rate this article and your feedback below.

Top comments (0)