
Hi , guys. I have had quite an informative class in Andrew Brown's bootcamp. Here are a few items I have been able to pick up from the class regarding Git.
I will be showcasing examples where I demonstrate the steps one would take when executing a certain task and the definitions. In this use-case, we will be using GIT that has been installed on our Gitpod account.
Prerequisites
- A Gitpod environment that gives you 500 free credits per month!
- If you will not be using Gitpod, make sure that Git is installed on your local computer.
What is Git?
Installing Git on Gitpod environment
Install a Gitpod extension on Chrome to access Gitpod on Github.
What is Semantic Versioning in Git?
The basic git workflow
The basic Git workflow goes something like this:
- You modify files in your working tree.
- You selectively stage just those changes you want to be part of your next commit, which adds only those changes to the staging area.
- You do a commit, which takes the files as they are in the staging area and stores that snapshot permanently to your Git directory.
But what happens if we want to provide better/streamlined and seamless workflow for a project? Then we follow the lead below;
Basic Git workflow chart for projects or for this project:
 1
1
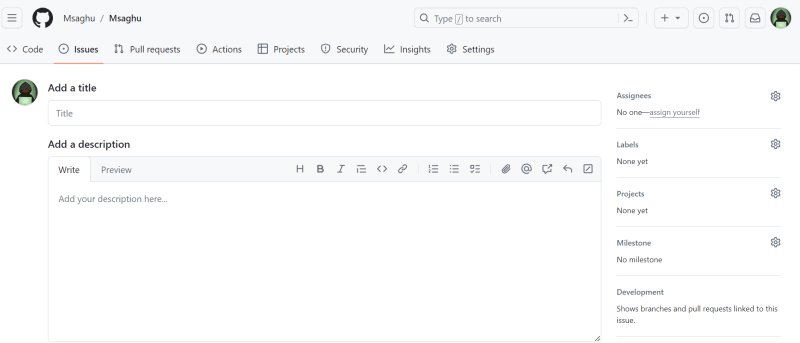
- Stage 1: Create an Issue
On the github page, choose Issues and choose Create new issue. Then add a title to it and Submit the new issue. You the right hand side,
Create a new issue and create a label for it i.e is it a bug?, is it documentation?
-
Stage 2: Create a Branch
Create a branch
Stage 3: Merge the Branch into Main
Stage 4: Verify
Stage 1: Creating an issue
We create a ticket/issue then name the branch after the feature issue i.e 1-a-new-issue
The issue will give us a number which we can use to create the branch with the command below.
Stage 2: Create a Branch

In the issues page, on the right hand, scroll down and select create branch.
The branch name should be the same as the issue name with the issue number, and accept checkout locally.
Choose the create branch button.
In our terminal, we can now create the branch. Then run the command below to streamline the code from the remote repository
git fetch origin

git checkout 1-a-new-issue
Stage 3: Merge the Branch into Main
Pushing the code to the remote branch on Github
In the version control knob in VSCode/ Gitpod , we can view the changes made. We will then stage the changes and then commit them with a commit message and the issue number i.e
#1 added an emoji to the code
If asked, sync the changes
NOTE
In the Git tree,
main are the files on your local machine,
origin the files on Github
Create a pull request
Go to the Git tree and view the tag position which we now want to pull into the main branch.
Stage 4: Verify and Sync the changes
In Github, go to pull requests then;
1. Create a pull request
Bring the feature branch to main
Add a comment to the pull request.
Squash and merge the commit
Confirm the squash and merge.
Commit the changes
git commit
Push the changes to remote
git push
Go back to main
git checkout main
Pull the changes
git pull
Create a tag for the branch
git tag 0.1.0
Push the tags to remote Github branch
git push --tags
Refresh on Github and make sure that the branches and the tags have been created.
In a larger team the squashed branch will be deleted to clear the version control code.
Switching to a branch from main
If we have a branch that we have made changes in and we want to move into it from main, we can follow the following steps.
git fetch
git add .
git stash save
git checkout branch name
git stash apply
We made changes to main instead of the branch, what do we do?
Mistakes happen, even to the most meticulous of us, so don't fret. Here's what to do;
git add .
git stash save
git stash list
git fetch
git checkout the-branch-we-should-have-made-changes-in
git pull
git stash apply
git stash list temporarily stores files
git fetch shows you all the new branch
To create tags
git checkout main
git pull
git tag 0.1.0
git push --tags
git fetch
HOW TO AUTOMATE DELETION OF BRANCHES AFTER MERGING
HOW TO AUTOMATE TAGGING OF BRANCHES

Top comments (0)