
Table Of Contents
- Install Packages (json-server, faker, lodash)
- Create Generator.js File
- Editing Package.json File
- Testing with Postman 1
- Create Database.json File
- Testing with Postman 2
- Conclusion
NB: This article, will be based on the premise that you are already familiar with
1. JSON
2. API
3. JavaScript
4. Package Manager (in this case, NPM)
5. Postman
Install Packages
Let's start with installing our packages with the help of our package manager (npm). I am using node v10.16.0. To check which version you're using run the below code in your shell.
λ node --version
// v10.16.0
To install all the packages at once , navigate to your Project's root folder and type the below code
λ npm install faker json-server lodash
NB: 'λ' should not be included, I use (https://cmder.net/) for my shell
Create Generator.js File
To properly arrange things, create a folder in the root directory of your project (same
level as you node_modules). Say 'db', where you will store your Generator.js and
Database.json files.
- The Generator.js will serve as a schema (template) for building our Database structures. Unless you plan on writing out the data yourself, heck!!!, you could as well buy finger massage cream before you start 😂. The Generator.js would be a default exported module (Kinda turned it up-side-down) js file, within will be where you will require the faker and lodash package we installed earlier. Then we return an object, containing our endpoint-schema.

Schema Structure
With the faker and lodash required (NB: as at the time of writing this article, Node.js, uses require, instead of import syntax), the returned object, will have a first layer key-value pair, which would serve as the endpoint (like; www.localhost:8080/people) when we are done.
Lodash, A JavaScript utility library delivering consistency, modularity,
performance, & extras (https://lodash.com/)

Faker is a JavaScript library that generates fake data for you. Whether
you need   to bootstrap your database, create good-looking XML documents,
fill-in  your persistence to stress test it, or anonymize data taken from
a  production service, Faker is for you.
(https://github.com/marak/Faker.js/)
people: lodash.times(100, (n) => {
    return{
       id: n + 1,
       name: faker.name.findName(),
       avatar: faker.image.avatar(),
       phone: faker.phone.phoneNumber(),
       email: faker.internet.email()
     }
}),
// lodash.times(100) performs a 100th time loop with n as the counter.
/* faker.name.findName() is a method found in faker docs, for providing random names.
*/
Editing Package.json File
It's time to run our script to do the softwork for us, i.e generating our data. Find your package.json
file, also found in your root directory. Move down to the scripts
section, add the below code.
"gen" : "json-server ./db/generate.js",

// "gen" is just a fancy name I used (you could legit come up with yours 😎)
/* json-server, our third (actually first 😁) package installed
 will be automatically picked by node.
*/
// Then comes the ./db/generate.js, which is the directory and the generator file.

NB: Please forgive me, Just found out my project bears 'generate.js'
instead of 'generator.js', they are still same procedure. And 'db.json'
instead of 'dashboard.js'
Ok, With the Package config done, go to your shell, and run the below code
λ npm run gen

// This will executes the script action we configured in the package.json file // and generate our data
NB: Hey, if you had taken my advice and name yours another thing, edit the
above code and enter your own name. (Let's save ourselves headaches from
debugging 😉)
Testing with Postman 1
If everything went well, without errors, you will receive a Url for your endpoints like below
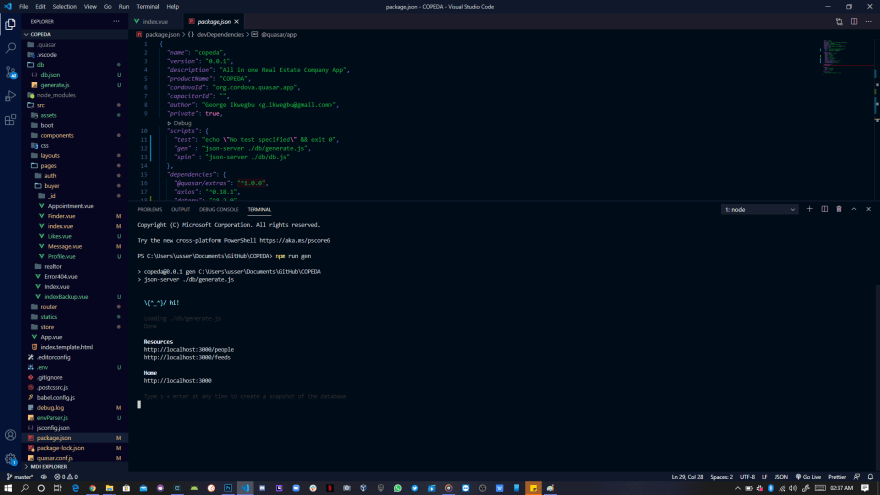
YES!!! we did it 🎉🎉🎉🎉🎉🎉
Now, open your postman, use a GET request on the available endpoints. Your result should look like the below image.

Create Database.json File
NB: In my own project, I used 'db.json'
Create a database.json file, copy your response from the postman result, as seen in the above section's image, and paste inside the database.json
NB: Just for tips, json is just lovely, so I will show you how to paste
and format fro json.
/* First, have your curly braces, then the key(endpoint, and <b>must</b>
be in  <b>Double</b> quate), and then what you
copied from postman.
*/
{
   "people": [
       {
          "id": 1,
          "name": "Kiana Gulgowski Sr.",
          "avatar":"https:// 128.jpg",
          "phone": "120.085.7363 x3143",
          "email": "Daren2@yahoo.com"
        },
       ...
       .
       .
       .
        {
          "id": 100,
          "name": "Stevie Morar",
          "avatar":  "https://s3.amazonaws.com/128.jpg",
          "phone": "(122) 628-3813 x91330",
          "email": "Antonina47@yahoo.com"
        }
     ],
   "feeds":
    {
       "state": "success",
       "pages": 1,
       "feeds": [
          {
             "id": 1,
             "fullname": "Adelle Jacobi",
             "avatar": "https://s3.amazonaws.com/uifaces/28.jpg",
             "handle": "Jayson.Raynor",
             "user_id": "6c8556ac-d616-4288-ad73-35bf9ade456b",
             "timePosted": "2020-09-08T09:51:03.854Z",
             "content": "Sit doloremque v",
             "likes": "@Conn",
             "comments": "@Leif"
           },
        ]
    }
}
NB: The above is just a snippet of how your database.json file should be
structured. When you are done, Please refer back to the Editing
Package.json File image, check the next script
added ? <b>spin</b>. This would be used to spin and properly configure the
<b>database.json</b> file as a full API service. When you are done editing
the package.json file, do well to run the below code, to spin up the
server.
// in your package.json file, in the script section
"spin" : "json-server ./db/db.js" // used to spin the server

// in your shell
λ npm run spin

/* This will executes the script action we configured in the
package.json file  and spin up the server proper.
*/
Conclusion
Hey, congratulations Champ!!! We did it. Now, as the database server is up and running (I don't know who is pursing it though 🤣🤣). You can make API calls from your FrontEnd applications, with the endpoints we talked about, and you will get results. Also, other http methods are accepted, atleast, I have tried out POST.
NB: The script for generating the data creates an endpoint, this should
only be used for generation. To use the API proper, spin the server, then
another open shell, spin your own FrontEnd server, in my case (using quasar)
λ quasar dev // for quasar development mode

λ npm run serve // for vue
Thanks.
![[deleted user] image](https://res.cloudinary.com/practicaldev/image/fetch/s--b_Q_OnuL--/c_limit%2Cf_auto%2Cfl_progressive%2Cq_auto%2Cw_880/https://res.cloudinary.com/practicaldev/image/fetch/s--diPD5F8K--/c_fill%2Cf_auto%2Cfl_progressive%2Ch_150%2Cq_auto%2Cw_150/https://thepracticaldev.s3.amazonaws.com/i/99mvlsfu5tfj9m7ku25d.png)


Top comments (0)