We will build, deploy and manage a three tier application in Azure using Azure Web App, Azure PostgreSQL and Azure Kubernetes Service. A three tier application is basically an application which has a presentation layer (frontend), application layer (backend) and data layer (database).
Table of Contents
1. Prerequisites
2. Sample Application
3. Install Azure CLI and log in
4. Create resource group in azure
5. Deploy and run a containerized web app with Azure App Service
5.1. Run Application Locally
5.2. Create Dockerfile
5.3. Build Docker image and run Docker container
5.4. Create Azure Container Registry and push Docker image.
5.5. Create and deploy a web app from Azure Container Registry repository
6. Create PostgreSQL Database
6.1. Create an Azure Database for PostgreSQL - Flexible Server
6.2. Create Database
6.3. Connect to Database
6.4. Get Connection String
7. Deploy Microservices using AKS
7.1. Restructure Monolithic application into a Microservice architecture
7.2. Get environment variables
7.3. Run code locally
7.4. Set up Dockerfile
7.5. Configure API Gateway using Reverse Proxy
7.6. Create Images
7.7. Tag Container Images and Push to Registry
7.8. Create a Kubernetes cluster
7.9. Install the Kubernetes CLI
7.10. Connect to the cluster using kubectl
7.11. Create deployment and service manifest files and configure environment variables.
7.12. Deploy the application
7.13. Expose Proxy endpoint and test application
8. Build Frontend container image
9. Test Application
10. Continuous Integration with Azure pipelines
11. Clean up resources
Prerequisites
- Azure account and subscription. If you do not have an account, you can create one here. Login to your account if you have one.
- Basic understanding of microservice architecture.
- Basic experience using Docker commands to store and retrieve Docker images.
- Basic understanding of Kubernetes concepts.
- Have Docker desktop installed or you can install it here.
- Install Azure Data Studio.
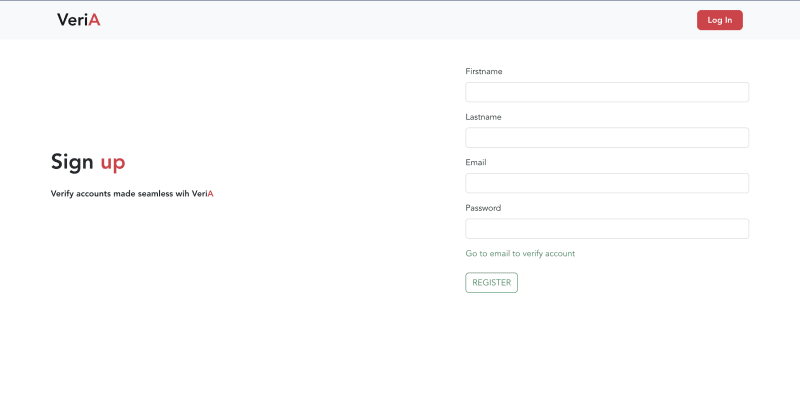
Sample Application
We will deploy an application which is used to verify users bank account number. The frontend was built with VueJS and the backend with ExpressJS. We will split the backend monolith application into a microservice architecture. A reverse proxy would be used to route incoming requests to the right microservice.
The frontend application will be dockerized, pushed to Azure Container Registry and deployed using Azure Web App service. The backend application will be dockerized, pushed to Azure Container Registry and deployed using Azure Kubernetes Service. Azure PostgresSql database would be used to store user data.
Install Azure CLI and log in
Azure CLI is a command-line tool to connect to Azure and execute administrative commands on Azure resources. Install for your operating system using this link.
I am using MacOS, so i used the command:
brew update && brew install azure-cli
After installation, confirm the CLI was successfully installed by running az version in the terminal. If you get the versions as shown below, then you are now able to run azure commands.

Log in to authenticate your account by running the command
az login
Create resource group in azure
To create any resource in Azure, we need to have a resource group to hold related resources for a solution. You can create a resource group in azure portal or using the CLI.
In Azure portal,
- Search for Resource Groups.
- Click on Create or Create resource group button.
- Fill in the resource group name and select a region where you would want your resources to be hosted.
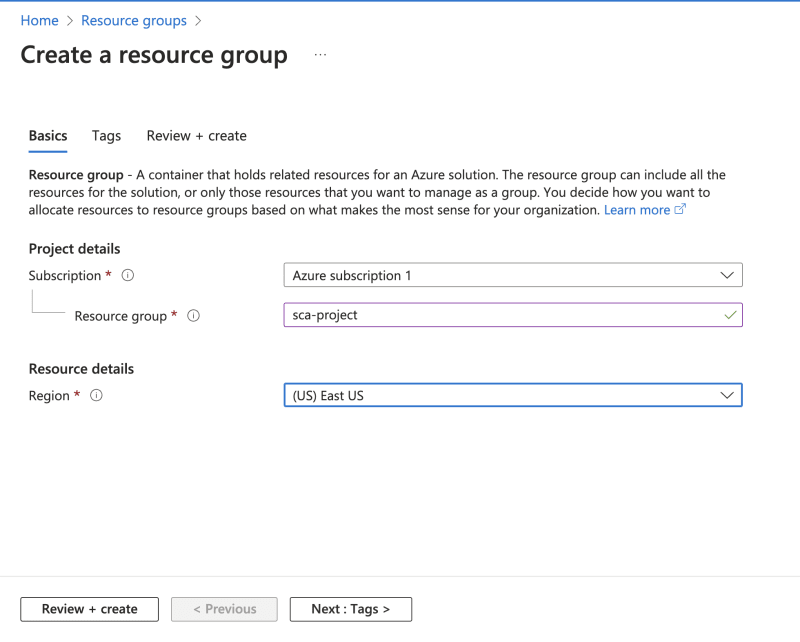
- Click on Review + create button. Then, select Create.
Using Azure CLI, we pass the name and location for the resource group as shown below. Run the command in the terminal.
az group create --name sca-project --location eastus
Deploy and run a containerized web app with Azure App Service
Let us deploy and run our frontend application first. If you would like to follow along, clone the starter code here.
Run Application Locally
To run locally, install all dependencies using npm install. Create a .env file and copy the contents of .env.sample into it. Add the application backend base url value https://verify-account-api.onrender.com after the “=”. Then, run the command npm run serve.
Create Dockerfile
Dockerfile is a file that contains instructions and commands that would be automatically run in sequence to build a docker image. Create the file named Dockerfile in the root of the project and the contents would be:
# Stage 1: Build the Vue app
FROM node:16 as build-stage
WORKDIR /app
ARG VUE_APP_BASE_URL
ENV VUE_APP_BASE_URL $VUE_APP_BASE_URL
COPY package*.json ./
RUN npm install
COPY . .
RUN npm run build
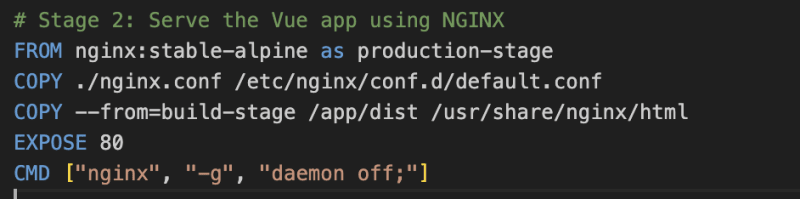
# Stage 2: Serve the Vue app using NGINX
FROM nginx:stable-alpine as production-stage
COPY --from=build-stage /app/dist /usr/share/nginx/html
EXPOSE 80
CMD ["nginx", "-g", "daemon off;"]
This Dockerfile is stating to use node version 16. The WORKDIR is used to define the working directory of a container. It creates and changes directory which is a combination of mkdir and cd commands. The ENV provides the environmental variable needed by the application. The package.json file is copied, dependencies are installed, files are copied from the local to the docker container and the build command is run. The application is served using nginx. We are exposing the application at port 80.
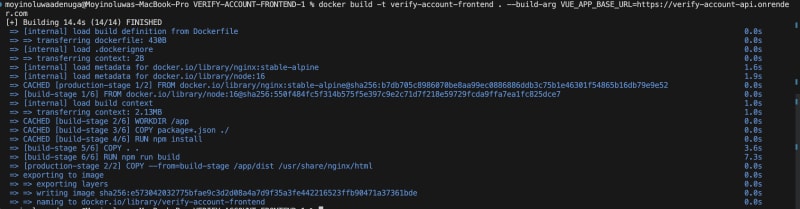
Build Docker image and run Docker container
Open the Docker desktop application which provides the environment to build and run containerized application. On the terminal, build the Docker image using:
docker build -t <docker-image-name> .
Replace <docker-image-name> with the name you want to give the image.
Create a container from the image and run container using:
docker run -it -p 8080:80 --rm --name <container-name> <docker-image-name>
Replace <container-name> and <docker-image-name> with the name you want to give the container and the docker image name. We are also publishing the container port to 8080 using -p 8080:80 and automatically removing the container on exit using the --rm flag. Read more on docker run commands here.
View application on http://localhost:8080/. Exit running the container using CTRL + C command.
Create Azure Container Registry and push Docker image.
Azure Container Registry is a service which allows you to build, store, and manage container images in a private registry. Like Docker Hub, Container Registry uses repositories which contain one or more images.
A major reason to use Container Registry is because it offers better security. Also, as it is hosted on Azure, you can store images close to locations where they would be deployed.
You can create the azure container registry on the Azure portal or using Azure CLI.
In Azure portal,
- Search for Container Registries.
- Click on Create or Create container registry button.
- Select the resource group created earlier. Also, fill in the registry name. Leave the other fields as default.
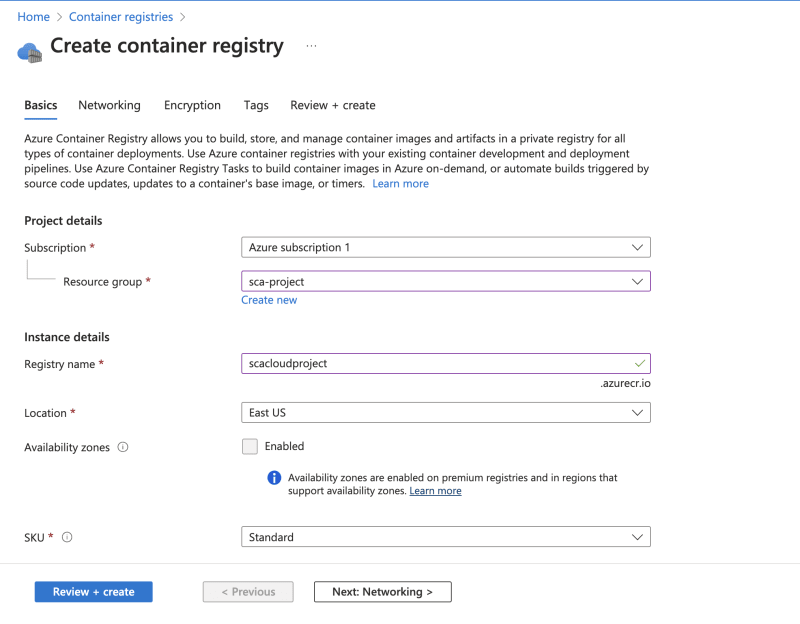
- Click on Review + create button. Then, select Create.
Using Azure CLI, we pass the resource name and resource group as parameters as shown below.
az acr create --name <resource-name> --resource-group <resource-group-name> --sku standard --admin-enabled true
Parameters:
- resource-name: must be alphanumeric and it is the name of your container registry.
- resource-group-name: use the resource group name created earlier.
To host the docker image created earlier, use:
az acr build --registry <container_registry_name> --image <docker-image-name> .
Replace <container_registry_name> with the name of the registry you created earlier and <docker-image-name> with the image created earlier.
If you would like to build a Docker image on Azure, run this command. This command copies the file contents to the Container Registry, then uses the Dockerfile to build the image and store it.
az acr build --file Dockerfile --registry <container_registry_name> --image <new-docker-image-name> .
Replace <container_registry_name> with the name of the registry you created earlier and <new-docker-image-name> as the name of the docker image that will be created.
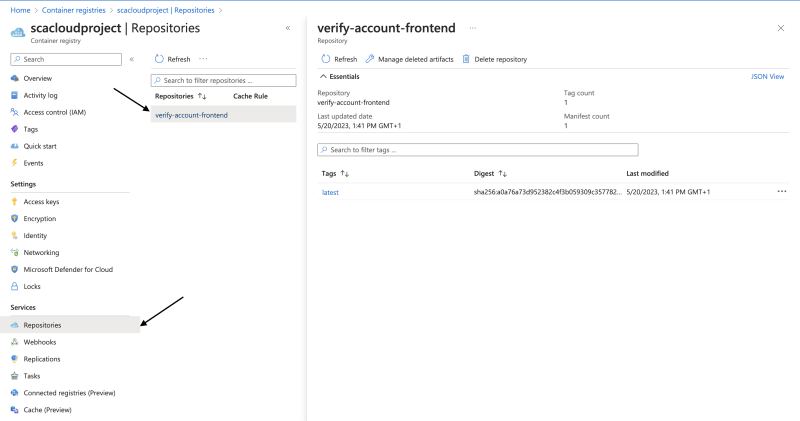
It takes a while to build. Once done, view the Docker image in the Container Registry by selecting Repositories.
Create and deploy a web app from Azure Container Registry repository
To create and deploy a web app, follow these steps:
- Search for Web App and select.
- On the Basics tab, enter the following values for each setting. Some of the fields are prepopulated. Make sure to confirm they are the ones you would like to use. Enter the web app name which would be the default url. For the Publish, change to Docker Container as we would be deploying from a container. I also updated my Pricing plan to a free one.
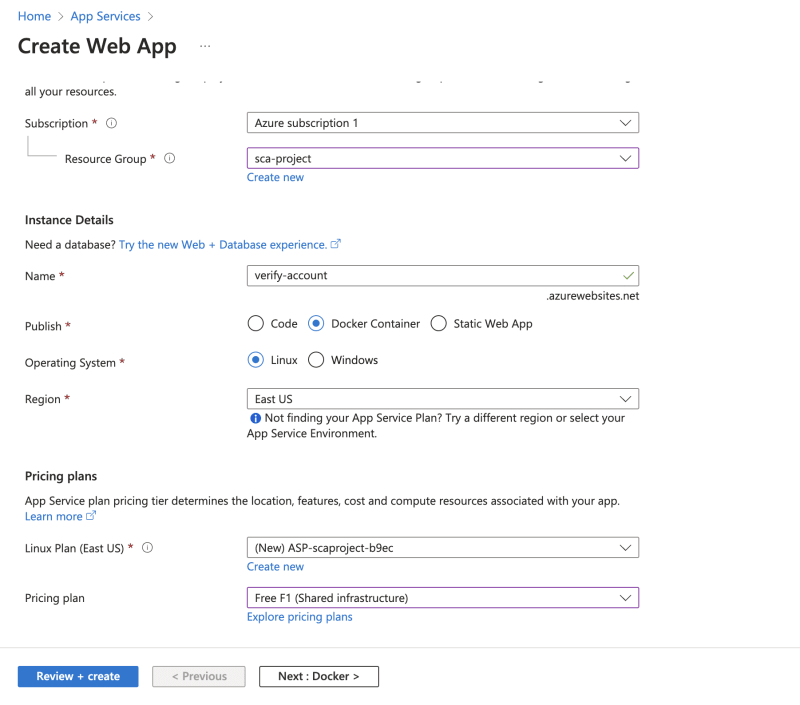
- Select Next: Docker.
- On the Docker tab, change the image source to Azure Container Registry. Then, confirm the registry details.
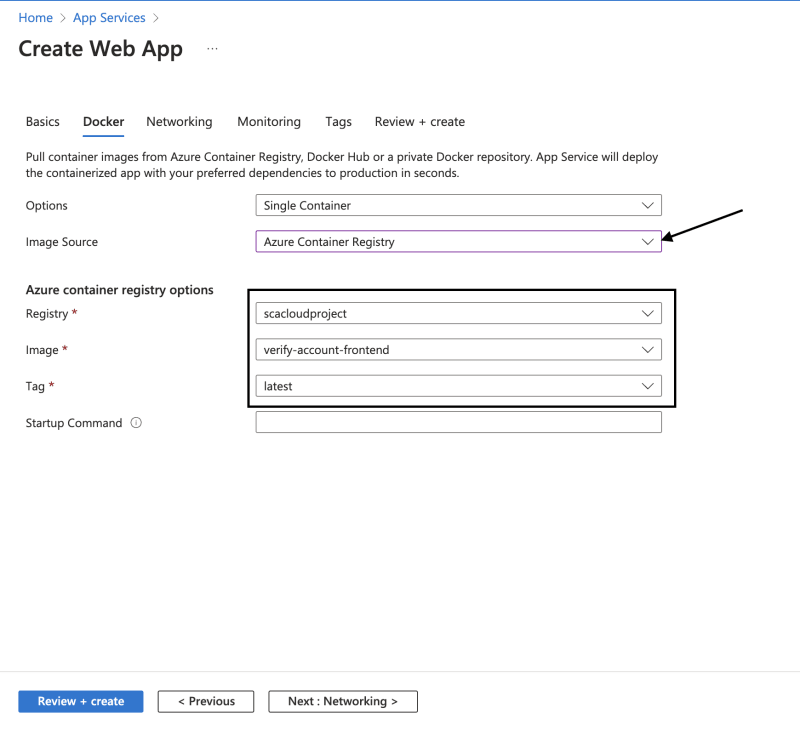
- Select Review and create, and then select Create. It takes a while to deploy.
- After deployment succeeds, select Go to resource to see the web app just created.
- In the top menu bar, select Browse to open the site in a new browser tab or copy the url. It might take a while the first time for the website to display.
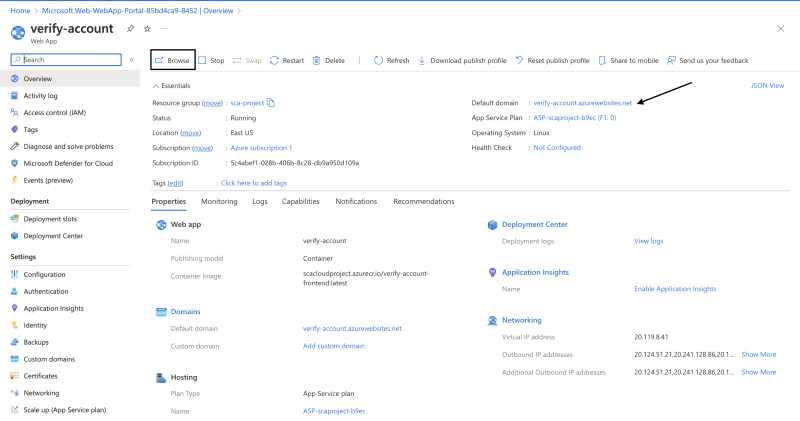
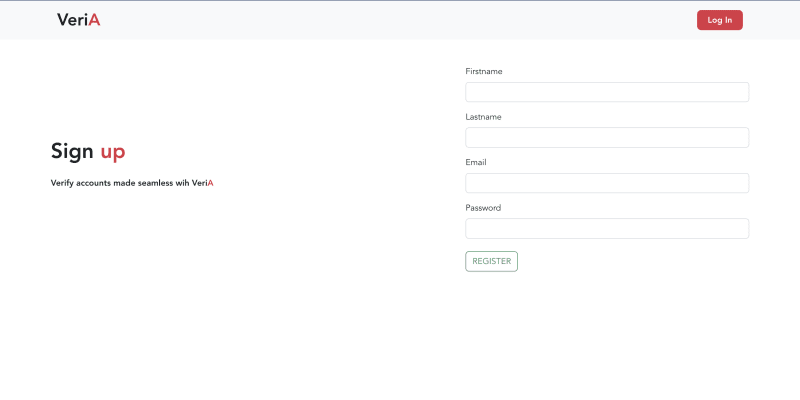
- View application.
Create PostgreSQL Database
We will create a PostgreSQL server and database to store users information when they register and also retrieve it during login.
Create an Azure Database for PostgreSQL - Flexible Server
This can be created in Azure Portal or using the CLI.
In Azure Portal,
- Search for Azure Database for PostgreSQL and Select it.
- Click on Create on the left card to create the database.

- In the Basics tab, ensure to fill all required fields as shown below. Enter the resource group and database server name.Choose a Region.
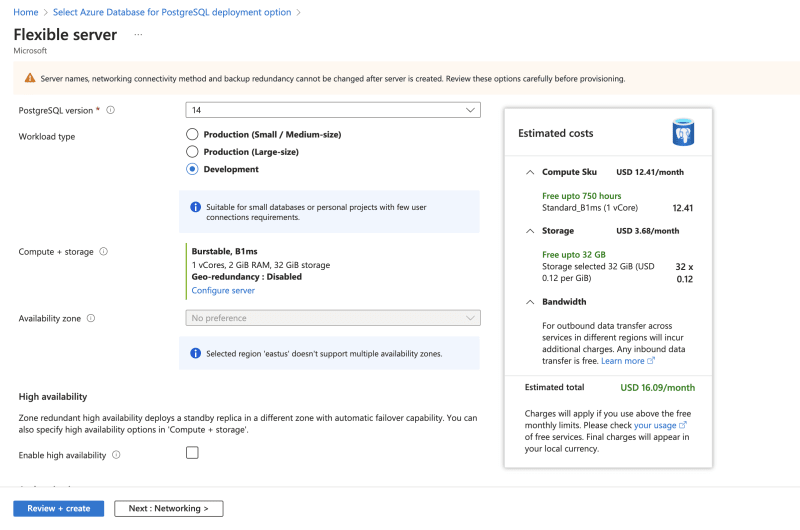
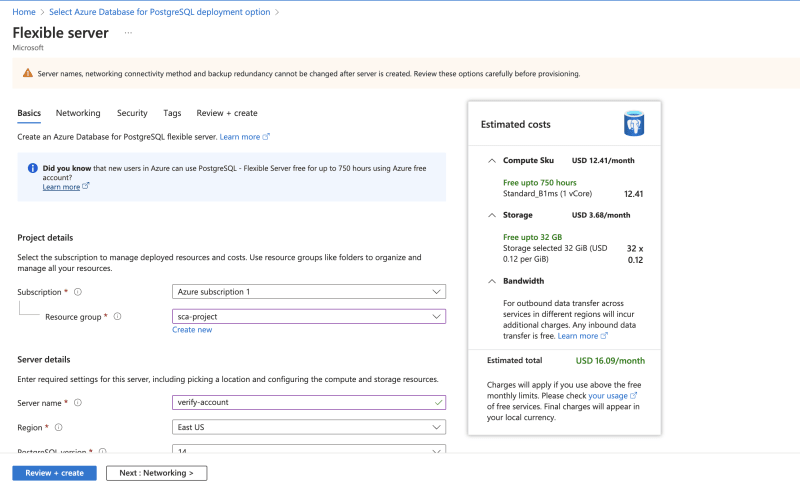 For the workload type, select development since we are using it for a personal project.
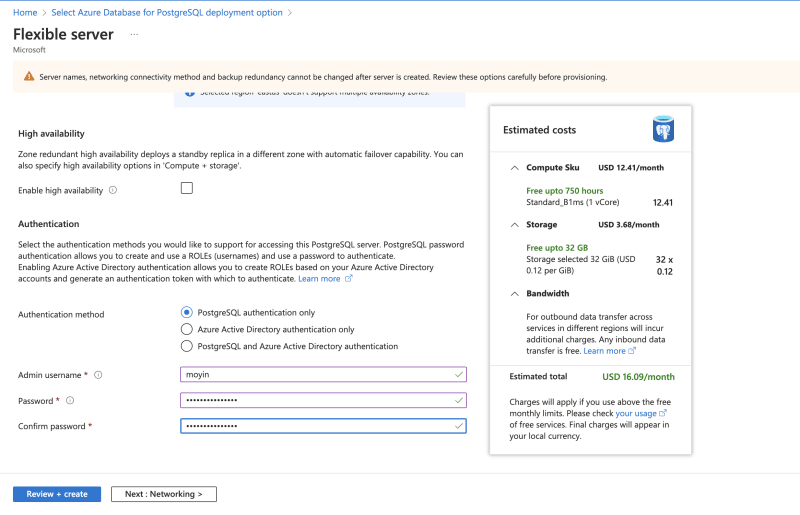
 Set up username and password for authentication
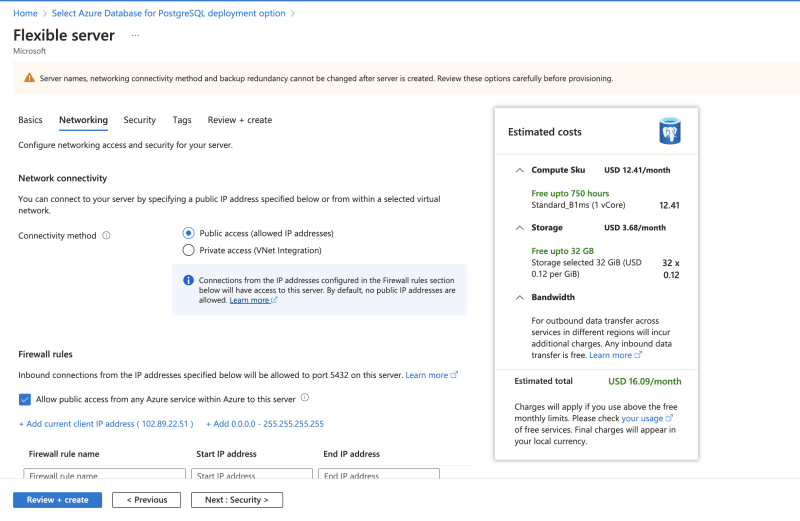
- In the Networking tab, allow Public access and you can also add your current IP address.
- Select Review and create. Then, Create.
- After Deployment, Go to resource.
Using the Azure CLI, we can use this command to create a PostgreSQL flexible server with custom parameters.
az postgres flexible-server create --location <location> --resource-group <resource-group> \
  --name <database-server-name> --admin-user <username> --admin-password <password> \
  --sku-name Standard_B1ms --tier Burstable --public-access all --storage-size 128 \
  --version 14
Replace the <location>, <resource-group>, <database-server-name>, <username> and <password> with the right values.
Note: Database server name should be globally unique.
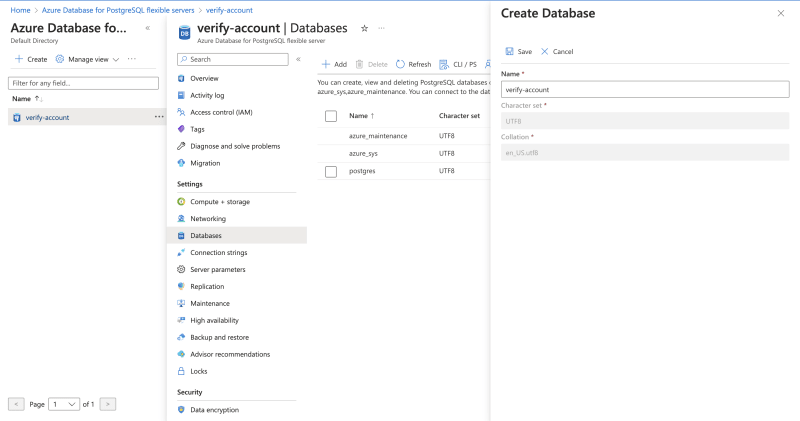
Create Database
Navigate to the Databases tab. Select the Add button. Fill in database name and Save.
Connect to Database
Open Azure Data Studio application. Go to the extensions tab and search for postgresql.
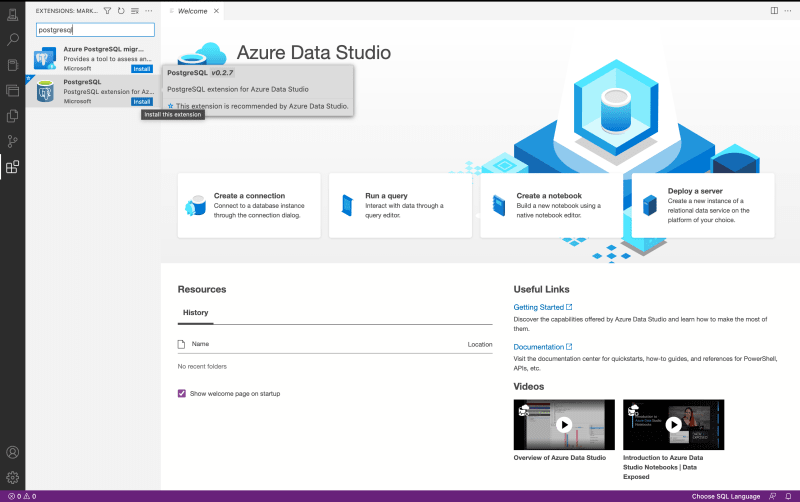 .
.
If you encounter issue with the extension, check this link.
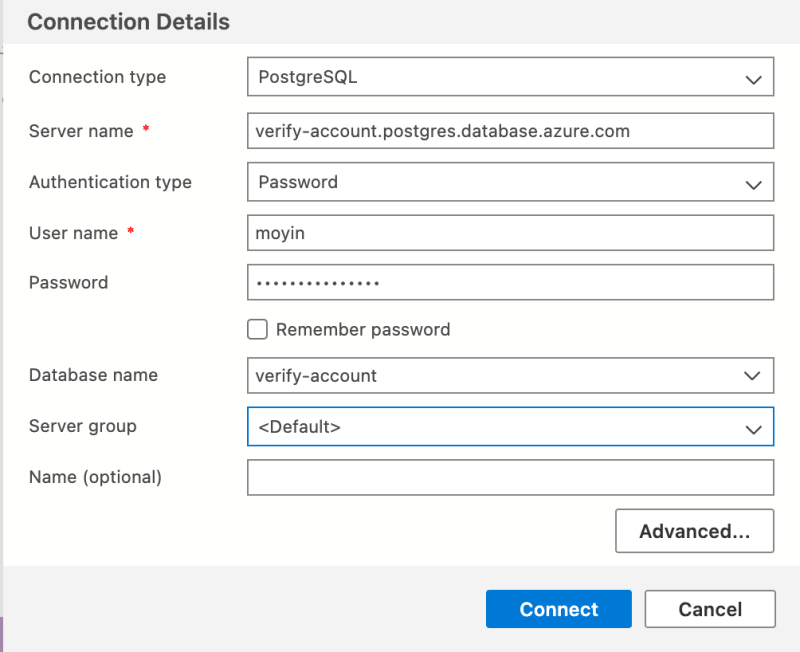
Link azure account and connect to the database by adding the server and database name. Also, add your authentication details.
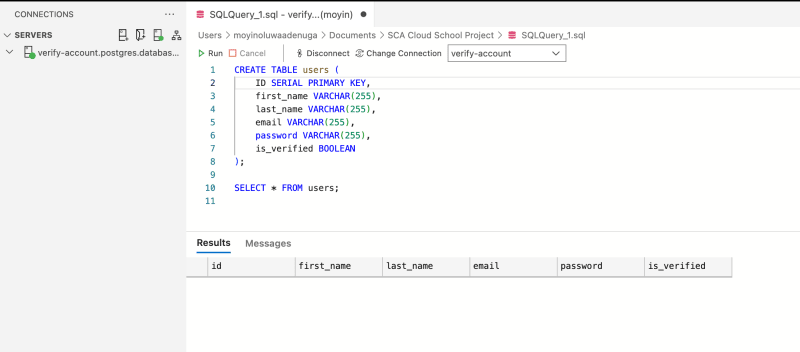
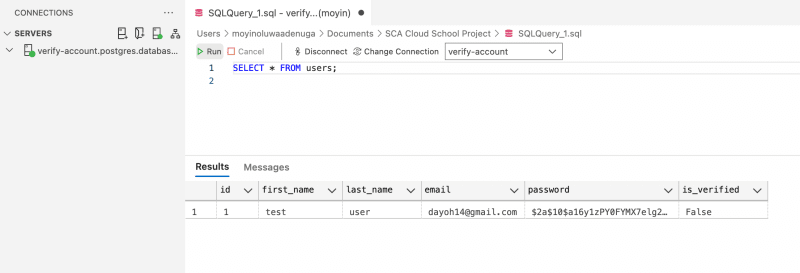
Create a Users table that would be used by the backend application.
Get Connection String
In Azure, go to the Connection strings tab.
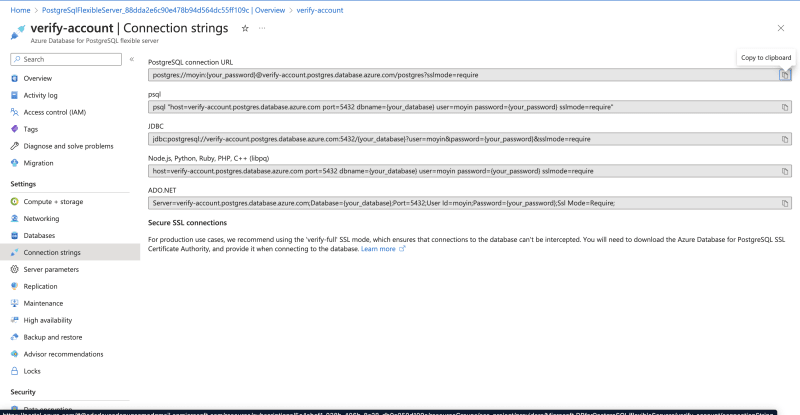
There are several ways to connect but we will be using the PostgreSQL connection url as it fits into the application we will use. Note, we would replace the postgres close to the end of the url with the database name verify-account.
Deploy Microservices using AKS
Here, we will split our backend application into a microservice architecture. Then, we will dockerize the application, set up an application gateway and deploy in a kubernetes cluster. If you would like to follow along, clone the starter code here.
View the deployed microservice application code here.
Restructure Monolithic application into a Microservice architecture
The current project contains the logic for both /users and /verify-account endpoint. We will decompose the API code into 2 different services that can be run independent of one another.
Create two new directories (as services) named user and verify-account. Delete the package-lock.json file. Then, copy the content of the root directory into both folders. The folder directory should look like this.
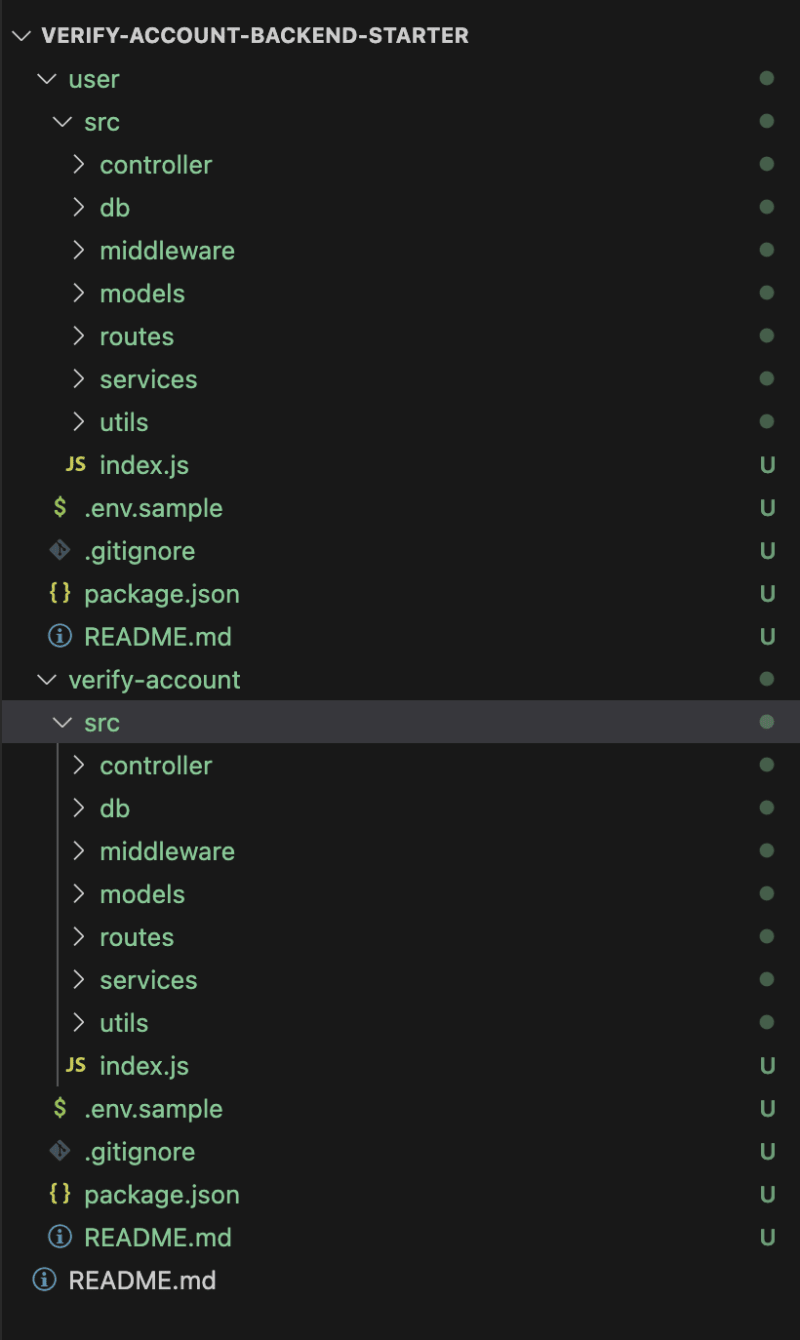
Go through the folders and files, and remove code not related to each service. If you get stuck or are unsure of what is left, compare with the code here.
Get environment variables
For the DATABASE_URL, use the PostgreSQL connection url and replace the password. To get the MAIL_USERNAME, MAIL_PASSWORD, OAUTH_CLIENTID, OAUTH_CLIENT_SECRET and OAUTH_REFRESH_TOKEN, check this guide to learn how to create these keys for nodemailer. If you do not want to set these up, you can comment out the part in the code using it. The TOKEN_KEY and RESET_TOKEN_KEY are random strings used to hash the user password. Create a Paystack account, Add a Business and use the Test API Secret key as the PAYSTACK_SECRET_KEY. The FRONTEND_BASE_URL is also used in the email to route the user back to the frontend application.
Run code locally
For each microservice, change directory to the microservice folder and run npm install command to install all project dependencies. Create a .env file and copy the content of .env.sample file. Put the values gotten above. Run npm start or npm run dev to test the application.
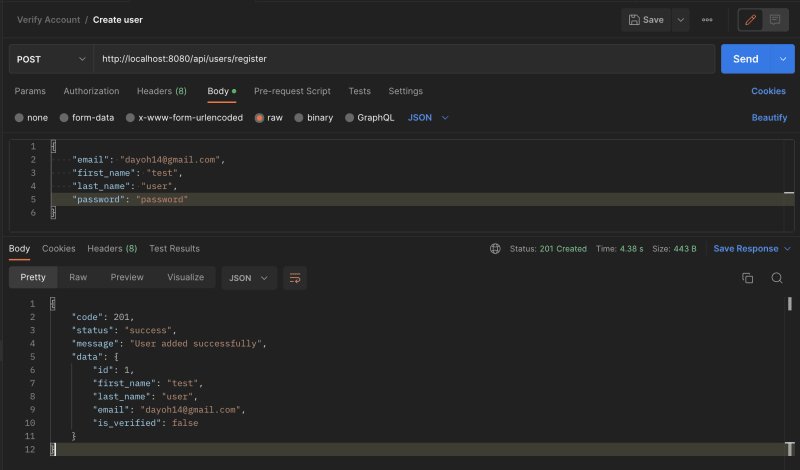
Let's test the register user endpoint http://localhost:8080/api/users/register.
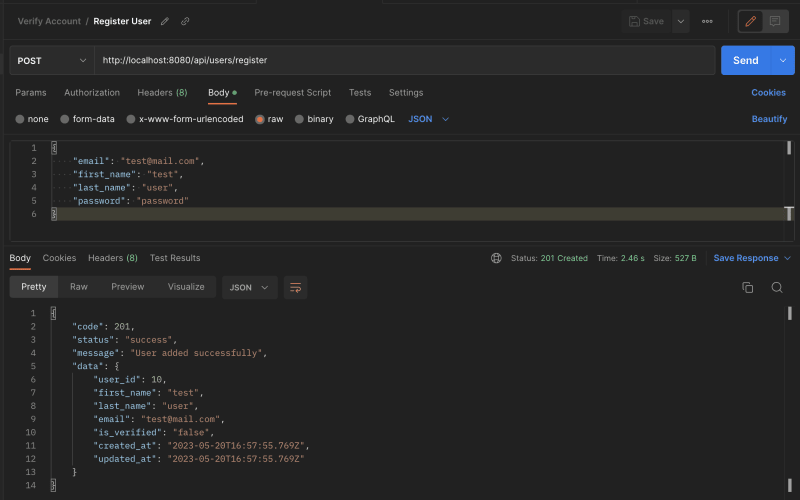
If the endpoint does not return a response, then something is wrong. Try to debug and fix the issue.
Set up Dockerfile
Remember the dockerfile we created earlier for the frontend application. We will create a similar one for the microservices. In the microservices project directory, create a file named Dockerfile and paste this code:
FROM node:14
# Create app directory
WORKDIR /usr/src/app

# Install app dependencies
COPY package*.json ./
RUN npm install

# Bundle app source
COPY . .
EXPOSE 8080
CMD [ "npm", "start" ]
Also, create a .dockerignore file and add node_modules.
Configure API Gateway using Reverse Proxy
API Gateway is used to ensure requests are routed to the right service. There are a couple of ways this can be done. These include using Azure API Management, Azure Application Gateway and others, but we will be using reverse proxy.
Create a folder and name it reverse-proxy. Create a Dockerfile in it and paste this:
FROM nginx:alpine
COPY nginx.conf /etc/nginx/nginx.conf
Also, create a nginx.conf file and configure it. Read up on how it works here.
worker_processes 1;
events { worker_connections 1024; }
error_log /dev/stdout debug;
http {
    sendfile on;
    upstream user {
        server user:8080;
    }
    upstream verify-account {
        server verify-account:8080;
    }
    proxy_set_header   Host $host;
    proxy_set_header   X-Real-IP $remote_addr;
    proxy_set_header   X-NginX-Proxy true;
    proxy_set_header   X-Forwarded-For $proxy_add_x_forwarded_for;
    proxy_set_header   X-Forwarded-Host $server_name;
    server {
        listen 8080;
        location /api/verify-account {
            proxy_pass         http://verify-account;
        }
        location /api/users {
            proxy_pass         http://user;
        }
    }
}
Create Images
To build multiple images from different Dockerfile, we need to create a docker-compose-build.yaml file in the project root directory.
The file contains the path to the different directory and you also specify the image name. This is how the docker-compose-build.yaml file looks.
version: "3"
services:
  reverseproxy:
    build:
      context: ./reverse-proxy
    image: reverseproxy
  verify_account:
    build:
      context: ./verify-account
    image: verify-account
  user:
    build:
      context: ./user
    image: user
Then run this command to build the images.
docker compose -f docker-compose-build.yaml build --parallel
To run the images in a container, create a docker-compose.yaml file.
version: "3"
services:
  reverseproxy:
      image: reverseproxy
      ports:
          - 8080:8080
      restart: always
      depends_on:
        - user
        - verify-account
  user:
    image: user
    environment:
      DATABASE_URL: $DATABASE_URL
      MAIL_USERNAME: $MAIL_USERNAME
      MAIL_PASSWORD: $MAIL_PASSWORD
      OAUTH_CLIENTID: $OAUTH_CLIENTID
      OAUTH_CLIENT_SECRET: $OAUTH_CLIENT_SECRET
      OAUTH_REFRESH_TOKEN: $OAUTH_REFRESH_TOKEN
      TOKEN_KEY: $TOKEN_KEY
      RESET_TOKEN_KEY: $RESET_TOKEN_KEY
      PAYSTACK_SECRET_KEY: $PAYSTACK_SECRET_KEY
      FRONTEND_BASE_URL: $FRONTEND_BASE_URL
  verify-account:
    image: verify-account
    environment:
      TOKEN_KEY: $TOKEN_KEY
      RESET_TOKEN_KEY: $RESET_TOKEN_KEY
Create a .env file in the root directory and paste all the project environment variables. Use the docker compose config to confirm all the environment variables are set. Then, use this command to run the container.
docker compose up
Test the application by using any of the endpoint. It should work as before. When you go to the Database and query for all users, you should see the user added.
Build and Push to Registry
Log in to the container registry to connect to the Kubernetes cluster from a local computer. The <acrName> is the name of the container registry e.g scacloudproject.
az acr login --name <acrName>
Build the image and push to the Container Registry using the acr build command.
az acr build --file Dockerfile --registry <container_registry_name> --image <new-docker-image-name> .
Confirm the images are successfully pushed by checking the portal.
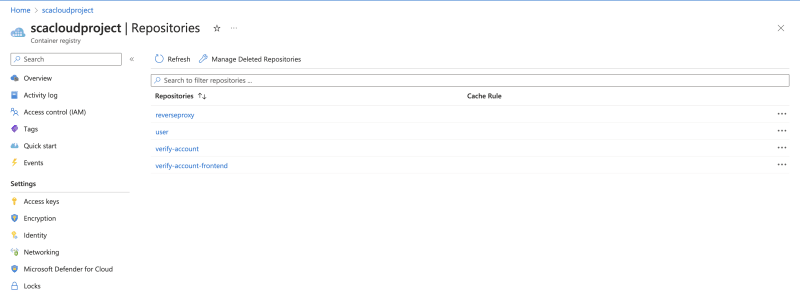
You can also view in the CLI using:
az acr repository list --name <acrName> --output table
Create a Kubernetes cluster
You can use the command below to create a kubernetes cluster. If you do not have the Owner or Azure account administrator role in your Azure subscription , use this guide to create Kubernetes cluster with role based access control.
az aks create \
    --resource-group <resource-group> \
    --name <aks-cluster-name> \
    --node-count 2 \
    --generate-ssh-keys \
    --attach-acr <acrName>
This command takes a while to run. You can also create it in the portal using this guide.
Install the Kubernetes CLI
Use the Kubernetes CLI, kubectl, to connect to the Kubernetes cluster from a local computer.
az aks install-cli
Connect to the cluster using kubectl
Connect to the cluster.
az aks get-credentials --resource-group <resource-group> --name <aks-cluster-name>
To verify connection to the cluster, run kubectl get nodes to return a list of cluster nodes.
kubectl get nodes

Create deployment and service manifest files and configure environment variables.
A manifest file is usually a YAML file which is used to specify the configuration for a Kubernetes object that can create and update a set of identical pods. Each pod runs specific containers, which are defined in the spec.template field of the YAML configuration.
Kubernetes also helps in handling scalability of pods, ensuring the correct number of pods are running, and taking care of updates to pods on an ongoing basis. All these activities can be configured through fields in the Deployment YAML.
Create a deployments folder in the project root directory to store all the manifest files. Create manifest file for all the services. Ensure the right image is added for each pod
Here is how the user-deployment.yamlfile looks.
apiVersion: apps/v1
kind: Deployment
metadata:
  name: user
spec:
  replicas: 2
  selector:
    matchLabels:
      app: user
  template:
    metadata:
      labels:
        app: user
    spec:
      containers:
      - name: user
        image: scacloudproject.azurecr.io/user
        envFrom:
          - secretRef:
            name: verify-account-secret
        ports:
        - containerPort: 8080
        resources:
          requests:
            cpu: 100m
            memory: 128Mi
          limits:
            cpu: 250m
            memory: 256Mi
---
apiVersion: v1
kind: Service
metadata:
  name: user
spec:
  ports:
    - protocol: TCP
      port: 8080
      targetPort: 8080
  selector:
    app: user
From the file above, we can see the envFrom variable which specifies where to get environment variables. Let's configure the secret file.
kubectl create secret generic <secret-name> <data-source>
![]()
Other ways to get the env variables in the deployment files are by specifying them directly or using configmap for configuration variables.
Deploy the application
To deploy all the manifest files, create a bash script named deploy.sh in the deployments folder and add all the deployment commands for each container.
kubectl apply -f <filename>
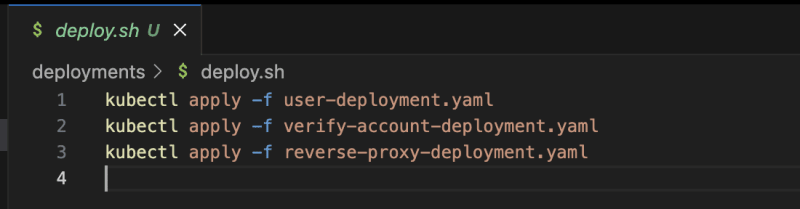
Change directory to the deployments directory and run the script with ./deploy.sh.
Run kubectl get pods to check the status of the pods.

Debugging
If you encounter any issue with the deployment, check your indentation as it is very important in a YAML file or try to search online for help. Also you would need to delete all deployment and services using these commands.
kubectl delete --all service
kubectl delete --all deployment
Run kubectl get pods to ensure none is running. Then, run the script ./deploy.sh again. Then, run kubectl get pods and ensure all pods status are running.
Expose Proxy endpoint and test application
To get the url we will use to access the frontend microservice, we will expose the reverse proxy port. After, get the IP address with port number using kubectl get services.
kubectl expose deployment <reverse-proxy-name> --type=LoadBalancer --name=<public-reverse-proxy-name>

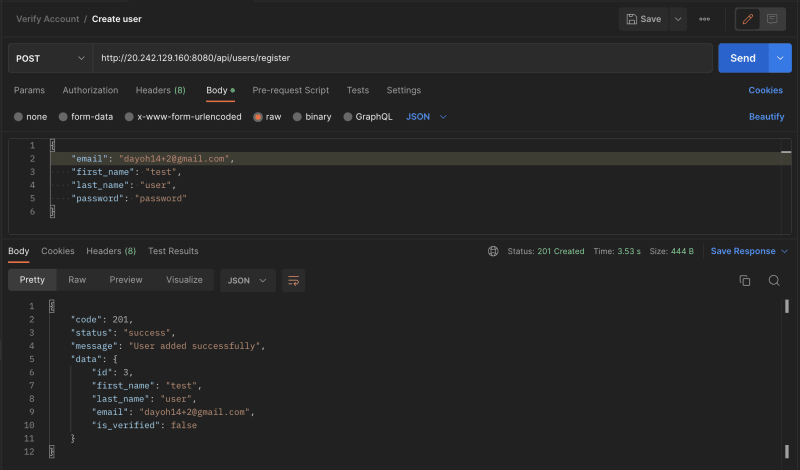
Try to make a request in Postman application using any of the endpoint to test the url.
Build Frontend container image
Build the container image again to use the url. Run
az acr build --file Dockerfile --registry <container_registry_name> --image <docker-image-name> . --build-arg VUE_APP_BASE_URL=<api-base-url>
Test Application
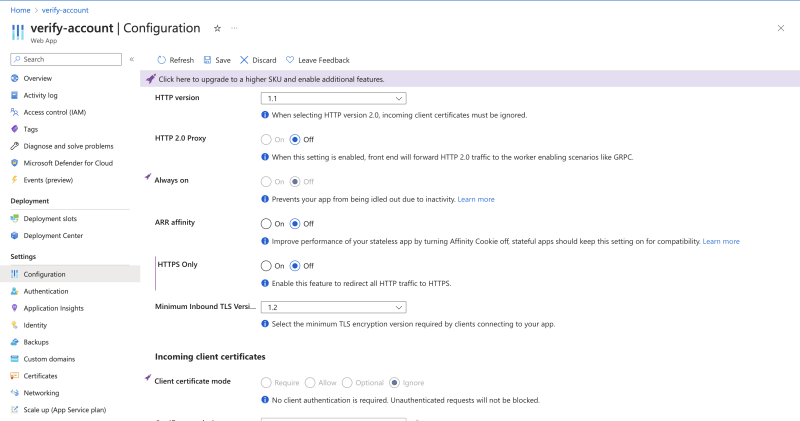
In the configurations, under the General Settings tab, turn off HTTPs only requests.
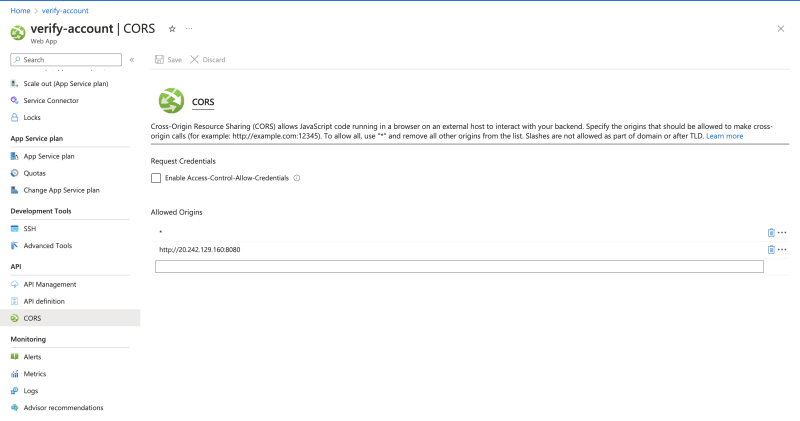
Add the backend url to CORS as well to prevent CORS origin issues.
I encountered a mixed content error because https website was trying to access a http url. On Google Chrome, turn it off by going to the site lock, then click on site settings. Scroll down to insecure content, and allow. Restart the App Service.
Go back to the application and make requests.
On reload of routes which were not the base routes, I encountered a 404 error which happens for single page application. To fix this, create a nginx.conf file in the frontend project root folder and add this code to route the requests.
server {
    listen       80;
    server_name  localhost;

    location / {
        root   /usr/share/nginx/html;
        try_files $uri $uri/ /index.html;
        index  index.html index.htm;
    }

    error_page   500 502 503 504  /50x.html;
    location = /50x.html {
        root   /usr/share/nginx/html;
    }

}
Also, add it to the Dockerfile, rebuild image and restart App Service.
View Deployed application
Deployed_web_application.mov - Google Drive
Continuous Integration with Azure pipelines
To avoid manually building the images, it is ideal to set up a continuous integration process to ensure that for every push to the branch or PR merged, an image is built and pushed to the container.
This can be easily done by going to the Pipelines tab on Azure DevOps and creating a new pipeline. Use this guide to set up a pipeline as I am not able to due to some permissions.
Clean up resources
We created several resources using our Azure subscription. We will clean up these resources so that we won't continue to be charged for them. You can delete on the CLI or in the portal.
Delete with CLI using:
az group delete --name myResourceGroup --yes --no-wait
In the Portal,
- In Azure, select Resource groups.
- Find the resource group name you used, and select it.
- In the Overview tab of the resource group, select Delete resource group.
- A dialog box appears prompting you to confirm the deletion. Enter the name of the resource group again, and select Delete.
- Select Delete again to confirm deletion. This will delete all of the resources created.

Top comments (0)