Note: this was originally posted on my personal website at moriahmaney.com
Introduction
I built my first desktop computer as a teenager when I started to become interested in PC gaming. Since then, I've done multiple iterations and upgrades until I finally arrived at a place where I was comfortable enough to water cool my computer. Water cooling is often done by hobbyists as a way to reduce temperatures and noise, and to enable overclocking hardware components while maintaining good temperatures.
Disclaimer: I do not claim to be an expert on water cooling. If you plan to water cool a PC, this guide is mainly to serve as an introduction to the process and to chronicle my own journey water cooling my PC. It is not comprehensive by any means.
Part List
| Item | Type | Link |
|---|---|---|
| Motherboard | ASUS Strix Z370-E | http://a.co/5Dq88Cr |
| Processor | Intel i7-8700K | http://a.co/fZD5R7U |
| Graphics Card | EVGA GeForce GTX 1080 Ti SC Black Edition | http://a.co/9IbItRz |
| RAM | Corsair Vengeance LPX 16GB (2x8GB) DDR4 | http://a.co/5hmcAUN |
| Power Supply | Corsair RM750x | http://a.co/bXYCbwB |
| Storage | Kingston 240GB SSD | http://a.co/8QtGGgp |
| Storage | Kingston 120GB SSD | http://a.co/5oXpV3U |
| Storage | WD Black 2TB HDD | http://a.co/bbt9Jfk |
| CPU Waterblock | EK-Supremacy EVO | https://bit.ly/2rIgtLk |
| GPU Waterblock | EK-FC Titan X Pascal | https://bit.ly/2MaONxv |
| GPU Backplate | EK-FC Titan X Pascal Backplate | https://bit.ly/2KiQDHB |
| Pump/Reservoir | EK-XRES 140 Revo D5 PWM | https://bit.ly/2h11XJi |
| Radiator | EK-CoolStream CE 280 | https://bit.ly/2fUpQpV |
| Fans | EK-Vardar EVO (2) | https://bit.ly/2MlCTA3 |
| Tubing | EK-DuraClear | https://bit.ly/2FvLedA |
| Fittings | EK-ACF Fitting 10/13mm (8) | https://bit.ly/2nyxckA |
| Fluid | PrimoChill Vue | https://bit.ly/2P0QfAm |
| Cables | CableMod ModFlex Pro | https://bit.ly/2Ozgwoz |
| PCI-E Extension | EZDIY-FAB | http://a.co/hBH9W3r |
| Case | Fractal Design Define R6 | https://bit.ly/2LZp6Pv |
Process
Testing
Building your PC using the original cooling (air) ahead of time if you're building completely from scratch is an important step. This will ensure all of your components work before adding the additional complexity of water cooling. Building a PC from scratch is outside the scope of this write-up, so that's as in depth as I will go here.
Planning
Planning your loop properly is one of the most important ways to make sure your components will work together and avoid spending extra money on part incompatibilities. In addition, it is recommended to draw your loop out ahead of time. If you're building your loop alone, measuring tubing lengths is recommended at this stage. I had another person to help me, so we ran the tubing, marked it, and cut it as we went instead.
Fitting
I had originally ordered an NZXT H500 for this build, then realized the NZXT 500i was the only version with the ability to vertically mount the GPU. As this was a core component of the build asthetic I was going for, I re-ordered an NZXT H500i and had to wait for it to arrive. Once it arrived, I started to dry fit the reservoir/pump and the raditator, only to realize they wouldn't fit in the case without a massive amount of overcrowding. An important note is that the NZXT H500i is a brand new case, so I didn't have many reviews to go off of and just went on hope. This is where you do as I say and not as I do, and plan ahead of time so it doesn't happen to you.
More Fitting
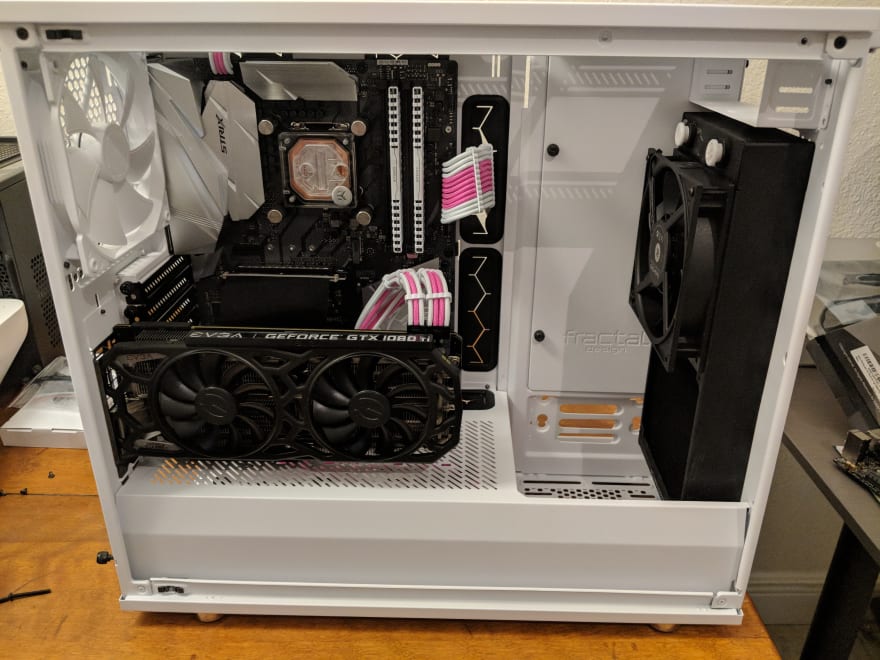
After realizing my second case also didn't work, I did an extensive amount of research and landed on the Fractal Design Define R6 in white. I watched countless YouTube builds with watercooling to make sure it would actually fit. I had to wait another week for this case to arrive, but when it did I could finally do another dry fitting. Below is a photo of the dry fit (I had already removed the pump and reservoir, but you get the idea).
Assembly
I started this build by installing the power supply and routing the cables through the case to get them exactly how I wanted them. This is a good first step especially if you want clean cable management throughout. Below is a photo of the cable management on the back side of the case.

Next, mount the CPU water block to the motherboard, and be careful to not overtighten it.
Whatever GPU water block you purchase should come with instructions on removing the air cooler from your graphics card and installing the water block. Below are a few photos of the process to visualize this step.

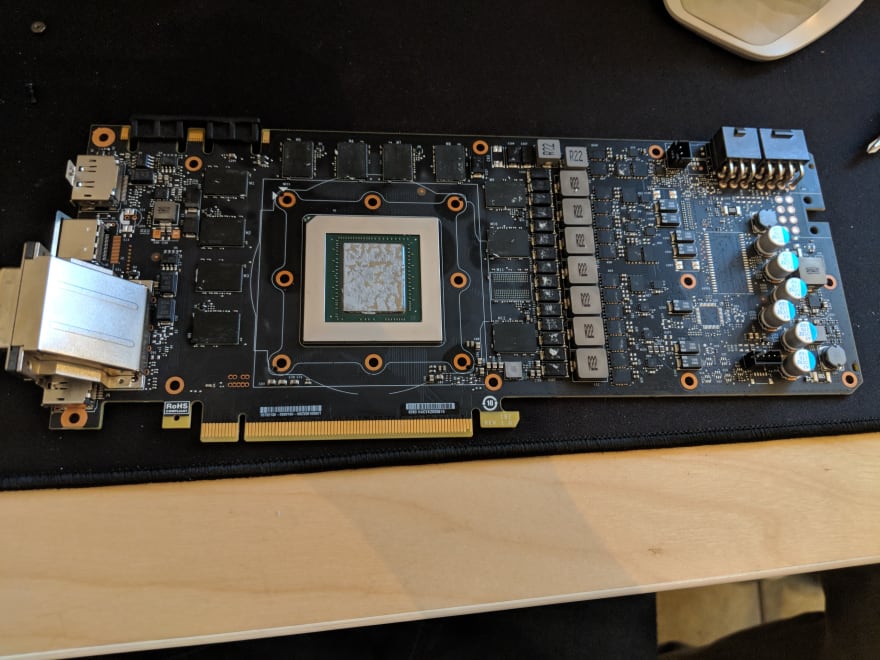
Once you've removed the air cooler and removed the original thermal pads, the instructions will tell you where to place the new thermal pads and how to install the water block. Below is a photo of my GPU with the water block fully installed.

The next step is to mount the radiator, fans, and reservoir inside the case. Below is a photo with these components installed.

Next, install the fittings where you will have tubing and caps on any ports where you will not. After that, mount the GPU inside your case. I used the riser cable for this step since I wanted a vertically mounted GPU.
With everything installed, I started running tubing inside the case, marking it, and cutting it for each run. If you are doing this alone, you may have already measured these lengths and cut them, so this step is not necessary and you can skip straight to attaching the tubes. Below are photos as I measured, cut, and attached the tubing.


Leak Test
Before you do a leak test, you should place as many paper towels as you reasonably can under every set of fittings in your build. This will help catch any leaking water and you can easily touch test the paper towels throughout to ensure they stay dry.
To fill my loop, I used a kitchen funnel and a spare piece of tubing to fill the reservoir. Then (using a jumper on the power supply ATX 24-pin to run the pump), I slowly added the PrimoChill Vue System Prep mixed with distilled water, cycling the power supply to pull the water through the loop. Once the loop was full, I let it run for a few hours until I was satisfied there were no leaks. Below is a photo of my computer during the leak test.
Note: Do not run the pump with no water in the reservoir. This can and will burn out your pump very quickly

After the leak test, I removed the jumper and reconnected my components. I used the system normally for three days to let the system prep run while continuing to keep a close eye on it for any leaks.
Flush
To flush the loop, I unmounted the GPU from the case and drained it from the plug there into a bowl. Once the water level was sufficiently low, we picked up the case and tilted it around (very carefully) until any remaining fluid drained out. After that, I refilled it with distilled water and drained it again after running it for a few minutes with the jumper cable as described in the leak test section above.
Refill
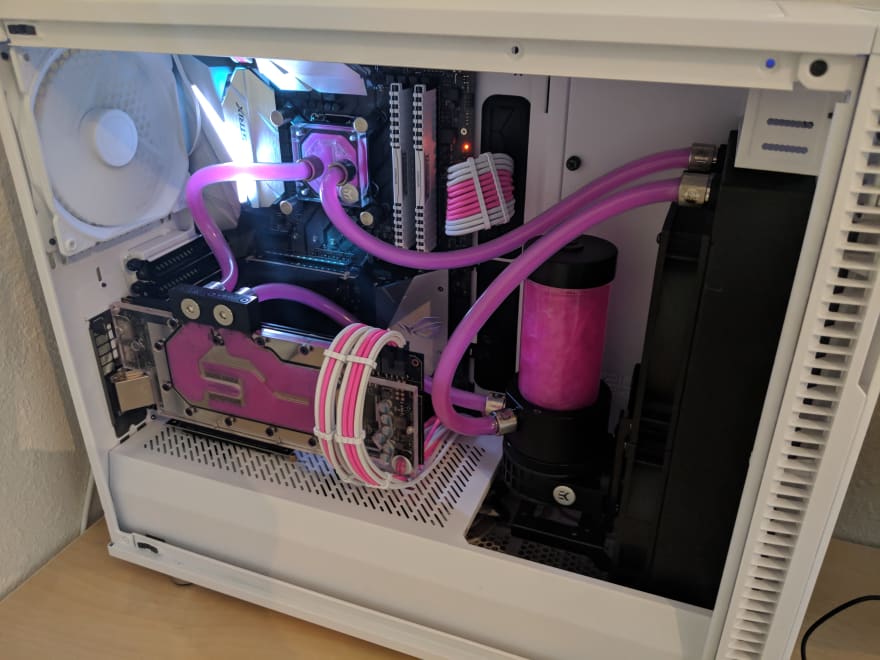
Once the system was totally drained, I refilled it using the same process as described in the leak test section using my final fluid (PrimoChill Vue). I let it run normally for a few days to get rid of any air bubbles, then topped of the reservoir until it was as full as I could comfortably make it. Below are some photos of the completed build.


Takeaways
In the end, I'm incredibly pleased with how this build turned out. It's the first build I've ever done where it felt completed (at least for now). If I could do it over again, I definitely would have been more careful to not order a brand new case without waiting for reviews and build videos to go live. Water cooling is an expensive and complicated process, but now I have a computer I am truly proud that I built.

Oldest comments (56)
Nice post, thanks for sharing! Your end result is 🤩🤩
So glad you enjoyed it! And thank you!
thanks very much!!
Wow, that looks really sweet! I especially like how the fluid and case match the rest of your setup!
Sorry if you mentioned this in the article, but how long did this take you, both in terms of labor and "wall clock" time? I've always been intrigued by water cooling, but it scares the heck out of me. Although the last time I did anything cooling related, I installed my cooler backwards, so maybe I should be scared 😅
Thanks very much!
From start to finish (including collecting parts) it was probably multiple years.
Once I had all the parts but the case snafu it was probably a few weeks with waiting for shipping.
Once the right case came in, I did this for the most part over about four days, a few hours each night and then 6 or so hours on a Friday night. Filled it and leak tested it the next day which took a few hours. Draining it and refilling it took about an hour or an hour and a half, too I think. So all in all probably less than 20 hours total of labor.
I'd say start-finish with all the correct parts was probably about a week elapsed by the time I had the final fluid in.
And anyone can do it with the right amount of research and planning!
This is so awesome. I didn't even know you could cool a PC with water. Also, extra points for matching some of the keyboard keys to the wiring in the motherboard and coolant. 🔥
Thanks very much! It is a niche thing, but has gained a lot of popularity with hobbyists over the past few years especially!
Great job! Turned out awesome!
thanks so much!
Nice build, thanks for sharing!
My last one was a 6700k with a 10% overclock on air, similar manufacturer choices for components. I ended up with an odd GPU - Gigabyte 980Ti G1 Gaming - because it had 2 DVI to support the overclockable Korean monitors. They were a great value for 1440p @ 96Hz.
It makes my heart glad that you built it for gaming. :)
Nice! And yeah, I've been PC gaming for almost 10 years at this point!
That's awesome. I've been at it a fair few years myself. Cheers!
Love the Macbook on the left side of your desk, with the video cable ready to be plugged in. My current setup is completely inefficient for that, and looking at your L-desk makes me want to get one!
Thanks! I also have it set up so my keyboard and mouse switch over when I plug it in :)
The desk is also an IKEA BEKANT desk in case you wanna look it up!
Wow I'm jealous, turned out beautiful! I love the combination of pink & white, great job
Thanks very much! ✨
Nice build this said please be very careful using EK parts, they can be flimsy and destroy the best build, add to that a horrendous customer service.
Thanks but I've done a lot of research and had nothing but good experiences with them! Should be a-okay.
Good to hear.
Now I'm gonna go take a shower to take off more of this envy stink and think of a way to sell a kidney to afford a build like this.
Lol, thanks!
Nice work, Moriah. Have fun!
Thank you!
Some comments may only be visible to logged-in visitors. Sign in to view all comments.