
The process of developing an app for indoor spaces navigation has three stages:
1) Finding user’s position
2) Calculating the route
3) Rendering the route
Finding User’s Position
The ARKit 2.0 contains an ARReferenceImage function that can identify a 2-dimensional image within the real world and then use that image as a reference point for AR content.
Having scanned the 2-dimensional visual marker placed on a floor surface or a wall with the help of ARKit, then the app matches it with data on remote cloud to find the exact coordinates of it in the real world.
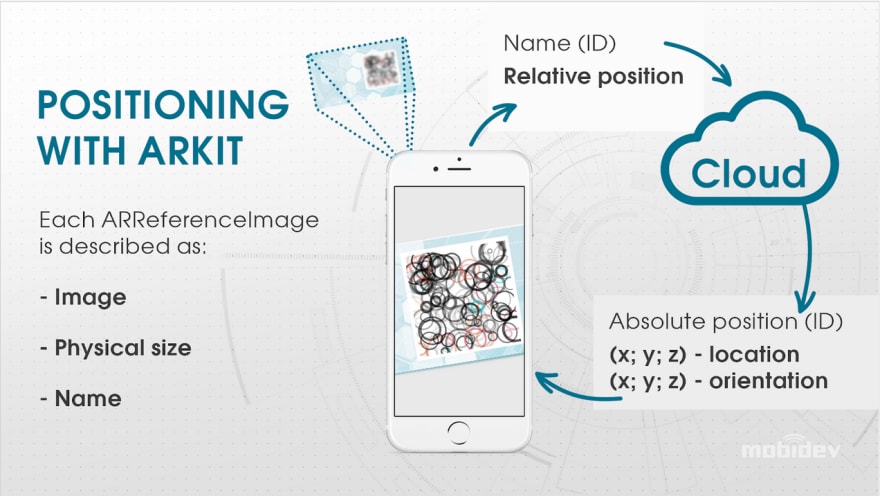
The ARReferenceImage object is made up of three data properties: an image, a name identifier, and the size of the image. However the name field can be used as unique identifier, which can then be linked up with a cloud-based coordinate set.
After the visual marker has been scanned, the resulting position of the user can be translated to 3-dimensional coordinates to represent our starting point.
Calculating the route
Provided that we can’t always reliably get a map of a given building with adequate scalability and picture quality, we must create a custom map using the Cartesian coordinate system and then align it with azimuth and geo coordinates using Google Maps or a similar solution.
An important notice: AR Ruler is a tool with bias issues, meaning traditional measuring tools are preferable.
Vector images allow for top-quality zooming with minimum transmitted data, resulting in excellent performance.

We’re then able to generate a graph by incorporating rooms and corridors with the placed visual markers locations.
Rendering the Route
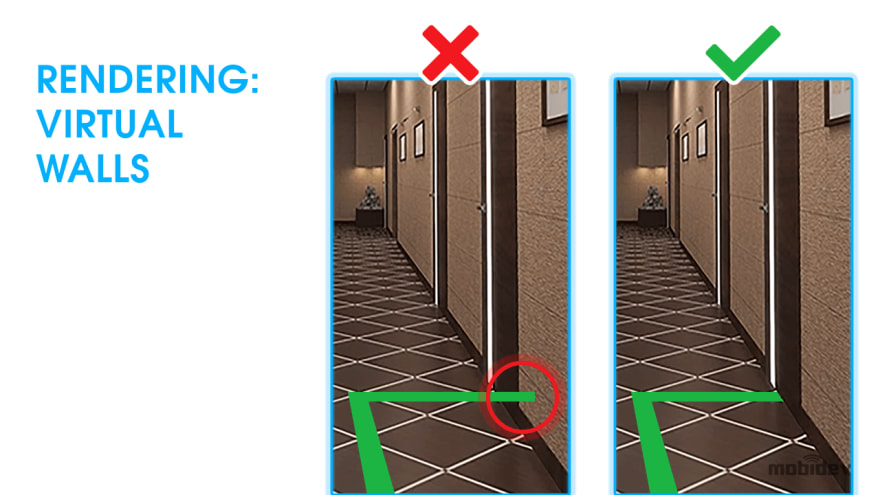
Finally, it’s necessary to render the route itself. To begin, the image layer generated by the camera is overlaid with a 3-dimensional layer. As the route progresses around corners, we’d expect a wall to block the route, but we view the entire route. The resulting output is confusing and doesn’t look natural or aesthetically pleasing.
We have three potential solutions to this issue.
1) The first and simplest solution is to represent the route with an arrow, similar to the look of a compass. This works in certain contexts, but isn’t optimal for many use cases, including navigation apps.
2) Another solution is to only output the route within a fixed proximity from the user. This can be implemented fairly quickly and easily and does represent a solution to the issue.
3) The final, most progressive solution is to generate a low-poly building model with multiple 2-dimensional maps. This results in effectively clipping any part of the route that shouldn’t be visible. When it disappears around a corner, the route is clipped at that point. In a long stretch of straight hall, we’ll see the route until it vanishes around a corner. This type of route is easy for users to understand, and looks quite natural.
That's how the process looks. The video shows how ARKit-based app works for navigation inside the office building.
As a general rule, the two biggest factors in developing an AR indoor navigation app are the mapping and its overall complexity level.
It’s worth noting that this method has a technical limitation. It needs an uninterrupted session to function. To maintain proper accuracy, the user has to maintain an active camera even after scanning the starting marker, all the way to the final destination. It’s possible to mitigate this limitation by working with technologies like Wi-Fi RTT to leverage new methods of indoor positioning.
It's possible to do the same in ARCore with Augmented Images feature. Read my article about ARKit vs ARCore comparison for image detection and tracking.

Top comments (0)