Let's continue with the second use case for popup confirmation message (first part here).
Here is the result what user will see:

Create UI page with confirmation modal popup window and define all logic in the processing script. You can trigger subflow for example. Fully customized design and advance processing logic is a great advantage for this approach, but some intermediate scripting skills are needed.
This popup window has some title, text, buttons like in previous use case (part one). But there is more: standard input for date time field and checkbox. Processing logic is triggering flow (explained later).
There are three parts which you as developer need to do in ServiceNow:
1) Create/duplicate UI page how it will look, what will be visible in the window
2) Define processing logic what will happen after button clicked
3) UI action which adds a button on the form and shows the popup message on click. For sure instead of UI action, it could be triggered from client script, it depends on use case.
1. Create/duplicate UI page
As the starting point, you can choose any existing UI page and copy it to your UI page and then make modifications. Or starting from the scratch. The code is standard HTML with CSS so no rocket science, moreover you can use many useful ServiceNow macros and Jelly (Navigate to: System UI > UI Macros and explore). The sky is your limit.
To create a new UI page, navigate to: System UI > UI Pages and use New. Or select existing and use Insert and stay, this will create the copy. Do not forget to rename it.

Three important parts (fields) of UI page:
-
HTML: defines design of popup window. HTML, CSS, Jelly, ServiceNow UI macros can be used (Navigate to:System UI > UI Macros). ```javascript
<?xml version="1.0" encoding="utf-8" ?>
${gs.getMessage('Are you sure you want to continue?')}
${gs.getMessage('Select date and time: ')}
I accept everything.
/g:ui_form
/j:jelly
Crucial part is:
`<input type="hidden" name="my_sys_id" id="my_sys_id" value="${RP.getWindowProperties().get('sys_id')}"/>` where is sys_id of your record. It is initialized from UI action (explained later) and used in processing script. It is crucial to have this id for processing logic. Syntax is valid for `Global` scope, for any other scopes use `${RP.getWindowProperties().sys_id}`. It took me hours to find out why in scope apps `get('sys_id')` is not working. Well, global vs. scope script differences are never ending story.
`<g:dialog_buttons_ok_cancel />` is out-of-the-box UI macro. Navigate to: `System UI > UI Macros` and search for `dialog_buttons_ok_cancel`. Give a try to observe what exists. For example, check the macros starting with `dialog` or `ui`. You are free to use any other UI macros and use it in your solution, just **important note:** do not edit any macro, it is probably used somewhere else.
- `Client script`: Handles any client-side processin. Runs in the browser (e.g. functions called by buttons, etc.). We set a value of hidden form field used later in processing script.
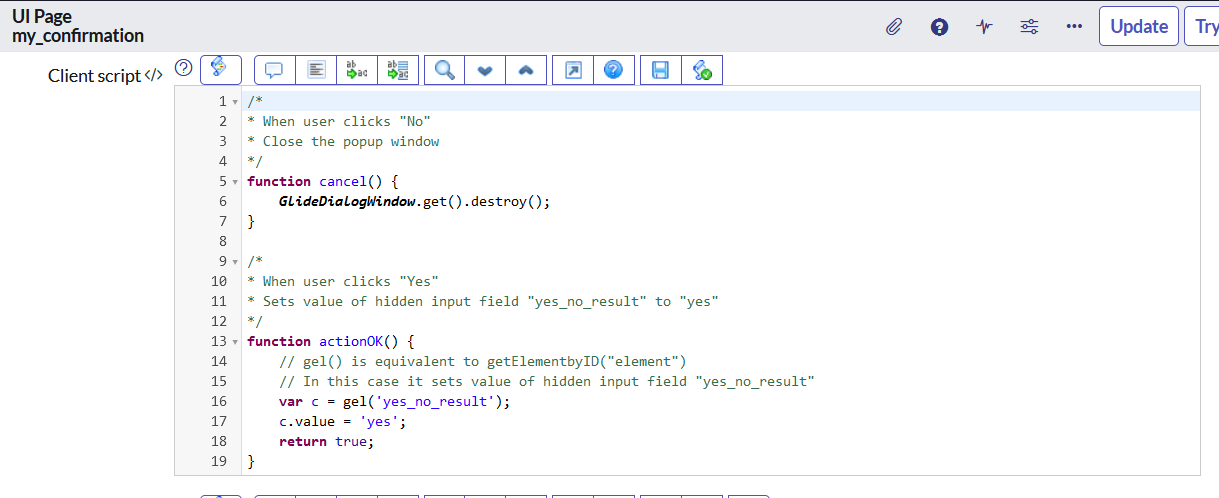
```javascript
/*
* When user clicks "No"
* Close the popup window
*/
function cancel() {
GlideDialogWindow.get().destroy();
}
/*
* When user clicks "Yes"
* Sets value of hidden input field "yes_no_result" to "yes"
*/
function actionOK() {
// gel() is equivalent to getElementbyID("element")
// In this case it sets value of hidden input field "yes_no_result"
var c = gel('yes_no_result');
c.value = 'yes';
return true;
}
-
Processing script: Runs on the server when the page is submitted. It contains server side scripts like GlideRecord or flow triggering.
2. Define processing logic
In our case, I want to run a subflow. It can contain any logic you need to run. I assume you have existing logic in the subflow (maybe some future post will be about flows). I will just show useful feature Create code snippet in Flow designer. It generates code which you will use in processing script:

All you need is to create if/else decision, to set variable inputs and then add some final steps based on subflow output. In this case, it redirects to incident record and shows success message. Check comments in code for additional details.

/*
* yes_no_result is value of hidden field on the form
* the same values of "accept", "my_date_time" can be reached
* Value set in client script (step before)
*/
if (yes_no_result == 'yes') {
    try {
        var gr_inc = new GlideRecord("incident");
        if (my_sys_id != "" && my_sys_id != null && gr_inc.get(my_sys_id)) {
            // Subflow triggering code
            var inputs = {};
            // Subflow inputs, input name = incident_in
            inputs['incident_in'] = gr_inc; // GlideRecord of table: incident
            // Start Asynchronously: Uncomment to run in background. Code snippet will not have access to outputs.
                    // sn_fd.FlowAPI.getRunner().subflow('global.my_incident_confirmation').inBackground().withInputs(inputs).run();
            // Execute Synchronously: Run in foreground. Code snippet has access to outputs.
            var result = sn_fd.FlowAPI.getRunner().subflow('global.my_incident_confirmation').inForeground().withInputs(inputs).run();
            var outputs = result.getOutputs();
            // Get Outputs:
            // Note: outputs can only be retrieved when executing synchronously.
            var incident_out = outputs['incident_out']; // Reference
            if (incident_out != "" && incident_out != null) {
                gs.addInfoMessage("Action successfully done.");
                response.sendRedirect("incident.do?sys_id=" + my_sys_id);
            }
            else {
                gs.addErrorMessage("Error. Check the sublow logs.");
                response.sendRedirect("incident.do?sys_id=" + my_sys_id);
            }
        }
    } catch (ex) {
        var message = ex.getMessage();
        gs.error(message);
    }

}
response.sendRedirect("incident.do?sys_id=" + my_sys_id);
Instead of triggering flow, you can use standard server side script using GlideRecord and to do whatever is needed. For example, this code does some stuff on child incidents. Processing script:
if (selection_result == 'yes') {
    // Is my_sys_id initialized
    if (my_sys_id != "" && my_sys_id != null) {
        var updated_child_inc = [];
        var gr_child_inc = new GlideRecord("incident");
        gr_child_inc.addQuery("parent_incident", my_sys_id);
        gr_child_inc.query();
        // Get all incident childs and add comment there
        while (gr_child_inc.next()) {
            gr_child_inc.comments = "Comment from processing script in UI Page";
            updated_child_inc.push(gr_child_inc.number.toString());
            gr_child_inc.update();
        }
        // Add info message with list of affected child incidents and redirects to incident
        gs.addInfoMessage("Action successfully finished. Updated child incidents: " + updated_child_inc.toString());
        response.sendRedirect("incident.do?sys_id=" + my_sys_id);
    } else {
        gs.addErrorMessage("Error: sys_id is not initialized.");
    }
}
3. UI action
You just initialize popup window defined in UI page, set title, and sys_id. All the logic is in UI page. The same you can do via client script (eg. onChange when the field value changes) instead of UI action, it depends on use case.

function myAction_2() {
    var dlgClass = typeof GlideModal != 'undefined' ? GlideModal : GlideDialogWindow;
    // IMPORTANT define which UI page will be displayed, UI page name out-of-box or custom
    var dlg = new dlgClass('my_confirmation');
    var msg = getMessage('Confirmation');
    dlg.setTitle(msg);
    // IMPORTANT set sys_id properties, it is used in UI page as record identifier
    dlg.setPreference("sys_id", g_form.getUniqueValue());
    dlg.render();
}
I always prefer to re-use existing objects. It is fast, and I am not a fan of re-inventing the wheel. I call it laziness, but you know what I mean, right? :) Sometimes it takes time to analyze existing codes, but it pays off in the end.
In these posts, the aim is not to give complete steps how something is done. I would like to show the way of thinking and to show the basic working use cases. With these basics and understanding, you can develop very complex and nice solutions. Only sky is the limit. (First part here.)
Statement: Solution presented in this post is tested on personal development instance. No client ServiceNow nodes were injured during development, no data loss, no major incident occurred. Developed and tested on Tokyo ServiceNow release.

Top comments (1)
Nice blog and informative content,
Thanks for sharing with us,
We are providing Best SERVICENOW Training in Hyderabad,
SERVICENOW Online Training in Hyderabad
SERVICENOW Training in Hyderabad
SERVICENOW Course in Hyderabad