
Cloud-native applications are on the rise thanks to the scalability and flexibility they provide. However, this type of architecture has its own challenges. Implementing a CI/CD pipeline will solve most of them, like defining delivery procedures, delivering applications independently, and gaining observability of the numerous building blocks in a system are some of them.
A CI/CD pipeline is the key to automating the steps of the software delivery process. This includes initiating code builds, running automated tests, and deploying to a testing or production environment.
One CI/CD pipeline consists of multiple steps executed one after another or in parallel. There are two known pipeline syntaxes — Scripted and Declarative. The key difference between them is their flexibility.
Although both syntaxes are based on Groovy DSL, the Scripted pipeline syntax is less restrictive. It also allows almost anything that can be done in Groovy. This means that the script can easily become hard to read and write.
On the other hand, the Declarative syntax is more restrictive and provides a well-defined structure, which is ideal for simpler CI/CD pipelines. This syntax supports the “pipeline as code” concept. Therefore, you can write in a file that can be checked into a source control management system like Git.
In order to make it more convenient for developers to set up a CI/CD pipeline, Microtica supports the Declarative syntax to define build procedures along with the source code.
Declarative CI/CD Pipelines
For the pipeline process to work, each component/microservice should have a file named microtica.yaml on the root level in its source code. This file contains the specification of the build process.
During the build process, Microtica extracts the specification from the code. Then, it creates a state machine to drive the defined process.
In order to ensure a single source of truth for pipeline specification, Microtica does NOT allow changes in the Build pipelines from the UI. Changes will only take effect from the YAML file provided in each source code repository. We find this very helpful in avoiding possible confusion of definition, maintenance, and, most importantly, debugging problems in the process.
Define a CI/CD pipeline
There are no limitations to the steps of the build pipeline that you can define. Here is one example of a microtica.yaml file that defines a build pipeline for NodeJS application. This pipeline executes three particular commands defined in the commands section.
Pipeline:
 StartAt: Build
 States:
   Build:
     Type: Task
     Resource: microtica.actions.cmd
     Parameters:
       commands:
       - npm install
       - npm test
       - npm prune --production
       sourceLocation: "$.trigger.source.location"
       artifacts: true
     End: true
- Pipeline — the root key which defines the start of the pipeline section
- StartAt — defines the first action of the pipeline
- States — defines a list of states for the particular pipeline
- Type — a type of pipeline action. Always set it to Task.
- Resource — an action that the engine will use. Currently, we support microtica.actions.cmd, an action that executes bash scripting.
-
Parameters — a set of parameters that are given to the action
- commands — a list of bash commands. Here, you define your custom scripts for build, test, code quality checks, etc.
- sourceLocation — the location where the action can find the source code. You should NOT change this. Once pulled from the Git repository, Microtica stores the artifacts on a location specified by the user for the particular component/microservice. $.trigger.source.location defines that location.
- artifacts — a value that defines that this build will produce artifacts which will be stored in S3 and used during deployment. Set this value should to false in case the artifact of the build is Docker image
- End — defines that this is the last action in the pipeline.
Microtica supports bash commands for the execution action. In the future, we are planning to allow developers to define their own custom actions.
Getting a Docker image ready for deployment
Let’s create an extended pipeline from the example above, adding an additional step to prepare a Docker image for deployment:
Pipeline:
  StartAt: Build
  States:
    Build:
      Type: Task
      Resource: microtica.actions.cmd
      Parameters:
        environmentVariables:
          pipelineId: "$.pipeline.id"
          version: "$.commit.version"
        commands:
        - echo Starting build procedure...
        - npm install
        - npm test

        - echo Logging in to Amazon ECR...
        - $(aws ecr get-login --region $AWS_REGION --no-include-email)

        - echo Checking if repository exists in ECR. If not, create one
        - repoExists=`aws ecr describe-repositories --query "repositories[?repositoryName=='$pipelineId']" --output text`
        - if [ -z "$repoExists" ]; then aws ecr create-repository --repository-name $pipelineId; fi

        - awsAccountId=$(echo $CODEBUILD_BUILD_ARN | cut -d':' -f 5)
        - artifactLocation=$awsAccountId.dkr.ecr.$AWS_REGION.amazonaws.com/$pipelineId

        - echo Build Docker image...
        - docker build -t $pipelineId .
        - docker tag $pipelineId $artifactLocation:$version
        - docker tag $pipelineId $artifactLocation:latest

        - echo Push Docker image
        - docker push $artifactLocation
        sourceLocation: "$.source.location"
        artifacts: false
      End: true
In this example, we first inject environment variables in the step runtime with environmentVariables parameter ($.pipeline.id and $.commit.version are both provided by Microtica).
The CI/CD pipeline in the latest example starts by executing necessary instructions to build and test the code. Once this is done, Microtica creates an ECR repository if it doesn’t already exist.
Once we have the ECR repository in place, the last step is to build a new Docker image and then push it in the repository.
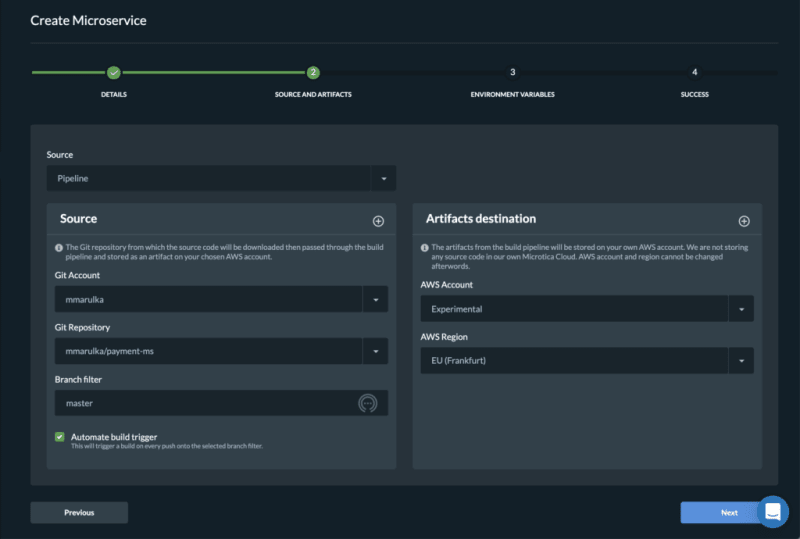
After you define the microtica.yaml file with the build pipeline, you can automate your build process in Microtica when you create the component or microservice with the wizard in the portal. This option will add a webhook to your repository.
A webhook is a listener that triggers a build process whenever you push new code to your repository branch. This way, you can be sure that you’re always working with the newest changes.
Building the Docker image gave us an artifact so we can deploy it in a Kubernetes cluster. You can do this from Microservice details — Add to Cluster, or in the Kubernetes Dashboard — Microservices — Deploy.
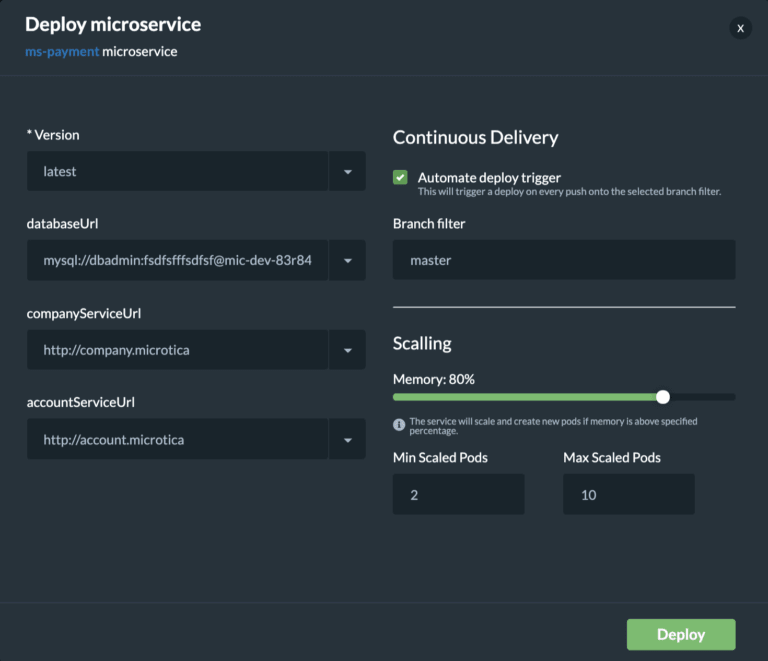
When you deploy your microservice in a Kubernetes Cluster you can select the scaling options. Moreover, you can also set up continuous delivery for your microservice.
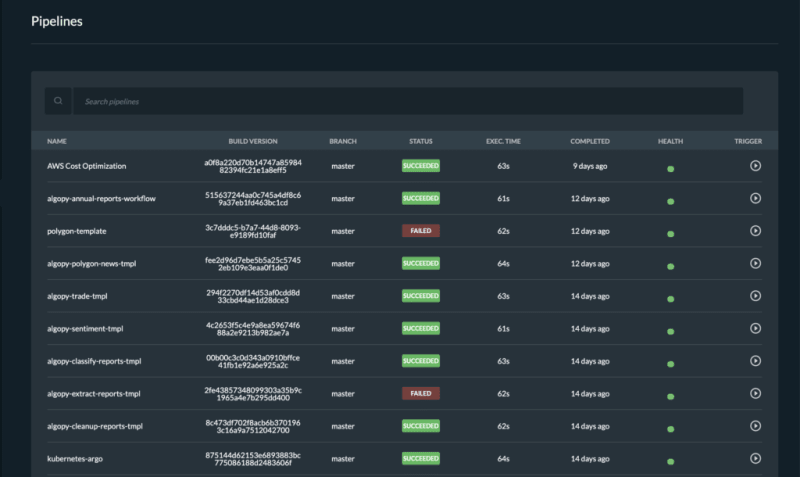
Pipelines overview

Once you trigger a build manually or automatically, follow the build process in the portal and see the events in real-time. If the build fails, it will mark it with red on the screen and it will show the error in the logs.
Follow all the pipelines for your components and microservices in the Pipelines overview page and track their status. Microtica will mark a pipeline as not healthy if there are several failed builds detected.
From this page, you can access any build in the history of your project. More importantly, you can also and inspect the logs to find the problems.
We are strong advocates for automated pipelines as they remove manual errors. Moreover, they are crucial for reliable and sustainable software delivery.
They make software developers more productive, releasing them from the need to perform pipeline steps manually. Most importantly, they reduce the stress around new product releases.
P.S. Feel free to contact me if you have any trouble trying this out.


Top comments (3)
Brief and to the point, Nice one.
Thanks Vincent :)
Very helpful