In the last post we covered setting up dynamic shared storage with my NETGEAR ReadyNAS system I have in my home lab but any NFS server would bring the same outcome for you in your configuration. This post will cover two areas we will continue to speak to storage but we will cover object storage, I am going to use MinIO to be able to have an object storage option in my lab, I can use this to practice some tasks and demo things between Veeam Backup & Replication and Kasten and storing backup files. Also, in this post we will cover Helm and Helm charts.
What is Helm?
Helm is a package manager for Kubernetes. Helm could be considered the Kubernetes equivalent of yum or apt. Helm deploys charts, which you can think of as a packaged application., it is a blueprint for your pre-configured application resources which can be deployed as one easy to use chart. You can then deploy another version of the chart with a different set of configurations.
They have a site where you can browse all the Helm charts available and of course you can create your own. The documentation is also clear and concise and not as daunting as when I first started hearing the term helm amongst all of the other new words in this space.
How do I get helm up and running?
It is super simple to get Helm up and running or installed. Simply. You can find the binaries and download links here for pretty much all distributions including your RaspberryPi arm64 devices.
Or you can use an installer script, the benefit here is that the latest version of helm will be downloaded and installed.
$ curl -fsSL -o get_helm.sh https://raw.githubusercontent.com/helm/helm/master/scripts/get-helm-3
$ chmod 700 get_helm.sh
$ ./get_helm.sh
Finally, there is also the option to use a package manager for the application manager, homebrew for mac, chocolatey for windows, apt with Ubuntu/Debian, snap and pkg also.
Helm so far seems to be the go to way to get different test applications downloaded and installed in your cluster, something that we will also cover later is KubeApps which gives a nice web interface to deploy your applications but I still think this uses helm charts for the way in which the applications are deployed.
MinIO deployment
I think I mentioned in a previous post that I wanted an object storage option built on Kubernetes to test out scenarios where Object Storage is required for exports and backups. This being a home lab will automatically mean we are not going to be using any heavy load or performance testing but around some demos this is useful. What this also means is that the footprint of running MinIO within my cluster is very low compared to having to run a virtual machine or physical hardware.
Once again documentation from MinIO is on point, which was actually a misconception that I maybe had of this Kubernetes and CNCF world was that the documentation might or may be lacking across the board but actually that is not the case at all everything I have found has been really good.
Obviously as we went to the trouble above installing Helm on our system we should go ahead and use the MinIO helm chart to bootstrap the MinIO deployment into our Kubernetes cluster.
Configure the helm repo
<span style="color: #24292e; font-family: Consolas;">helm repo add minio https://helm.min.io/
</span>
Install the chart
<span style="color: #24292e; font-family: Consolas;">helm install --namespace minio --generate-name minio/minio
</span>
I also went through the steps to create a self-signed certificate to use here those steps can be found here.
How to get the default secret and access keys
I deployed my MinIO deployment within my default namespace by mistake and have not resolved this so the following commands need to take that into consideration. First, get a list of all the secrets in the namespace, if you have a namespace exclusive to MinIO then you will see only those secrets available. I added a grep search to only show minio secrets.
kubectl get secret | grep -i minio
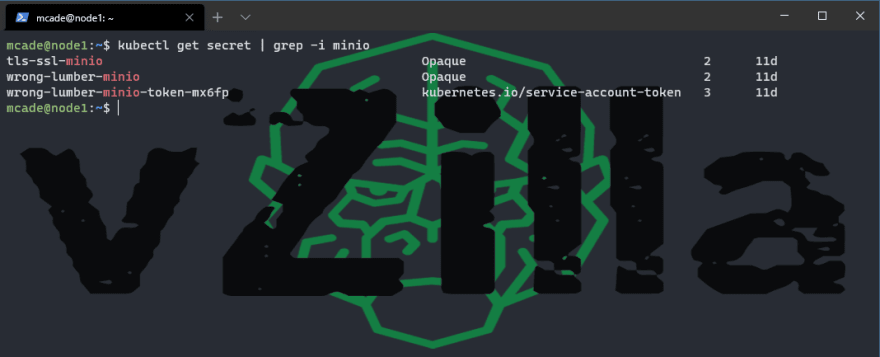
If you have setup a self-signed or third-party certificate, then you will likely have a secret called “tls-ssl-minio”
kubectl get secret tls-ssl-minio

you will also have a service account which may look familiar to my command below, although I think all names are random
kubectl describe secret wrong-lumber-minio-token-mx6fp

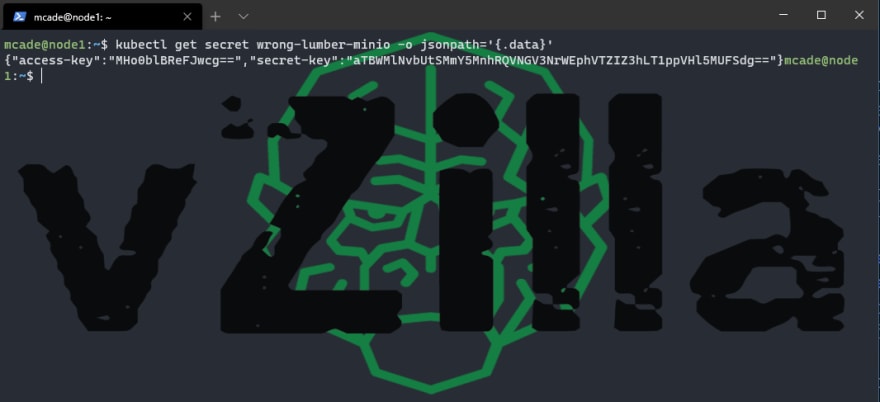
then you will have finally the one we need with the access and secret keys in.
kubectl describe secret wrong-lumber-minio

you should notice at the bottom here two data types access-key and secret-key, we next need to find out more from these. If we run the following we will get those values.
kubectl get secret wrong-lumber-minio -o jsonpath='{.data}’
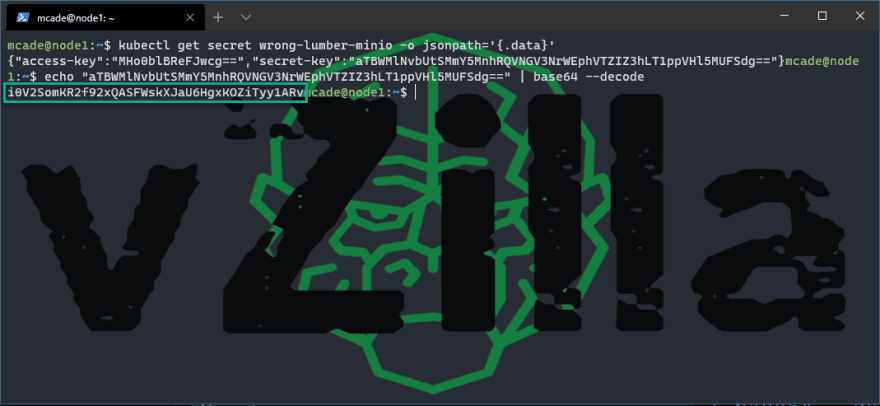
but one more thing we need to encode them. Let’s start with the access key
echo “MHo0blBReFJwcg==” | base64 –decode

and now the secret key
echo “aTBWMlNvbUtSMmY5MnhRQVNGV3NrWEphVTZIZ3hLT1ppVHl5MUFSdg==” | base64 –decode
Now we can confirm access to the front-end web interface with the following command
kubectl get svc

Note that I am using a load balancer here which I added later to the configuration.
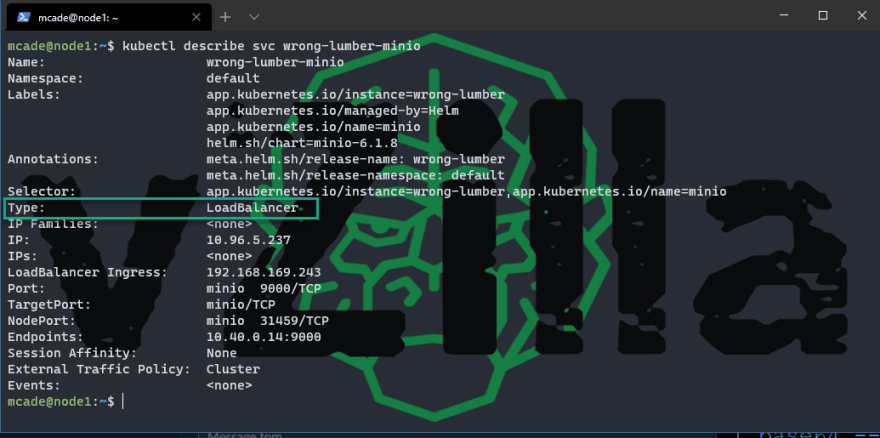
Now with this configuration and the access and secret keys you can open a web browser and navigate to http://192.168.169.243:9000

You will then have the ability to start creating your S3 buckets for your use cases, you can see here that a future post will be covering this as a use case where I can export backups to object storage using Kasten K10.

In the next post I will be working on how to access your Kubernetes cluster from your windows machine.
The post Building the home lab Kubernetes playground – Part 5 first appeared on vZilla.

Top comments (0)