
It’s the simplest play in the review generation book: follow-up to a positive CSAT score with a review request.
Each time you close a ticket, your customers will be asked whether they were satisfied with their support interaction. And each time they say they were, they’ll be asked to make their opinion public on platforms like Capterra, G2, etc.
To prep this post, I worked with Edouard Gonet, an absolute beast when it comes to Zendesk, to make sure I’d include best practices, and set this up in the simplest possible way. It takes roughly 1h to set up, and it should transform a solid 20 – 25% of your positive CSAT ratings into public reviews.
Start by setting up CSAT
If you already have CSAT enabled, you can skip directly to step 2 👇
CSAT is only available starting on the Support Pro or Suite Growth plans, so if you’re on the Team plan, you’ll need to upgrade or set up your own CSAT engine.
You can refer to Zendesk’s help center article for more details
When you enable CSAT (customer satisfaction ratings), end users are prompted to rate the support they received by answering a brief survey indicating whether they were or were not satisfied.
CSAT surveys for Zendesk Support are sent via email one day after the ticket is set to solved. For Zendesk web, mobile, and social messaging, they are presented in the messaging interface immediately after the ticket is set to solved.
Let’s set it up:
First, head over to the admin section of your Zendesk account and go to the People section.

Next, in the left sidebar, select “End Users” under “Configuration”. Switch to the Satisfaction tab, and tick the box that says Allow customers to rate tickets.
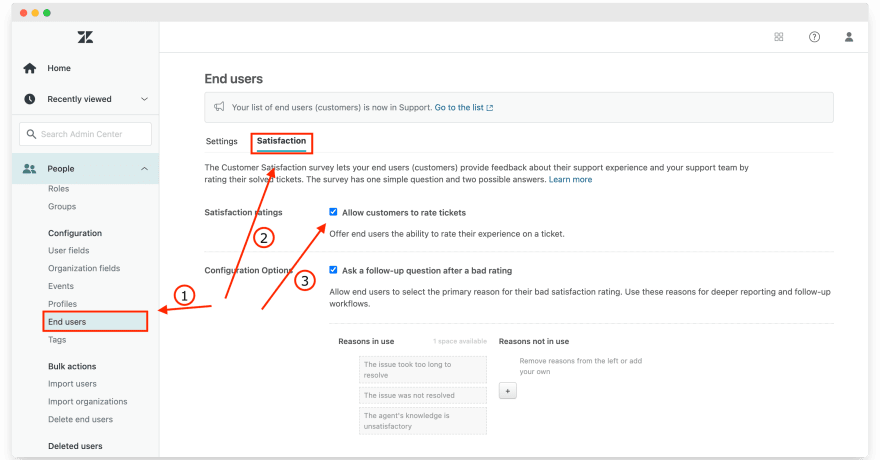
You’ll also be able to ask a follow-up question after bad-ratings to group answers and automate actions based on that. But let’s stick to getting more reviews for now. Then, don’t forget to save tab.
Ticking this checkbox has created an automation workflow on Zendesk, which you can access and customize by going to the automations: Objects & rules > Business rules > Automations.

If you click on the automation here, you can customize the conditions, and the email template that will be sent out.
By default, Zendesk sends an email exactly 24h after a ticket is closed. This means when you activate it, it won’t send an email to all your customers who had closed tickets more than 24h ago.
If you’d like to change that, you can change the line Ticket: Hours since solved Is 24 to Ticket: Hours since solved Greater than 24.
Of course, you can also decide to send the email a little faster after the ticket is solved, for example 4h.
This is also where you can customize the email template you’ll be sending out.

Keep it simple and authentic, and you’ll be good. Here are a few survey email examples we gathered for inspiration.
If you’re using messaging (web and mobile) Zendesk will also have created a trigger (Business rules > Triggers) to immediately request satisfaction ratings when the ticket status is changed to Solved over the messaging interface.
And if you’re using social messaging, another trigger specifically for social messaging was also created.
Don’t forget to test everything to make sure it works like you expected, and then move on to step 2
Set up an automated follow-up to ask for reviews
The next step is to follow-up with customers who declared they were satisfied to ask them to review your service on a public review platform.
Choosing the right platform, and getting the right link
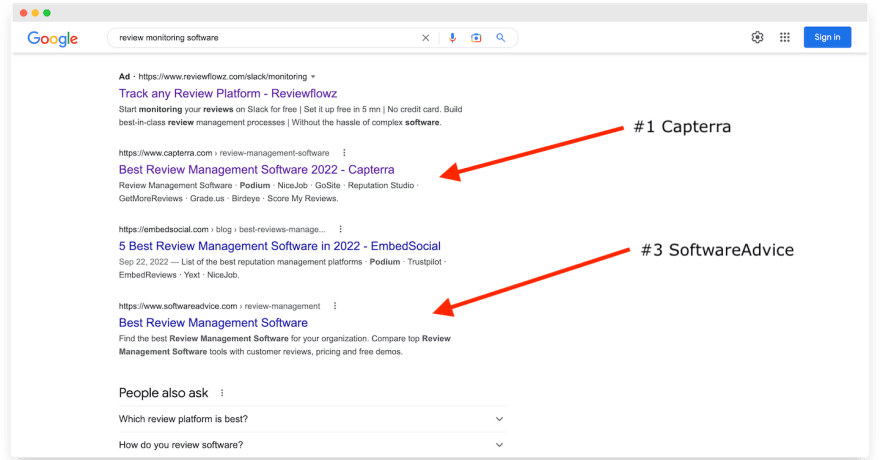
First, you’ll need to decide on what review website you’d like to send your customers. If you’re in the B2B business, forget immediately about Google and Facebook, and consider Capterra or G2 instead.
As much as they’d like you to forget this, GetApp, SoftwareAdvice, and Capterra are one and only platform, with the exact same reviews, just displayed differently. So an extra review on any of those 3 platforms is an extra review on all 3 platform.
You can also look at more specific platforms like the WordPress plugins marketplace, Shopify Apps, Hubspot ecosystem, Salesforce AppExchange, …
If you’re unsure where a review has the most value, pick whatever platform ranks highest on your main keyword, and focus on sending reviews to that platform at first.
You can find a lot more considerations around extra reviews’ value in our review management guide.
Once you have a clear picture of where you think marginal reviews will have the most value, you’ll need to find the most direct link you can find. It’s really fairly obvious but if there’s one thing you don’t want to do at this point is have your customers go through countless clicks just to get to the form. Show some respect…
Take a minute to go through the flow you expect your users to go through, and look for the quickest way to get them to the form.
Also, note that sometimes review platforms will give you tracked links that make reviewers eligible to a $10 or $20 amazon coupon. In that case, make sure you use those links, and communicate the offer clearly to your users.
If you want to have control over reporting and performance, it might be a good idea to use a link shortner or a link tracker here, so you can get a count of the clicks on your email. It shouldn’t affect deliverability since you’re only send this email to people who have interacted with you over email a few times already.
Setting up the automation
The good thing is our automation will be very close to the CSAT automation workflow that Zendesk has set up, with only a few key differences in the trigger.
Instead of sending an email X hours after a ticket is solved, we’ll send an email X hours after a positive CSAT answer is captured. Fairly straightforward right?
To set this up, we’ll use a trigger this time, to follow up immediately after a rating is captured.
So go to Triggers (Business Rules > Triggers) and click Add Trigger

A trigger works kind of like automations. You set conditions, and you define actions when these conditions are met.
What we need to keep in mind here, is we want to send the follow-up email only once, we wouldn’t want to spam our users with review requests, that would actually be counterproductive.
Let’s start with the conditions, scroll down to Conditions, Meet ALL of the following (AND logic). We’ll add two simple conditions here:
Satisfaction – Changed to – Good
Tags – Contains none of the following – review-follow-up
And in the actions, we’ll add a tag which we’ll name review-follow-up to ensure we don’t send the same email more than once.
So two actions:
Add tags – review-follow-up
Email user – (requester)
You can customize your email now. Don’t forget to check out our review email templates and best practices to maximize your performance.
To insert links in the email body, you’ll need to use HTML formatting (source) so it’ll look something like
<a href="link URL">text</a>
That’s it!
Name your trigger nicely, give it a clear description, and hit save.

This post was originally published on reviewflowz.com. For more details on leveraging Zendesk CSAT in your marketing workflows, check out the original post


Top comments (1)
Leveraging Zendesk's CSAT to enhance your presence on review marketplaces is a strategic approach. To further optimize your use of Zendesk, especially in a global market, consider the importance of localization. The resources found at zendesk localization offer comprehensive guidance on tailoring your Zendesk platform to diverse customer bases, ensuring that your support services resonate well with users worldwide. This can significantly enhance customer satisfaction and, consequently, your ratings on review platforms. How do you currently manage the challenges of serving a global customer base with Zendesk?