If you are a Software engineer, Operator or Developer then it might be a great begin to set up our Development environment with great tools. It makes you platform-independent and gives more flexibility to build and test our applications. It leverages a declarative configuration file which describes all our software requirements, packages, operating-system configuration.
😎 Easily and simple way to ready our workspace.
Prerequisite
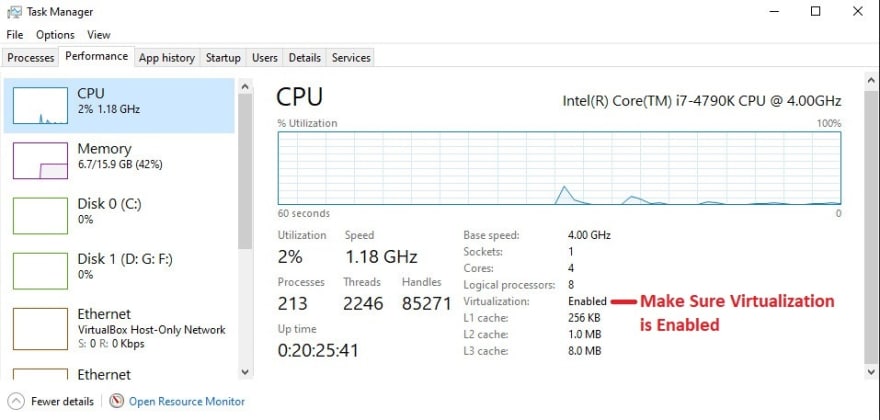
Note: If you are windows user then make sure virtualization is enabled otherwise you can enable it from
BIOSsettings.
To check openTask Manager->PerformanceTab thenCPU statisticYou can see Virtualization is Enabled or not.
Now, we're ready to go. 😊
Download & install below tools
Download & install VirtualBox and Vagrant base on the Operating system.
To check vagrant installed properly or not using,
vagrant --version
Now, Add Vagrant Boxes from the repository
Add box from online,
You can check available VM boxes, using below command
vagrant box list
Then, added Ubuntu 18LTS from Vagrant Cloud using the command
vagrant box add debian/jessie64
On the other hand, Optionally we can manually add boxes using a little bit of hack.
Open your Terminal or a command-line tool, then follow below steps
Download Image Manually from given below link, and then add it from the local machine.
Here, Information about that base VM box https://app.vagrantup.com/ubuntu/boxes/bionic64.
You can seev20191125.0.0is just the current version of that image so we can change it base on the desired box.
😎 Great! We downloaded your VM Box Manually, just need to add
vagrant box add <path_of_that_downloaded_box>
Example For Windows Machine:
vagrant box add debian/jessie64 file:///C:/Users/mesadhan/Downloads/bionic-server-cloudimg-amd64-vagrant.box
Example For Unix Machine: (Linux, MAC)
vagrant box add debian/jessie64 ./bionic-server-cloudimg-amd64-vagrant.box
Check now box added or not
vagrant box list
😎 Congratulations Great Jobs.! We successfully added our Ubuntu 18LTS Vagrant Box
Vagrant Script, Initialization Setup
After adding that box, we need to create a declarative script, base on that script our workspace environment will be created.
create a Vagrantfile file, then add below script
# -*- mode: ruby -*-
# vi: set ft=ruby :

ENV['VAGRANT_NO_PARALLEL'] = 'yes'

Vagrant.configure(2) do |config|

  # Number of VM Instance
  NodeCount = 1
  NodeName = "-mesadhan-"

  (1..NodeCount).each do |i|
    config.vm.define "ubuntu#{NodeName}0#{i}" do |node|

      # Here, our vagrant box, we can change it.
      node.vm.box = "ubuntu/bionic64"
      node.vm.hostname = "ubuntu#{NodeName}0#{i}.example.com"

      node.vm.network "private_network", ip: "172.40.40.10#{i}"
      node.ssh.forward_agent = true

      # port expose so that we can access internal vm application from externally
      node.vm.network "forwarded_port", guest: 4200, host: 14200   # frontend-app
      node.vm.network "forwarded_port", guest: 8080, host: 18080   # backend-app
      node.vm.network "forwarded_port", guest: 5432, host: 15432   # postgresql
      # add more custom port that you need for your application

      # share host machine floder with vm machine
      node.vm.synced_folder "vagrant-data", "/home/vagrant-data"

      node.vm.provider "virtualbox" do |v|
        v.name = "ubuntu#{NodeName}0#{i}"
        v.memory = 1024
        v.cpus = 1
        v.gui = false
      end
    end
  end

  # Run a script when vm initialize
  config.vm.provision :shell, :path => "vm-initial-script.sh"
end
create vm-initial-script.sh file, then add below script
#!/bin/sh -e

# Update package list and upgrade all packages
apt-get update
apt-get -y upgrade

echo "Successfully ready our virtual machine."
😨 We do lots of things, Hold on. We are done almost
Now, just hits below command
vagrant up
Note: Our VM just provisioning within a few minutes, and then it's run the initialization script with update all the latest packages and libs.
😀 WOW! finally, we bootup our VM machine using the script, It takes a bit of time to make it ready.
After provision that VM. SSH into that VM instance using below Commands
vagrant ssh
😎 That's Cool, we can now access that VM machine from the terminal or command-line tools.
👌 Congratulations!. & Thank You!
Feel free to comments, if facing any issues.
✅ Vagrant cheat sheet [More helpful commands]
Starting a VM
-
vagrant up-- starts vagrant environment (also provisions only on the FIRST vagrant up) -
vagrant resume-- resume a suspended machine (vagrant up works just fine for this as well) -
vagrant provision-- forces reprovisioning of the vagrant machine -
vagrant reload-- restarts vagrant machine, loads new Vagrantfile configuration -
vagrant reload --provision-- restart the virtual machine and force provisioning
Getting into a VM
-
vagrant ssh-- connects to machine via SSH -
vagrant ssh <boxname>-- If you give your box a name in your Vagrantfile, you can ssh into it with boxname. Works from any directory.
Stopping a VM
-
vagrant halt-- stops the vagrant machine -
vagrant suspend-- suspends a virtual machine (remembers state)
Cleaning Up a VM
-
vagrant destroy-- stops and deletes all traces of the vagrant machine -
vagrant destroy -f-- same as above, without confirmation
Boxes
-
vagrant box list-- see a list of all installed boxes on your computer -
vagrant box add <name> <url>-- download a box image to your computer -
vagrant box outdated-- check for updates vagrant box update -
vagrant boxes remove <name>-- deletes a box from the machine -
vagrant package-- packages a running virtualbox env in a reusable box
Saving Progress
-vagrant snapshot save [options] [vm-name] <name> -- vm-name is often default. Allows us to save so that we can rollback at a later time
Tips
-
vagrant -v-- get the vagrant version -
vagrant status-- outputs status of the vagrant machine -
vagrant global-status-- outputs status of all vagrant machines -
vagrant global-status --prune-- same as above, but prunes invalid entries -
vagrant provision --debug-- use the debug flag to increase the verbosity of the output -
vagrant push-- yes, vagrant can be configured to deploy code! -
vagrant up --provision | tee provision.log-- Runsvagrant up, forces provisioning and logs all output to a file

Top comments (0)