It's my article reposted from Habr.
It's the English version of this article. Shout-out to Viktor Fedotov for helping with translation.
I’m developing a .NET library DryWetMIDI which is used to work with MIDI files and MIDI devices. Most of the library API is cross-platform (within the operating systems supported by .NET of course), however the exact handling of MIDI devices is different for every operating system. Currently the corresponding API works on Windows only, but there is a strong desire to support other systems too. I’m not rushing to support all the existing platforms from the start, so I’m going to make the API to work on macOS first, since it’s no less popular than Windows, but probably is the most popular one among music professionals.
Of course, it doesn't make sense to implement the whole API right away and It’s much easier to make sure that everything works on a small example. This is exactly what I did, and I am suggesting you to go through the whole path to the final solution along with me. The brief list of steps is at the end of the article.
First attempts
As it’s usually done in the .NET world the library is distributed through the NuGet package manager. That's why I immediately knew that the package must contain native binaries to provide API for specific operating systems.
In C# we can write a declaration of an external function as follows:
[DllImport("test")]public static extern int Foo();
As you can see we don’t need to specify the extension of a native library since .NET will use a suitable one based on the current operating system. In other words, if test.dll and test.dylib files are located alongside our application, the function Foo will be called from test.dll on Windows, and from test.dylib on macOS. We can scale the solution to *nix systems by providing a test.so file.
To move forward let’s create a project for our test library. DryWetMIDI specifies netstandard2.0 and net45 TFMs within its .csproj file, so in order to be as close as possible to the real conditions I specified those target platforms for the test project as well. The project will be called DualLibClassLibrary and will contain a single file Class.cs:
using System.Runtime.InteropServices;

namespace DualLibClassLibrary
{
    public static class Class
    {
        [DllImport("test")]
        public static extern int Foo();

        public static int Bar()
        {
            return Foo() * 1000;
        }
    }
}
Of course we also need native binaries: test.dll and test.dylib. I compiled them from a simple C code (I’m going to use the same approach for the real library):
for Windows
int Foo() { return 123; }
for macOS
int Foo() { return 456; }
If you’re interested, test.dll and test.dylib files were created within an Azure DevOps test pipeline (in fact two pipelines: one for Windows and one for macOS). After all of that, I’ll need to do all the required actions within CI builds, so right away I decided to see how it should be done for the DryWetMIDI. The pipeline is pretty simple and it consist of 3 steps:
1. generate a file containing C code (PowerShell task)
New-Item "test.c" -ItemType File -Value "int Foo() { return 123;
}"
(return 456; for macOS);
2. build a library (Command Line task)
gcc -v -c test.c
gcc -v -shared -o test.dll test.o
(test.dylib for macOS);
3. publish an artifact with the library (Publish Pipeline Artifact task)
Here we have test.dll and test.dylib files implementing the same function Foo, which returns 123 for Windows and 456 for macOS, this way we can always easily check if a result of a function call is correct. We’ll place the files near DualLibClassLibrary.csproj.
Now we need to figure out how to add the files to a NuGet package so they are copied to the output directory after each application build in order to guarantee that our test library will work as it should. Since the library is cross-platform and uses the new .csproj format (SDK style), it would be great to declare packing instructions there. After doing some research I came up with this .csproj:
<Project Sdk="Microsoft.NET.Sdk">
<PropertyGroup>
<TargetFrameworks>netstandard2.0;net45</TargetFrameworks>
<LangVersion>6</LangVersion>
<Configurations>Debug;Release</Configurations>
</PropertyGroup>
<PropertyGroup>
<PackageId>DualLibClassLibrary</PackageId>
<Version>1.0.0</Version>
<Authors>melanchall</Authors>
<Owners>melanchall</Owners>
<Description>Dual-lib class library</Description>
<Copyright>Copyright Melanchall 2021</Copyright>
<AutoGenerateBindingRedirects>true</AutoGenerateBindingRedirects>
</PropertyGroup>
<ItemGroup>
<Content Include="test.dll">
<Pack>true</Pack>
<CopyToOutputDirectory>Always</CopyToOutputDirectory>
</Content>
<Content Include="test.dylib">
<Pack>true</Pack>
<CopyToOutputDirectory>Always</CopyToOutputDirectory>
</Content>
</ItemGroup>
</Project>
Building the package:
dotnet pack .\DualLibClassLibrary.sln -c Release
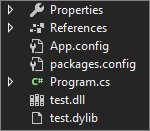
To check the package installation let’s create a folder somewhere, add it as a packages feed in Visual Studio and put the generated file DualLibClassLibrary.1.0.0.nupkg to this folder. We are going to use classic .NET Framework on Windows to check the package installation. Now let’s create a console application and install our library into it. After doing so we can see the two files have appeared in the project:
So good so far, let’s write a simple code within the Program.cs:
static void Main(string[] args)
{
    var result = DualLibClassLibrary.Class.Bar();
    Console.WriteLine($"Result = {result}. Press any key to exit...");
    Console.ReadKey();
}
After running the application we see the unsatisfying picture:

Well... let’s take a look into bin/Debug folder:

Surprisingly enough the files are missing. It is indeed strange since we’ve specified the <CopyToOutputDirectory> item for them and we do actually see the files within the project structure. But everything becomes clear after we take a look into the .csproj file:
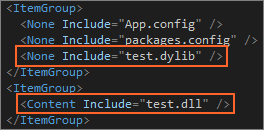
We have two weird things here. Firstly the <CopyToOutputDirectory> item is missing. And secondly, test.dylib has been added as <None> item but test.dll has been added as <Content> item. If we take a look into the .nupkg file with NuGet Package Explorer, we’ll see the following manifest:
<?xml version="1.0" encoding="utf-8"?>
<package xmlns="http://schemas.microsoft.com/packaging/2012/06/nuspec.xsd">
<metadata>
<id>DualLibClassLibrary</id>
<version>1.0.0</version>
<authors>melanchall</authors>
<owners></owners>
<requireLicenseAcceptance>false</requireLicenseAcceptance>
<description>Dual-lib class library</description>
<copyright>Copyright Melanchall 2021</copyright>
<dependencies>
<group targetFramework=".NETFramework4.5" />
<group targetFramework=".NETStandard2.0" />
</dependencies>
<contentFiles>
<files include="any/net45/test.dll" buildAction="Content" />
<files include="any/netstandard2.0/test.dll" buildAction="Content" />
<files include="any/net45/test.dylib" buildAction="Content" />
<files include="any/netstandard2.0/test.dylib" buildAction="Content" />
</contentFiles>
</metadata>
</package>
As you can see, sadly, the files were added without the copyToOutput attribute (you can read about the attribute here in the table: Using the contentFiles element for content files).
Copying files to the application’s output directory
After looking through the web (including issues on GitHub, answers on StackOverflow and official Microsoft documentation), I modified the files packing elements in the library’s .csproj:
<Content Include="test.dll">
  <Pack>true</Pack>
  <CopyToOutputDirectory>Always</CopyToOutputDirectory>
  <PackageCopyToOutput>true</PackageCopyToOutput>
  <PackagePath>contentFiles;content</PackagePath>
</Content>
<Content Include="test.dylib">
  <Pack>true</Pack>
  <CopyToOutputDirectory>Always</CopyToOutputDirectory>
  <PackageCopyToOutput>true</PackageCopyToOutput>
  <PackagePath>contentFiles;content</PackagePath>
</Content>
The <PackageCopyToOutput> item is exactly what we need to make the copyToOutput attribute to appear in the package manifest. Also we explicitly specified destination folders for the files to avoid directories like any. If you’re interested in this topic you can read more here: Including content in a package.
Let’s build the project one more time and check the manifest:
<?xml version="1.0" encoding="utf-8"?>
<package xmlns="http://schemas.microsoft.com/packaging/2012/06/nuspec.xsd">
<metadata>
<id>DualLibClassLibrary</id>
<version>1.0.1</version>
<authors>melanchall</authors>
<owners></owners>
<requireLicenseAcceptance>false</requireLicenseAcceptance>
<description>Dual-lib class library</description>
<copyright>Copyright Melanchall 2021</copyright>
<dependencies>
<group targetFramework=".NETFramework4.5" />
<group targetFramework=".NETStandard2.0" />
</dependencies>
<contentFiles>
<files include="test.dll" buildAction="Content" copyToOutput="true" />
<files include="test.dylib" buildAction="Content" copyToOutput="true" />
</contentFiles>
</metadata>
</package>
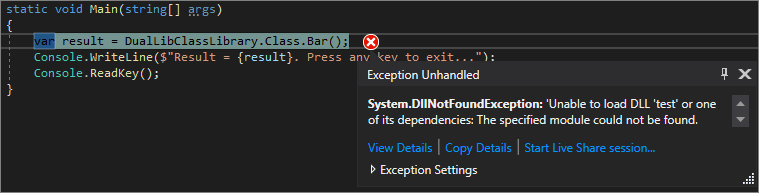
Another failure. If we are going to try the same thing in .NET5, we’ll get:
Basically there’s no difference except a slightly changed message of the exception. After submitting a GitHub issue I received the answer:
Please see our docs on
contentFiles. It supports adding different content depending on project's target framework and language, and therefore needs files in a specific structure which your package is not currently using.
It turns out that I overlooked a few details in the documentation: if you add files into directories named like contentFiles/any/netstandard2.0 instead of simply contentFiles, a .props file is created automatically and it contains proper elements for copying files to the application’s output directory. However before I received any answer I did my own research and came up with a different approach. And in hindsight it was the right decision and the reason is that you will not have all of the files installed properly from a package into your .NET Framework application when using the contentFiles folder. I strongly believe it is an important scenario and thus it must be supported.
There is an article on the Microsoft documentation with a promising title: Creating native packages. The article itself is not very informative, but we can learn something useful from it – the fact that we can create a .targets file with <CopyToOutputDirectory> elements specified for our files. The .targets file must be included in a package along with native libraries. Well, let’s create DualLibClassLibrary.targets file:
<?xml version="1.0" encoding="utf-8"?>
<Project ToolsVersion="4.0" xmlns="http://schemas.microsoft.com/developer/msbuild/2003">
  <ItemGroup>
    <None Include="$(MSBuildThisFileDirectory)test.dll">
      <Link>test.dll</Link>
      <CopyToOutputDirectory>PreserveNewest</CopyToOutputDirectory>
    </None>
    <None Include="$(MSBuildThisFileDirectory)test.dylib">
      <Link>test.dylib</Link>
      <CopyToOutputDirectory>PreserveNewest</CopyToOutputDirectory>
    </None>
  </ItemGroup>
</Project>
And in the DualLibClassLibrary.csproj file we write:
<ItemGroup>
  <None Include="test.dll">
    <CopyToOutputDirectory>PreserveNewest</CopyToOutputDirectory>
    <PackagePath>build\</PackagePath>
    <Pack>true</Pack>
  </None>
  <None Include="test.dylib">
    <CopyToOutputDirectory>PreserveNewest</CopyToOutputDirectory>
    <PackagePath>build\</PackagePath>
    <Pack>true</Pack>
  </None>
  <None Include="DualLibClassLibrary.targets">
    <PackagePath>build\</PackagePath>
    <Pack>true</Pack>
  </None>
</ItemGroup>
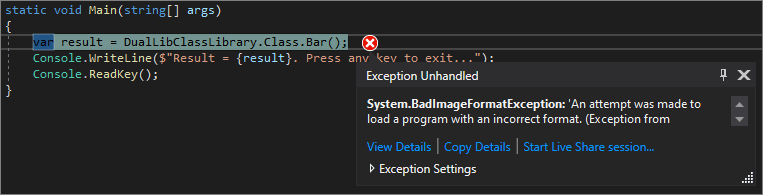
By building a package for the version 1.0.2, installing it to our .NET Framework console application and running it we have:

This exception is usually thrown when the application's process is 64-bit while the native library is 32-bit or the other way around. But in this case I built the libraries on 64-bit systems and the application was running on a 64-bit operating system too. Well, it seems our journey continues.
Support for 32-bit and 64-bit processes
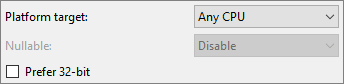
If we open the properties of our console application project in Visual Studio inside the Build tab, we can see this checkbox:

It turns out, this option is checked by default for a .NET Framework project and the application’s process will be 32-bit even on a 64-bit operating system. It’s funny that for .NET Core/.NET 5 projects this option is turned off by default:
Of course, we can turn this option off and the application will finally print the correct result:
Result = 123000. Press any key to exit...
But that’s obviously not the solution for the following reasons:
- we won’t be able to use the library in 32-bit processes;
- it requires additional actions from a user (unchecking a checkbox);
- the classic default scenario (create new .NET Framework application without any additional actions) won’t be supported.
Certainly this is not an option and the problem must be solved. In fact the solution is obvious: let’s just create native binaries for each operating system in two versions – 32-bit and 64-bit. It means the package will be larger in size since it will contain 4 platform-specific libraries instead of 2. I don’t see anything wrong with this approach because the files are small, and thus I am going to proceed with it (and I can’t see how it can be done in another way).
Let me briefly tell you about how I build 32-bit libraries. As I’ve mentioned above I create binaries within Azure DevOps pipelines using gcc. gcc is called with -m32 flag which in theory tells gcc to build a 32-bit library. This is fine on build agents with macOS images, but on Windows I got quite a few nasty log messages:
C:/ProgramData/Chocolatey/lib/mingw/tools/install/mingw64/bin/../lib/gcc/x86_64-w64-mingw32/8.1.0/../../../../x86_64-w64-mingw32/bin/ld.exe: skipping incompatible C:/ProgramData/Chocolatey/lib/mingw/tools/install/mingw64/bin/../lib/gcc/x86_64-w64-mingw32/8.1.0/../../../../x86_64-w64-mingw32/lib\libuser32.a when searching for -luser32
...
C:/ProgramData/Chocolatey/lib/mingw/tools/install/mingw64/bin/../lib/gcc/x86_64-w64-mingw32/8.1.0/../../../../x86_64-w64-mingw32/lib/libmsvcrt.a when searching for -lmsvcrt C:/ProgramData/Chocolatey/lib/mingw/tools/install/mingw64/bin/../lib/gcc/x86_64-w64-mingw32/8.1.0/../../../../x86_64-w64-mingw32/bin/ld.exe: cannot find -lmsvcrt collect2.exe: error: ld returned 1 exit status
I asked a question about these errors on StackOverflow and on Microsoft Developer Community site, and got answers stating that the 32-bit version of the MinGW is not preinstalled on Microsoft-hosted agents, which causes the error. After trying many options, I chose the brechtsanders/winlibs_mingw project creating a simple PowerShell script:
Write-Host "Downloading winlibs..."
Invoke-WebRequest -Uri "https://github.com/brechtsanders/winlibs_mingw/releases/download/11.1.0-12.0.0-9.0.0-r1/winlibs-i686-posix-dwarf-gcc-11.1.0-mingw-w64-9.0.0-r1.zip" -OutFile "winlibs.zip"
Write-Host "Downloaded."

Write-Host "Extracting winlibs..."
Expand-Archive -LiteralPath 'winlibs.zip' -DestinationPath "winlibs"
Write-Host "Extracted."

Write-Host "Building DLL..."
$gccPath = Get-ChildItem -Path "winlibs" -File -Filter "i686-w64-mingw32-gcc.exe" -Recurse

& $gccPath.FullName -c test.c -m32
& $gccPath.FullName -shared -o test.dll test.o -m32
Write-Host "Built."
By using the i686-w64-mingw32-gcc.exe compiler from the archive, I was finally able to build the 32-bit test.dll. Hooray!
Now we need to figure out how to tell our library which API to use: 32-bit or 64-bit one. I am quite sure there are multiple different approaches, but I settled on the following one:
- build test32.dll, test64.dll, test32.dylib and test64.dylib native binaries;
- create abstract class
Apicontaining abstract methods that correspond to our managed API for internal usage; - create two subclasses of
Api–Api32andApi64– which will implement abstract API from the base class calling unmanaged API from test32 and test64 correspondingly; - create class
ApiProviderwith theApiproperty which will return an implementation based on a current process bitness.
Here the code of the classes:
Api.cs
namespace DualLibClassLibrary
{
    internal abstract class Api
    {
        public abstract int Method();
    }
}
Api32.cs
using System.Runtime.InteropServices;

namespace DualLibClassLibrary
{
    internal sealed class Api32 : Api
    {
        [DllImport("test32")]
        public static extern int Foo();

        public override int Method()
        {
            return Foo();
        }
    }
}
Api64.cs
using System.Runtime.InteropServices;

namespace DualLibClassLibrary
{
    internal sealed class Api64 : Api
    {
        [DllImport("test64")]
        public static extern int Foo();

        public override int Method()
        {
            return Foo();
        }
    }
}
ApiProvider.cs
using System;

namespace DualLibClassLibrary
{
    internal static class ApiProvider
    {
        private static readonly bool Is64Bit = IntPtr.Size == 8;
        private static Api _api;

        public static Api Api
        {
            get
            {
                if (_api == null)
                    _api = Is64Bit ? (Api)new Api64() : new Api32();

                return _api;
            }
        }
    }
}
And then the code of Class class will be:
namespace DualLibClassLibrary
{
    public static class Class
    {
        public static int Bar()
        {
            return ApiProvider.Api.Method() * 1000;
        }
    }
}
After a new version of the package is created (of course with new files added to the DualLibClassLibrary.targets and DualLibClassLibrary.csproj before that) we’ll see that the method of our library works correctly no matter whether application’s process is 32-bit or 64-bit.
Conclusion
Here you have a complete chronology of my trials on the creation of a NuGet package with platform-specific API, and it would be useful to briefly list the main points (I promised the instructions after all):
- create native binaries in 32-bit and 64-bit versions;
- place them near a library project (you can place them in any folder and specify the folder’s path in .csproj and .targets files);
- add .targets file with the
<CopyToOutputDirectory>element (with desired value) added for each native file; - add elements for packing .targets file (should be placed in the build folder of a package) and all native binaries in the .csproj file;
- implement a way to select a native file based on the fact whether a process is 32-bit or 64-bit.
Simple as that! The solution of our test library is available here: DualLibClassLibrary.zip. The library was tested in the following scenarios on Windows and macOS:
- .NET Framework application;
- .NET Core / .NET 5 application;
- Self-contained application.
As for support of 32-bit and 64-bit processes – I’ve checked only on Windows, I'm not sure how to check it on macOS.


Oldest comments (0)