Medusa is hosting a hackathon during Hacktoberfest 2022. You can check it out and build something using Medusa to win awesome prizes. One example of a project for the Hackathon is integrating a third-party service like Matomo with Medusa, as shown in this article.
Aside from Medusa’s advanced ecommerce features, Medusa’s composable architecture and plugins system gives both developers and merchants the flexibility in choosing the services to integrate into their ecommerce store. One service that you can integrate for Analytics purposes is Matomo.
Matomo is an analytics platform just like Google Analytics but with some extra perks. Matomo can be self-hosted as well as used within their own SaaS version of the product which they call Matomo Cloud.
By using Matomo and integrating it with Medusa, you can track analytics related to user demographic, ecommerce events, and custom events that you can define. For example, how many times an item has been added to a cart.
In this tutorial, you will learn how you can integrate the Medusa storefront with Matomo Analytics to see basic stats like visit count, user behaviour, etc. You will also learn how you can work with Matomo event tracking.
You can obtain the source code for this tutorial on the GitHub repository.
Prerequisites
To use Medusa, you need to have Node.js installed on your local computer. If you don’t have it already, you can download it from the official Node.js website.
Configure Medusa
In this section, you will learn how to install and configure the three core parts of Medusa locally and prepare the Medusa storefront to be integrated with Matomo.
Install Medusa Server
Medusa server is the most important part of Medusa. It manages everything, including handling products, orders, payments, etc.
To use the Medusa server, you first need to install Medusa CLI by running the following command in your terminal:
npm install -g @medusajs/medusa-cli
Then, run the following command to create a new Medusa project via the CLI tool:
medusa new medusa-matomo --seed
Now, the CLI tool will download all the files and bootstrap a new Medusa instance. —seed flag will populate the database with dummy data.
When the project is successfully created, go into the directory it was created and run medusa develop:
cd medusa-matomo
medusa develop
If the server successfully started, you should see Server is ready on port: 9000 or something similar to that in the terminal output.
Configure Medusa Admin
Now that you have the Medusa server in place, you will also need an admin dashboard to do stuff like adding products, fulfilling orders, and much more. Fortunately, Medusa has also provided us with a Medusa admin panel that you could use for this purpose.
To get that up and running, first clone the admin panel from the GitHub repository:
git clone https://github.com/medusajs/admin medusa-admin
Once it is successfully cloned, change to the new directory and install all dependencies:
cd medusa-admin
npm install
Then, you can run the following command to start the admin panel:
npm run start
Once that has started, you can visit localhost:7000 and should see a login page.
Since you used --seed when creating the server at this point you should already have a user created. Enter admin@medusa-test.com as the email and supersecret as the password and login to the admin panel.
Configure Medusa Storefront with the Next.js Starter
Now that you have every backend component ready, you need to take care of the storefront. You can build a whole storefront yourself but for this tutorial, you’ll use the official Next.js Starter provided by Medusa.
To install the storefront, you can go to your preferred directory and run:
npx create-next-app -e https://github.com/medusajs/nextjs-starter-medusa medusa-matomo-front
This will create a new Next JS project with the Medusa Next JS starter code.
Change to the newly created directory and rename the .env.template file:
cd medusa-matomo-front
mv .env.template .env.local
To run your Medusa storefront, first make sure that the server is running, then run the following command:
npm run dev
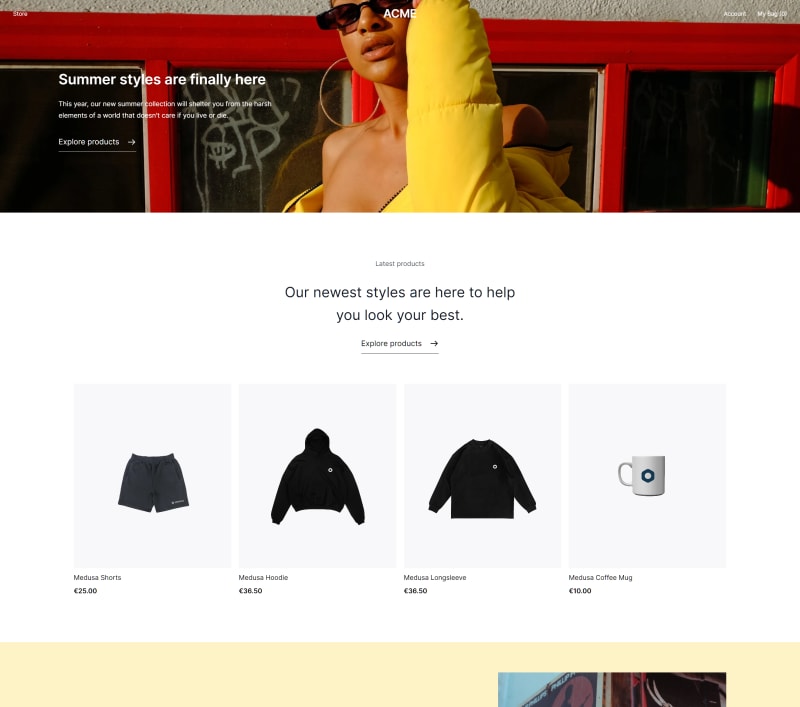
This runs your storefront on localhost:8000. If you open it in your browser, you should see the storefront with some dummy products.
Configure Matomo
Now that you are done setting up all the Medusa stuff, you can move on to the Matomo side of things.
Create a Matomo Account
There are two ways to use Matomo: hosting it on your own or using their hosted service (Matomo Cloud). For this tutorial, you’ll use the free trial.
To get started with Matomo, you can go to the website and start by registering for their Matomo cloud 21-day trial. During the registration process, it asks for a website address, you can give your personal website or a dummy website address.
Once you have registered on their website, you will receive an email with a password to access your account.
Obtain Matomo Tracking Code
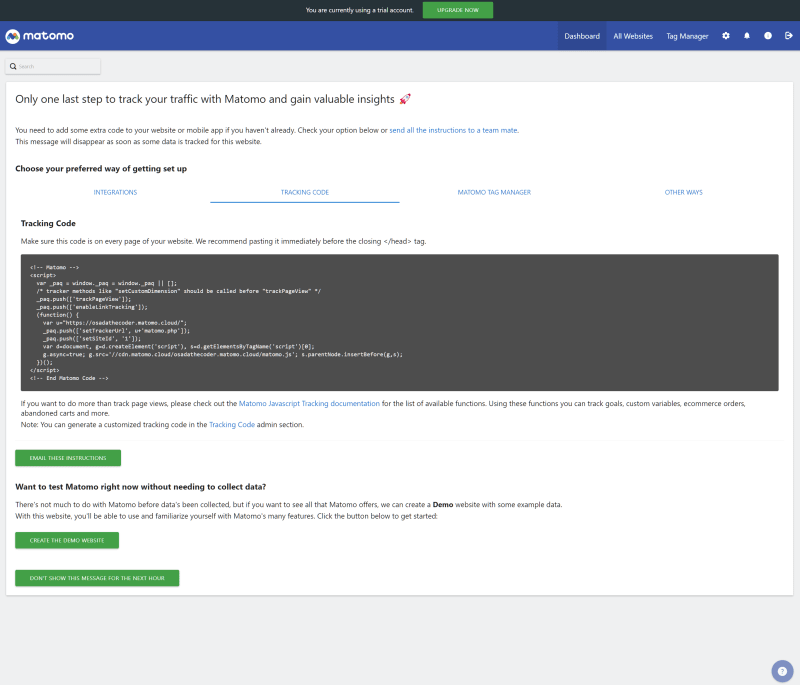
Login to your Matomo account following the instructions in the email you received and you should see something similar to this.
Now, you can click on the All Websites button in the top-right corner. Click on Add a new website and add your website. In the window that opens, choose Website.
In this case, I am going to name my website Medusa Matomo Demo and add localhost:8000 as one of the URLs.
Once you’re done, scroll down and click the Save button.
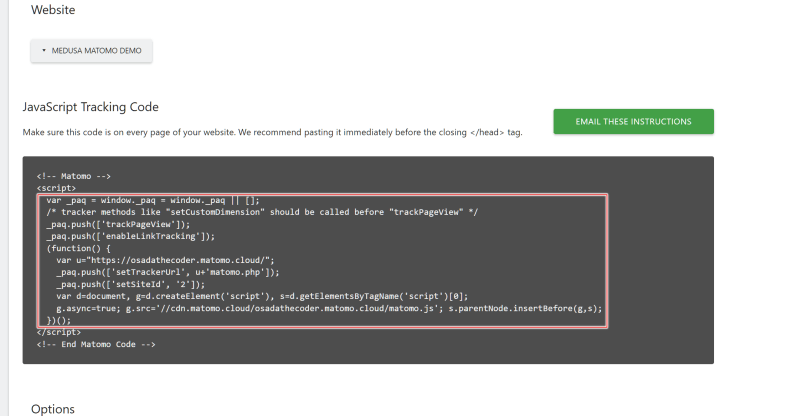
Now, on the next page, you can click on View Tracking Code and copy the whole code that is shown there without the opening and closing script tag.
Integrate Medusa Next JS Storefront with Matomo Analytics
Open the src/pages/_app.tsx file and import the Script component from the next/script package at the top of the file like this:
import Script from "next/script"
After importing the script module, include the snippet below inside the Hydrate component. Make sure to replace YOUR_MATOMO_TRACKING_CODE_HERE with the code you copied earlier in the above step:
<Script id="matomo_analytics">
    {`YOUR_MATOMO_TRACKING_CODE_HERE`}
</Script>
Once done, your app.tsx file should look similar to this. (Again, make sure to change the analytics code):
import { MEDUSA_BACKEND_URL, queryClient } from "@lib/config"
import { AccountProvider } from "@lib/context/account-context"
import { CartDropdownProvider } from "@lib/context/cart-dropdown-context"
import { MobileMenuProvider } from "@lib/context/mobile-menu-context"
import { StoreProvider } from "@lib/context/store-context"
import { CartProvider, MedusaProvider } from "medusa-react"
import { Hydrate } from "react-query"
import "styles/globals.css"
import { AppPropsWithLayout } from "types/global"
import Script from "next/script"

function App({ Component, pageProps }: AppPropsWithLayout) {
  const getLayout = Component.getLayout ?? ((page) => page)

  return (
    <MedusaProvider
      baseUrl={MEDUSA_BACKEND_URL}
      queryClientProviderProps={{
        client: queryClient,
      }}
    >
      <Hydrate state={pageProps.dehydratedState}>
        <Script id="matomo_analytics">
          {`
              var _paq = window._paq = window._paq || [];
  /* tracker methods like "setCustomDimension" should be called before "trackPageView" */
  _paq.push(['trackPageView']);
  _paq.push(['enableLinkTracking']);
  (function() {
    var u="https://xxx.matomo.cloud/";
    _paq.push(['setTrackerUrl', u+'matomo.php']);
    _paq.push(['setSiteId', '2']);
    var d=document, g=d.createElement('script'), s=d.getElementsByTagName('script')[0];
    g.async=true; g.src='//cdn.matomo.cloud/xxx.matomo.cloud/matomo.js'; s.parentNode.insertBefore(g,s);
  })();
            `}
        </Script>
        <CartDropdownProvider>
          <MobileMenuProvider>
            <CartProvider>
              <StoreProvider>
                <AccountProvider>
                  {getLayout(<Component {...pageProps} />)}
                </AccountProvider>
              </StoreProvider>
            </CartProvider>
          </MobileMenuProvider>
        </CartDropdownProvider>
      </Hydrate>
    </MedusaProvider>
  )
}

export default App
Test Analytics
To test the integration, all you have to do is visit your website. You will see your visit on your Matomo dashboard. If you have multiple websites, make sure to switch between them using the select field next to the search field.
Matomo Event Tracking
At this point, you know how to set up basic analytics with Matomo. However, analytics is not always about visitor count and their country; you can also track user activity. For example, how many times users have clicked on the add to cart button or how many times users have scrolled to the end of the page.
You can do these very easily with Matomo event tracking.
Track the “Add to Cart” Event with Matomo
To do this, we’re going to use a package called matomo-tracker-react. You can install this by running the following command inside the Medusa storefront directory:
npm i @datapunt/matomo-tracker-react
If the command gives you an error, make sure to stop the Next.js server and try again.
Now, you have to make some modifications in _app.tsx file. First, you have to add the following imports at the top of the file:
import { MatomoProvider, createInstance } from "@datapunt/matomo-tracker-react"
Then just above your App function, you have to initialize a new instance of the library:
const instance = createInstance({
  urlBase: "https://osadathecoder.matomo.cloud/",
  siteId: 2,
})
If you’re wondering where the values of urlBase and siteId are coming from, they’re coming from the Matomo tracking code you previously got:
var _paq = window._paq = window._paq || [];
  /* tracker methods like "setCustomDimension" should be called before "trackPageView" */
  _paq.push(['trackPageView']);
  _paq.push(['enableLinkTracking']);
  (function() {
    ***var u="https://osadathecoder.matomo.cloud/";***
    _paq.push(['setTrackerUrl', u+'matomo.php']);
    ***_paq.push(['setSiteId', '2']);***
    var d=document, g=d.createElement('script'), s=d.getElementsByTagName('script')[0];
    g.async=true; g.src='//cdn.matomo.cloud/osadathecoder.matomo.cloud/matomo.js'; s.parentNode.insertBefore(g,s);
  })();
See the parts that are italicized in the above tracking code. That’s where those values are coming from. Make sure to replace the values of urlBase and siteId with the values from your tracking code.
Finally, you have to wrap the whole app with a MatomoProvider passing it to the instance you created in the value prop:
function App({ Component, pageProps }: AppPropsWithLayout) {
  //...

  return (
    <MatomoProvider value={instance}>
      <MedusaProvider
        baseUrl={MEDUSA_BACKEND_URL}
        queryClientProviderProps={{
          client: queryClient,
        }}
      >
        <Hydrate state={pageProps.dehydratedState}>
          //...
        </Hydrate>
      </MedusaProvider>
    </MatomoProvider>
  )
}

export default App
Then to achieve your ultimate goal which was tracking the add-to-cart event, you need to find the place where the add-to-cart button is in the code. In the Next.js storefront you can find it in src/modules/products/components/product-actions/index.tsx.
Start off by adding the following import at the top of src/modules/products/components/product-actions/index.tsx:
import { useMatomo } from "@datapunt/matomo-tracker-react"
Inside the ProductAction component, initialize the useMatomo hook:
const { trackEvent } = useMatomo()
Finally, replace the button at the end of the returned JSX with the following:
<Button
  onClick={() => {
    addToCart();
    trackEvent({ category: "product", action: "add-to-cart" });
  }}
>
  {!inStock ? "Out of stock" : "Add to cart"}
</Button>
Previously, the button only added that specific item to the cart, but now it also tracks the add-to-cart event under the category of product using Matomo.
Test the Event
Start your Next.js storefront and make sure the Medusa server is also running.
Then, open the storefront and add a product to the cart.
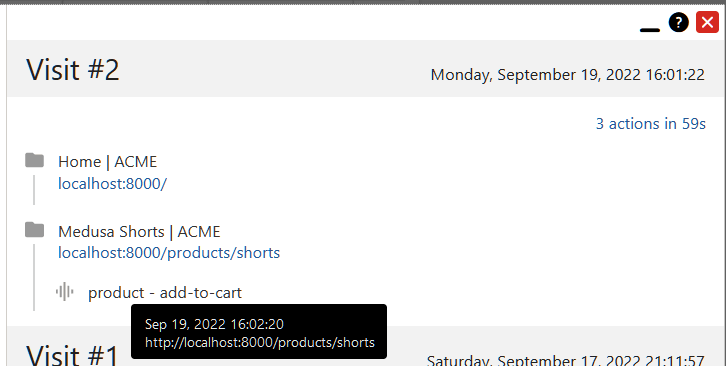
Next, check the Matomo dashboard. Under the actions of the current session, you should see an event being recorded. If you hover over the icon, you can see the event name.
If you go to Visitors → Visits Log, you should see the event with the page where the event occurred.
Now, you can track any event that is happening on the webpage by following the above steps using Matomo.
Conclusion
Medusa’s headless architecture and plugin system allow developers to pick and choose which services to utilize in their ecommerce store.
One of the many services you can integrate into Medusa is Matomo. By combining Medusa and Matomo’s features, you can maximize your ecommerce store’s capabilities by tracking different types of events and understanding your customer’s behaviours.
Should you have any issues or questions related to Medusa, then feel free to reach out to the Medusa team via Discord.


Top comments (1)
Always great to see open source projects combined 💜