Kentico Kontent has a CLI that you can use to manage your content model - using code.
Not only can you build your model using code, but you can also migrate your model changes across any environments that you've set up in Kentico Kontent i.e. Development, QA, UAT, Production etc.
In this post we're going to use the migrations feature of the CLI to create a content model from scratch. We won't be designing the model in Kentico Kontent's user interface. Instead, we'll be doing everything by code.
We'll need a blank project to work with - so go over to Kontent and create a new one. Don't go modelling anything, though 😁.
If you want to grab the final code then clone the following GitHub repository.
Before you start, make sure you have Node 10+ and npm 6+.
Step 1 - Set up a Migration Project
Create a folder wherever you set up your projects. Open a new command window or terminal at that folder location. Kick off a new project using npm or yarn. I'm going to use npm, so run the following command:
npm init -y
We're going to need a few dependencies in order to run our scripts. These are:
RxJS
The CLI uses the Kentico Kontent Management API (v2). This has a peer dependency on RxJS, so let's install this before we add the CLI. I've heard rumour this dependency may be going away some time in the future. That, or I've been having weird dreams again. Comment below if I'm horribly wrong.
npm i rxjs
Kentico Kontent CLI
Next, let's go grab the CLI. This does support global installation (add the '-g' flag to the line below). I've been installing it locally, given the RxJS dependency.
npm i @kentico/kontent-cli
Dotenv
The migration process will use project keys from Kentico Kontent. Dotenv allows us to store secret API keys as environment variables, which saves you from putting these directly into your code. Be sure to keep this information out of source control as well.
npm i dotenv
Step 2 - Grab your Project Keys
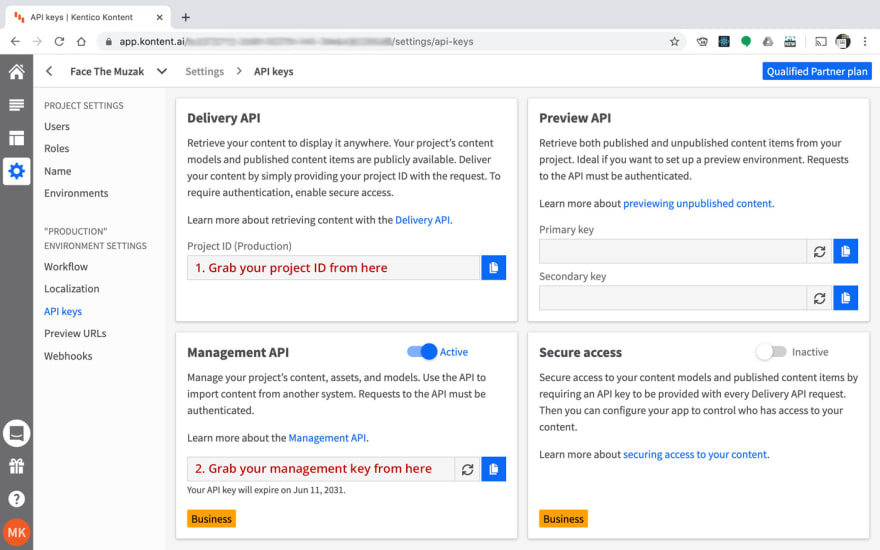
OK, so we do need to bounce into Kentico Kontent to get those secret API keys. Open the blank project you created and go to Project Settings (the cog icon in the menu). When we create a new project, Kentico Kontent creates a single Production environment.
Let's grab the settings for this environment:
- The Product ID
- The Management API Key (make sure to activate it)
Let's use the Kentico Kontent CLI to save these settings into our project. Add in your unique settings to the line below and run the command:
kontent environment add --name PROD --project-id "<YOUR_PROJECT_ID>" --api-key "<YOUR_MANAGAMENT_API_KEY>"
The --name parameter can be anything you want. You'll use this name ("PROD" in our example) to target the environment you want to run your migrations on.
If this has worked as intended then the Kentico Kontent CLI will have created a file called .environments.json.
{
    "PROD": {
        "projectId": "<THE_PROJECT_ID_YOU_ENTERED>",
        "apiKey": "<THE_MANAGAMENT_API_KEY_YOU_ENTERED>"
    }
}
You can repeat Step 2 for each environment that you set up on a project. We don't have to do this now. Because we're starting from a blank project, our Production environment is enough. However, if this was a real gig our content pipeline could have multiple environments, such as:
- Development to QA to UAT to Production.
Environments are managed under Settings > Environments
When you click Clone, Kentico Kontent will copy everything from the selected environment into a new environment (the content model and all content items). The new environment will have completely new settings (Project ID and Management API Key), which is why you would repeat the step to save those settings into your .environments.json file.
Step 3 - Add a New Migration Script
The Kentico Kontent CLI has a handy command to get started with migration scripts. Run the following:
kontent migration add --name 01_create_album_review_content_type
This creates a new JavaScript migrations file (with the catchy name of 01_create_album_review_content_type.js). The module has the following code:
const migration = {
    order: 1,
    run: async (apiClient) => {
    },
};

module.exports = migration;
You can have multiple migration scripts. Depending on what you're doing to your model, you'll likely have an order you want to run these in. That execution sequence is controlled through the order property.
The run function is where you put the migration code that you want to execute on your content model. The parameter getting passed here is an instance of the Kentico Kontent Management API client. As we'll see, this client allows you to do some pretty cool things to your content model and all your content items.
Running the command also created a folder called Migrations (within your project folder). This is where Kentico Kontent put the script. All your migration scripts need to be in a folder called Migrations, otherwise an error will be thrown 🔥🔥🔥.
Open the project up in your favourite editor. It's time to start writing some code.
Step 4 - Creating Content Types
As the name of our first migration script would suggest (01_create_album_review_content_type.js), we're going to create a new content type called Album Review.
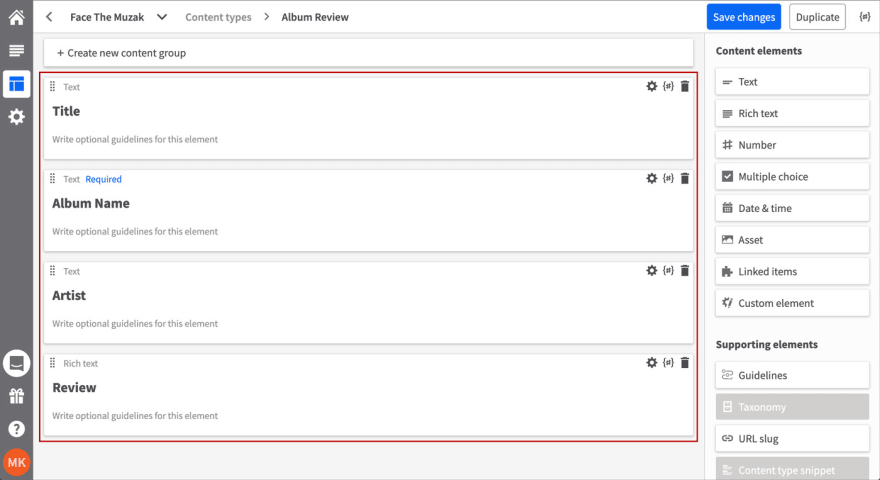
This content type is going to start with the following fields:
- Title (text content element)
- Album name (text content element, required)
- Artist (text content element, required)
- Review (rich text content element)
Update your migration script with the following code:
const migration = {
    order: 1,
    run: async (apiClient) => {
        await apiClient
            .addContentType()
            .withData(BuildAlbumReviewTypeData)
            .toPromise();
    },
};

const BuildAlbumReviewTypeData = (builder) => {
    return {
        name: 'Album Review',
        codename: 'album_review',
        elements: [
            builder.textElement({
                name: 'Title',
                codename: 'title',
                type: 'text',
            }),
            builder.textElement({
                name: 'Album Name',
                codename: 'album_name',
                type: 'text',
                is_required: true,
            }),
            builder.textElement({
                name: 'Artist',
                codename: 'artist',
                type: 'text',
                s_required: true,
            }),
            builder.textElement({
                name: 'Review',
                codename: 'review',
                type: 'rich_text',
            }),
        ],
    };
};

module.exports = migration;
The run function shows the client call to create a new content type. We're defining the structure of our Album Review content type in BuildAlbumReviewTypeData.
To run this migration script ("01_create_album_review_content_type") on the default production environment (which we registered as "Prod"), execute the following command:
kontent migration run --environment PROD -n 01_create_album_review_content_type
If the migration ran successfully then you should see the following in your output:
The "01_create_album_review_content_type.js" migration on a project with ID "" executed successfully.
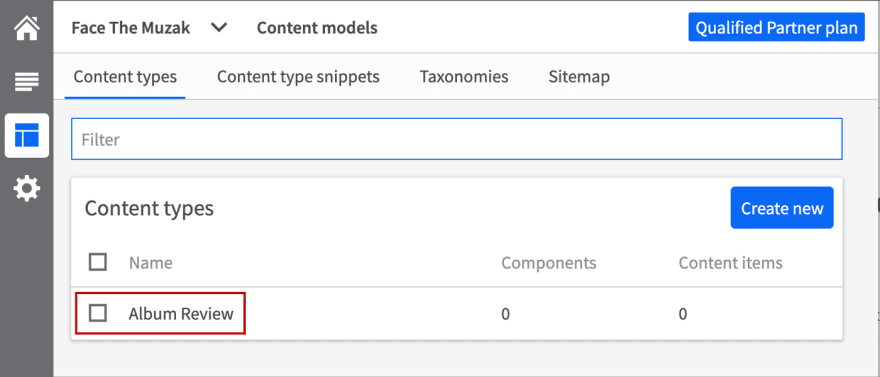
If you jump into Kentico Kontent and go to the Content models, then you'll see the new content type:
If you click on the content type to open it up, then you'll see the structure we added using our migration script:
You'll also notice that the Kentico Kontent CLI has created a status.json file at the root of your project:
{
  "<YOUR_PROJECT_ID>": [
    {
      "name": "01_create_album_review_content_type.js",
      "order": 1,
      "success": true,
      "time": "2020-06-29T22:15:10.115Z"
    }
  ]
}
As the name suggests, this file keeps track of the status returned from your migration scripts. This file will get updated as you run future scripts.
Let's create one more content type so that we'll have a little more in our model to play with. Create a second file in the migrations folder called 02_create_reviewer_content_type.js and add the following code:
const migration = {
    order: 2,
    run: async (apiClient) => {
        await apiClient
            .addContentType()
            .withData(BuildReviewerTypeData)
            .toPromise();
    },
};

const BuildReviewerTypeData = (builder) => {
    return {
        name: 'Reviewer',
        codename: 'reviewer',
        elements: [
            builder.textElement({
                name: 'First Name',
                codename: 'first_name',
                type: 'text',
                is_required: true,
            }),
            builder.textElement({
                name: 'Last Name',
                codename: 'last_name',
                type: 'text',
                is_required: true,
            }),
            builder.textElement({
                name: 'Twitter Handle',
                codename: 'twitter',
                type: 'text',
            }),
        ],
    };
};

module.exports = migration;
The migration script will create a new Reviewer content type that we're going to use in a relationship with our Album Review content type.
Run this migration with the following command:
kontent migration run --environment PROD -n 02_create_reviewer_content_type
Note: You can run migrations individually or as a batch. Use the following Kentico Kontent CLI command to run all your migrations:
kontent migration run --all --environment PROD
The migration process will skip any migration that it has already processed. You'll see this in the output in your command window / terminal:
Skipping already executed migration 01_create_album_review_content_type.js
Step 5 - Updating a Content Type
As your model extends, you're going to want to update content types that you've already created. This can also be done in a migration script.
Now that we've got a Reviewer content type, we should create a content element (fancy pants term for a field) in our Album Review content type so we can link these two; i.e., an Album Review will be written by one Reviewer.
Create a new migration script in the migration folder called 03_add_reviewer_linked_item.js. Add the following code:
const migration = {
    order: 3,
    run: async (apiClient) => {
        const modification = [
            {
                op: 'addInto',
                path: '/elements',
                value: {
                    name: 'Reviewer',
                    codename: 'reviewer',
                    type: 'modular_content',
                },
            },
        ];

        await apiClient
            .modifyContentType()
            .byTypeCodename('album_review')
            .withData(modification)
            .toPromise();
    },
};

module.exports = migration;
If you look first at the API call we're building, you'll see we're modifying the Album review content type (which we target through the code name). Our modification is an array of operations that contain content type data.
We only have one operation defined in this call. Our operation is going to add (addInto) a new modular content element. "Modular Content" is a legacy API name. You'll see it called a "Linked Item" in the user interface.
Run your migrations again. This time, try:
kontent migration run --all --environment PROD
You should notice that the first two migrations are skipped, and that only the third runs.
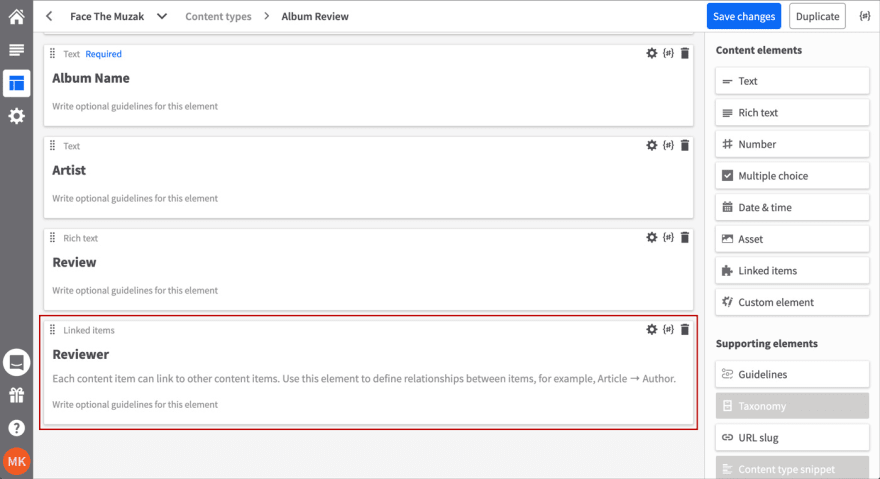
If we jump into Kentico Kontent and look at the Album Review content type then at the bottom we will see our new field:
Step 6 - Configuring Relationships
If you're familiar with Kentico Kontent then you'll know that the Linked Item content element offers a lot in terms of handy configuration that will make editors' lives easier - and protect our model.
The screenshot above is from another project. You can see that the Linked Item content element is required, and that it can have only one relationship to a Widget-Logo Grid content item.
The Reviewer content element should only allow an association to one Reviewer. However, that's not how things are currently set up in our content model. An editor could link an Album Review to any number of different content types.
Now, we could've set the following configuration in our previous step, but I wanted to show you how you can make deeper-level edits and replace or add new configuration to content elements that are already part of a content type.
Add a new migration script in the Migrations folder called 04_update_reviewer_linked_item.js.
Add the following code:
const migration = {
    order: 4,
    getReviewerId: async (apiClient) => {
        const response = await apiClient
            .viewContentType()
            .byTypeCodename('reviewer')
            .toPromise();
        return response.data.id;
    },
    run: async (apiClient) => {
        reviewerId = await migration.getReviewerId(apiClient);

        const modification = [
            {
                op: 'replace',
                path: '/elements/codename:reviewer/item_count_limit',
                value: {
                    value: 1,
                    condition: 'exactly',
                },
            },
            {
                op: 'replace',
                path: '/elements/codename:reviewer/allowed_content_types',
                value: [
                    {
                        id: reviewerId,
                    },
                ],
            },
        ];

        await apiClient
            .modifyContentType()
            .byTypeCodename('album_review')
            .withData(modification)
            .toPromise();
    },
};

module.exports = migration;
There are a few things of note in this migration.
- We're applying multiple operations to the Album Review content type Reviewer content element. Or, in other words, we're doing a bunch of stuff to the Reviewer field 😎. We set the item_count_limit to '1' and set the allowed_content_types to our Reviewer content type.
- In order to create the relationship we need to use the ID of the Reviewer content type. We don't have this - but we can ask for it. This is done in the function getReviewerId, which uses the API to query for the Reviewer content type data.
Run the migration.
kontent migration run --environment PROD -n 04_update_reviewer_linked_item
If you pop over to Kentico Kontent and check out the Album Review content type, you'll see that the Reviewer content element now has the configuration we need to keep our model nice and tidy.
Next Steps
A lot can be done with the Kontent CLI and Kontent Management API. For me, the next step is definitely doing more homework on managing changes across environments.
Managing your model through code requires you to understand the structure Kentico Kontent uses to represent your content model and content items.
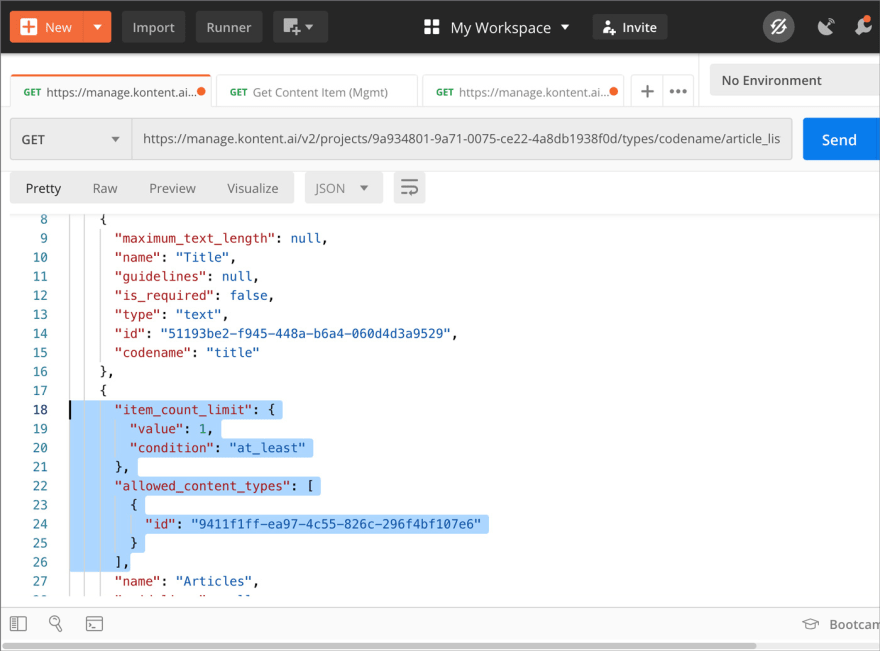
For example, when it came to setting the allowed content types (allowed_content_types) to Reviewer (a GUID), how did I know the name of the property and the fact that a GUID was required?
This is where querying the Delivery API or Management API with a tool like Postman comes super in handy.
For that matter, how did I know the correct format for the path property (elements/codename:reviewer/allowed_content_types)? For this type of insight, you really need to check out the excellent Kentico Kontent documentation.
Interested in another example that also includes TypeScript? Check out Kentico Kontent's own boilerplate project.
Have fun migrating your content model changes!
Photo at the top by Pille Kirsi.



![A Linked Item content element configured to limit relationships] A Linked Item content element configured to limit relationships](https://res.cloudinary.com/practicaldev/image/fetch/s--XaiXUSFa--/c_limit%2Cf_auto%2Cfl_progressive%2Cq_auto%2Cw_880/https://i.imgur.com/YJtgU5m.jpg)



Top comments (0)