After addressing the elephant in the room (Git vs GitHub).
Let's look at how to start working with both.
Scenario 1:
You are going to work on a repository that already exists.
- FORK
Forking is copying the contents of the main repository and pasting it in a new repository on your GitHub account.
So basically copying happens on the GitHub account (only) and you communicate with this newly created repository on your GitHub account from the locally running git.
Any change you do henceforth will update this new repository created on your GitHub account and the main repository (from which you forked) will remain unaffected.
- CLONE
Cloning is copying the contents of the main repository on your local machine.
So basically copying happens between GitHub and your local machine over the network(internet) i.e. you communicate to the original remote branch from the git in your local machine.
Any change you do henceforth will update the main repository from which you took a clone.
Cloning via https vs ssh
We'll cover this on another post, but in shortClone using https:
- You can clone from any repository just by doing directly
git clone <link of repository>- You will have to input your username and password every time you want to communicate with GitHub (remote).
Clone using ssh:
- You will have to put your public ssh key in your git hub account and then clone by
git clone <link of repository>- You don't have to input your username and password to communicate with remote (GitHub).
Scenario 2:
You are starting your own project, working on your local machine and want to create a GitHub repository of the same.
-
Step 1:
git init <name of folder>
Go to your desired folder and type this command
What this will do is create a folder as specified and also create a .git sub-directory.
Basically it initializes your git repository locally.
.git directory contains all the information i.e. history, remote address, etc. about your repository on your local machine
git clone < > = git init < > + copy files from remote repository
Now you work on your files and save them as you do.
-
Step 2:
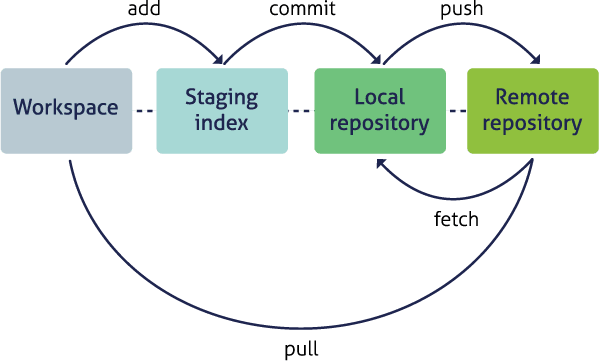
git add .orgit add <name of files>
What this command does is that it adds all your files to the staging area.
work/.git/index
Basically from here you can preview your commit i.e. add all the files you've modified to the commit or segregate the work into more accurate commits by adding file wise.
What is a staging area will be covered on another post but in short imagine it is an area where you can put only those files which you need in your commit out of all the files you've worked on.
-
Step 3:
git commit -m <commit message>
What this command does is adds all your staged files into your repository as a commit (which has a unique hash to access) with a specific message for better understanding of anyone who looks at it
work/.git/objects
Basically here all your changes will be added to the local git repository along with all the other commits you've done before.
Again, we will go into detail in another post and will cover blobs and trees etc. this is a beginner level post.
-
Step 4:
git push origin <branch name>
What this command does is push/copies your local repository onto the remote repository i.e. a network command.
Therefore all your files will be uploaded and stored to the remote server(GitHub, GitLabs, etc.) from your local machine with the help of the version control tool called Git.
Once you've pushed your changes and your friend or collaborator wants to update his/her local repository they can do one of the following:
git fetch --all
This command downloads all the data from remote repository into your local repository i.e. a network commandgit pull origin <branch name>
This command downloads all the data from remote repository and tries to merge or overwrite the data in your working directory i.e. a network command
Here is a pictoral summary of everything I've said above


Top comments (0)