
Learn about HTML, CSS, JavaScript (vue.js), and Regular Expressions by creating a dummy code editor that looks like VS-Code
Idea
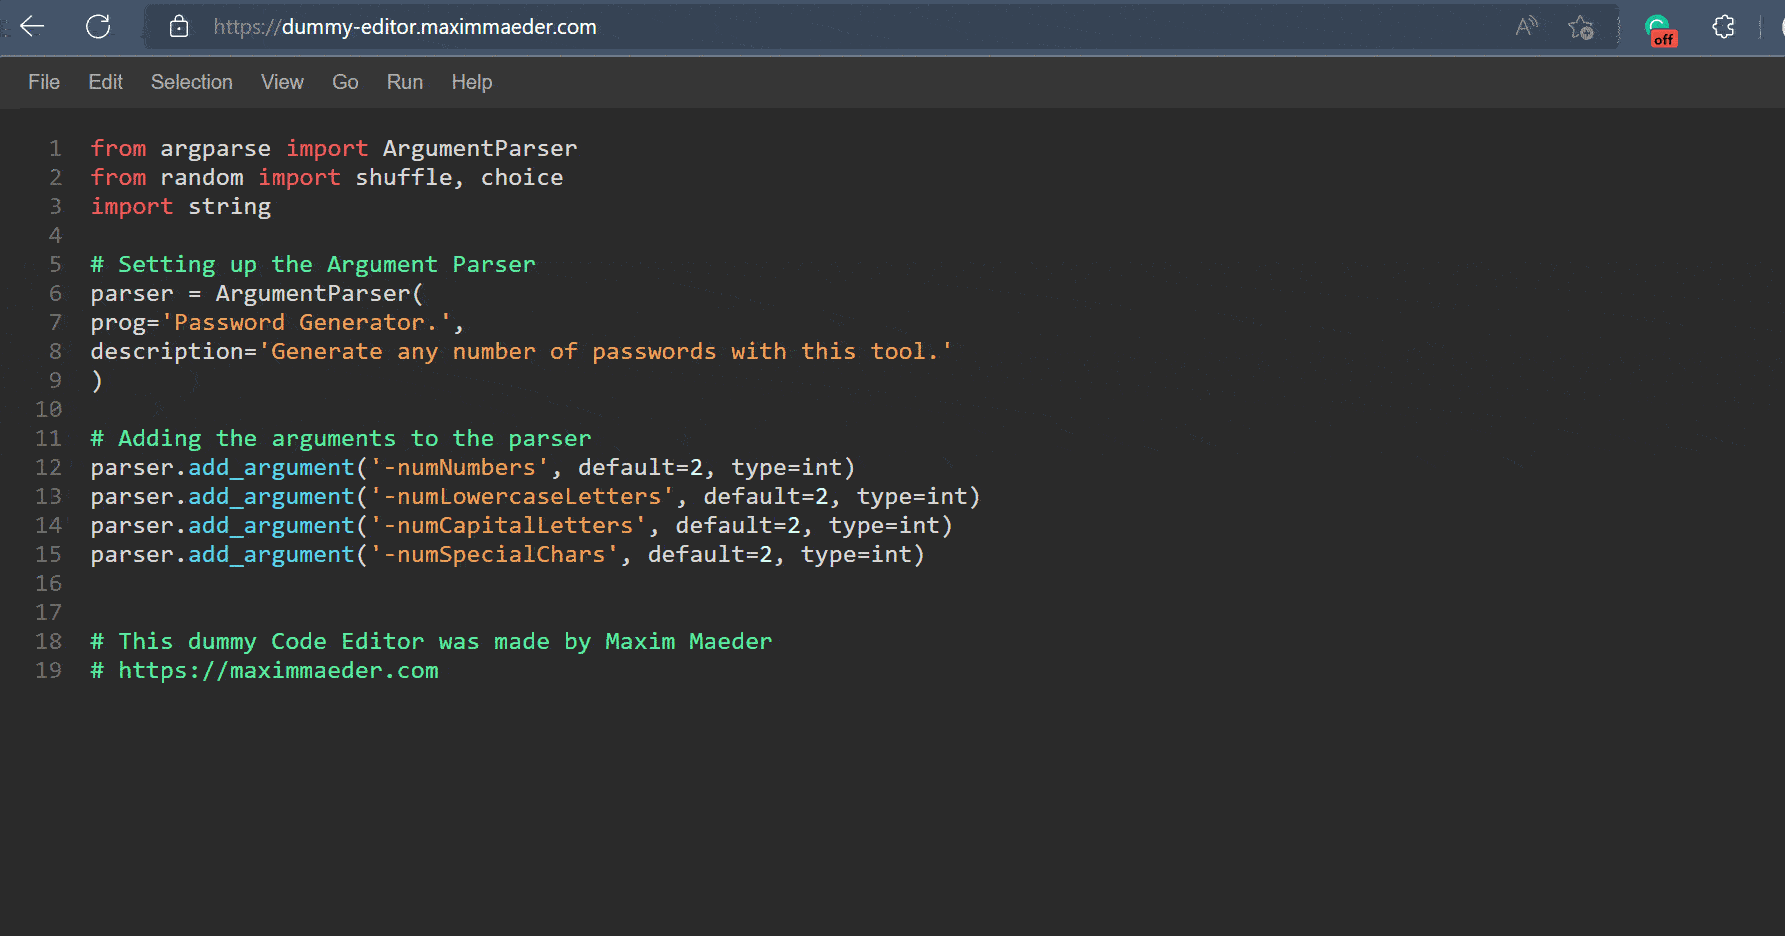
Today we will create a dummy code editor that supports syntax highlighting. We use HTML, CSS and JavaScript (Vue.js). We are also going to learn about RegularExpressions for the highlighting. Below you see the Editor already in action, so you better understand what we will do.

You find the Live Demo here.
HTML
We start with the HTML of the Editor. We use the standard scaffolding of HTML, which can be made in VS-Code with the emmet abbreviation !.
At the Head of the page, we set a title that will appear in the browser tab, import the style sheet, and get vue.js via a Content Delivery System, so we don't have to set up a project. However, it is not advised to do that since there could be loading times when the CDN servers receive many requests simultaneously.
<title>Highlighted Dummy Code Editor</title>

<link rel="stylesheet" href="style.css">

<script src="https://unpkg.com/vue@3"></script>
Now inside the body, we add a div with the id app, which will be our app. Then inside, we have two divs. One represents the menubar at the top, and the other holds the Editor. We won't go into detail in the menubar as it just contains buttons like File, Edit, Help.
<div id="app">
    <div class="menubar">
        ....
    </div>

    <div class="editor-container">
        ....
    </div>
</div>
Now inside the editor container, we once again have two divs. The first one will be holding the line numbers. In it, we duplicate a span element with a ranged loop. The range is determined by the line count of the content which will hold the input.
Then for the Editor itself, we insert a div and a textarea We do it this way because the user can only edit the text area, but it cant display HTML. That's why we need the div. We insert the converted as HTML into it with the v-html directive, and we bind the content value to the textarea with the v-model directive. The content will be parsed and extended with syntax highlighting before being inserted into the div.
<div class="linenumbers">
    <span v-for="n in content.split('\n').length">{{ n }} <br> </span>
</div>
<div class="editor">
    <div class="display" id="textarea" v-html="convert()"></div>
    <textarea v-model="content"></textarea>
</div>
With CSS, we will make it, so the textarea and div are overlaid onto each other, so the user does not notice that he is not editing only one area but two.
Now let's add some functionality with JavaScript!
JavaScript
Setup
We have imported vue.js. Now we get the createApp function. After that, we also set a starting String that is not shown here in total, containing some python code.
const { createApp } = Vue

var startingString = `from argparse import ArgumentParser
...`
Then we call that function and set up our starting string to be the content variable in the vue.js object. The user is editing this value. We have already seen how this value is handled in the HTML. We also define a method convert() that we use to convert the content to HTML. In the next part, we examine how this function is made up. Last but not least, we mount the app on our div with the id #app.
createApp({
    data() {
        return {
            content: startingString
        }
    },
    methods: {
        convert() {
            ...
        }
    }
}).mount('#app')
Highlight the Code using Regular Expressions
Now, let us highlight some code! In the convert function of our vue app, we start by saving the content variable to the parsed variable.
var parsed = this.content
Then we define many regex patterns being replaced with the RegExp object. But what do these mean? Let's look at the first two patterns meant for strings with " and '. All regex patterns look like this: /pattern/modifier where the modifier is almost always g, which means that all patterns are matched. It is also possible to tell it to match case insensitive. The pattern part starts with ", which means itself, but then we continue with (.*?). Here the parentheses group this part of the pattern. The dot . means to match any character. And the * modifies the character in front of it so it can appear zero to infinite times, so any number of characters, but the ? tells it to be lazy. We conclude with another ". Lazy means it will try to match as few characters as possible. Example: "Hey" hola() "Goodbye". It should have two matches because there is a function in the middle. With our lazy modifier, it would match the whole string. The commentWordPattern is pretty similar. The keyWordPattern is also easy as the | means a match that or this word/character.
/* Patterns */
var stringPattern1 = new RegExp(/"(.*?)"/g)
var stringPattern2 = new RegExp(/'(.*?)'/g)
var keyWordPattern = new RegExp(/\b(False|None|True|and|as|assert|async|await|break|class|continue|def|del|elif|else|except|finally|for|from|global|if|import|in|is|lambda|nonlocal|not|or|pass|raise|return|try|while|with|yield)\b/g)
var commentWordPattern = new RegExp(/(#.*)/g)
var functionWordPattern = new RegExp(/([a-zA-Z_]*)(\(.*\))/g)
var numberWordPattern = new RegExp(/(\d)/g)
Now we also need to change our content according to the patterns. Here the grouping plays a big role because we can insert that group into the replacement with the $1 placeholder. Nine groups can be inserted with $1 to $9. So we use string.replace(pattern, replacement). We replace each type with its content but wrapped in a span element with a custom attribute, which we later use to style strings, keywords, comments, and functions.
parsed = parsed.replace(stringPattern1, '<span str>"$1"</span>')
parsed = parsed.replace(stringPattern2, '<span str>\'$1\'</span>')
parsed = parsed.replace(keyWordPattern, '<span kw>$1</span>')
parsed = parsed.replace(commentWordPattern, '<span com>$1</span>')
parsed = parsed.replace(functionWordPattern, '<span func>$1</span>$2')
parsed = parsed.replace(numberWordPattern, '<span num>$1</span>')
Last but not least, we return the parsed HTML so it can be used with the v-html directive.
return parsed
Now the application should work. But it does not look good, so we add some CSS!
CSS
Setup
Let's start by setting box-sizing to border-box because it will make it easier to work with paddings. Then we select a dark background color and make it, so the body is one hundred percent of the viewport height high. And we remove the margins of everything.
* {
    box-sizing: border-box;
    margin: 0;
}

body {
    background-color: RGB(42, 42, 42) !important;
    height: 100vh
}
After that, we make a class for the menu bar we defined earlier in the HTML. We set it to display: flex so the items are side by side, and we also make it stick to the top with position: sticky and top: 0. We also set the z-index to anything greater than one. We also style the buttons in the menubar in their usual and hovered states. This ensures that the menubar is in front of the code at all times.
.menubar {
    background-color: RGB(54, 54, 54) !important;
    padding-left: 1em;
    display: flex;
    align-items: center;
    position: sticky;
    top: 0;
    z-index: 2;
}

.menubar button {
    padding: 0.7em 0.7em;
    background-color: transparent;
    color: RGB(175, 175, 175);
    border: none;
}

.menubar button:hover {
    background-color: RGB(66, 66, 66);
    cursor: pointer;
}
Editor
Now let us get to the Editor. We first set the container's display to the grid and two columns. One is 50px in width, and the other fills the rest of the available space using 1fr. The 50 Pixel column will hold the line numbers.
.editor-container {
    display: grid;
    grid-template-columns: 50px 1fr
}

.linenumbers {
    color: rgb(109, 109, 109);
    font-size: 1.3em;
    font-family: monospace !important;
    padding: 1em 0.1em;
    text-align: right;
}

.linenumbers span {
    width: 100% !important;
}
In the .display area and the textarea, we set the height to 100% and the resize to none, so the textarea stays the same. Then, set the position to absolute, so the elements break out the flow. This will cause them to go to the top left of their container, essentially overlaying each other.
.display,
textarea {
    padding: 1em;
    font-size: 1.3em;
    font-family: monospace !important;
    height: 100%;
    outline: none;
    border: 0px solid black;
    width: 100%;
    resize: none;
    position: absolute;
    margin: 0;
    background: transparent;
    padding-left: 1em;
    overflow-x: auto;
}
Now we set the color of the text area to be transparent. But this will cause the caret to be invisible, so we have to set its color once again. For the display, we set a color and the white-space property to pre-wrap so the white spaces prevail.
textarea {
    color: rgba(0, 0, 0, 0);
    caret-color: aliceblue;
}

.display {
    color: rgb(216, 216, 216);
    white-space: pre-wrap;
}
Last but not least, we set the height of the container to 100 percent the position to relative.
.editor {
    height: 100%;
    position: relative;
    flex-grow: 1;
}
Highlights
Now for the syntax highlighting, we simply color elements that have the attributes we have provided.
[kw] {
    color: RGB(234, 97, 97);
}

[num] {
    color: #d8fff6;
}

[func] {
    color: rgb(95, 211, 234);
}

[str],
[str] * {
    color: rgb(234, 162, 95) !important;
}

[com],
[com] * {
    color: rgb(95, 234, 165) !important;
}
Showcase
Let's look at the app in action.
You find the Live Demo here.
You find the GitHub Repo here.
Conclusion
Excellent! You have successfully created a Dummy using Python code! See how you can add more features to this program, such as different languages.

Top comments (0)