TL;DR Using the power of my gaming computer through the convenience of my MacBook - setup for a headless Windows 10 gaming PC with macOS Steam in-home streaming
I really like Apple's hardware and enjoy my little, ultraportable, MacBook (that is sadly discontinued). One thing Apple hardware falls short on is in the gaming category, that is, unless you punt for the highest model MacBook Pro with a dedicated graphics chip (no thanks), so if I want to play games it's either a PC or PS4.
In the absence of a desk or monitor, in the past, I have used a Steam Link to play games from my PC on the TV. Steam Link is great for titles that have controller support but less great for RTS's or anything where you have to use a mouse and keyboard.
Steam Remote Play
The Steam client, though sometimes lacking in usability, has a bunch of great features - one of which is Remote Play, which allows streaming from one PC to another device. It's Steam Remote Play that powers the Steam Link.
Something I never explored was using Steam Remote Play to stream from my gaming PC to my MacBook which should be possible, despite the severe lack of gaming grunt afforded by the ultraportable.
Remote Desktop
First thing to do is setup Remote Deskop on the gaming PC. The gaming PC runs Windows 10 Pro which can be setup in Settings -> System -> Remote Desktop and enable.
Once Remote Desktop is enabled I tested with the free Microsoft Remote Desktop 10 app available from the Mac App Store (a nice surprise and a really great app).
Side note: I have done a bunch of extra work to "secure" the Remote Desktop connection which will come in handy down the line if I want to access from outside my home network.
With Remote Desktop setup I switched to the Mac and used Remote Desktop to do the rest of the configuration (probably not ideal but I don't have a monitor for the PC and staring at the TV gets old, really quickly).
Headless Windows
The goal is to have the PC, no monitor attached, boot straight into Steam (big picture mode) and skip loading all the usual Desktop etc.
In short I want to turn my PC into a games console but with extras.
This gaming PC is also used for Plex and a Minecraft Server so there are a handful of other things I want to start when the PC boots.
Finally, it would be ideal to sleep after a time so some way of waking the PC from sleep without having to press a button would be perfect.
A, non-exhaustive, checklist of things to solve:
⬜️ Straight to desktop
⬜️ Booting into Steam (and others)
⬜️ Auto wake
Straight to desktop
This approach is best done on a dedicated non-admin user
Getting Windows 10 to boot straight to desktop is achieved by changing a registry entry. The Windows Registry is a huge database of settings for basically everything running on the machine, including Windows itself.
Thankfully there are plenty of articles that help when making changes, though tread carefully as it's really easy to bork Windows when fiddling in the Registry. Following the steps in this article there are a bunch of values to change in the entry:
HKEY_LOCAL_MACHINE\Software\Microsoft\WindowsNT\CurrentVersion\Winlogon
I still find it nerve-wracking whenever I make changes to the Registry but once these have been applied rebooting my PC take it straight to desktop.
✅ Straight to desktop
⬜️ Booting into Steam (and others)
⬜️ Auto wake
Booting into Steam
There is something called Kiosk mode which does this but it's limited to Windows 10 Pro / Enterprise and seemed to be restricted to UWP Apps - I couldn't see a way to do this with Steam in my cursory search.
The approach here is to replace the usual Windows 10 Logon shell, Explorer, with something else. Like everything interesting in Windows, this is again configured in the Registry and like the auto login the same entry is needed:
HKEY_LOCAL_MACHINE\Software\Microsoft\WindowsNT\CurrentVersion\Winlogon
This time the value to change is "Shell", initially it was explorer.exe which starts the desktop and kick starts any other loading that happens with it.
To test this I tried setting it to C:\"Program Files (x86)"\Steam\steam.exe and rebooting the PC to see, thankfully it booted straight into Steam (I setup Steam to start into Big Picture Mode). To make sure I could still get back to the safety of my desktop I reverted the change back to explorer.exe and made sure that was still working.
Booting into Steam (and others)
So switching an exe worked but that is just one program, what about the three that I want to start?
Operating systems tend to have some way of scripting, that is, adding a bunch of commands into a file and having them execute. In Windows this can be achieved with a .bat file or a Batch file.
The first test was to try starting steam from a batch file. In the weird and wonderful world where Microsoft has added Linux to Windows 10 I can start bash from cmd.exe and then run vim to create the batch file... what a time to be alive.
ECHO Starting Steam
start C:\"Program Files (x86)"\Steam\steam.exe
It's pretty straightforward and easy to test either type the name out in the command prompt or double click.
Where I replaced the explorer.exe with the steam.exe I can now replace it with the batch file and it will execute each line in the file, which means I can start Minecraft Server and Plex.
The full startup script looks something like this:
ECHO Starting Plex
start  C:\"Program Files (x86)"\Plex\"Plex Media Server\Plex Media Server.exe"
ECHO Starting Minecraft
start  D:\Minecraft\start.bat
ECHO Starting Steam
start C:\"Program Files (x86)"\Steam\steam.exe
It's important to start both Plex and Minecraft server first so there's not risk they will popup anything over Steam.
✅ Straight to desktop
✅ Booting into Steam (and others)
⬜ Auto wake
Auto wake
The final piece of the puzzle is to enable auto wake, this is part energy saving, part noise reduction and part why not?
For this there's a cool networking feature called Wake-on-LAN and this allows sleeping computers connected to a network to be woken up by sending a so-called "magic packet".
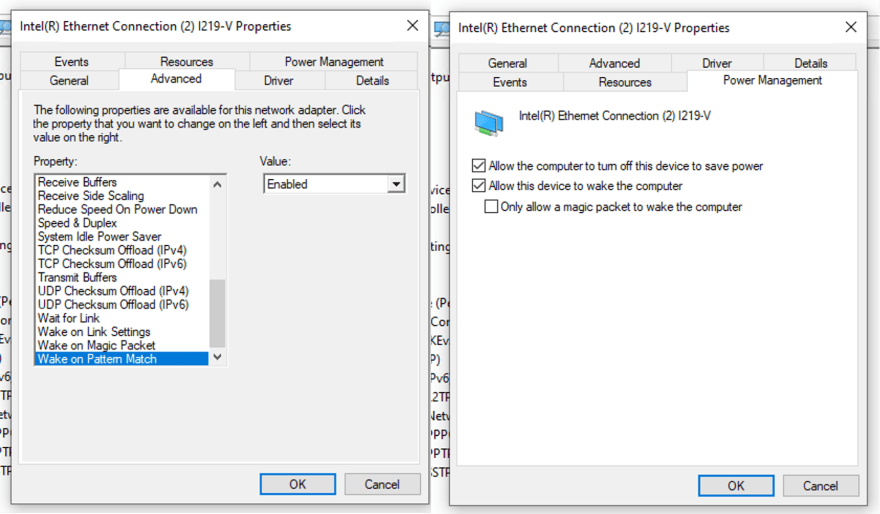
Setting this up is done in from Windows Device Manager -> Network Adapters then finding the Ethernet adapter being used by the computer. In the Advanced tab are two entries Wake on Pattern Match and Wake on Magic Packet that needed to be enabled and a checkbox in Power Management "Allow this device to wake the computer".
One way to test this is to use a little helper called wakeonlan, with this
I can broadcast the magic packet to the network and have the PC receive it and
wake. To do this I needed the mac address and the IP address of the subnet mask
both of which I get get (for full details StackExchange had all the answers).
The other way I tested this was to put the computer to sleep and then use the Plex app on my phone to wake up the PC - this works a treat and with Plex Remote Access I can leave my PC sleeping then wake it up when I need it, wherever I am in the world.
✅ Straight to desktop
✅ Booting into Steam (and others)
✅ Auto wake
Time to play?
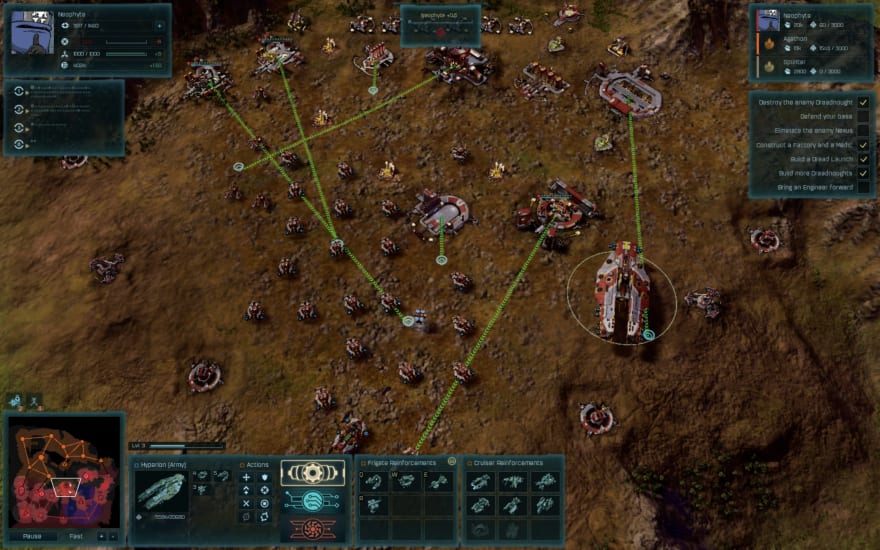
After solving everything I needed to solve I started up Steam on my MacBook and then started browsing my games - I fired up Ashes of the Singularity and was really impressed with how well the splash screen, sound and all, streamed across my home network (wifi + power line adapters). However it didn't look quite right. I couldn't click on any of the UI and it was almost like the screen was too small for the game.
The final problem to solve was screen resolution of the headless PC. I'm certainly not an expert when it comes to this but from what I know Windows talks to the Graphics Card / display card to work out what resolutions it can display in, 1920x1080, 1280x720, etc. Without a monitor plugged in Windows can't tell what resolution to output and fallback to some defaults.
Where does Windows store these defaults? Nvidia control panel? Display Settings? Of course not, it's back to the Registry.
After a bit of googling I found an article that looked promising. Starting in the entry:
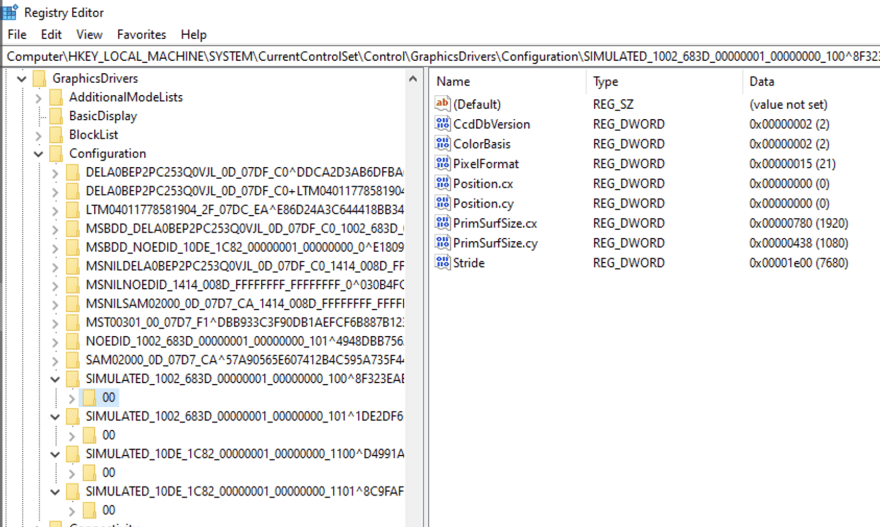
HKEY_LOCAL_MACHINE\SYSTEM\CurrentControlSet\Control\GraphicsDrivers\Configuration
A few entries for SIMULATED_... would need to be updated
Within this entry there are a bunch of different configurations, clicking through I found 4 which started with the SIMULATED prefix and changed each of these to default to 1920x1080.
One gotcha I ran into was when editing the value, not changing to decimal.
With the default resolution updated and the PC rebooted I was able to access Steam with a sensible resolution and Stream a game to my MacBook!
Thanks for reading, I am going to go play some games now, catch you next time.
First appeared on my blog, published 21st April 2020


Top comments (3)
Great post and very easy to understand. I assume you have a great experience in such stuff, I write my guides on Gamers Point Info.
If you have any spare time, then look on to my Lag Fix Guide for PC and see if any methods are left to be mentioned.
Thanks so much! I would love to check out your guides but I’m getting 404s... 😬
Amazing work man. Any ideas on how you could improve the performance of MAC for Gaming?
I was researching for my Gaming Blog If you have any methods that work well do let me know. Most of my methods work for Windows Optimization If you know similar methods for Mac then please let me know.