自分用の備忘録記事
最近新しくリリースされたシンプルなDIコンテナライブラリのVContainerの導入方法をメモ
環境
Unity 2018.4.14.f1
VContainer ver 0.9.0
導入方法
GitHubから直接UnityPackageをDLしてプロジェクトにインストールする方法とUnityPackageManagerでインストールする方法がある、今回はUnityPackageを直接インストールする方法をとる
GitHubのリリースページから0.9.0のUnityPackageをDLし、プロジェクトにインポート
この時、manifest.jsonに
nuget.mono-cecil": "0.1.6-preview
の指定を追加
これで特にエラーが無ければまずは導入成功
簡単なサンプル
次にVContainerを利用した簡単なサンプルを作成します。
VContainerには疑似的にMonoBehaviourのStartやUpdateイベントと似た様な処理を行うことが出来る仕組みがあるので( MonoBehaviourを利用しないクラスでMonoBehaviourのUpdate同様に毎フレーム何かの処理をする等を行えるように )そのサンプルとMonoBehaviourを継承した通常のGameObjectのコンポーネントから利用する方法の二通りを作成します。
HelloWorldServiceの作成
先ずはゲームを通じて利用するHelloWorldServiceクラスを作成します、呼び出し元確認用にstringで引数をとりいつ呼ばれたかをコンソールに表示します、 このクラスはMonoBehaviourを継承しないクラスとします。
using UnityEngine;

public class HelloWorldService
{

    public void HelloWorld(
        string text)
    {
        Debug.Log($"{text} : HelloWorld");
    }

}
GameLifetimeScopeの作成
Zenjectで言うところのSceneContextを作成します
ProjectWindowで右クリック Create > C# Script でファイル名に *LifetimeScopeと記述すると自動でテンプレートスクリプトを作成します。
using VContainer;
using VContainer.Unity;

public class GameLifetimeScope : LifetimeScope
{
    protected override void Configure(IContainerBuilder builder)
    {
    }
}
この段階ではまだテンプレートのままです、いったん先に進みます。
GamePresenterの作成
MonoBehaviourを継承していないクラスでMonoBehaviourのStartやUpdateのイベント同様な処理を行えるクラスを作成します。
using VContainer.Unity;

public class GamePresenter :
    IInitializable,
    IPostInitializable,
    IFixedTickable,
    IPostFixedTickable,
    ITickable,
    IPostTickable,
    ILateTickable,
    IPostLateTickable
{
    private readonly HelloWorldService hellowWorldService;


    public GamePresenter(
        HelloWorldService _helloWOrldService)
    {
        hellowWorldService = _helloWOrldService;
    }


    // Start()直前に呼ばれる.
    public void Initialize()
    {
        hellowWorldService.HelloWorld("Initialize");
    }


    // Start()直後に呼ばれる.
    public void PostInitialize()
    {
        hellowWorldService.HelloWorld("Postinitialize");
    }


    // FixedUpdate()直前に呼ばれる.
    public void FixedTick()
    {
        hellowWorldService.HelloWorld("FixedTick");
    }


    // FixedUpdate()直後に呼ばれる.
    public void PostFixedTick()
    {
        hellowWorldService.HelloWorld("PostFixedTick");
    }


    // Update()直前に呼ばれる.
    public void Tick()
    {
        hellowWorldService.HelloWorld("Tick");
    }


    // Update()直後に呼ばれる.
    public void PostTick()
    {
        hellowWorldService.HelloWorld("PostTick");
    }


    // LateUpdate()直前に呼ばれる.
    public void LateTick()
    {
        hellowWorldService.HelloWorld("LateTick");
    }


    // LateUpdate()直後に呼ばれる.
    public void PostLateTick()
    {
        hellowWorldService.HelloWorld("PostLateTick");
    }

}
実装しているインターフェースは其々コメントに書かれある通りのタイミングに呼ばれます。
TestObjectの作成
最後にMonoBehaviourを継承したTestObjectクラスを作成します
using UnityEngine;
using VContainer;

public class TestObject : MonoBehaviour
{
    private HelloWorldService helloWorldService;


    // コンテナから取得.
    [Inject]
    public void Construct(HelloWorldService _helloWorldService)
    {
        Debug.Log("Inject");
        helloWorldService = _helloWorldService;
    }


    void Update()
    {
        if (Input.GetKeyDown(KeyCode.Space))
        {
            helloWorldService.HelloWorld("TestObject");
        }
    }
}
Update時にスペースキーを押下したらHelloWorldSericeのHelloWorld()を呼び出すようにします。
Sceneの作成
次にシーンを作成します
先ずコンテナを実装するためにGameLifetimeScopeオブジェクトを作成します、Hierarchy上で右クリック Create Empty で GameObjectを生成、GameLifetimeScope.cs をアタッチします。

このまま実行しても何も起きないので GameLifetimeScope に手を加えます
using VContainer;
using VContainer.Unity;

public class GameLifetimeScope : LifetimeScope
{

    protected override void Configure(IContainerBuilder builder)
    {
        builder.Register<HelloWorldService>(Lifetime.Scoped);
        builder.RegisterEntryPoint<GamePresenter>(Lifetime.Singleton);
    }

}
利用される側のHelloWorldServiceクラスをbuilderに登録、その次に利用する側のGamePresenterをbuilderに登録します。
そして実行
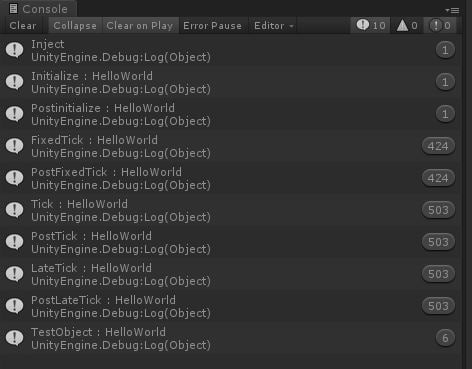
コンソールが以下の様になれば正常に動作しています、Hierarchy上にはMainCamera、DirectionalLight、GameLifetimeScopeオブジェクトの3つだけでありこのログを読んだオブジェクトがシーン上に配置されていないことがわかります。

次にGameObjectから利用する場合です。
GameLifetimeScopeに以下のように手を加えます。
using UnityEngine;
using VContainer;
using VContainer.Unity;

public class GameLifetimeScope : LifetimeScope
{

    [SerializeField] TestObject testObject;


    protected override void Configure(IContainerBuilder builder)
    {
        builder.Register<HelloWorldService>(Lifetime.Scoped);
        builder.RegisterEntryPoint<GamePresenter>(Lifetime.Singleton);

        // TODO : GameObjectとの紐付け( これ以外の方法があるかはまだわからない ).
        builder.RegisterComponent(testObject);
    }

}
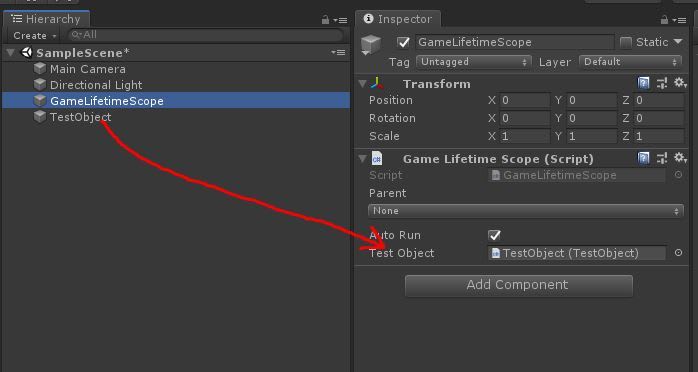
次にシーン上にTestObjectを配置します。
この時GameLifetimeScopeのInspectorからTestObjectをセットします。
これで実行
以下のようにコンソールが表示されれば成功です、スペースキーを押下したときに
TestObject : HelloWorld
が表示されてるのが確認できるはずです。
以上でとりあえずVContainerを導入及び簡単なサンプルの作成までの手順です
ここに一応サンプルプロジェクトを配置しています見る必要はないと思いますが
より詳細の情報やZenjectのAPIとの対応表を確認したい人は開発者のGitHubページにて確認できます


Top comments (0)
Some comments may only be visible to logged-in visitors. Sign in to view all comments.