Even if you don't believe Bitcoin and Ethereum will recover, there are still plenty of job opportunities in Web3 and Metaverse fields. It might be something worth dipping your feet into it since it might be a beginning of good career. I started to work in crypto more than a year ago, and I decided to write this cheatsheet to Ethereum and JavaScript because it wasn't that easy to find. You find here examples how to use the most popular libraries to build distributed apps including creating wallets, signing messages and sending transactions. Using code!
I must mention this at the very beginning. we will use Görli testnet to perform all operations in this article. We will not use any tokens that have monetary value, so you don't need to worry about your funds.
What makes this article unique is that we will focus only on the most practical aspects rather than building entire Next.JS app like I used to do in my previous articles. If you feel like you need to refresh the complete process of creating the entire app from scratch you should read my article on How to Build 2048 Game in React which I published a few months ago.
This article contains a few external resources such as:
- Görli ETH Faucet - example app built by me. It will allow you to play with your MetaMask wallet.
- Source code (GitHub) - feel free to fork/clone/play with it on your own.
- ...and a YouTube video. It took me more than a month to prepare all code for this tutorial, so it would mean the world to me if you watch it, smash the like button, and subscribe to my channel.
Thank you!
Brief intro
I will skip explaining what is blockchain and it is changing the world. I don't expect you to know anything about blockchain but it might be useful. If you have any questions you can ping me on Twitter.
If you want to perform transaction on Ethereum you need a wallet. There are two kind of wallets - soft(ware) wallets and hardware wallets. Hardware wallets are more secure since it is harder to steal their credentials (private keys and mnemonics). Since we are only practicing, we will use a soft wallets in this article. The most popular one is MetaMask. You can use install it as a browser extension and it is free charge. If you don't have it yet - you can download it from here.
Libraries
Once you have your wallet, we can start coding. First, we need to install two essential libraries for Ethereum development - ethers and useDapp. BTW. I'm using yarn in this article but if you are more familiar with npm you can use it as well.
yarn add ethers @usedapp/core
-
ethers- allows developers to interact with blockchain. Retrieve data, send transactions, sign messages, creating wallets, and many other things. -
useDapp- it is an ethers wrapper for React. It offers plenty of hooks to connect wallet, retrieve balance, send transaction so developers don't need to interact with low level APIs. We will use it out of convenience.
Let's configure React
All required libraries are install, so we are good to setup our React app. In the main file, we need to activate useDapp by adding DAppProvider with the Ethereum API configuration:
// file: pages/_app.tsx
import '../styles/globals.css'
import type { AppProps } from 'next/app'
import { DAppProvider, Goerli } from '@usedapp/core'

const config = {
  readOnlyChainId: Goerli.chainId,
  readOnlyUrls: {
    [Goerli.chainId]: "https://goerli.infura.io/v3/00000000000000000000000000000000"
  }
}
function MyApp({ Component, pageProps }: AppProps) {
  return (<DAppProvider config={config}><Component {...pageProps} /></DAppProvider>)
}

export default MyApp
As you can see we need to provide Ethereum API to DAppProvider. Where can we find one? For development I would create a free account on Infura.io and generate API keys for Ethereum. It is the easiest way.
When you created you account and logged in into your dashboard. You must click on "Create new key"button in the top right corner, and choose "Web3 API (Formerly Ethereum)", and name your project however you want - in my case it is fluffykitten.

Now we need to choose GÖRLI network from the dropdown and copy the API link:
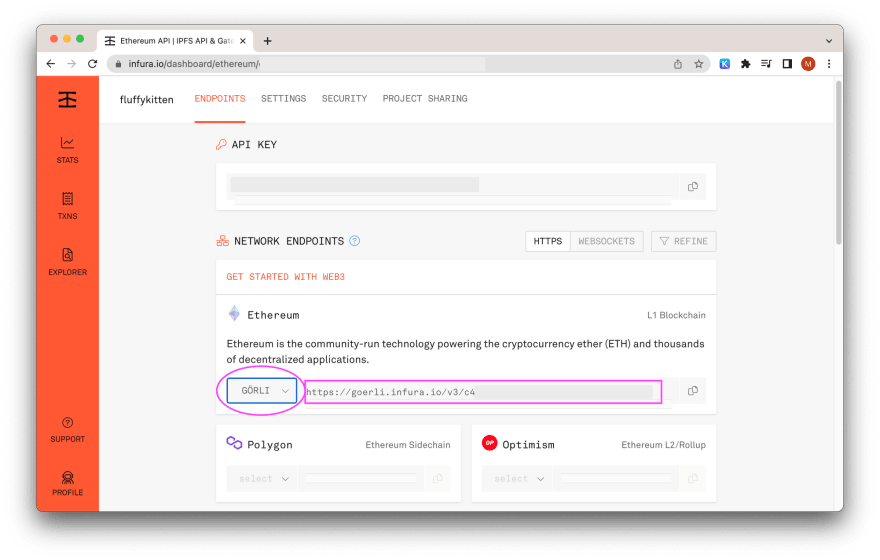
Once you have it we are good to go.
Signing messages
One of the most important features of every wallet is ability to sign messages. It will be very important to us since we can use this signed message to authenticate users. How come? If user was able to sign message with their wallet - we can assume the own it it, and can execute transactions from it. It is a very common approach in the Web3 development.
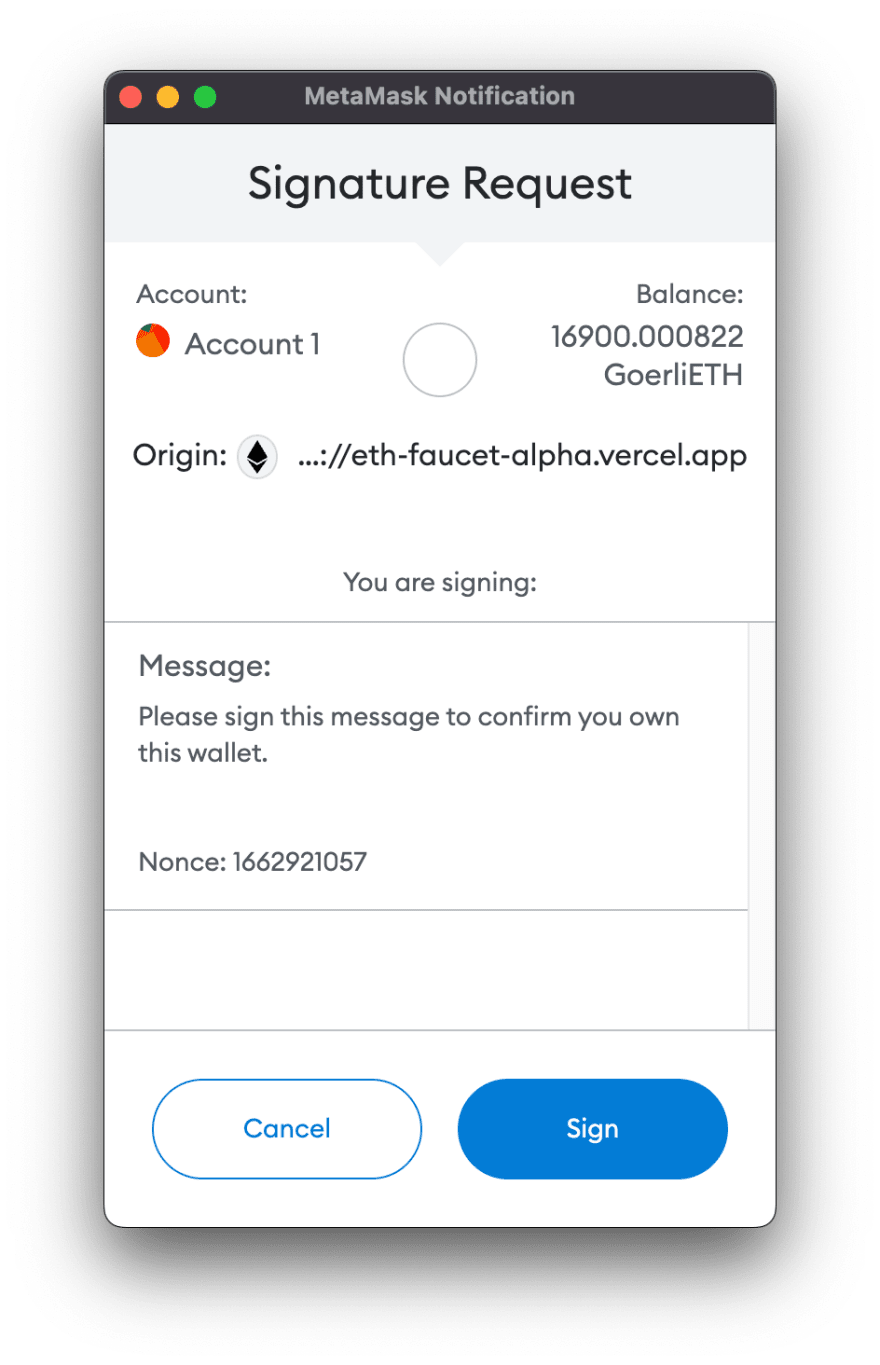
Sounds great, right? But how can we use it in React? It is simple. We should use useEthers hook, offered by useDapp, and we extract from it the library property (line 6). It will allow us to interact with user's wallet.
Now let's define the signMessage function. We will use to call the library to retrieve the wallet signer. Signer allows us to request transactions and signing messages from user's wallet. The user will need to approve those action - check the screenshot with MetaMask modal above.
Once we have the signer we can call the signMessage method with the text message we want to sign with this wallet address.
// file: pages/Home.tsx
import { useEthers } from '@usedapp/core'
import type { NextPage } from 'next'

const Home: NextPage = () => {
  const { library } = useEthers()

  const signMessage = async () => {
    const signer = library?.getSigner()
    const signature = await signer?.signMessage("Fluffykitten FTW!")
    alert(signature)
  }

  return (
    <div>
      <button onClick={signMessage}>Claim</button>
    </div>
  )
}

export default Home
How to verify signed messages?
When the message has been signed we can send it to somebody along with the wallet address, and signature, so they can confirm if message was actually signed by given wallet. Often, this mechanism is used to make users sign some agreements such as terms of service or EULAs.
Developers usually prepare API endpoints to verify those sort of messages and record them in databases for legal reasons. Let's assume we want to verify the signed message on our own. How we can do this?
First, we need to install one more package called @metamask/eth-sig-util. You can do this by running the following command in your terminal:
yarn add @metamask/eth-sig-util
Now we need to import recoverPersonalSignature from this package and pass the message and signature to it. It will return the address that actually signed this message. Afterwards, we just need to compare returned address with the address given by user.
import { recoverPersonalSignature } from "@metamask/eth-sig-util"

const address = "0x00000000000000000000000000000000
const message = "Fluffykitten FTW!"
const signature = "0x00000000000000000000000000000000000000000000000000000000000000000000000000000"

const recoveredAddress = recoverPersonalSignature({ data: message, signature})

if (recoveredAddress === address) {
  console.log('OK! SIGNATURE MATCHED!'
}

console.log('STOP! SIGNATURE MISMATCH!'
How to use Ethereum in Node.js?
Now you know how to interact with Ethereum using React and browser wallets but it gets a bit more tricky when it comes to Node.JS. In Node.JS, you will need to call blockchain using low level libraries such as ethers. It might be intimidating at the beginning but I will give you some tips how to get started.
First, we need to create a wallet using ethers. It is very simple - we just need to get to the Wallet namespace and call the createRandom method. It will return new wallet credentials.
import { ethers } from "ethers"

const wallet = ethers.Wallet.createRandom()

console.log("Your new Ethereum wallet credentials:")
console.log("Wallet address", wallet.address)
console.log("Private key", wallet.privateKey)
BE CAREFUL: You need to protect your private key and never reveal it to anyone! If somebody intercepts it they will be able to control the wallet and steal your funds.
Where can I get free testnet Ether?
Now you have your wallet ready so we need to top it up with testnet Ether. You can get some from my Görli ETH faucet. Just use your browser, connect your MetaMask wallet, and click on the Claim button. Obviously, you will need to sign a message first to authenticate this wallet. The real use case of signing messages, isn't it?
Once you got your testnet Ether, we will send it to the wallet address created using ethers. Just copy the address to your clipboard, and follow the screenshots.
First, click on the "Send" button (marked with the purple circle on the screenshot below).

Now you need to provide the receiver wallet address, amount of tokens, and click on the "Next" button.

Now we need to review our transaction and click "Confirm".

Now our transaction is being broadcasted. It should reach the receiver wallet within 3 minutes.
How to send transaction using ethers?
Now we gonna do the same exercise we did in the previous step but using code. The code snippet is a bit longer and more complex this time, so I will drop it here and explain everything below.
const infuraUrl = "https://goerli.infura.io/v3/00000000000000000000000000000000"
const chainId = 5 // Görli network
const provider = new ethers.providers.JsonRpcProvider(infuraUrl, chainId)

const privateKey = "0x0000000000000000000000000000000000000000000000000000000000000000"
const wallet = new ethers.Wallet(privateKey, provider)

// 1 ETH = 1 * 10 ** 18 wei
const amountInWei = BigInt(1 * 10 ** 18)
const receiver = "0x00000000000000000000000000000000"
const trx = {
    to: receiver,
    value: ethers.BigNumber.from(amountInWei.toString())
}
await wallet.sendTransaction(trx)
In the first three lines, we are configuring the Ethereum API. It is exactly the same API endpoint we used before to setup useDapp. The chainId needs to be set to 5 since we want to use Görli testnet. If you need to use Mainnet (aka production) change it to 1 but then you will operate on the real Ether (aka real money). Obviously you need to have some real Ethers before you spend them.
In line 3 we are establishing connection to the Ethereum API.
In line 4 and 5 we setup wallet using credentials we created earlier on. We need to pass the private key and the Ethereum API connector.
In line 6, we are defining the amount of tokens we want to send to the receiver - in our case it is 1 Ether. Before we send this transaction we need to convert this amount into the smallest unit on Ethereum which is Wei. Ethereum has 18 digits in decimals, so you need to use special classes such as BigInt and BigNumber to fit those numbers to memory.
How much is 1 Ether in Wei? 1 Ether = 1000000000000000000 Wei (18 digits)
In line 7, we define the receiver wallet address.
In line 8, we construct the transaction object. Notice we need to convert the BigInt number into BigNumber that comes from ethers. It is super important to convert into the type understood by Ethereum.
and in line 9 we perform the transaction.
Last words
My main idea for this article was giving a cheatsheet how to start interacting with Ethereum blockchain without reading long documentations and white papers. That's all I could do in less than 2000 words. I hope you find it useful.
At the beginning I mentioned, I built an example app for this article you can find it on my Github. If you like it please give it a star on Github! Thank you.
Recently I am more active on Twitter! I'd appreciate if you follow me!
If you found this article helpful please share it, so more developers can learn from it. Occasionally I publish videos on my YouTube channel, and it would be great if you subscribe, hit the like button, and drop a comment under your favourite video.
Stay tuned!
PS. I published a few similar articles on FreeCodeCamp before, just take a look:


Top comments (0)