Last updated: 2020-02-11
I’ll be updating my AWS articles from time to time, as I learn more. I got my first cert — the AWS Certified Cloud Practitioner certification — on January 22nd, but as I took the practice exams (5 exams, 2x each) and the actual exam, I learned about gaps in my knowledge. So I’ll be filling those in through the articles I wrote beforehand.
One of the first things you’ll do after creating an AWS account is add users and groups via the IAM console. We will initially do this as the “root” account user. But be careful — root accounts are not restricted in any way. Therefore, I strongly recommend following the Security Status checklist FIRST when visiting the IAM console:
- Delete your root access keys (only shown when logged in as the root user)
- Since root accounts should only be used for console access, it should not be used for programmatic access, so the access keys should be deleted. I’ll discuss what access keys are for, later.
- Activate MFA (multi-factor authentication) on your root account
- ALWAYS do this for the root account.
- We can use a “virtual” device, such as the Google Authenticator app or browser extension. You’ll generate a QR code to scan. I like to add the account to both the app and the Chrome extension, so when the QR code is displayed I scan it in the app, and while it is still displayed I scan it from the extension. If you skip to the next step, you will never see the QR code again, so make sure you capture it both ways before moving on. Also, you cannot just take a screen shot and scan in the image from the Chrome extension afterwards. It won’t let you. So make sure you do it when you’re still on the IAM console page.
- We can also use a UTF security key or other hardware MFA device instead. I’ve seen recommendations that we should use a hardware device for root accounts, but I’ve never done that. In a high-security company with exceptionally sensitive data, that may be a requirement.
- Create individual IAM users
- Aside from initially creating an initial user with admin rights, and giving a user access to the Billing console (future article), I’d avoid using the root account for anything else beyond going through this initial checklist.
- Use IAM groups to assign permissions
- It almost never makes sense to assign permissions directly to individual users. Even if you initially have a single user, create a group to assign the user to, and apply permissions to the group. It’s much easier to assign users to multiple groups if we have to, rather than to assign permissions haphazardly to individual users.
- Apply an IAM password policy
- This is where we specify the minimum length, what characters are allowed, reuse rules, expiration rules, and if an admin is required to reset the password after expiration or if the user can do this on their own.
- Rotate your access keys (not shown when logged in as root)
- This is more of a user account recommendation than a checklist item.
- I’m assuming this isn’t shown for the root account because the first checklist item is to delete any root access keys to begin with. Again, I’ll discuss what access keys are for in a bit.
Sign-in Link
At the top of the IAM console, we’ll see an IAM users sign-in link:

By clicking the Customize link, we can create an easy to remember alias instead of the numeric AWS account number as the first part of the URL. This URL will allow users to directly visit the console login page. Be aware, though, that if you have access to several AWS accounts, and you store your passwords in a manager tool such as LastPass or 1Password, what the browser pre-fills into the login fields can be misleading. Even if you customize the fields in the password manager tool, don’t trust the pre-filled values you see, and always select the specific account from the password manager dropdown. Even then, sometimes I had to manually enter the values, which is a real PITA.
Creating a Group
Now that we made it through the checklist, it’s time to create an “admins” group (or whatever you want to call it) from the Groups menu item on the left. When you hit the step for attaching policies, note that we are limited to 10 policies for a group. That shouldn’t be an issue, because we can apply several permissions to a single policy. For this group, we should just apply a single policy; AdministratorAccess. Since this encompasses all permissions, we don’t need to add any other policies to the group. That’s all we need to do to create a group.
Creating a User
Now we can create users to assign to this group. Let’s create a single user for now by clicking the Users menu item on the left. Note that we can create several users at a time if they share the same access types and permissions. Also note that it’s at the user level where we decide what type of “access” the user can have; not at the group level:

- Programmatic access, which gives the user the right to access AWS via the CLI (future article), API, or SDK. Programmatic access requires the creation of an access key. Recall that we deleted the access keys for the root user, because that account should only ever have console access.
- AWS Management Console access, which gives the user the right to log into this console.
I strongly recommend creating separate user accounts for programmatic vs. console access, although if you’re just creating a temporary user to learn AWS, a single user is fine for access to both.
When we select console access, the Console password fields are displayed, where we can request an autogenerated or manual password. I recommend requiring the users we create change their password upon first login, so we really only need to request “autogenerated” here. Let’s enforce that by selecting the Require password reset option as well. FYI, setting this option automatically assigns the IAMUserChangePassword policy to the user so they’ll be able to do this. Aside from this, users have zero permissions when first created.
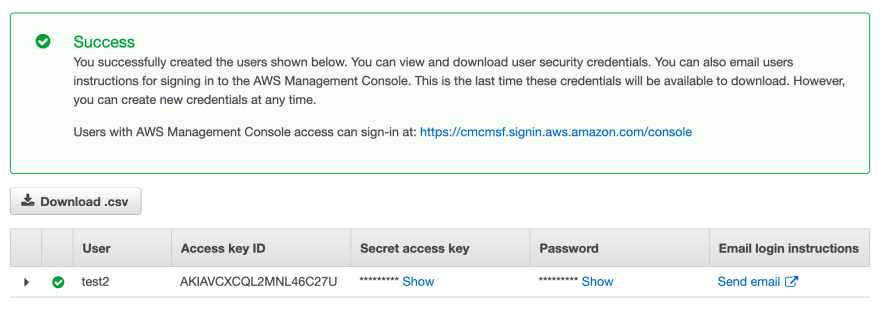
Access Keys
After we create the user, we’ll see a “success” page, where we’ll also see the system-generated access key. Once we leave this page, we will never, ever be able to see the secret access key or password again. So I recommend either saving them into a secure location (such as the LastPass “vault” or similar tool), or downloading the CSV file containing all the values (not very secure). If we do lose this, it’s not the end of the world. We’ll just have to regenerate a new access key and delete or inactivate the lost one. From this page, we can also request AWS send an email to the user with this info.
Adding a User to a Group
The next step is to add the user to a group — in our case, the admins group we created earlier. We could instead select the option to copy permissions from another user, or attach policies directly, but as I mentioned earlier, I don’t recommend that.
We can skip over the Tags page for now; that’s a separate article, and not essential at this time.
More on Policies
We should take a look at the Policies option (select from the menu on the left). Policies can “allow” or “deny” specific rights. We’ll see the hundreds (and hundreds, and hundreds) of pre-canned AWS policies. We can create our own as well. Policies are actually defined under the hood via JSON key/value pairs. When we create our own policies, we’ll often do this directly in JSON, although there is a visual editor as well. But this is for a future article.
Since there are so many policies, AWS makes it easy for us to filter these by type (“customer managed” — ones we create, AWS managed, etc.) or by how they’re used. We can also enter a partial search string.
Roles
One other thing you may be interested in on the IAM console is a feature called Roles. These are not associated with a specific user or group within the account. We can use roles for granting/delegating permissions to resources (including IAM users in other accounts).
Roles allow us to avoid sharing long-term access keys. For example, if we want to access S3 from the AWS CLI from an EC2 instance's terminal, you can avoid storing access keys/secret keys on the machine by giving the EC2 instance S3 access via a role that has S3 access policies.
Applications can also assume roles, similar to AWS users assuming roles.
Of course, if you have no idea what I'm talking about, don't worry -- this will be a future article.
Credential Reports
One other thing you may be interested in on the IAM console: we can generate and download a Credential report that will show us user account details which an admin should review on a regular basis.
One final note — although many AWS services are available at the “region” level, IAM settings are “global.”

Oldest comments (0)