Adding Facebook Login to your iOS app is a quick way to boost signup conversion rates. Lots of people already have Facebook accounts and aren't in the mood of going through a registration page. Plus, if you only use social login you can save yourself a lot of time by removing the need to handle authentication on your backend. Sounds like a win-win, right?
Well, there are some caveats. The "golden path" of implementing Facebook Login is to install the Facebook SDK. It's a great way to simplify the login flow, provides some good UX improvements for the user and saves you time. At least in theory. In practice, there are a few problems with Facebook's SDK.
What's wrong with the Facebook SDK?
- Build and app size. An empty iOS app archive is around 1 MB. I added the necessary Facebook SDK dependencies for Facebook login (v7.0.0), and the archive grew to 8 MB. That's 7 megs of code for the simple task of showing a few text fields and initiating a web request.
- User privacy. Facebook wouldn't be Facebook if it didn't use its SDK to collect your user's data. According to their FAQ, Facebook Login collects all kinds of user data like app launches, user IDs, your user's user agent information, IP address, time zone, carries, disk space and other information. This is all user-identifying data that can be used to track your users across apps and websites. In other words, Facebook can use this data to build out your users' app and browsing history, without them even knowing.
- SDK bugs. Recently, Facebook's SDK broke multiple million-user apps, as well as a bunch of tiny ones. Considering the amount of complex code the closed-source SDK runs, their terrible code practices and the sensitivity of the user data they collect, it'll make your life a lot easier if you could avoid adding their SDK in the first place.
- GDPR compliance. Some of the data Facebook collects is personally-identifiable information. If you don't get consent from your users before collecting their information, you violate GDPR – not Facebook.
If all this makes you worried about how you can provide Facebook login to your users without their SDK – don't fret! You can use Facebook login without Facebook SDK. What you have to do is use their web APIs instead. This post is all about how to use Facebook login in your iOS app without the Facebook SDK.
Note: You can find the full implementation of this tutorial on GitHub.
Facebook Login without the SDK
Here's how the process works, step-by-step:
- First, your app will show a web view of Facebook's login page.
- Once the user logs in, Facebook will redirect the web view to a URL that you specify, and append the authentication token as a URL parameter.
- You will read that parameter and send it to your backend service.
- Your backend service will verify Facebook's authentication token and give you credentials for making authorized requests.
The process is similar to how the SDK works, except we'll use iOS-provided web views to show the login. The web view will act as a sandbox, making sure your user's data stays as private as possible and saving you from having to include Facebook's SDK into your app.
However, getting the security right can be a bit tricky, and the information on Facebook's docs and the Internet is scattered and incomplete. This is why I wrote this guide to arm you with the knowledge and trust to ditch Facebook's SDK securely. Let's get started!
Initiating an Authentication Session
To make the process as secure as possible, you'll use ASWebAuthenticationSession, a class from the built-in AuthenticationServices framework specifically created for authenticating your users inside a web view. AuthenticationServices runs in a separate process from your app, making sure that there's no way for your app to spy on the user while they're logging in. This makes it more secure than a regular WebKit view.
Another big advantage of AuthenticationService's web view is that it can access cookies on your device. This means that if you had logged into Facebook earlier, you won't need to type in your email and password again.
Additionally, the web authentication session will pop up a dialog informing the user their authentication data will be shared with your app, making sure your users are informed about what's going on.
Let's get going! I'm going to assume you have a view controller with an IBAction to a Facebook login button. In this example, that IBAction function is called continueWithFacebookTapped.

Open your view controller file and, before anything else, add a new import to the top of the file:
import AuthenticationServices
You'll see this come into play later.
Next, add the following implementation to continueWithFacebookTapped:
@IBAction func continueWithFacebookTapped(_ sender: Any) {
  let facebookAppID = "YOUR_APP_ID"
  let permissionScopes = ["email"]
}
You'll start by declaring these two lines. The first line is your Facebook app ID. Make sure to replace the value with your app ID. You can find it by going to Facebook Developer, opening My Apps in the top-right and selecting your app. You'll get to your app's dashboard. You can find your app ID top-left, right next to your app's name.
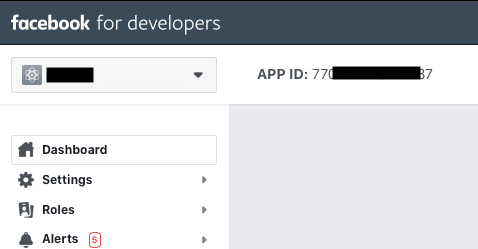
Copy it over and paste it as the value of facebookAppID in the code.
In the second line, you declare permissionScopes – a list of permissions you'll need to access. In this case, you're only looking for the user's email. You can see a list of available permissions on Facebook's documentation page.
Next, continue writing the function by adding the following code:
let state = UUID().uuidString
let callbackScheme = "fb" + facebookAppID
let baseURLString = "https://www.facebook.com/v7.0/dialog/oauth"
let urlString = "\(baseURLString)"
  + "?client_id=\(facebookAppID)"
  + "&redirect_uri=\(callbackScheme)://authorize"
  + "&scope=\(permissionScopes.joined(separator: ","))"
  + "&response_type=code%20granted_scopes"
  + "&state=\(state)"
let url = URL(string: urlString)!
This code builds out the URL you'll show in the web view. The URL points towards Facebook's login page, but includes a couple of URL parameters that tell Facebook how to log your user in:
- Your client (app) ID. This is a unique, but non-secret, string identifying your app.
- A callback URL. When Facebook is done with logging your user in, it will redirect the web view to this URL. In your case, it will call fb12345678://authorize, but instead of 1234567 it will be your Facebook app ID.
- The permission scopes you want to get.
- What the response should look like. In this case, a combination of an authentication code and the permissions your user has granted.
- Finally, a unique state string. Later on, you'll verify that this state was left unchanged during the login process, to verify that nobody was spoofing a login attempt.
Next, you'll initialize an authentication session with this URL:
let session = ASWebAuthenticationSession(
  url: url, callbackURLScheme: callbackScheme) {
  [weak self] (url, error) in
  guard error == nil else {
    print(error!)
    return
  }

  print(url)
}
When the session starts, it will pop up a web view. Once it detects a redirect with the callback scheme you provided (a URL starting with fb12345678://) it will dismiss the web view and call the trailing closure declared above with the redirect URL. Facebook will append a bunch of parameters to the redirect URL, giving you access to the login code.
Before the authentication session can show a web view, though, it needs access to a view. Add the following extension to the bottom of the file:
extension ViewController: ASWebAuthenticationPresentationContextProviding {
  func presentationAnchor(
    for session: ASWebAuthenticationSession) -> ASPresentationAnchor {
    return view.window!
  }
}
This declares the view controller as the authentication session's context provider. In this case, the context is the current window. The authentication session will use the window to present a web view.
Finally, add the following two lines to the bottom of continueWithFacebookTapped:
session.presentationContextProvider = self
session.start()
The above code adds a context provider to the session and starts it. Run the project and tap the Continue with Facebook button.

You should see a Facebook login page pop up.
Getting the authentication code
After logging in, the web view will close and you'll see a URL printed to the console that looks something like this:
fb1234567://authorize/?code=AUTHORIZATION_CODE&granted_scopes=email%2Cpublic_profile&denied_scopes&state=694B3393-34CD-47B7-AF79-B78D29A1EBCD#_=_
The first bit of the URL, fb1234567://authorize/ is the URL you told Facebook to redirect to. The rest of the URL is a couple of query parameters that Facebook added for you:
- First, there's a code. This is the authorization code for your user. You can send this code to your backend service, which will then exchange the code for a Facebook authorization token.
- Next, the granted_scopes parameter tells you which permission scopes the user granted. Scopes that were denied will be inside denied_scopes.
- Finally, the state parameter is a string that should match the original state you sent when you initialized the login process.
To parse this URL, you'll create a struct to encapsulate the data mentioned above. Add the following struct to your project:
public struct FacebookLoginResponse {
  let grantedPermissionScopes: [String].
  let code: String
  let state: String
}
Next, add a new function to your view controller that will get a component from a URL:
func getComponent(
  named name: String,
  in items: [URLQueryItem]) -> String? {

  items.first(where: { $0.name == name })?.value
}
This is a small helper function that you'll use in a bit. For now, all you need to know is that you'll split the URL parameters into an array of URLQueryItems. To get the value of a parameter by the parameter name, you'll find the first item in the array that matches that name.
Next, add a new function that parses the URL into an instance of FacebookLoginResponse:
func response(from url: URL) -> FacebookLoginResponse? {
  guard
    // 1
    let items = URLComponents(
      url: url,
      resolvingAgainstBaseURL: false)?.queryItems,
    // 2
    let state = getComponent(named: "state", in: items),
    let scope = getComponent(named: "granted_scopes", in: items),
    let code = getComponent(named: "code", in: items)
  else {
    return nil
  }
  // 3
  let grantedPermissions = scope
    .split(separator: ",")
    .map(String.init)
  // 4
  return FacebookLoginResponse(
    grantedPermissionScopes: grantedPermissions,
    code: code,
    state: state)
}
Here's what's going on in the function:
- First, you create an array of URL components from the provided URL. This will parse all the parameters of the provided URL and fill up the array.
- Next, you use the helper function you declared earlier to get the state, permission scopes, and code values from the URL query parameters.
- The permission scopes are all in one comma-separated string, so you split the string on commas to get a
Stringarray of permissions. - Finally, you create the login response with the data you parsed from the URL.
Now that you have a way of extracting information from the redirect URL, you can call this function from ASWebAuthenticationSession's completion closure. Change the declaration of session to the following:
let session = ASWebAuthenticationSession(
  url: url, callbackURLScheme: callbackScheme) {
  [weak self] (url, error) in

  guard error == nil else {
    print(error!)
    return
  }

  guard
    let receivedURL = url,
    let response = self?.response(from: receivedURL) else {

    print("Invalid url: \(String(describing: url))")
    return
  }

  guard response.state == state else {
    print("State changed during login! Possible security breach.")
    return
  }

  // At this point, you should send this code to your backend
  // service and get regular authentication credentials that
  // you use in the rest of your app.
  print(response.code)
  self?.sendCodeToServer(response.code)
}
If the URL is not nil, grab the response. Before doing anything else, you should check that the state you got in the redirect URL matches the one you sent when initializing the login flow. If these are different, someone might have tried to spoof a login request. However, you're smarter than them: You won't let them go through.
Finally, after all the checks, you can access the authentication code. This a string that uniquely identifies your user's login request. You should send this code to your backend service, at an endpoint akin to POST login/facebookCode (or similar, depending on your backend implementation) with the code attached to the body of the request.
From then on, the backend service should take over. Here's what needs to happen on the backend service:
- The server receives the code you sent and calls Facebook's endpoint for exchanging a code for an authentication token.
- The server should then respond with either an app-specific access token that's unrelated to Facebook, or send the Facebook authentication token back to the app if the app needs to perform further requests to the Facebook API.
Initiating this request would look something like this:
func sendCodeToServer(_ code: String) {
  let url = URL(string: "https://example.com/login/facebookCode")!
  var request = URLRequest(url: url)
  request.httpBody = code.data(using: .utf8)
  request.httpMethod = "POST"

  URLSession.shared.dataTask(with: request) {
    [weak self] (data, response, error) in

    guard let data = data else {
      print("An error ocurred.")
      return
    }

    let receivedToken = String(decoding: data, as: UTF8.self)
    guard !receivedToken.isEmpty else {
      print("An error ocurred.")
      return
    }

    self?.store(token: receivedToken)
  }
}
Note that this is a fake web request. In your app, you'd change both the URL and how you send the token to match your server's expected request format. Once you receive a token in your response, you'll store it by calling the store(token:) function, which you'll implement in the section "Storing your login information".
Getting an access token instead of a code
Note: This section is optional. You only need to perform these steps if your backend service is not set up to receive a code, but expects an access token instead.
By default, Facebook returns a code instead of an access token. This is different from the login SDK which returns the access token. Your backend service might already be set up for this, so in some cases, you want to get the access token directly.
Luckily, the API allows you to get an access token. First, inside facebookLogin, change the declaration of urlString to the following:
let urlString = "\(baseURLString)"
  + "?client_id=\(facebookAppID)"
  + "&redirect_uri=\(callbackScheme)://authorize"
  + "&scope=\(permissionScopes.joined(separator: ","))"
  + "&response_type=token%20granted_scopes"
  + "&state=\(state)"
The only change here is setting response_type to token instead of code.
The response will change, so you need to update the FacebookResponse struct to match:
public struct FacebookLoginResponse {
  let grantedPermissionScopes: [String].
  let acessToken: String
  let state: String
}
Next, in response(from:), change the line where you grab code to the following:
let accessToken = getComponent(named: "access_token", in: items)
Finally, at the bottom of the function, change the return statement to set the access token instead of the code:
return FacebookLoginResponse(
  grantedPermissionScopes: grantedPermissions,
  accessToken: accessToken,
  state: state)
Your app is now ready to receive an access token instead of a code. Once you get the access token, you should send it to your backend service.
Once the backend service receives the token, it must verify the token. Facebook exposes a fairly straight-forward request to verify that the token is valid.
Storing your login information
When storing tokens, don't use UserDefaults. UserDefaults is not encrypted and therefore your user's token is out there in plain text, and easily accessible from a jailbroken device. Instead, store the token inside Keychain. The keychain services API is a built-in iOS API that lets you store small bits of user data in an encrypted, secure location.
Unfortunately, the keychain services API was originally written in C and the API is a little bit cumbersome to use. That's why many Swift libraries wrap around Keychain and make your life easier. I recommend KeychainAccess by Kishikawa Katsumi since it's frequently updated and supports new iOS features.
If you're using KeychainAccess, you can store the token by first importing the library into the view controller file:
import KeychainAccess
Next, add the following code to the controller:
let keychain = Keychain(service: "com.marinbenc.FacebookLogin")

func store(token: String) {
  keychain["accessToken"] = token
}
First, you create an instance of Keychain with an ID, which could be any string you like. Inside the function, you'll store the token inside the keychain instance.
Once you store this information, you can check if the user is logged in, based on whether you have a stored token or not.
var isLoggedIn: Bool {
  keychain["accessToken"] != nil
}
If there's a stored token, your user is logged in, and you don't need to prompt them with a login screen. However, make sure to check that their token hasn't expired. (See Checking token validity below.)
Logging out
To log out, delete the stored access token and you're good!
func logOut() {
  keychain["accessToken"] = nil
}
Since the token is the only bit of user-identifiable information you store, deleting it will make it impossible for your app to perform further requests on your user's behalf.
Checking token validity
Access tokens live for around 60 days. However, they can be invalidated even before that. Here's how a token can become invalid:
- your user changes their password
- your user logs out from your app in Facebook's setting
- your users completely de-authorizes your app
- the token expires
Because of this, you must check if the token is valid at least once a day.
You can check token validity either from the server or from your iOS app (provided you store the access token). One way to check token validity is to perform a Facebook Graph API request and check the response for errors.
func checkTokenValidity(_ accessToken: String) {
  let url = URL(string:
    "https://graph.facebook.com/me?access_token=\(accessToken)")!
  URLSession.shared.dataTask(with: url) { (data, response, error) in
    guard let response = response as? HTTPURLResponse else {
      return
    }

    if response.statusCode < 200 || response.statusCode >= 300 {
      self.logOut()
    }
  }.resume()
}
The above function makes a request to the Facebook Graph API with the user's access token. If the response is outside the successful range (200 to 300) you'll log the user out.
Additionally, the response will contain JSON data that usually explains what kind of error happened inside an error object. If the token is invalid you'll get the following response:
{
    "error": {
        "message": "Invalid OAuth access token.",
        "type": "OAuthException",
        "code": 190,
        "fbtrace_id": "SOME_ID"
    }
}
You'll get different messages if the token has expired, the user revoked your access, the user logged out or the user changed their password. To see all the possible responses, take a look at this post on Facebook's blog.
A good time to perform this check would be when your app starts. You can call this function from inside AppDelegate.swift, from application(_:didFinishLaunchingWithOptions:):
func application(
  _ application: UIApplication,
  didFinishLaunchingWithOptions launchOptions:
  [UIApplication.LaunchOptionsKey: Any]?) -> Bool {

  let keychain = Keychain(service: "com.marinbenc.FacebookLogin")
  if let storedToken = keychain["accessToken"] {
    checkTokenValidity(storedToken)
  }

  return true
}
Can I log the user in without a backend service?
Logging in through a web view means there are additional security concerns you need to keep in mind. Web browsers are made to load any webpage you throw at them, and they're vulnerable to phishing attacks, cross-site scripting attacks, or cross-site request forgery attacks.
Because of these concerns, when you log in with Facebook's web login, you receive a short-term access token that is usually valid for only a couple of hours. Storing this token wouldn't mean much since your user would have to log in again in 2 hours – not the best user experience!
However, if you verify the access token from your backend service, you get a brand new long-lived access token that is good for a couple of months, instead of mere hours.
You might be tempted to simply verify the token from your app instead of from your backend service. And, technically, this would work: But it's a bad security practice. To verify the token, you need access to your Facebook app's secret. If your app ID is your app's username, you can think of the secret as your app's password. The app ID is public and can be known to all, but the secret should remain, well, secret.
If you want to verify tokens from your app, you'll have to store the API token somewhere in your app. If you do this, someone could decompile your app and find the app token. Additionally, when you make requests, you have to send the secret along with the request. Anyone sniffing web requests could find your attached secret and use it to not only hijack your users token but also your apps token, letting them change your Facebook App settings!
So, to sum up, never store or send your app secret from a client device. All calls that need the secret should be done from your server.
I hope this helps you ditch the SDK and give your users a better experience while not putting their security at risk. If you find any issues with this post, feel free to reach out.
Sources and further reading
A general overview of building a manual Facebook login flow:
https://developers.facebook.com/docs/facebook-login/manually-build-a-login-flow/
Facebook security best practices:
https://developers.facebook.com/docs/facebook-login/security
How to handle expired access tokens:
https://developers.facebook.com/blog/post/2011/05/13/how-to--handle-expired-access-tokens/
General information about access tokens:
https://developers.facebook.com/docs/facebook-login/access-tokens
Handling access token errors:
https://developers.facebook.com/docs/facebook-login/access-tokens/debugging-and-error-handling

Top comments (5)
Excellent article, Marin - very well thought out!
This is the best practice I think. Very good article.
Thank you this was useful! Where does that
://authorizecome from? Can't find it in the documentation, is it possible to register different suffix?Can you post a similar tutorial for Android too ? Or possibly redirect me to one ?
Nice article! Where does this redirect_uri come from?