We are nearing the end of journey, and you are almost ready to graduate from Vue Padawan level. But first watchers, you must learn.
We're going to tackle two very important concepts today, watchers, as mentioned, and form input bindings.
Let's get started and we'll build a super simple form to showcase both these fantastic features.
<html>

<head>
  <title>Vue 101</title>
</head>

<body>
  <div id="app">
    <label>What's your favorite game ever?</label>
    <input type="text" >

    <hr>

    <p>{{ response }}</p>
  </div>

  <script src="https://cdn.jsdelivr.net/npm/vue/dist/vue.js"></script>

  <script>
    const app = new Vue({
      el: '#app',
      data() {
        return {
          favoriteGame: null,
          response: ''
        }
      }
    });
  </script>
</body>

</html>
Let's take a look at what we're doing here.
Inside our <div id="app"> we've created a label and the most basic form of an <input> tag. After, we're outputting the result of a response property.
Inside our Vue instance, we're declaring a local state that includes two properties, favoriteGame and response. Also note, that we're using the data() as a function with the return syntax this time, if we don't v-model won't work.
The idea here, is that we want to first be able to store whatever the user inputs on the <input> field into a variable, that way we can use it later on as we see fit.
In vanilla JS or even jQuery you may be tempted to try to capture the input element with a $('input') or document.querySelector, but in Vue we have a much simpler way to achieve this mundane task.
Introducing v-model.
v-model
As you've learned before, everything that starts with a v- is a Vue directive. What v-model in particular translates to, in very simple terms, is:
Vue, I want you to grab this input that i'm putting this v-model directive on, and make a two way relation with it. I'm going to give you a property, and whenever I change this property anywhere in my code - I want you to change it on the input, and likewise, whenever this input changes - I want you to reflect those changes in my prop.
Let's try to put this in action, go to the <input> declaration, and add the v-model directive to it.
<input type="text" v-model="favoriteGame">
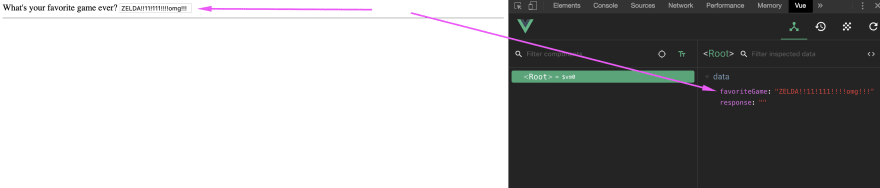
Now go and run this in your browser and type something into your magical input box of goodness. Taaaaa...da?
Ok, even though nothing seems to be happening. Go ahead and open your Vue devtools and inspect the <Root> element's data. YEAH. Progress!
Now go into the dev tools and change the value of favoriteGame into something else (don't forget the quotes wrapping it, we need a string here). EZ-BINDS-R-US 💪
Vue is VERY smart about how to bind with every type of native HTML form inputs, so really you only need to drop in the v-model bomb and profit, but the power of v-model really shows when you start building your own wrapper components and using it a-la-carte.
Behind the scenes v-model is actually setting up a v-bind:value and a v-on:input even binding, but going in depth on this is a bit out of scope so i'm just going to drop you a link if you're interested in looking further and look the other way. v-model on Components
Watchers
Now that we have our sweet sweet two-way binding v-model awesomeness in place, let's actually do something with it.
You've already learned that with a state data prop you can put it in your template with {{ favoriteGame }}, so no need to go over that again. You've learned how to use it inside a method and computed prop with this.favoriteGame - so no need to redo that. But what happens when you want to "listen" or "react" to this property actually getting modified?
Computed properties are fantastic at recalculating stuff and returning a value, but what if we want to modify another piece of state on our app when this value changes, or maybe even fire an async request of some sort? In these niche cases watchers come and save the day.
Let's go an add the boilerplate for creating a watched prop.
<script>
  const app = new Vue({
    el: '#app',
    data() {
      return {
        favoriteGame: null,
        response: ''
      }
    },

    // Watchers here
    watch: {
      favoriteGame(newValue, oldValue) {
        console.log('Favorite game was ' + oldValue + ' and now is ' + newValue)
      }
    }
  });
</script>
Watchers are defined inside a watch property in our instance or component, and we pass it an object that will include a property for each one of the props we want to watch.
In simple terms, every data prop or props prop you want to watch/react to needs to go inside this watch: {} with its name. So if your prop is named favoriteGame that's the name of your function.
Each one of these functions gets two params passed to it, the first one will be the newValue that this prop is getting, and the second one is the oldValue that it used to have before the change.
Check out the console.log statement and refresh your browser window. Try typing something into the <input> and check out your console output. Every time our favoriteGame prop changes in ANY way, this watcher will be fired.
Now let's actually do something cool with it. Remember our response prop? Let's put something into it depending on what the user answers, and have some fun with it.
watch: {
  favoriteGame(newValue, oldValue) {
    if (!newValue) return // If its an empty string, pass

    // If the new value contains the keyword metroid
    if (newValue.toLowerCase().indexOf('metroid') !== -1) {
      this.response = 'Ceres station is under attack!'
      return
    }

    // If the new value contains the word zelda
    if (newValue.toLowerCase().indexOf('zelda') !== -1) {
      this.response = 'Its dangerous to go alone, take this 🗡️'
      return
    }

    // If the OLD value was metroid, and user changed it something else
    if (
      oldValue.toLowerCase().indexOf('metroid') !== -1 &&
      newValue.toLowerCase().indexOf('metroid') === -1
    ) {
      this.response = 'GET TO DA CHOPPA NAO'
      return
    }

    // Default response
    this.response = 'Sure, why not?'
  }
}
In case you don't know, indexOf checks the string and returns -1 in case there was no match, and else it returns the position of the string we're searching for in the string being searched.
Go ahead and have some fun with this, make some new examples and play with it in your browser.
I hope you can see now the power of watched properties, the way I have found it useful is to think, if my property changes and I need to REACT programmatically to it (with an ajax call, an external function, updating a secondary value, etc), then watchers are usually a good call. For anything else, go with computed properties.
<html>

<head>
  <title>Vue 101</title>
</head>

<body>
  <div id="app">
    <label>What's your favorite game ever?</label>
    <input type="text" v-model="favoriteGame">

    <hr>

    <p>{{ response }}</p>
  </div>

  <script src="https://cdn.jsdelivr.net/npm/vue/dist/vue.js"></script>

  <script>
    const app = new Vue({
      el: '#app',
      data() {
        return {
          favoriteGame: null,
          response: ''
        }
      },
      watch: {
        favoriteGame(newValue, oldValue) {
          if (!newValue) return

          if (newValue.toLowerCase().indexOf('metroid') !== -1) {
            this.response = 'Ceres station is under attack!'
            return
          }

          if (newValue.toLowerCase().indexOf('zelda') !== -1) {
            this.response = 'Its dangerous to go alone, take this 🗡️'
            return
          }

          if (
            oldValue.toLowerCase().indexOf('metroid') !== -1 &&
            newValue.toLowerCase().indexOf('metroid') === -1
          ) {
            this.response = 'Nothing is true , everything is permitted'
            return
          }

          this.response = 'Sure, why not?'
        }
      }
    });
  </script>
</body>

</html>
Conclusion
Congratulations on making it this far!
You now have the basic tools to actually build a really cool and functional application in Vue, I guarantee it. However, there is still a lot to learn and a lot to explore in order for you to squeeze every inch of juice out of this framework.
But don't worry, I've said it before and I stand by it today, one of the key aspects I enjoy most about Vue.js is the documentation.
I remember back when I was starting out with programming I was really afraid of having to dive docs because they were usually really poorly explained, and assumed a high level of understanding of the language and the framework/lib that I was trying to use.
Thankfully, the Vue docs team has done a wonderful job of making a complete guide full with examples for everything that we have covered in this guide plus everything else you need to excel at this framework.
This concludes the Beginner series for Vue!
If you want to keep up with my articles, keep an eye on my Twitter account at @marinamosti and check out my other articles at Progress' blog!
Beware the power of the magical avocado, and thanks for reading! ♥

Latest comments (47)
Thanks for the whole serie!
Hey there! Amazing content. I'm just starting with Vue and being able to read this helped the process of understand more about Vue.
One question tho. I noticed that there was a Vue warn saying 'Error in callback for watcher "favoriteGame: TypeError: Cannot read property 'toLowerCase' of null', what does this mean?
It means that the variable that you are using
toLowerCaseon does not exist. Can't really tell without seeing the code though.Glad you liked it!
Thanks for this series, Marina!
I've been away from Vue for a few months and am still relatively new to being a developer generally so this tutorial has been really helpful for me this week.
I'll look forward to other posts from you :)
Hey Emma :) Glad you found it helpful! Def keep an eye out, I usually post on twitter when something is out. Thanks for reading :D
Thanks a lot for this great intro to Vue.js – it really helped me get a grip on the basics. Not that keen on avocados mind – hopefully avocado appreciation isn’t a prerequisite for great Vue development. Cheers!
Thankyou so much for the wonderfull article
I like your top down approach of explaining things
Its not only informative yet fun to read
I enjoyed it thoroughly
I would love to see more articles from you
On nested components and slots
Hey Abdul, thanks a ton for reading and your nice words. Nested components and slots seems like a great idea to write about, thanks for the tip!
I get an exception the very first time this code runs since oldValue is null.
This is what I did to get it to not throw the exception:
if ((!oldValue || oldValue.toLowerCase().indexOf("metroid")!==-1) &&
newValue.toLowerCase().indexOf("metroid") ===-1
) {
this.response = "GET TO DA CHOPPA NAO";
return;
}
Very nice explanation of v-model, two-way relation!
input<->model
Tks a lot, this is a good article for beginer of vue :)))
Many thanks for this series Marina. My laziness to learn Vue came to a stop when I came across your series. Your content is super-easy to understand and follow.
Thank you Thoba! Comments like these light up my day :)
Thanks Marina for such free tutorials you gave to us. It did really helps me a lot of figuring out what Vue framework actually is for a beginner like me. Hope you can keep share a lot of helpful tutorial for another technology too.
regards, Yodi
Hey Yodi, thanks for your kind words. Its a pleasure to help out people and it was super fun to write! Follow me on twitter for other articles and what not :) @marinamosti